- Posted by Ruslan Polishchuk
- Date: January 15, 2018
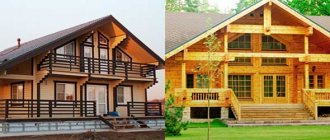
Although, due to the constant development of production technologies, new modern building materials are constantly appearing on the market, wooden houses still remain very popular. Wood is an accessible and relatively inexpensive material, and if it is properly processed, the house will serve for many years. In addition, wooden buildings have a beautiful appearance and are environmentally friendly. One of the main elements of any house is the roof, since the durability of the entire structure and how comfortable it will be to live in depends on its quality and reliability. In order for the roof to fulfill its purpose for many years, it is necessary to properly build the rafter system, select and lay the roofing material, and also properly insulate the entire structure.
- 1.1 Main components and elements of the roof of a wooden house
1.1.1 Video: fastening the rafter system
- 2 Roof insulation in a wooden house
2.1 Video: insulating the roof of a wooden house
- 3.1 Video: filing the cornice
- 4.1 Video: replacing the roof of a wooden house
Common types of roofs of wooden houses
Exterior of a wooden roof
It should be noted that it is rare to find a house made of wood with a pitched roof. Such a roof for a wooden house is not very practical, and if you consider that the shape of a pitched roof is not very beautiful, then other, more interesting options are often chosen.
The existing types of roofing for a private home are so diverse that choosing one on which wooden roofing material will look good is quite a difficult task. However, regardless of the type of roof, a wooden roof will always look original, distinctive and unique. Conventionally, all types of roofs of wooden houses can be divided into the following categories:
- Hip roof (which has not one slope, but several);
- Attic - they are also called sloping roofs;
- Gable roofing is one of the most traditional roof shapes;
- Multi-gable - roofs with a large number of gables;
- Hip roofs are another type of hip roof, which have equal slopes of the same shape;
- Semi-hip (there are both gable and four-slope).
If roof projects for wooden houses were initially conceived in such a way that there would be a wooden roof with slopes, then this can bring additional amenities, such as:
- Excellent drainage of water from the roof;
- Good properties for thermal insulation of floors;
- Removing snow cover from the roof under its own load;
- Possibility of using cheaper materials.
And these are not all of the benefits listed, but just some of them.
Construction of an extension - an opportunity to update an old house
Any old building will look different with a new veranda. In the case of a limited budget and little construction experience, it is enough to build a frame extension with a longitudinal connection to the main building. Here, the method of hanging the top frames on support posts is used. Before redoing the roof of a wooden house for a new extension, you need to check its condition. If the roof does not require repair, then one additional slope will be enough. The foundation of a light veranda is a columnar concrete structure tied under a frame. The floor joists are attached to the frame. Since the shrinkage of the materials used in construction occurs unevenly, the joints between the old house and the new veranda should not be rigidly coupled.
Despite the fact that major repairs of wooden buildings and their extensions may be required after several decades, the roof is exposed to negative natural influences and wears out quickly enough, so it requires timely replacement. Before you start work, you need to choose what to cover the roof of a wooden house, what shape it will be and what rafter system it can support. Popular article: “Major repairs of the roof of an apartment building - methods.”
How can roofs differ?
Log houses, as a rule, have pitched roofs of various shapes. The most typical and simplest one for private houses is a gable (or gable) one. This is exactly what we will talk about in this article.
Also in low-rise construction, attics and, accordingly, mansard roof shapes are popular. However, for the attic it is not necessary to construct a broken-shaped roof. You can make a so-called “half-attic” if you raise the walls by approximately 1/3 or half of the floor and install a regular gable roof. You can even get by with a regular gable (triangular) roof if it is wide and high enough.
In principle, you can cover the sheathing with slate, and you’re done. And to insulate the ceiling - the ceiling between the attic and the living floor. This is, of course, the simplest and most brutal option. Many people prefer to tinker more thoroughly with a roof, even a cold one - especially now, when so many materials have appeared, and according to the assurances of their manufacturers, you cannot take a single step without all kinds of steam, hydro and other insulation and insulation. But the key idea is that it is much easier to structurally insulate the attic floor (ceiling) than the roof itself. Especially if we are talking about a log house with chopped pediments, and then it will be clear why.
On the other hand, you can make an insulated roof - for the attic, or in order not to make a separate ceiling (for example, in a bathhouse - in a relaxation room).
- According to the design of load-bearing elements:
- Many people know that the main load-bearing elements of the roof are the rafters. But there is also...
- roofing on slabs
The rafters can be rigidly connected to the frame of the house, or they can be sliding (“floating”) - an independent rafter structure. Hard ones are traditionally divided into:
- hanging - exert bursting pressure on the walls when the weight of the roof is transferred to the building; acceptable with a width between supports (external walls) of up to 6 - 6.5 meters;
- layered - connected to each other by a tie - a beam - at the lower ends, and thus exert vertical pressure; mandatory when the step between supports is from 7 meters.
In their pure form, hanging rafters are rare; they are often reinforced with crossbars, additional racks, jibs and other structural elements. The entire structure of a pair of rafters with other elements is called a truss. In addition to suspended and layered structures that are assembled on site, there are roof trusses that are assembled in a factory and delivered ready-made.
Advantages and disadvantages of wooden rafters
However, working with wood and installing wooden rafters does not present any particular difficulties. In addition, there are other advantages of using wood as a material for rafters:
- low cost of wood;
- universal availability;
- relatively light weight, simplifying installation;
- there is no need to use heavy construction equipment;
- versatility, the ability to be used on buildings made of any material, regardless of the bearing capacity of the foundation.
The disadvantages of choosing wooden rafters are minor, but they also need to be known in person before starting construction:
- the need for treatment with protective agents that prevent fire and rotting of wood, as well as reducing its “attractiveness” to various insect pests;
- the use of wooden rafters is possible only on spans up to 14-17 m; for wider spans it is recommended to use metal or reinforced concrete;
- slightly reduced service life compared to metal or reinforced concrete trusses.
Thus, all the shortcomings are features rather than real negative aspects. This explains such a widespread use of wooden rafters in private housing construction.
Roof design
The construction of a roof begins with calculations of the rafter system and roofing materials. The rafter system consists of timber and boards. The configuration of the structure depends on the type of roof chosen; it can be single-slope, double- or four-slope, with straight or broken slopes.
When calculating the power of the rafter system and the installation pitch of the rafter legs, it is important to take into account the loads on the roof, which are summed up from the individual loads:
- dead weight of the roof frame;
- weight of roofing pie elements;
- snow load typical for the region;
- wind load;
- the approximate weight of people repairing or maintaining the roof;
- safety margin in case of disasters (hurricane winds, increased precipitation).
Snow and wind loads depend on the climatic characteristics of the region (which requires the introduction of correction factors in calculations), as well as on the angle of inclination of the roof slopes
.
When calculating the material for the roof, it is important to take into account the working dimensions of sheet roofing materials, since they are laid overlapping. To minimize insulation waste and simplify its installation, it is recommended to select the rafter pitch taking into account the appropriate width of the thermal insulation material
You can calculate roof construction yourself, using the appropriate tables from reference books, or by resorting to a specialized calculator, of which there are plenty on the Internet. It is recommended to entrust the calculation of complex roofs to a professional architect.
When calculating the cost of constructing a roof, the quantity of each basic material is multiplied by its cost and 10% is added to the resulting value. We must not forget about consumables - fasteners, sealant, etc. The total cost also includes transportation of materials.
Preparation of lumber
The construction of the roof of a house is carried out on the basis of a detailed design, which indicates the length and cross-section of all structural elements, as well as the principles for the implementation of fastening units.
To install the frame, it is important to use well-dried (humidity up to 15%) high-quality lumber - without chips, cracks and other defects. This guarantees the necessary reliability of the rafter system, and also eliminates deformation of its elements during operation.
The roof frame is mainly built from coniferous wood, as this material is durable, resistant to rotting, and durable.
To increase fire resistance and protect the wooden frame elements from damage by microorganisms, they are treated with special fireproof and antifungal agents before installation.
. The fire-retardant composition is applied in two layers, and the second layer can be applied only after the first has been completely absorbed and dried. The installation of the wooden parts of the frame begins after they have completely dried.
The rafter system can also use elements made of rolled metal - corners, channels. But metal structures are rarely used when constructing a roof yourself, since their installation requires the use of welding equipment.
Choosing timber for rafters
For rafters, it is preferable to use coniferous timber. The timber must be aged and have a humidity of 18-22%. If the humidity is above 22%, the wood will shrink unevenly, which will lead to misalignment of the rafter system and disrupt the geometry of the roof. For country houses and residential cottages, timber with a section size of 50*150, 50*200, 100*200 mm is most often chosen for making rafters. It is not advisable to use a larger beam, because at the same time, the load on the walls of the building will increase significantly.
The timber must be treated before installing the rafters. For processing we use:
- flame retardants - increasing fire resistance and reducing flammability;
- antiseptics - protection against rotting and fungus;
- insecticides - protection against insects and rodents.
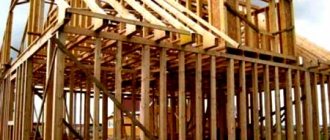
Rafter systems for a wooden house
Rafters are the first step in shaping the relief of a pitched roof. Among all types, when constructing wooden roofs, one of three options is used:
- Wooden trusses;
- Hanging rafters;
- Layered rafters.
Wooden trusses are a very rare solution in individual construction. It is rational to use such structures for the reconstruction of old buildings, as well as for the construction of industrial structures. The main characteristic of wooden trusses is their ability to span large spans of up to 20 meters and the use of permanent wooden structures.
Hanging rafters are used when there is no load-bearing wall in the middle of the building
Hanging rafters are wooden roof structures when the house does not have a central load-bearing wall. They are mainly used for buildings whose width is less than 8 meters. In addition, hanging rafters are used for complex architectural solutions, for example, when constructing the roof of a Chinese-style house.
Layered rafters are the most common scheme for constructing a wooden pitched roof. They got their name due to the design feature when the lower end of the rafter leg is located on the mauerlat, and the upper one rests on the rack. The pitch used can vary from 60 to 200 cm. The material used is timber or composite boards. An ideal solution for houses with a width of 7 meters or more, the design of which requires the presence of at least one load-bearing wall.
When installing the rafter system of a wooden house, you need to use sliding fasteners for the rafters
Calculation of timber for rafters
The purpose of calculating the rafter system is to determine the required cross-section of the beam. To do this, you need to know: the length of the rafter legs, the installation pitch of the elements and the parameters of future loads. The dependence of the cross-section of the beam on the installation pitch of the rafters is shown in the table:
| Length of rafter legs, cm | Rafter spacing, cm | Section of rafter beam, cm |
| up to 300 | 120 | 8 x 10 |
| up to 300 | 180 | 9 x 10 |
| up to 400 | 100 | 8 x 16 |
| up to 400 | 140 | 8 x 18 |
| up to 400 | 180 | 9 x 18 |
| up to 600 | 100 | 8 x 20 |
| up to 600 | 140 | 10 x 20 |
Example: to make rafters from timber 3.5 m long, you can use two options: 1) timber 8x16 cm in increments of 1 m; 2) timber 8x18 cm with a pitch of 1.4 m. Knowing the length of the house wall and the pitch, you can easily calculate the required number of rafters and beams.
For other roof elements, dimensions should be taken based on SNiP 3.03.01-87 (updated SP 70.13330.2012):
- Mauerlat - 10x10 or 15x15;
- purlins, crossbars and struts - 10x10, 15x15 or 10x20;
- puffs - 5x15;
- hemming boards - 2.5x10 or 3x10.
The length of the rafters should not exceed 6 m! A structure greater than 6 m will not provide sufficient deflection strength.
When designing a timber roof, design engineers must calculate the current loads on the rafter system. The calculation takes into account the weight of the final roofing covering, thermal and waterproofing, sheathing, drainage and snow retention elements, as well as temporary loads. The calculation is made using special programs. It is impossible to make such a calculation on your own due to the large number of variable variables.
Anti-shrinkage roof structure for chopped gables
There are two fundamental solutions:
- roof on slags - close in technology to traditional nailless roof structures of traditional Slavic log houses;
- installation of sliding rafters.
There is also a rafter-rafter system, but these are the same sliding rafters, only with the addition of side rafters.
In fact, this is butter oil, because in the first version the load-bearing beams are located horizontally, and in the second version vertically. Both structures are powerful enough to withstand the heaviest roofing, such as a tile roof. There is no point in duplicating them.
Another thing is that in addition to holding the roof, the sleds also rigidly connect the gables. And when rafters are added to such a structure, they do this in two cases:
- to lay sheathing on the vertical rafters;
- to make a thick pie of a warm roof for the attic.
It is likely that engineering solutions for arranging a warm roof on a slab base are quite possible, but they have not yet been developed, since for now developers have enough rafters. Therefore, if you plan to build an attic, you cannot avoid installing rafters if you do not want to experiment.
Installation of timber rafters
To install prepared and processed timber into a rafter system, you need a set of professional tools: a construction level (preferably laser), an angle grinder, a gas or electric saw, a drill with a set of drills. It is also necessary to prepare fasteners in advance: screws, corners, clamps, etc.
There are two options for assembling rafters:
- Assembly is carried out on the ground, and the finished rafters are lifted up and installed. This option is not suitable for massive rafter systems, because A construction crane is needed to lift the structure.
- Assembly is carried out on the roof. In this case, only timber, boards and tools rise to the top.
Roof without a single nail
The chickens cut into several side slugs. The chickens themselves were cut down from spruce trunks, and the hook was made from the root system. The hens supported the stream - a hollowed out log, against which rested the boardwalk - the roof plank. The upper part of the plank was laid freely on the ridge beam in such a way that during shrinkage the upper ends of the gables could freely converge. For this purpose, space was left during installation. The ridge beam (knes) was hewn on both sides so that the gorges would fit more tightly.
If you leave 10 cm for lifting the gorges along the Knes, then this will be more than enough, because when shrinking, the chicken will also fall, and therefore the gorges lying on the beds. From above, the gorge was pressed against the ridge beam with an ohlupnik - a heavy hollowed out log. In this way, the gorges were fixed both at the top of the roof and on the plumbs.
Of course, now no one forces you to meticulously follow the ancient technology; where appropriate, you can use nails, screws, etc. The main thing is to grasp the principle. What is it?
Here's what:
In the same way, today you can attach a continuous sheathing to a slab roof. If you don’t want to bother with chickens (although this is no more difficult than with a rafter system), then you can rest the boards against a hollow hollowed out in the upper crown. Moreover, you can do the opposite - attach the boards to the ridge beam, so that they then fall into the hollow in the upper crown. This is exactly how they work when installing a warm roof using “Norwegian” technology, which I will briefly discuss below.
Choosing material for the Mauerlat
It is recommended to use pine to make the Mauerlat.
Although some builders insist on using spruce, this is not advisable. This can be explained by the fact that pine contains more resin. Thanks to this, it is not so susceptible to putrefactive changes.
It is quite easy to distinguish pine from spruce. To do this, just smell the material. It should smell like resin and turpentine. In addition, pine has a bright yellow tint, which is difficult to confuse with another.
Roof structure of a private house lathing
Having finished installing the rafters, you can fill the sheathing. To arrange it you will need boards (2.5 cm thick) or bars. The sheathing can be either continuous or have gaps. But before you build the roof. waterproofing should be laid along the rafters. When creating a living room in the attic, it is best to insulate the roof in advance. The insulation is installed in the space between the rafters. The material can be mineral wool or polystyrene foam.
To create a “warm” living space in the attic, lay insulation in a double layer. The thickness of one layer should not be less than 50 mm. The insulation layer helps absorb noise from outside the room. A vapor barrier membrane is laid on the insulation. It protects the material from the formation of condensation on it. To avoid spending extra money on repairing the roof of a private house, follow all the instructions and recommendations. Try to lay the layers of the roofing pie correctly.
Roof shapes
Pitched roofs come in different shapes. It is worth highlighting here:
- single-pitched;
- gable;
- hipped (tent and hip);
- broken
The most common are gable and hipped hip roofs.
The most common option is a gable or hipped hip roof. The first requires the construction of pediments. Broken lines are relevant when constructing an attic. At first the rafters go at a steep angle, and then at a smaller one. This technology allows you to raise the ceiling of the attic room. We also recommend reading about the half-hip roof rafter system.
Design of a roof truss system
The design of the house truss system must be tested for strength by specialists. When calculating strength, they take into account, in addition to loads,
. the slope angle of the slopes and the shape of the roof, as well as the type of rafter system and safety factor.
The rafter system consists of many elements. Each element is acted upon by forces that are different in magnitude and direction.
The rafter system as a whole and its individual parts are subject to loads directed vertically, horizontally and tending to rotate the part.
When designing a rafter system, they take into account whether there will be an attic or attic on the roof, the presence of windows in the roof or gables, the conditions for supporting the rafters on the walls, the shape of the house plan and other factors. It is better and more correct to build the roof of a house according to a project completed by a specialist designer
The construction of simple types of roofs can be entrusted to an experienced specialist who does not have designer qualifications
It is better and more correct to build the roof of a house according to a project completed by a specialist designer. The construction of simple types of roofs can be entrusted to an experienced specialist who does not have designer qualifications.
The roof truss system of a private house must meet the following requirements:
- The rafter system must be strong and rigid
- changes in the shape or size of the roof under the influence of loads must not exceed permissible values. - The roof should be light
. in order to put less weight on the walls and foundation of the house. - The rafter system should not transmit thrust
(force in the horizontal plane) to the walls of the house. - The rafter system must be durable
. Replacing or repairing a rafter system is an expensive proposition.
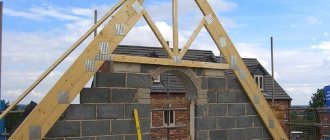
To fulfill the first two requirements, the rafter system is made of separate linear elements assembled into a structure in the form of a triangle. A separate flat triangle of a rafter system, made up of two rafters and associated parts, is called a rafter frame or truss.
Rafter frames or trusses installed on the walls parallel to each other at a certain distance and form the roof truss system
.
Changes cannot be made to a rafter system designed by a specialist at will. Adding or excluding any part will lead to a redistribution of loads to other nodes of the system. Even changing the number of nails used to connect parts can lead to the destruction of the house.
For example, increasing the number of nails used to nail the rafters can lead to unacceptable thrust on the walls. Read about it below.
Try to make the rafter system symmetrical. The symmetrical arrangement of rafter legs, racks, and struts will allow the loads to be evenly distributed along the roof slopes, which will increase the stability of the roof and walls of the house.
To remove moisture from the wooden parts of the roof and condensation, the attic space must be ventilated
with the help of perfumes. For this purpose, ventilated gaps are provided in attic roofs.
To protect against moisture, the mauerlat and other wooden parts of the rafter system are separated from the masonry walls by waterproofing.
If this is not done, the tree will quickly rot.
The rafter system for a private house is made of wood. Sometimes, for example, in frame houses with a metal frame, metal profiles are also used to make the rafter system.
Step-by-step instructions for performing the work
The sequence of stages of roof construction is as follows:
- taking measurements of the building box (dimensions may slightly differ from the design ones);
- preparation of materials and tools, treatment of wood with antiseptic;
- fastening the Mauerlat to the wall;
- installation of a ridge crossbar, if needed (for layered rafters);
- frame installation;
- strengthening the roof using racks, struts and tie-downs;
- waterproofing;
- sheathing;
- providing ventilation;
- installation of drips;
- installation of coating.
Fastening the Mauerlat
In order for the roof to be securely fastened, you need to ensure that it is securely connected to the wall of the building. If a wooden house is being built, then a mauerlat is not required - this element is the top crown made of timber or logs. In this case, fastening to the wall is carried out using special “floating” fasteners. They are sold ready-made, most often called sleds. This type of roof arrangement allows the entire structure to move slightly as the walls shrink without destruction or deformation.
"Sliding" fastening in a wooden house
A similar situation arises with a frame house. In this case, the Mauerlat will be the top frame of the walls. It is attached to the frame posts with a gash using angles, staples or nails.
Methods of attaching rafters to the frame in a frame house
The roof structure made of brick, concrete blocks or concrete involves fastening through a Mauerlat. In this case, there are several ways.
There are four ways to place the Mauerlat on the wall:
- on staples;
- on stiletto heels;
- on anchor bolts.
The Mauerlat can be secured to brackets. In this case, wooden blocks are placed into the masonry from the inside. They should be located at a distance of 4 rows from the edge. One side of the bracket is attached to the mauerlat, and the other to the same block in the masonry. The method can also be considered simple. It is not recommended for large buildings with high loads.
Fastening the Mauerlat to brackets. Antiseptic wooden blocks are provided in the masonry of the wall with a pitch of 1-1.5 m
When installing the roof yourself, fastening can be done through studs or anchor bolts with a diameter of 10-12 mm. The fasteners are laid in the masonry. The Mauerlat is temporarily placed on the sawn-off edge and lightly hit with a hammer. After this, indentations remain on the beam at the fastening points. You need to make holes for the studs along them. After this, the beam is put on the fasteners and the nuts are tightened. The method is ideal for walls made of lightweight concrete with a monolithic reinforced belt.
Attaching the Mauerlat to studs
Attaching the rafters to the mauerlat
In houses made of brick or stone, it is more reasonable to perform it using rigid fastening of the rafters to the mauerlat. In this case, you can use both a layered and hanging system. The design involves two methods:
- with notch;
- without cutting.
Connection with and without
cutting In the first case, the rafters are cut with a slope so that they fit tightly to the mauerlat. To remove the cornice, fillies are provided. They are attached to the leg with an overlap of at least 1 m. Rigid fixation of the assembly should be done using self-tapping screws, nails or staples. But the assembled frame will be more reliable if metal corners with holes for self-tapping screws are used for fixation.
The method without cutting often does not involve the use of fillies. In this case, the beams themselves provide the frame extension. This option is simpler than the previous one, since it does not require high precision. It is suitable for beginners. In this case, stop bars or boards are used to ensure a tight fit to the Mauerlat. Rigid fixation, as in the previous case, is performed with metal corners on both sides.
Attaching rafters to the wall
The completed frame must be secured to the frame of the building - this will prevent a strong gust of wind from tearing off the roof. To do this, the rule is to use a twist of two wires with a diameter of 4 mm. They are wrapped around the leg where it rests on the mauerlat, and then the wire is attached to the wall with an anchor or ruff about 4-5 rows before the cut. The element must be laid in the masonry in advance.
Wind protection
For a wooden house, you can simplify the task. You can assemble the frame using staples. This option will speed up the process. But it is important to remember that this method is only suitable if the walls are made of wood.
Strengthening the system
How to strengthen the frame for spans of more than 6 meters? It is necessary to reduce the free span of the rafters. For this purpose, struts and racks are used. Reinforcement must be done taking into account the layout; it is important that these elements do not interfere with people’s stay and fit harmoniously into the interior.
The struts are usually placed at an angle of 45 or 60 degrees to the horizontal plane. The racks cannot be supported on the floor span. They can be installed on underlying walls or beams and trusses thrown between walls.
Tightening is necessary to reduce the thrust. Because of it, the rafters can simply move apart. This is especially true for systems with hanging beams. To assemble the frame, use two ties, which are attached on both sides of the rafters. Fixation is carried out using screws, nails or studs.
Connection to purlin
At the top point, the rafters rest on an intermediate or ridge girder. Depending on the chosen system, location and width of the span, it is made of timber with a cross-section from 50x100 to 100x200 mm. Fastening is carried out on connecting metal plates, bolts or nails.
Lathing
Before starting work at this stage, it is necessary to lay waterproofing material. Builders recommend using a vapor diffusion moisture-proof membrane. It costs more than plastic film, but provides more reliable protection. Owning your own home is not a reason to save money.
Roof structure under corrugated sheets
The roof requires fastening of the sheathing. The type depends on the selected roofing material. For metal, a sparse sheathing of boards 32-40 mm thick will be sufficient. Under bitumen shingles you need a continuous sheathing made of 25-32 mm boards or moisture-resistant plywood.
Ventilation of the under-roof space
Before proceeding with the roofing stage, it is worth considering the ventilation of the under-roof space. This will protect structures from mold, mildew and destruction.
Proper ventilation under the roof will protect the structure from the appearance of fungus
For ventilation it is necessary to provide:
- air flow through the cornice (the cornice is hemmed with a sparse board or special perforated soffits);
- air movement under the covering (there should be a gap of 2-3 cm between the insulation and the roof);
- air outlet in the area of the ridge (for this, a ridge and/or point aerator is installed on the roof).
Roof covering
The type of roof is selected for aesthetic and economic reasons. It is also worth studying the manufacturers’ proposals and finding out the permissible slope. For example, it is not recommended to lay bitumen shingles on a slope of more than 45°.
Seam roofing is a lightweight, fireproof and durable covering
The flooring material must provide reliable waterproofing. Its installation is carried out in strict accordance with the manufacturer's instructions. There are five most common types of coverage:
- seam roofing;
- metal tiles;
- corrugated sheeting;
- ondulin;
- flexible tiles.
What kind of roof should be installed on a log house?
For a log house roof with chopped gables, only the option with sliding rafters is suitable.
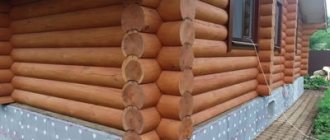
All this is due to significant shrinkage of the log house. Now we are talking about gable roofs. It's simple: if some part of the frame is higher than another, then the geometry between these parts will change after shrinkage. Each log loses up to 15% of its diameter in the process of shrinkage, but this is a fairly large amount. For rounded logs the standard is 6-8%.
A chopped pediment is like this:
The logs in the gable (gable) part are called “males”.
If the log house is a flat box, then all its walls will settle equally. But if some parts (gables) are higher than others (longitudinal walls), then the difference in height between them will change, and if you build a roof on rigidly fixed rafters, then it will literally be torn off the frame, the males may fall out... In general, this is fraught with a serious emergency situation.
Here's how the chopped pediment shrinks:
For which log houses are rigid rafter structures suitable? For those without tongs! When the roof is placed on a flat frame box - for example, a hip roof. Or you can make a frame pediment (with boards, a blockhouse, etc.) ... But this will not be quite a log house in its pure form.
A full-fledged log house with a gable roof can only have a chopped pediment. Why? Because the pediment is also a part of the house, and a considerable one at that. If you make it frame, it turns out that half the house is a frame assembly. Maybe this is practical - because it is simpler - but in this case, it is practical to build the entire house using frame technology. Log houses are erected for their special merits, and if they are to be done, then do it sensibly and without half-measures.
How to build a house roof correctly, basic steps
Before you start studying material on how to build a roof for a house with your own hands, it is important to become better acquainted with the design features of each type of roof. So, the basic requirements for roof construction are as follows:
- high mechanical strength, which can withstand not only the weight of the roof, but also large wind loads in combination with the pressure of the mass of wet snow;
- low mass of the roof, contributing to the absence of pressure on the load-bearing walls and foundations of buildings and structures.
Depending on the design, the following types of roofing are distinguished:
:
- flat;
- pitched (with or without an attic).
If with a flat roof everything is more or less clear, then with a pitched roof the situation should be clarified. First of all, arranging a roof with an attic space has many advantages
:
there is an opportunity to get additional utility room where you can organize storage of things; Over time, you will be able to convert the attic into a living space (the so-called attic); the level of general ventilation of the building increases significantly during the construction of attics; the attic is an additional layer of thermal insulation between living quarters and the environment, therefore, during its construction, special attention is paid to the issues of insulation of this room.
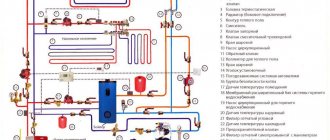
Parts of the structure
The rafter system diagram includes many elements. To understand drawings and correctly perceive information, you need to know at least the basic ones. So, what is the roof made of?
Ridge, cornice and slopes - the main part of the roof
First of all, these are the ridge, cornice and slopes. These elements are the main parts . The ridge is the topmost part of the structure. Cornice or overhang - bottom. Slopes are inclined surfaces that are located between the ridge and the cornice.
The construction of a rafter system requires knowledge of load-bearing elements. These include:
- Mauerlat is a timber that is laid along the edge of the walls of a building. The Mauerlat is needed to evenly transfer the load from the rafter legs, which are supported pointwise. Typically, timber with dimensions of 150x150 mm or 200x200 mm (for large buildings) is used for its manufacture.
- Rafter legs are inclined beams that transfer the load from the roof's own weight, snow and wind to the mauerlat. Such beams are usually installed from the ridge to the eaves. But when constructing a hip roof, elements appear that have only one of the specified points. They are supported on a ridge or on a cornice. Such details are called spigots. They usually have the same cross-section as the rafters. In fact, sprigs are rafter legs cut off on one side.
- Purlin - a beam on which roof elements rest. The purlin can be installed under the racks. Another option is a ridge girder (crossbar). The rafters rest on it at the top point. The cross-section of the purlin depends on its span, usually 200x200 mm.
- Sloping legs are only needed for hip roofs. They are diagonal rafters resting on the Mauerlat at the corners. The cross-section is assumed to be enlarged, usually 150x200 or 100x200 mm.
- The design of a wooden roof requires the presence of tie rods, struts and racks. They are designed to reduce the load on the main elements. When building a house with your own hands, it is important to remember that the racks cannot be rested on the floor span. Installation is only possible on underlying walls or on purlins spanned between walls. Such elements can be mounted on the ceiling only if it is designed for such a load and reinforced in the required area.
- The lathing is needed to make a base for the covering. For metal tiles and seam roofing, the sheathing can be sparsely made of boards 32-40 mm thick. For bitumen shingles, you need a solid base made of boards 25-32 mm thick or moisture-resistant plywood.
- In order to make the cornice extend, fillies are installed. They become an extension of the rafters. The filly is attached to the rafters for a length of at least 1 m. The cross-section of the element is usually taken to be 50x100 mm.
Load-bearing elements of a hip roof
Another element of the rafter system is a truss. This is a one-piece structure that consists of rafters, tie rods, struts and racks, rigidly connected to each other . The truss has a triangular shape, and inside it is divided into several smaller triangles, which provides it with good stability.
Wooden roof repair
Problems with wood flooring usually arise in places where there has been stagnation of water or the elements do not fit tightly together. It is not recommended to make cuts or patches; it is best to completely replace damaged wooden elements, laying new ones in their place. If the rafter beam is damaged by rot, prepare the same one, with the appropriate dimensions and inserts, and then install it in place of the damaged part.
If the rafters are damaged, the entire roof may sag. In this case, you need to support it with racks and hold it with jacks, then install struts under the rafters and secure them with brackets. If the rafter leg has just begun to rot, it can be strengthened by installing overlays that are fixed on both sides of the rafters with bolts. The overlay must be at least twice the length of the rotted area.
You can strengthen the rafters by installing overlays, which are fixed on both sides with bolts
To avoid the need for repairs, it is necessary to periodically inspect both the roofing material and the rafter system. If a dull sound is heard while tapping the beams, this indicates internal damage; it is better to replace such an element immediately.
Installation of an inclined system
If you decide to make a layered rafter system with your own hands, then please note that the load-bearing internal partition wall must be strong enough.
Before the device, it is necessary to assemble scaffolding in advance to guarantee the safety of working at height.
Layered rafter system
The initial work is the same as for installing a hanging system. Connecting the upper ends of the rafters can be done in several ways, but the most common method is end-to-end fastening.
Cuts are made on the opposing rafter legs at the desired angle. The rafters are connected by the resulting ends and nailed onto two nails. The connection can be reinforced with a wooden or metal overlay.
The second method of fastening - overlapping - is performed using bolts or studs with wide washers and nuts. With this method, the rafters will touch the planes.
Important: In the ridge part, it is better to connect the rafters in a special way: the rafter legs should be positioned with a gap, and they are fastened together using a special movable metal connecting element. This will prevent the roof from being damaged during shrinkage.
The middle part of the rafter system is supported by an internal wall and load-bearing pillars.
Materials for roof insulation
It is very important to choose high-quality and reliable material for thermal insulation of the roof of a timber house. There are a number of parameters that roof insulation must meet
Material requirements
Key indicators of a high-quality heat insulator:
- environmental friendliness and safety for humans.
- low thermal conductivity (no more than 0.04 W/m°C);
- light weight so as not to create additional load on the load-bearing elements of the structure;
- holds its shape well;
- high vapor permeability;
- soundproofing properties;
- density not lower than 15 kg/m3.
What insulation can be used for the roof
Types of roof insulation
It should be said that among the huge number of modern insulation materials, there are not many materials that meet the criteria listed above.
To insulate the roof you can use:
- mineral wool;
- ecowool;
- expanded clay;
- expanded polystyrene;
- polyurethane foam.
Features of each material
To determine which insulation is better, let’s look at each in more detail:
Mineral wool is rightfully considered the best material for thermal insulation of a wooden house
With a low weight, it has a high density, which is very important when insulating a roof structure. Mineral wool is not flammable and does not absorb moisture; these indicators are especially valuable when used in wooden buildings
Resistance to high temperatures allows it to be used to insulate the roof of a bathhouse. The material is of natural origin, rodents do not like it, and insects do not grow in it. Ecowool. Made from cellulose, it is light weight and affordable. It is a good heat and sound insulator. But the material is highly flammable; to prevent ignition, fire retardants are added to the composition to prevent the spread of flame. It is not advisable to use in very damp areas. Expanded clay. Loose insulation consisting of hollow granules. Due to its porous structure it has high thermal insulation properties. For effective heat transfer, a thick layer of material is needed, which increases the load on the supporting structures. Expanded polystyrene. Presented in the form of slabs that are light weight, high strength, and have good thermal insulation abilities. The material is flammable, therefore, when insulating a log house, it is necessary to choose slabs with a flammability rating of G1. Polyurethane foam. Similar to the previous material, it is a light-weight, durable slab that is easy to install and lasts a long time. Spray insulation is also available for sale, but its installation requires professional equipment.
Pros and cons of a timber roof
Roofs with a timber rafter system are used for wooden and frame houses, as well as for structures made of slabs and piece building materials. This type of coating is considered universal and has many advantages:
- environmental friendliness and safety;
- warm house, wood retains heat well;
- good sound insulation (largely depends on the type of roof);
- natural ventilation of the attic floor or attic;
- low cost and ease of installation.
The disadvantages of timber roofs include low fire resistance and high requirements for timber for the installation of rafters. The fire resistance of timber can be increased by treating the wood with fire retardants.