The installation of gables is an important part of the roof construction work, which ultimately determines the aesthetic and operational parameters of the structure. You should not rely on the erroneous opinion of self-taught builders who claim that the end walls limited by slopes can simply be covered with boards or covered with siding.
In order to correctly arrange the gables with your own hands, you need to take into account a number of technical nuances and familiarize yourself in detail with the technological rules of their construction, fastening, and finishing.
General information about the structure of the pediment
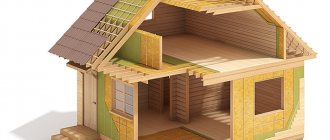
The upper end side of the gable roof, which is located between the ceiling and the side slopes of the roof, serves as a reliable support for the building with an attic. It is worth making the pediment of a gable roof using high-quality materials, taking into account the specifics and functions of the structure.
In addition to its decorative role, the design is practical:
- gives the roof additional rigidity, evenly distributing the load on the load-bearing walls and foundation;
- acts as a shield for the attic from wind and precipitation;
- retains and retains heat inside the building;
- encloses the area under the roof for the arrangement of a residential or technical structure.
Due to the different ability of materials to conduct heat, a layer of waterproofing is laid between the sheathing and the cladding to avoid moisture penetration.
Sometimes a door, window and even a balcony are cut into the gable part. Such elements are typical for the arrangement of a residential floor.
Description and functions of gables
Finishing of the pediment is possible with any decorative and protective materials.
According to the dictionary of construction terms, a pediment (frontispiece) is the completion of the facade (end) of a building, limited at the top and sides by the roof slopes, and at the bottom by the cornice. Used for arranging single-pitched, double-pitched and broken types of roofing.
In the absence of a cornice, the pediment is made integral with the front wall of the house.
The building structure performs several important functions:
- the finishing of the pediment decorates the appearance of the building, performing decorative functions and imparting integrity to the architectural form;
- protects the attic from precipitation and snow sweeping;
- prevents wind from blowing, debris and dust from blowing in;
- strengthens the roof frame;
- reduces heat loss through the ceilings of the upper floors;
- allows you to equip additional residential or utility rooms on the attic floor or attic.
To equip residential and utility rooms, the building element is insulated.
Pediment shapes
The variety of designs and types of gables depend on the type of roofing device and the architectural features of the building. Below we consider the varieties used in the construction of country buildings, which can be finished and sheathed yourself.
Keeled
Reminiscent of an inverted keel of a sea vessel. Semi-oval, pointed at the top center. Outwardly it resembles a dome. It is built on roofs of a complex broken shape. Previously, this is how the roofs of Russian architecture were decorated.
Triangular
The most common form of gable roof gable, representing an isosceles triangle. As a rule, the angle of inclination of the sides of the roof relative to the ground is 15, 30 or 45°.
Semicircular
The roof slopes are brought together to the center, forming an arc rounded towards the middle. Exterior finishing can be done with any materials, but given the specific shape, the cladding process will be accompanied by difficulties in measuring and using traditional skirting boards.
This form is an architectural echo of the Renaissance.
Stepped
The roof is without slopes, the roof is tightly connected to the walls of the facade, reminiscent of steps, the number of which decreases in the upward direction. This type of structure was built during the construction of Gothic religious buildings. The pediment is finished with stone or glass; the choice of material depends on the purpose of the room.
Torn
The slopes part, diverging in different directions, and do not have a connection at the top point. The gap is filled with mold and sculptural stucco. This design is typical for a building in the Baroque style.
Luchkovy
The shape resembles a stretched bow string. This is an arched semicircular pediment; as the height of the circle increases, it is called circular.
Trapezoidal
It is a quadrilateral whose vertical sides are equal in length, and the lower horizontal side is longer than the top. A type of gable with non-joining sides of the roof. For strength, the structure must be equipped with additional reinforcing beams.
Interrupted
Used for construction when it is necessary to make windows on the pediment above a horizontal cornice at the base. The cladding is carried out with marble or ceramic tiles.
Uninhibited
View of the pediment, with sections pushed forward. It has protrusions that break up the overall height. Gives the building a rich and presentable appearance. This design is used to cover architectural monuments.
Varieties of frontispieces
The classification of pediments is carried out according to several criteria:
- geometric shape;
- method of construction depending on the rafter system;
- material of manufacture;
- finishing options.
The pediment design is developed in advance, since this part of the building affects the total weight of the house, which is taken into account when arranging the foundation. The sequence of work when arranging the roof also depends on the chosen design option.
Pediment shapes
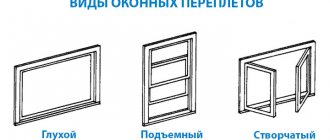
Mansard type of pediment
Architects and designers identify several options for the geometric shape of pediments:
- Triangular is the most common type in private construction. It has the shape of an isosceles triangle, where equal sides are limited by the roof slopes. To protect the wall from precipitation, it is often built with overhangs.
- The trapezoidal option is suitable for a sloping roof, where the angle of inclination of the slopes changes. It has become widespread in private homes, as it allows you to equip an attic floor with a sufficient height of rooms at a lower cost.
- Semicircular, the upper part has the shape of a circular arc. It involves the arrangement of a roof with a complex curved shape, which sharply increases the cost of construction.
- Luchkovy is a type of semicircular, but with a smaller height, reminiscent in shape of a bow with a string.
Pediments are rarely used in mass construction:
- stepped;
- keeled with complex shapes;
- uninhibited, characteristic of expensive housing and requiring great skills in construction;
- interrupted ones are used to install any building structures;
- torn.
Triangular
Keeled
Torn
Luchkovy
There are also male pediments, which during construction are made as a continuation of the main wall, for example, in houses made of timber, brick, and blocks.
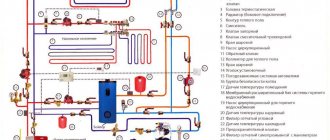
The influence of the rafter system on the structure
Types of rafters on which the pediment is attached.
Foundations for pitched roofs are made using the technology of layered or hanging rafters.
In the first case, before installing the rafters, a pediment is built on which the longitudinal beam of the ridge rests. It is on this element that the rafters are attached with the upper edge.
The hanging rafter option provides support on the walls of the house and can be made without a ridge beam. In this case, the pediment must be specially attached to the rafters or strengthened in another accessible way after the roof construction is completed.
How to cover a roof gable
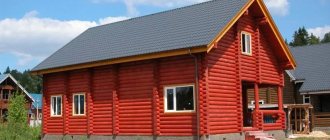
The variety of building materials for gable lining makes it possible to choose a cladding that suits any home design. The design matches the decoration of the main facade or differs from it.
To understand how to sew up a pediment efficiently and practically, you need to study cladding options. It must correspond to the architectural style of the building and the type of roof.
Vinyl siding
It has good wear resistance and can withstand atmospheric fluctuations. The construction market offers a wide selection of types of textures and imitations of natural materials (wild stone, log or plank surface, etc.) for finishing. The panels fit firmly together without moving the pattern, making it easy to sew up the gables with your own hands.
Main characteristics:
- Maintains the appearance and integrity of the coating for a long time.
- It repels moisture and does not deteriorate the siding under its influence.
- Color and texture variety.
- The surface composition prevents the formation of destructive bacteria and microorganisms.
- Easy to care for. There is no need to treat the siding with protective compounds and paint. It is enough to spray the coating with water from a hose when it becomes dirty.
- The affordable cost of siding makes it a common option for finishing a gable wall. Plastic models are cheaper.
Thanks to its undeniable advantages, siding is a sought-after finishing material. It is used for partial and complete finishing of the facade. This is the best way to close the pediment inexpensively and beautifully .
The disadvantages of this finishing material include:
- Exterior vinyl siding cannot be repainted to a different color.
- Prone to deformation under mechanical stress.
- Under the influence of severe frosts it can burst, and in the scorching sun it can burn out.
Components from different manufacturers do not always correspond to a single dimensional grid, so it is recommended to purchase a set of finishing materials from one manufacturer.
Making the gable of a gable and pitched roof yourself is quite simple. Latches on the horizontal edges of the panels provide a tight and reliable fixation.
PVC increases in volume as the temperature increases. Therefore, to avoid deformation, vinyl siding panels are not fastened tightly.
Metal siding
A very practical material made of steel, aluminum or zinc. Among the advantages of metal siding are strength, resistance to changes in atmospheric conditions, and long service life.
Disadvantages include poor sound insulation and the appearance of rust in the cut areas of the end slats. A large selection of colors and shapes of metal siding has made it a popular finishing material. Aluminum panels are easy to repaint.
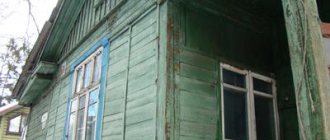
Wood
The pediment is hemmed with timber, edged or tongue and groove boards. This finishing is done quickly, simply and does not involve significant expenses.
Wooden cladding is lightweight and does not weigh down the structure. Looks harmonious on any structure. Eco-friendly material does not interfere with natural air circulation and does not produce perspiration. This type of pediment decoration is common.
It is more expensive than other types of roof cladding, despite its instability to atmospheric changes. But it involves additional costs for consumables; the preparation of fastening profiles requires special preparation.
Lining
The material repeats the texture of natural wood . It is sewn onto a wooden frame using self-tapping screws, screws or nails. For hidden installation, clamps are used. The tongue-and-groove connecting lock makes facing the fronton easy and quick.
Lining is considered a fire hazard, so it must be regularly treated with fire-resistant compounds. It also becomes deformed from excess moisture, therefore it requires covering the surface with a water-repellent paint emulsion.
For cladding the pediment, it is better to use sections made of coniferous wood. Wood resin blocks the penetration of moisture and prevents the formation of pathogenic microorganisms. It is necessary to work with dry wood; undried wood becomes deformed during the installation process, forms cracks and breaks down over time.
Imitation of timber
This material is called false timber. Refers to a type of lining and consists of panels made of natural wood. The finishing of the pediment with material resembles cladding made of timber. The imitation does not require additional processing; it is ready for cladding the outside of the pediment. The front part is flat, smooth, without defects.
There is a tenon along one plank, and a groove along the other. This lock ensures reliable fastening of the panels to each other and increases the level of sound insulation.
The light weight of the panels does not load the frame and foundation.
Covering gables with this material is suitable for wooden, brick, and block houses. It is used to finish the attic floor.
Planken
Facade board made of hard wood, the end edges of which are beveled or rounded. A strong finishing material is ideal for covering the pediment of a wooden house with your own hands.
Main advantages:
- long service life;
- resistant to mechanical damage;
- practically does not absorb moisture;
- tolerates temperature changes;
- resistant to fungus and corrosion;
- simple and convenient installation method;
- a large selection of textures and colors, different device options;
- Thanks to special treatment it is fireproof.
If one board is damaged, there is no need to completely dismantle the pediment; simply replace the damaged panel. A facade made of planken is more durable than other options for finishing the pediment of a wooden house.
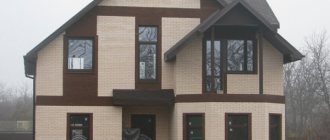
Brick
Often used to construct the pediment of a brick building with a gable roof. To ensure a tight fit and eliminate gaps between the joints, the edges of the material are ground down.
The brick pediment of a private house puts a large load on the walls and foundation, which must be taken into account during construction. In order to strengthen the supports, it is recommended to lay a reinforced belt along the upper contour.
Decorative rock
These are tile or panel segments that imitate natural stone. The method of fixation on the surface depends on the type of gable structure (frame, brick, concrete). By combining different types and colors, an unusual mosaic is laid out from material elements.
This is durable, beautiful and environmentally friendly cladding, without significant drawbacks.
Soft tiles
An attractive and effective , but difficult to install design method. Laying tiles on vertical surfaces is very inconvenient. Laying is carried out on a smooth rough surface. Attention should be paid to the reliability of fastenings.
Suitable for covering the facade of the attic floor, framing windows, bay windows.
The process takes a lot of time and effort. This finish looks luxurious and favorably emphasizes the individual character of the facade design, which more than justifies the difficulties in installation.
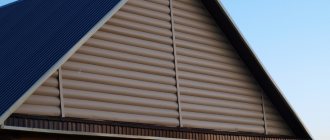
Profiled sheet
This finish does not deform under the influence of moisture, sunlight, or wind. The profiled steel sheet has the appearance of a corrugated plate and is the optimal material for roofing. All types of corrugated sheets, without exception, are coated with an anti-corrosion layer of zinc.
This gable finish is used in regions with all weather conditions. The surface is sheathed with corrugated sheets in the vertical direction. This arrangement promotes unhindered drainage of precipitation.
For cladding, a type of painted polymerized corrugated sheet is used, designated category “C”. Such a pediment requires additional sound insulation and insulation, and does not have an attractive appearance.
Ondulin
It gives the building an exotic look . It is not difficult to sheathe the roof gable with your own hands. The installation process does not require professional skills.
A long sheet is placed on the gable in the direction of the gutters from bottom to top. Ondulin is mounted exclusively on a solid surface, fixed to the pediment with an overlap, which neutralizes the risk of leaks.
A variety of colors makes it possible to choose the optimal design for any structure.
Other options
In addition to the above materials, there are other methods of finishing the pediment that are not inferior in technical and operational characteristics.
- Fiber cement siding is made from a mixture of cellulose fibers, sand and cement. Its properties are similar to stone cladding. It does not burn, does not require maintenance, and does not rot. Durable coating will last for many years.
- OSB and plywood are used for budget cladding of the gables of a wooden country house. The finishing layer is paint or varnish.
- Sheet polycarbonate (colored, cellular, monolithic) is a translucent material that allows sunlight to pass through. Used for attic gables. The sheets are attached to special profiles to create longitudinal strips of rigidity.
- Multilayer frame structures , made to order, are used for panoramic glazing. This design requires professional installation, allows light to pass through, and retains heat.
- Clinker tiles imitate brickwork, ceramics, and natural stone. Has a glossy or matte surface. Made from natural materials. This finish is suitable for brick, monolithic concrete buildings, block walls. Attached to mortars, requires experience in masonry work.
Step-by-step instructions for building a brick pediment
The brick pediment is a continuation of the wall; there is no cornice.
The brick pediment is suitable for any roof configuration.
Advantages of brick:
- long service life comparable to the entire period of operation of the building;
- resistance to external influences - precipitation, wind, sunlight;
- small sizes allowing you to build any geometric shape;
- does not require maintenance - cleaning, washing and painting;
- able to withstand the weight of finishing materials such as siding or lining.
The building material is not without its drawbacks:
- The mass of the pediment must be taken into account when calculating and arranging the foundation.
- It is necessary to fill in an additional armored belt - the load on the pediment and rear wall of the building will be much higher than on the sides, which can lead to cracks in the walls.
- The material will require additional labor for lifting bricks, mixing mortar, and laying.
- Until the mortar has completely hardened, significant loads, for example, longitudinal beams of the rafter system, cannot be applied to the brick pediment.
Construction algorithm
A layer of mineral wool insulation is laid under the brick.
Step-by-step plan for installing the pediment of a gable roof made of brick:
- If necessary, pour an armored belt around the entire perimeter of the building.
- Conduct horizontal markings, comparing and achieving equal lengths of diagonals if the house is rectangular.
- Vertical pillars are attached to the front and back of the building in places of the greatest height of the building. For an isosceles roof, the pillars are installed in the middle of the wall.
- At the height of the future pediment, a marking cord is attached to the posts. The lower end of the rope is secured to the height of the mauerlat.
- Lay out 2 rows of bricks along the width of the front wall without narrowing towards the center - this is necessary in order to hide the end of the mauerlat.
- Based on the vertical level and stretched template cords, the front and rear gables are erected. Brick trimming is carried out along the border of the cords.
- After 3–4 rows, reinforcement must be carried out.
- Eliminate unevenness in the side walls of the pediment using cement-sand mortar.
The external façade of the pediment is finished or left unchanged.
The gable cladding can be done with siding or other artificial materials using the ventilated facade method.
If desired, you can sew up the pediment with a metal profile sheet or imitation wood.
Aerated concrete gables must be finished. The material easily absorbs moisture and is quickly destroyed by temperature changes.
Painting the gable
To change the color, it is recommended to use special paint for facades. It protects the finishing layer from the penetration of atmospheric moisture, promotes the evaporation of steam escaping from the cladding, and protects the facade from the effects of natural phenomena.
Coatings are used to treat roof gables.
- Alkyd paint forms a protective film that prevents moisture penetration. The color does not wear off under mechanical influence, but fades over time from the sun.
- Oil paint creates a waterproof and vapor-proof layer. When exposed to UV rays, it cracks and fades.
- Silicone paint forms a durable, flexible and breathable film that protects against fading and delamination.
- Latex and acrylic paint is not afraid of exposure to the external environment and creates a protective coating on the surface that does not allow steam to pass through. This coating is susceptible to damage under mechanical stress.
To coat with paint, it is necessary to clean and prime the surface, ensuring uniform distribution and absorption of the color emulsion. Mix the paint to an even consistency, apply it along the gable, and after drying, apply a second layer.
To avoid smudges and stains, you first need to paint around the perimeter of the pediment. Painting begins directly from the top of the surface, gradually moving to the bottom.
Oil-based compounds are applied to wood surfaces. Plastered ones are covered with water emulsion.
What is a roof eaves
The need for the construction of cornices is that this element protects the upper part of the walls from the destructive effects of precipitation and winds. The length of the eaves overhangs is determined based on the climate of the region. The longer the overhangs, the greater the likelihood of the roof structure collapsing due to the accumulation of large amounts of snow and ice during heavy rainfall in winter.
The cornice performs a protective function
If the eaves overhangs are not long enough, they do not protect the walls well from the wind and from rain and snow, which leads to their destruction over time. This, in turn, can lead to roof collapse, as the geometry of the upper part of the walls changes. A properly executed cornice will prevent the walls from being destroyed and will give the whole house a complete look.
The cornice consists of several parts
How to make scaffolding
For safety reasons, during construction work at high altitudes, it is necessary to install strong and stable platforms. They should be so wide that they can move freely and lay out building materials and tools.
The gap between the tiers must be at least 1.8 m with a total height of the structure of up to 6 m. Regardless of the length of the scaffolding, vertical supports are located at a distance of no more than 2.5 m from each other.
For the frame, choose 4 vertical beams (section 10x10 cm) with a length corresponding to the height of the scaffolding. They are fastened together by horizontal boards. First, the side parts of the structure are assembled, then they are connected by parallel partitions.
The lower part is located at a distance of 0.5 m from the ground. The next one is 1.8–2 m higher from it. The flooring is made of boards 5 cm thick, between which there should be no gaps.
Ready-made scaffolding is screwed to the wall for reliability. For convenient movement of the structure, the side supports of the product are equipped with wheels.
How to hem a gable overhang
Methods for filing overhangs
There are two ways to file overhangs :
- wooden box
- along the rafters.
The first method is used when the roof angle is large. We take a board approximately 40 cm thick and fasten it in the space between the wall and the rafters. There is a small nuance: if one edge of this board is attached to the leg of the rafters, then the second board should be installed vertically to level the plane.
The second method is used for slight roof slopes. The rafters should form a flat surface, but this is extremely difficult to achieve. Therefore, thin boards are used, which are attached to the rafters, the length of which is from the wall to the edge of the canopy. The boards should be aligned with twine and fastened with self-tapping screws or iron corners.
Materials used for finishing overhangs
- Lining. One of the most convenient options. Please note that all elements must be treated with special means before installation. Instead of finishing tongue and groove boards, you can use pine and spruce boards. Installation begins with the timber being attached to the wall parallel to the lower edge of the rafters. An additional board is installed between the rafters and the timber at the same level.
After this, we make the sheathing and proceed to the installation of the lining. Each board is cut to length individually, and when fastening, a distance of 2-3 mm is left between the boards.
- Profiled sheeting. At the eaves level, along the wall and along the rafters, the timber is fastened at the same level. We measure the dimensions and cut the profiled metal sheet. We also do not forget that metal expands at high temperatures and contracts at low temperatures, so we attach strips with small gaps. And don’t forget to install gratings. We fasten using self-tapping screws; nails are not recommended, since the fastening will not be tight, and you can also deform the surface with a hammer. The joints are decorated with external and internal corner strips.
- PVC plastic hollow panels. They are often used to construct a gable overhang. Currently the cheapest filing method. Very easily damaged and not reliable.
- Sheets of galvanized steel, aluminum or copper. All sheets have a thickness of 0.6 mm. up to 1 mm. Installation is just as simple, just level the surface. We mark the sheets according to the templates.
When cutting galvanized steel, the edges are treated with paint to prevent rust from appearing. And aluminum and copper are coated with a special polymer coating for better protection.
Aluminum and copper sheets are secured using special fixing latches.
Do not exceed the length of the sheet by 5-6 meters, sagging is possible.
- Wall siding. This type of finishing is ideal when the house is completely covered with siding. It turns out beautifully and in the same style. Fastening follows the same principle as fastening the surface of the entire house.
There are PVC and metal soffits. The most popular material. They are made in various designs: flat, perforated, or in the form of gratings. They have a rich palette.
In the kit for the spotlights, you should purchase strips in the form of the Latin letters L and F.
F is attached from the eaves side. And the L-bar is on a special rail, which is attached to the wall.
It is advisable to mark everything before installation.
Then we take the dimensions from the slats to the F strip, subtract 5-6 mm. for thermal expansion. And cut the soffits to the required length.
The prepared elements are slightly bent and secured in place using metal screws.
Experts do not recommend installing overhang sheathing at ambient temperatures below +15 degrees Celsius.
As you understand, a well-installed overhang will protect not only the façade of the building, but will also increase the service life of the roof.
Installation of a gable roof overhang can be done with your own hands; now there are a lot of photos and videos on the Internet, study and move on. Don't rush and be careful. But it is better to entrust the matter to specialists.
Technology of work on the arrangement of the pediment
To figure out how to sheathe a pediment correctly, you need to consider the types of structures. They are conventionally divided into 2 types.
- The gable frame sheathing is attached to the truss boards, either horizontally or vertically. It is advisable to use the same material for the roof sheathing and overhangs.
- A roof with a formed pediment is sheathed exclusively for decorative purposes - in the process of reconstructing a finished structure or for the purpose of beautifying a house built from inexpensive materials.
The construction of the pediment is carried out according to a previously prepared project, taking into account the atmospheric characteristics of the region.
The general principle of finishing the roof gable of a private house.
- It is necessary to purchase building materials , components, fittings for lining the gable roof gable, and prepare tools. Additionally, you may need polyurethane foam to fill voids and crevices. To hem the pediment onto metal profiles, you will need metal scissors or a grinder.
- Install scaffolding for working at height.
- Prepare the rough surface (coat the brick base with a primer or install lathing). If necessary, remove old cladding. Before sheathing the gable of the house, treat the surface with an antiseptic.
- Cover the frame with polyethylene or a special membrane. The covering is fixed with a stapler onto the sheathing with an overlap.
- Apply markings and install the upper and lower profiles. A supporting profile is attached perpendicular to them. The standard installation step is 50–60 cm with a gap of 1–2 mm to compensate for temperature changes. If the pediment has a window, then the vapor barrier material is cut off, and the edges are folded and secured with a stapler. Framed with a profile around the perimeter. A galvanized flashing is installed at the bottom of the window.
- Cut the material to the shape of the facing surface. It is mounted from the bottom to the top corner. The starting bar and all subsequent rows are attached to the lower profile. The overhangs are framed by an edging yard.
- Install protective fittings - drains and baseboards. This method is relevant for working with materials that are fixed along their length (siding, lining, plank). For sheet coverings, the sheathing is made from unedged boards 10–15 cm wide. The fastening is vertical so that the relief of the sheets is directed upward. The first sheet is fixed to the sheathing in the center of the pediment, the subsequent ones are overlapped by 1 wave.
Video description
This video was shot specifically so that you have an idea about installing the panels on the frame:
Two ways to install PVC panels
In order to cut slabs of the desired shape, special templates are used, which are made based on the angles of inclination of the roof and its shape. The material for them can be thick paper or cardboard.
This picture shows the most convenient way to cut siding panels Source yandex.kz
When cutting panels according to templates, always maintain the temperature reserve, and do not adjust them flush with the edges of the pediment. At the very top row of panels, the entire nail strip is cut off, and holes are drilled at the top of the slab for installation.
The point for drilling is determined after applying the segment to the seat. But the hole should be located no closer than 3cm from the cut edge of the plate.
The installation of the panels itself proceeds in a vertical direction from bottom to top. Installation begins with fixing the starting profile and continues with the systematic fixation of slabs and connecting elements.
Nuances and errors in installing finishing materials
How to make a roof gable correctly - nuances when covering:
- the frame for fastening the cladding can be a wooden lattice or brickwork from which the roof and attic are constructed;
- before attaching the finishing material, it is necessary to dry all wooden elements and treat them with an antiseptic and fire retardant;
- the sheathing is made from beams with a cross-section of 4x5 cm to create square windows measuring 40x40 cm;
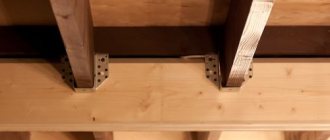
- to strengthen parts of the structure, staples or metal corners are used;
- the height of the pediment can be in the range of 0.7–2.5 m (standard option - 2 m).
Mistakes made when installing a pediment.
- Often, when connecting boards using the tongue and groove method, the panels are fastened with the groove up . This installation allows atmospheric moisture to pass into the joints, which can deform the material over time.
- with fasteners is too tight When tightly clamped to the sheathing, the panel bends during thermal expansion and can crack.
- Cladding the pediment of a new house without allowing time for the building to shrink.
- Purchasing non-galvanized fasteners in order to save money leads to rust spots on the finishing material.
Video description
The video contains a detailed description of the features of finishing work using vinyl siding:
Installing vertical siding on the roof gable requires additional labor costs, because with this installation method it is more difficult to achieve an ideal result.
Vertical installation of vinyl siding should be done in the following order:
- Corner strips are fixed along the edges of the gable wall .
- A plumb line is lowered from the top of the rafter system, necessary to indicate the central axis .
- is installed along this line .
- With a predetermined step other plates are attached parallel to the central one.
- the installation of panels begins , with the first segments installed in the corners of the structure.
The end result should be a vertical cladding like this Source bg.decoratex.biz
Light touches for an eye-catching design
To give the pediment an original and unique look, you can use some decorative elements:
- in the middle or on the sides you can place carved wooden elements (openwork decoration around the perimeter of the pediment and on the side slopes looks impressive);
- the viewing or ventilation window can be framed with stucco;
- under the cornice you can place an inscription reflecting the life credo or motto that characterizes the owner;
- the gables of houses are decorated with forged metal elements or products.
Whatever the decor, it must correspond to the general style of the building, match the shape and color scheme.
conclusions
As you can see, every home craftsman can build a high-quality pediment, provided that the instructions are followed. Professional assistance will be required when performing the end part of the roof from logs and beams. If all installation conditions are met, you can build a high-quality and durable structure.
Recommended Posts
Finishing the walls and corners of the house outside.
Facade plaster lamb
Exterior decoration of a country house
Options for facade finishing of the house
House finishing boards
Stages of work
A properly sheathed end of a building should represent a strong supporting structure. You can do this yourself, adhering to the exact execution of the following installation steps.
Preparation
The design of the pediment should begin by preparing the wall base. To do this, it is necessary to remove the old coating and cover the surface with a new leveling compound.
Laying waterproofing
A waterproofing material is first placed on the dried surface or it is coated with a special compound that repels water (mastic or sealant)
Particular attention should be paid to the boundaries of the pediment and the joints of surfaces. The waterproof material is attached with a slight overlap: approximately 10-16 cm
Frame installation
After laying the waterproofing, a box is mounted on the wall surface. To do this, the prepared slats are secured with dowels along the boundaries of the pediment. Then the frame bars are mounted on them with screws. All wooden elements are pre-treated with an antiseptic. The remaining bars are fastened at a distance of 50 cm. Using a building level and a metal ruler, align the bars parallel to each other.
Installation of insulation
Thermal insulation is a mandatory element of covering the end of the roof with corrugated sheeting. A layer of insulation placed under sheets of thin steel will ensure that heat is retained inside the house while suppressing noise coming from outside. Foam plastic or mineral wool is used as insulation, which is placed in the nests of the sheathing.
Laying vapor barrier
After laying the insulation, it is necessary to carry out vapor barrier work: lay the film with the rough side inside the room. It is laid with an overlap, and the sheets must overlap each other by no less than 10 cm. All seams must be sealed, leaving a hole for ventilation.
Cutting and laying corrugated sheets
Finishing the pediment with corrugated board is called sheathing or cladding. The purpose of this procedure is to protect the entire structure from heat loss and moisture penetration while simultaneously increasing rigidity.
The final procedure for laying profiled sheets also consists of several stages.
- The cutting of corrugated sheets is carried out on the ground according to the drawings prepared in advance and the results of gable measurements. Using hand tools (grinders), steel sheets are cut into blanks. The finished cutting is lifted up and carefully placed on the sheathing.
- The first fragment of corrugated sheeting must be fixed in the left corner of the gable sheathing. The right corner should complete the layout of the cut elements. Sheets located at the border of the sheathing should have a gap of about 5 mm. This is necessary to fix the material on the sheathing. The sheets are laid vertically with an overlap of approximately 15 cm.
- The sheets are fastened with self-tapping screws at intervals of no more than 30 cm. First, holes are marked with a drill on the bottom of the wave. Then use a screwdriver to insert self-tapping screws into the sheathing bars.
- The perimeter of the pediment is equipped with facing corners, fixing them with self-tapping screws. Mounting tape secures the connection of the corners with the gable wall.
- The finishing of the pediment should be completed by installing flashings.
Insulation of gable wall
Insulating a gable wall is important when planning to use the attic for housing or for long-term stays for other purposes - a workshop, an office, etc.
The wooden and frame types themselves are good heat insulators, and the frame type already has a layer of insulation inside the sandwich.
Two methods of insulation are used - from the inside and from the outside . From the point of view of convenience and safety of work, insulation from the inside is preferable.
But from the point of view of physics, it will be more effective to carry out insulation from the outside , since in this case the dew point is moved outside the wall and moisture has the opportunity to evaporate into the atmosphere, and not inside the house or the insulating layer.
There are a lot of insulation materials that work well in such conditions:
- Glass wool;
- Minvata;
- Styrofoam;
- Penoplex.
These and similar materials successfully perform their task. Siding or other sheathing materials can be used for exterior cladding.
ATTENTION!
The pediment of the building, being a support for the rafter system , at the same time partially increases the load on it due to the influence of wind. Therefore, its construction must be carried out with an understanding of all loads and ways to compensate for them , otherwise there will be excessive pressure on the rafter system, which can lead to deformations of the roof.
You can read in detail about the calculation of the rafter system here.
All work must be carried out after consultation with experienced builders, and structural elements must have a safety margin.