12 October 2015
Currently, developers give preference to natural materials, not only during construction, but for the exterior decoration of finished buildings. Today, natural materials are becoming popular again not only for construction, but also for cladding a house. Wood is an environmentally friendly material that will not only preserve the house, but also make it attractive.
There are many technologies for performing finishing work.
Today, many home owners prefer to clap their houses with shiplap boards. This method is most often used to decorate low houses or country houses. To increase service life and add originality, wood can be:
- Cover with varnish. Paint. Impregnate with special oils.
Sheathing a house does not cause any particular difficulties, so most often they do not resort to the help of specialists to carry out the work, but do everything themselves. The main thing is to have the necessary skills and follow the recommendations. In addition, choose high-quality materials and necessary additional elements.
House cladding rules
Sheathing the house with herringbone boards is carried out after preliminary marking.
It is necessary to create a frame on which the outer board will later be attached. It's best to use a regular hammer rather than a nail gun. Of course, the operating time will increase significantly, but this particular tool will provide the required quality.
Sometimes self-tapping screws are used as fasteners for boards.
They are attached using a screwdriver. The work will be done quickly. But a number of boards that are located inside will have to be hammered only with nails, the length of which is at least 80 mm.
Boards need to be prepared in advance:
- Dry thoroughly. Treat with antiseptic.
When covering, the front side of the board is exposed outward, and the bend is directed upward.
Source https://hvrax.ru
Manufacturers
The popularity of facade boards is increasing every year.
It is used not only for cladding facades, but also as decorative coverings for certain areas of the house. Today there are many types of cladding boards on the market. Among all this diversity, several popular brands can be distinguished:
- Vetedy;
- Bruggan;
- Legro is a Hungarian-made product that is distinguished by high quality and original design;
- PS-Wood is a domestic manufacturer of WPC boards, which are manufactured using German technology;
- Revaldia;
- "Ekoles" produces high-quality cladding planks that are suitable for various types of houses.
Features of installing an external board
After installing the internal boards, they begin to fasten those that will be outside. This part of the finishing work must be approached with the utmost seriousness, strictly following the recommendations.
Each plank is laid on top of the other, overlapping.
Simply put, the boards should overlap each other by at least 2.5 centimeters. To prevent mistakes and avoid distortion, the overlap location must be marked in advance. To prevent the wood from deforming, you need to use only well-dried lumber.
When performing façade cladding work, the following tools are used:
- Screwdriver. Jigsaw. Hammer. Ruler. Building level.
Without the tool listed last in the list, it is simply impossible to trim a house with an American quality and accuracy.
There are many possibilities for attaching edged boards to the facade of houses. Here are some examples:
In rustic. In this case, the end part will protrude. The groove is at the bottom.
With a bevel into a tongue and groove. It should be noted that this cladding option has its own difficulties, but the end result is very attractive and beautiful. The board for finishing is taken thick.
Semi-rustic.
On a flat surface, triangular grooves are obtained. The board must be cut at an angle. There are no grooves as such, and the overlap itself will be angular.
With a quarter slope. The facade of the house will be smooth. The connection of the boards is complex.
If we use a straight quarter, we get a smooth and beautiful façade.
This option gives a tight and durable installation, so no moisture gets under the sheathing boards. The grooves are selected at an angle of 90 degrees. In addition, performing such cladding is not at all difficult.
A tongue and groove connection is considered reliable, but for this you need to correctly cut the grooves using templates. If a mistake is made, the strength of the joint will be compromised.
The outer walls of the building are smooth, neither snow nor rain will get under the cladding. Moreover, this facade decoration is a heat-insulating layer. In gluing. This option involves gluing the boards together, so there is no overlap.
Waterproofing
Coating waterproofing is used on facades made of brick, aerated concrete or rubble. Wooden walls are covered with rolled material along the lathing with an overlap of 10 centimeters. A ventilation gap is left under the waterproofing, ensuring vapor permeability of the walls.
A special case
If a roof made of overlapping planks is installed, its structure will be noticeably different from that accepted for more modern roofing materials.
The traditional installation scheme is as follows:
- The basis of the roof is on the rafters, and the longitudinal logs laid on the gables of the house are laid down;
- At the base of the slope, a so-called stream is hung on hooks - a log hollowed out inside that serves as a drain;
- The board is laid along the slopes in two layers. In this case, the lower edge of both layers of the board rests against the flow, and the upper edge is pressed down by a log - a log.
The photo shows a house with a plank roof.
With the use of modern waterproofing materials, this scheme can be significantly simplified:
- A sheathing of boards or timber is placed on the bed;
- A layer of waterproofing is laid on the sheathing, extending to the edge of the gutter;
- A counter-lattice made of thin lath is placed on top of the waterproofing;
- The board is laid parallel to the planks with an overlap that prevents water from flowing in.
Laying the board parallel to the slabs.
The main problem with a plank roof will be the deformation of the boards due to constant fluctuations in humidity.
To prevent deformation, protective impregnations - water repellents - are used. Of the most famous impregnations, it is worth mentioning Aquatex - Extra and... ordinary drying oil. It is applied to the surface of the board heated in a water bath, in two layers without intermediate drying.
An important point: impregnation will have to be repeated every two to three years. From a practicality point of view, boards are not the best material for roofing.
Listen to advice
What material the house itself is made of does not matter.
Covering a brick house with wood is quite possible. The main thing is to follow the advice of experts. Then the house will not only be beautiful, but will also last much longer:
The board for covering must be well dried. It only needs to be planed on one side. The rough side is taken out.
The fact is that subsequent wood processing will be of better quality. Primer and paint will last longer on such a surface, and the house itself will attract attention. The choice of wood depends on the requirements of the home owners. You can use cedar, pine, spruce or redwood boards.
Let's consider these options in more detail.
Experts suggest choosing cedar planks. They are durable, easy to process, and most importantly, give the building a unique look.
As for mahogany boards, they last a long time. But it is very difficult to work with them: it is almost impossible to forget nails.
Pine boards are an excellent material, but not for external cladding. Cracks quickly appear on them, and natural disasters lead to deformation.
Spruce boards are good for everyone: they don’t warp or crack for a long time. But the presence of a large number of knots contributes to a decrease in the quality of the cladding. It is for this reason that facade cladding with spruce boards is practically not carried out.
- It is better to use ordinary steel nails as fasteners, but galvanized ones are not a suitable option. After all, the coating on them will be destroyed during installation work, which will lead to the appearance of rust. Don't skimp on nails if you want the sheathing to be of high quality and last a long time.
You can cover the facade with wooden boards in any country house. This method will make it not only attractive, but also maintain its environmental friendliness. After the facing work is completed, the board needs to be further processed: Covered with a special varnish. Painted with paint for external work. Impregnated with oil. The choice will depend on the requirements of the owner.
In addition, you need to take into account the style of construction. If you want to sheathe your own house with overlapped boards, then usually they try to solve two main problems. Sheathing a house with overlapped boards. First of all, this concerns atmospheric influences. Therefore, it is necessary to protect the walls of the building, for example, those made using foam concrete. It is necessary to provide reliable protection for the laid layers of insulation. The building will also receive a beautiful, original and decorative look.
Advantages and disadvantages
A house made from unedged boards looks original despite the budget. Finishing with overlapping workpieces does an excellent job of draining rainwater, as it creates an obstacle to the penetration of precipitation into the coating and a slope for gravity flow. Thus, if protective measures are taken, the cladding will last for several decades.
Also important advantages include the following points:
- low thermal conductivity of wood and air cushion between the base and finish;
- the gap in the cladding structure ensures natural ventilation of the facade;
- good vapor permeability of wood contributes to the rapid drying of the finish, that is, the formation of condensation inside the structure is virtually minimal.
There are few disadvantages that can be identified. One of them is the high consumption of lumber due to overlap. That is, the working width of unedged or prepared boards for finishing a house will be reduced by the recommended 20 mm.
The second disadvantage comes down to the woody nature of the sheathing. It requires mandatory treatment with compounds against fungus, mold and anti-fungus additives.
Universal wood protection product Source cloudinary.com
The end parts, so that they do not rot from the active influence of natural phenomena, also need to be impregnated and covered with decorative corners. Additionally, the finish can be painted with paints and varnishes for wooden facades.
Sheathing a house with boards: some features
To cover a house with boards, you will need finishing materials that must be suitable for solving these problems. They should make the house beautiful and provide reliable protection.
Horizontal sheathing around the window: a—overlapping sheathing, b—sheathing with overlapped tongue-and-groove boards, c—half-tongued profiled sheathing, d—tongue-and-groove profiled sheathing, e—base molding board, f—without base molding board, g—sheathing of corner with corner board, h , and - lining the corners in erunok.
In most cases, cladding a house with wooden boards requires the construction of a fastening frame. Certain exceptions are assembled panel houses. Such houses can be sheathed directly on the assembled load-bearing frame.
The creation of the frame depends on the material used to cover the walls.
The types of fastening of the future cladding play an important role. The choice of fastening is influenced by the structure of the facade. Sometimes his device does not have ventilation.
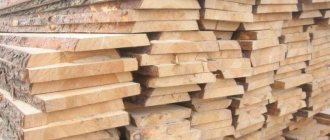
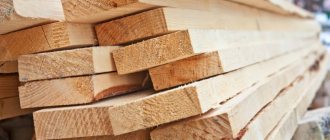
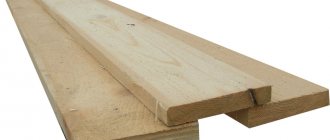
The construction material for covering the walls of a house is very often boards, which come in two types.
It can be cut to a certain size or unedged. It all depends on the design of the frame and the materials used. In some cases, wooden blocks of different sizes are also used.
They make house cladding using other materials, for example, siding. It is installed on factory metal profiles.
However, you will be interested in the external cladding of the building with wooden edged boards or clapboards. This block house imitates the surface of the walls; they look like the walls of a log house.
Return to contents
Roof cornice lining diagram.
Sheathing a house with boards (lining) begins from its lower part.
The lower part is installed according to the level. It is attached to the frame, and the tenon should be at the top. The next product is put on it with a groove made in it.
It must be said that in some cases the elements are difficult to place. This is due to manufacturing defects and deformation that occurred during drying. The length of the system determines its uniform installation on the bottom board.
To properly seat the element, gaskets are made, for which a small piece of the same lining is taken. A board is hammered through the gasket in the places where the gap has formed.
You often hear the phrase "shipping."
This refers to the overlap of the internal structure with two external parts.
To sheathe a house, use products with a width of 100 mm. The amount of overlap is 25 mm on each side. In other words, the best distance from the front board to the inner board is 150 mm.
This size must be maintained along the entire perimeter of the cladding. When covering the floor, so that there are no gaps between the laid sheathing and the tiled floor, you need to attach an additional board to the tiles and install a screed. In this case, the cladding of the house will turn into a kind of continuation of the base.
Before sheathing the house with boards begins, it is necessary to decide on the length of the products themselves. Since finishing work will be carried out in the future, there is no need to maintain high accuracy.
Return to contents
Options for joining boards for external wall cladding.
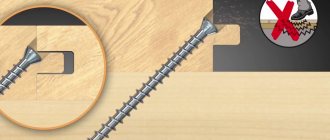
The board is installed according to pre-made marks. Fastening is carried out in the middle with a metal nail. You should not use a nail gun to install this type of sheathing.
But if the board is fastened with a self-tapping screw, a mechanical screwdriver will provide effective assistance. Elements located in the inner row are fastened with nails (80 mm); self-tapping screws should have a similar length.
Before installation, the product is measured and cut to the appropriate length. When sheathing a roof that does not have a very large angle of inclination, you can immediately cut off two or three elements.
When installing, you must remember that the boards are installed with the “front” side out. On this side the veins have a curve directed upward, very reminiscent of a smile.
Fastening the boards can be done using a nail gun. But to use such a tool, you need some experience. A beginner is unlikely to be able to drive nails exactly in a straight line. This is why it will be better to use a mechanical screwdriver.
Return to contents
After installing the internal products, you can install the external ones. Installation is carried out with an overlap.
The previous one is placed on the adjacent one with an overlap of 250 mm. To make the operation faster, you need to measure 250 mm on each board, starting from the rear edge. External products are secured with two nails where they intersect with the frame slats.
It happens that some of the boards may move, but this will not affect the reliability of the structure. Wet boards will inevitably become slightly deformed when drying.
Long nails will be needed to secure the outer row. Before you start hammering nails, you must first make markings using a level. The row of hammered nails will be even, neat and beautiful.
Today, natural materials are becoming popular again not only for construction, but also for cladding a house. One of these materials is wood, which is not only environmentally friendly, but also gives the structure an unusually attractive appearance.
Sheathing a house can be done using different techniques, but edged boards laid with an overlap look best. This option is usually used when finishing a low building, a country house in a country style. After covering, the board can be varnished, painted, or impregnated with special oils to preserve its original appearance.
Roof cornice lining diagram.
The process itself, how to sheathe a house with edged boards with your own hands, is not so complicated, but it is necessary to strictly follow all the conditions and stages, use high-quality boards, and special additional elements in the form of corners.
For work, two types of boards and corner elements are used. The internal one acts as a frame, the corners are mounted for the internal and external parts of the facade. The outer board will be the front board.
Coating
Coating with protective oils in production conditions costs +1200 rubles/m2. The service includes: sanding, coating the bottom side in 1 layer, coating the front side in 2 layers. We use only proven materials Kreidezeit and Leinos, in our assortment there are more than 50 possible shades to choose from.
Thermal ash
Thermal pine
Any natural wood must be protected with high-quality tinted oils from:
BURNOUT. When exposed to sunlight, the wood begins to fade and over time acquires a dirty gray tint. At the same time, ONLY tinted oils protect against burnout. DIRT AND DUST. When various particles of dirt and dust fall on an unprotected surface, they begin to destroy it. Also, contaminants can be deeply absorbed into the porous surface of the wood and leave unpleasant stains that will be very difficult or impossible to sand off. CRACKS. When water hits a surface unprotected by oil, it is instantly absorbed into the porous surface of a living tree. When the temperature drops, moisture crystallizes and cracks appear on the surface of the wood, which spoils the appearance of the decking. It is also necessary to protect the ends, this is the weakest point of a living array.
We recommend covering the planken not only on top, but also on the bottom. Below you can use any cheap compounds. This inexpensive symbolic layer on the back of the deck will provide additional protection.
Installation of internal board
Sheathing the house with overlapping boards.
Covering the house with boards is carried out according to pre-made marks; a frame for fastening the outer board is required. During work, it is recommended to use a regular hammer; a special nail gun is not used. It is this feature that makes the work of cladding a house with wood so long and requiring patience.
If you will use self-tapping screws to attach the inner board, you can purchase a screwdriver. This will speed up the work and make it better, but the inner row will still have to be fastened with nails; they should be 80 mm long.
Before you start attaching the board, you must first treat it with an antiseptic and dry it. After this, each element is cut to obtain the required length. The front side of the board is placed outward, the bend should be directed upward.
Final finishing
After the boards for finishing the facade are securely fastened, sealant can be applied to the joints. Experts recommend using polyurethane sealants, which are more elastic and can withstand fairly strong stretching. They are not so afraid of mechanical damage.
A combination of beauty and economy
Lastly, the finishing coat is applied. Most often, varnish is used, which must be carefully applied to each board with a small brush.
An unedged board for finishing a facade is an excellent and economical option that will look very beautiful and original. Installation does not take much time and does not require any special knowledge.
Exterior board installation
After all the internal boards have been installed, it is necessary to begin fastening the external ones. How to do this correctly?
Installation is carried out in an overlapping manner, with each previous board being laid on the adjacent board with an overlap of 250 mm.
Horizontal trim around the window.
Each board is pre-marked with an overlap so that the work is done quickly and efficiently. When drying, the material may become slightly deformed. Therefore, when purchasing, it is best to use well-dried wood.
Tools for work:
- screwdriver; jigsaw; hammer; ruler and building level.
During the exterior cladding of the house, it is necessary to use a building level so that the surface of the façade finish is smooth and beautiful.
Options for joining boards for external wall cladding.
There are many options for fastening external edged boards:
In rustic style, with lower end parts protruding at an angle, the groove is made at the bottom. With a bevel into a tongue and groove.
A complex profile is used, the external cladding is beautiful and stylish, the thickness of the board is significant. It is semi-rustic. The surface of the wall is smooth with small triangular grooves, the board is cut at an angle, the groove joint is not used, the overlap is angular. With a quarter slope. The surface of the facade turns out to be smooth; a complex straight quarter profile is used for the connection.
The surface of the facade is smooth and beautiful, the board is laid firmly and tightly, moisture does not have any opportunity to flow under the cladding. The grooves for fastening are cut at right angles, the connection is one of the most reliable and simplest. Into a tongue and groove. To lay the boards, a tongue and groove connection is used; it is important to cut the grooves using a template.
Otherwise, reliable docking will not work. The facade has a smooth and beautiful surface, moisture does not flow inside the wall, drafts will not bother you, as will heat loss. Installation is glued in place. The board is glued together, there is no overlap.
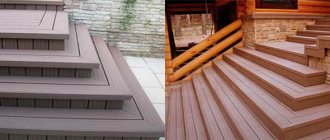
Slatted facade
A slatted façade is a system of posts and boards fixed (vertically or horizontally) at wide intervals. In essence, these are blinds that are “dressed” not on windows, but on walls.
Designs of this kind are popular mainly in countries with hot climates, that is, where reliable protection from the sun is needed. But they are also found in Europe, and recently in our country. This is a light, airy and, importantly, relatively inexpensive finish that can be an excellent home decoration.
Making a slatted facade is quite simple. It will require racks with a cross section of 5×5 or 10×10 cm (depending on the loads) and boards or bars with a thickness of at least 2 cm. They are fixed vertically, horizontally or diagonally. And if you show your imagination, you can create a complex and expressive pattern.
Theoretically, any wood can be used for a slatted facade, but pine or spruce will not last long. But larch will decorate the house for many years and even decades. The same applies to heat-treated and fired boards.
Useful tips
When covering a house with wooden boards, experts advise adhering to certain rules that will ensure a beautiful and durable finish:
For work, it is best to take a board that is planed on one side and not on the other. The rough side of the material is mounted outward. Then the primer, and then the paint, will last much better and longer, and the appearance of the house will be more attractive. The boards do not need to be nailed only at the bottom and at the top, since the material will easily split and absorb moisture.
It is necessary to use the staggered fastening option, when the boards are fixed on the surface of the facade in increments of 30-45 cm, i.e., in a checkerboard pattern. Wood of various species can be used for cladding the house.
It can be cedar, pine, spruce, mahogany. Based on their experience, it is best to use cedar planks. They are not only durable, but also easy to process and have a beautiful appearance.
Mahogany is difficult to process; it is difficult to drive a nail into the surface, although it does not warp over time. Pine has numerous beneficial properties, but it is not very good for external use, as it easily warps and splits. Spruce is rarely used for exterior work on facades, although its performance is much better than that of pine.
Spruce boards are full of knots, and this does not have the best effect on quality. Sheathing a house is best done using ordinary steel nails, not galvanized ones. The problem is that the galvanized layer is easily peeled off during installation, and when exposed to moisture, the nails quickly rust. Stainless steel is much more expensive, but the quality of finish is higher.
Sheathing a building with edged boards is an attractive and simple option for any country house.
This facade is not only stylish, but also environmentally friendly. After installation, the board can be varnished, painted, or impregnated with oil. It all depends on the imagination of the owner of the house and the general style of construction.
Today, natural materials are becoming popular again not only for construction, but also for cladding a house. One of these materials is wood, which is not only environmentally friendly, but also gives the structure an unusually attractive appearance.
Sheathing a house can be done using different techniques, but edged boards laid with an overlap look best. This option is usually used when finishing a low building, a country house in a country style. After covering, the board can be varnished, painted, or impregnated with special oils to preserve its original appearance.
Roof cornice lining diagram.
The process itself, how to sheathe a house with edged boards with your own hands, is not so complicated, but it is necessary to strictly follow all the conditions and stages, use high-quality boards, and special additional elements in the form of corners.
For work, two types of boards and corner elements are used. The internal one acts as a frame, the corners are mounted for the internal and external parts of the facade. The outer board will be the front board.
Lining
This facing material has long been well known to almost everyone. It is a wide panel, the thickness of which is 12-20 mm (depending on the purpose). The tongue-and-groove fastening system allows you to easily, reliably and hermetically connect parts of the cladding together.
The main advantages of lining include environmental friendliness, thermal insulation properties, aesthetic appearance, ease of installation and reasonable cost.
Installation of internal board
Sheathing the house with overlapping boards.
Covering the house with boards is carried out according to pre-made marks; a frame for fastening the outer board is required. During work, it is recommended to use a regular hammer; a special nail gun is not used. It is this feature that makes the work of cladding a house with wood so long and requiring patience.
If you will use self-tapping screws to attach the inner board, you can purchase a screwdriver. This will speed up the work and make it better, but the inner row will still have to be fastened with nails; they should be 80 mm long.
Before you start attaching the board, you must first treat it with an antiseptic and dry it. After this, each element is cut to obtain the required length. The front side of the board is placed outward, the bend should be directed upward.
Exterior board installation
After all the internal boards have been installed, it is necessary to begin fastening the external ones. How to do this correctly?
Installation is carried out in an overlapping manner, with each previous board being laid on the adjacent board with an overlap of 250 mm.
Horizontal trim around the window.
Each board is pre-marked with an overlap so that the work is done quickly and efficiently. When drying, the material may become slightly deformed. Therefore, when purchasing, it is best to use well-dried wood.
Tools for work:
- screwdriver; jigsaw; hammer; ruler and building level.
During the exterior cladding of the house, it is necessary to use a building level so that the surface of the façade finish is smooth and beautiful.
Options for joining boards for external wall cladding.
There are many options for fastening external edged boards:
In rustic style, with lower end parts protruding at an angle, the groove is made at the bottom. With a bevel into a tongue and groove.
A complex profile is used, the external cladding is beautiful and stylish, the thickness of the board is significant. It is semi-rustic. The surface of the wall is smooth with small triangular grooves, the board is cut at an angle, the groove joint is not used, the overlap is angular. With a quarter slope. The surface of the facade turns out to be smooth; a complex straight quarter profile is used for the connection.
The surface of the facade is smooth and beautiful, the board is laid firmly and tightly, moisture does not have any opportunity to flow under the cladding. The grooves for fastening are cut at right angles, the connection is one of the most reliable and simplest. Into a tongue and groove. To lay the boards, a tongue and groove connection is used; it is important to cut the grooves using a template.
Otherwise, reliable docking will not work. The facade has a smooth and beautiful surface, moisture does not flow inside the wall, drafts will not bother you, as will heat loss. Installation is glued in place. The board is glued together, there is no overlap.
Block house
This type of cladding can be recommended to those who want to give an unassuming “frame” the appearance of a real log house. The imitation is achieved thanks to the rounded shape of the front surface. When joined, such boards form a surface reminiscent of a log house wall.
One wide groove or several narrow ones can be cut on the back side of the block house. They are needed, firstly, to relieve the internal stresses of the wood, and secondly, to ventilate the space under the cladding.
The length of the board is from 1.5 to 6 m. The thickness “at the crest of the wave” varies from 2 to 4.5 cm, and the width from 9.6 to 19 cm. The impressive dimensions provide the block house with strength and durability. This type of cladding can last for decades. Of course, if it is made conscientiously.
The quality of a block house (as well as other lumber) is regulated by two standards - Russian GOST 8242-88 and European DIN 68126/86. But there is also a simplified market classification.
Grade "A"
should not have any defects other than healthy, fused knots and roughness on the underside of the lamella.
Variety "AB"
tolerates dark but well-adhering knots, as well as minor cracks and machining defects.
Grade "C"
- lumber of the lowest quality. In this case, both falling knots and deep cracks are acceptable. It is highly undesirable to use such a board for exterior decoration. In the difficult climate of central Russia, it will not last long.