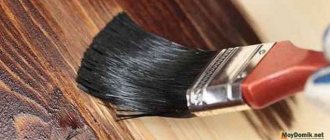
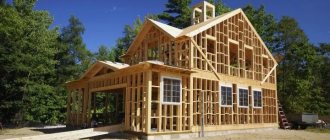
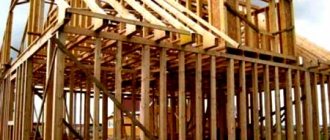
Despite the modern abundance of various building materials, wooden houses remain traditional in almost all regions of Russia. From time immemorial, their log houses were erected in both urban and rural areas. Nowadays, the possibilities of using wood have expanded significantly - today, processed timber is widely used for the construction of residential buildings, frame structures made of lumber and plywood or chipboard (OSB) are used.
Painting a wooden house inside
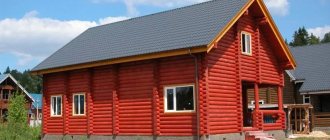
Every home owner, when choosing natural wood or materials based on it to build a house, wants it to retain its original qualities for as long as possible. Therefore, painting a wooden house inside, as well as outside, is a mandatory process to create conditions for long-term operation of such buildings. In addition, this significantly expands the horizons in the possibilities of both external and interior design.
When to grind
Opinions are divided on whether to sand the walls of the log house immediately or wait for it to completely shrink and dry. Some believe that waiting until the log house shrinks and the wood shrinks is too long, because the process is quite long, depending on many external factors such as:
- Log cutting season;
- Log manufacturing technologies;
- Type of wood, its density and humidity;
- Type of insulation used between the crowns;
- Climatic data of the region.
In addition, during this period the wood can become infected with fungus and change its color.
Others believe that this matter should not be rushed. The darkened color of the wood will disappear after sanding, and the fungus can be easily removed using biological impregnation. It is necessary to fully comply with all the necessary conditions for an effective and high-quality result.
To do this, the roof must be covered, the structure must completely shrink, but most importantly, the moisture content of the wood should not exceed 20%.
Despite the divergence of opinions, experts still recommend making your choice in favor of the second option. Premature processing and painting of damp walls can result in big troubles for the owner.
How to paint a log house
- We clean the surface of the logs from the outside. The walls must be thoroughly washed from dust. To do this, use a soft brush and a damp cloth. There is no need to generously water the walls. They must dry thoroughly before the next step.
- We sand the walls. The walls should be smooth after sanding so that the paint will apply evenly. The surface of wooden logs is treated with sandpaper. Start with coarse-grained sandpaper and finish with fine-grained sandpaper. You can speed up the work if you use a grinder with an emery wheel for sanding.
- We cover the walls with protective compounds. Fire retardant impregnation is applied first, followed by bioprotection.
- Apply 2 layers of each product to the wall and wait until it dries completely. The instructions for the paint indicate the exact drying time for one layer.
- A water-repellent coating is applied. For this purpose, paints or special protective mixtures are used. After each coat of paint, the wall is allowed to dry for a couple of days. The first layer must be done with a brush. Subsequent layers can be applied using a spray gun, protecting the eyes with goggles and the respiratory tract with a respirator.
Modern industry produces painting materials that initially contain insect repellents and fire-retardant impregnations. The use of such mixtures can significantly speed up the painting of external walls after sanding.
How to choose the right tool?
At first glance, it seems that the process is simple and doing everything with your own hands will not be difficult. We'll have to dissuade you. Study the information below and try to objectively assess your strengths. Do you have the necessary tools, time, persistence, and skills? Or maybe the best option would be to entrust this work to professionals?
As you probably know, grinding a log frame consists of several stages. Belt sanders do an excellent job. Today in stores they are presented in a fairly wide assortment, but not every one is equally well suited for this job. In order for the process to go faster, the tool should not be too heavy and powerful enough. It would be good if the model had a dust collection bag.
Sanding with a grinder also helps get rid of fungi and mold.
But this tool is not suitable for processing semicircular logs. It is better to use a grinder with special sanding discs with sandpaper. It should not be very heavy, otherwise after the first hours of work your arms will literally fall off. A power tool of 850 W will be quite enough. It is better to choose an angle grinder from well-known manufacturers (Makita, Bosh, domestic Intersko). Buying a cheap Chinese instrument is like playing the lottery. It can last for a long time, or it can break after 2 days.
Working with an angle grinder requires certain skills. In inept hands, an angle grinder will leave deep furrows and dark stripes on the body of the log. There are 4 stages of grinding with an angle grinder, and for each you need to use a sanding disc with the appropriate grain. At the first rough stage, sanding work is carried out using sandpaper with a coarse grain size of No. 40. The sanding sheet effectively and quickly removes the top layers of darkened wood. The forty is also suitable for grinding the ends of logs.
Under no circumstances should you sand the house during construction or immediately after; it takes about 2 years for it to shrink.
At the end of this work, the sandpaper should be replaced with a sheet with a finer abrasive - No. 80 or No. 100. It removes the initially raised pile on the log and brings the surface to a state of perfect smoothness. Final (fine grinding) - from 150 to 180, finishing - grit from 220 to 240. In hard-to-reach places, you can use a chisel. If you carefully go through all 4 stages, your house can be called a real masterpiece of architecture, and the walls will not need additional decoration. Coarser grinding involves going through only the first 2 manipulations.
Purchase of discs for grinding logs
Domestic discs are several times cheaper than imported ones, but the quality is almost the same.
If you do decide to sand the frame yourself, one of the problems you will have to face is the number of sanding discs. The fact is that a lot of them are required. For 1 m² of wall it takes from 1 to 3 discs. In order to preliminarily calculate the area, volume of work and financial costs, you need to use the height coefficient used when calculating by professional teams. If the walls are not smooth, but have curved crowns, measurements are taken using a tape measure, the tape of which should go around all the curves. In the end, it turns out that in a house with a ceiling height of 2.6 m, the actual wall height is about 3 m.
And again about disks. In a construction supermarket, purchasing such a number of discs (mostly imported there) will significantly hit your pocket
The best solution would be to pay attention to a domestic manufacturer. For example, discs from the Luga Abrasive Plant are several times cheaper, but in terms of quality characteristics they are not much inferior to imported products
Domestic disks are not available for sale at every online giant. Try contacting construction companies; they work directly with the manufacturer. Maybe you will be able to purchase small wholesale items from them at a fairly reasonable cost.
Useful recommendations for purchasing paint and painting
When choosing and purchasing paint for the interior decoration of wooden walls, it is very important to pay attention to the date of manufacture of the composition and the availability of certificates confirming its quality and sanitary compliance. If the seller cannot provide documents for the product, and the production date is not stamped on the packaging, but is written on paper and pasted on top, so to speak, interrupted, then it is recommended to immediately refuse to purchase such paint, especially if a fairly expensive version is purchased.
The fact is that if the paint is expired or frozen, then it may simply not lie on the surface, even if it is well prepared, and you can determine the quality of the composition only by opening the package and trying to apply it to the wood. For example, it will not be possible to paint anything with a frozen solution, since the paint will most likely curdle and have the consistency of liquid cottage cheese.
High-quality paint should spread easily over the surface of the wood, while having high hiding power
If the paint is of high quality, it will be easily applied to the surface, which means that painting the walls can be done by a person who has never even performed such repair work before.
Next, it is worth considering those factors that will directly affect the final finishing result.
- First thing to note. It is a common phenomenon that many homeowners, when doing their own renovations in a house or apartment, are careless about the preparatory stage of work, since they consider it unnecessary. However, if the base for the decorative coating is uneven and untreated with protective agents, you should not expect the desired result. In addition, after a short time, even defects that are invisible immediately after completion of the work will begin to appear, for example, such as blue discoloration, blackness of the wood, or “resin pockets” near knots. Therefore, the preparatory process must be considered mandatory and carried out as efficiently as possible.
- When treating wood with one of the protective compounds, it is necessary to very carefully process the end parts of logs or beams if they face the rooms. If the walls of the house are covered with clapboard, then its side surfaces should also be carefully treated with antiseptic solutions.
- All protective and coloring compounds are applied to wooden surfaces in thin layers along the grain, otherwise their absorption into the wood will be uneven, which will negatively affect the overall appearance.
This simple “improvement” from ordinary rubber rings will greatly simplify the process of applying paint with a brush from a can.
- To ensure that there is no excess paint on the brush, and that it does not flow, but lies flat, it is recommended to use a simple device consisting of two stationery or ordinary rubber bands. One of the rubber bands is put on the bottom and top of the can, and the second along its diameter. The second elastic band will hold the first one, preventing it from sliding to the side.
After dipping the brush into the paint, press it against the stretched rubber band, leaving excess solution in the container.
- When applying paint to the surface of wood, do not try to cover it with a thick layer at once, as the painting will turn out sloppy. If you plan to get an opaque surface, then you should apply the paint in several thin layers, each of which should be applied after the previous one has completely dried.
- When painting walls covered with wooden clapboards, it is best to apply the final top coat starting at the top and gradually moving down - this method will help make the surface of the wall smooth.
- Paint can look different in a can and on the wall, so it is recommended to do a test paint job, that is, apply the solution to a small section of the wall in an inconspicuous area. It is best to choose the lower corner part of the surface.
- In order for the decorative layer to lie evenly on the surface, experts recommend adding a color to the primer that is one or two tones darker or lighter than the base color.
- The optimal temperature for painting surfaces is 22÷25 degrees. You should not carry out this process in hot weather, as the paint will dry too quickly and therefore unevenly. If the temperature is too low, the fluidity and hiding power of the compositions deteriorate, and the drying period increases.
Treatment of log timber with protective compounds
Wood is a soft and fibrous material. Humidity and microorganisms turn it into an unusable material over several years, so after sanding logs and beams, their surfaces must be coated with antiseptic and fire-retardant compounds. The former are responsible for the safety of lumber from the negative effects of mold and fungi, the latter increase fire resistance.
Protective liquids are applied using conventional painting tools: brushes and rollers. If the treatment area is large, then use a spray bottle. First of all, an antiseptic is applied, after it dries and is absorbed into the wood, a fire retardant is applied.
There is another composition that gives the wood certain shades. It is called glaze material. There are more than 40 varieties of glazing compounds on the market today that give wooden walls different shades, including colorless options.
It should be noted that protective liquid materials are divided into two categories: for interior use and exterior use. They cannot be swapped, because the compositions are very toxic for external use, although they have higher protective properties.
Coating the log house with an antiseptic using a spray bottle
Reasons for the need to stain wood
Why is it generally necessary to treat wood with various paints and varnishes? It would seem that the natural texture of wood is attractive in itself, and in most cases there is no particular need to embellish it? And all this is due to the fact that impregnation and painting of wood is capable of preserving its physical and aesthetic properties for the longest possible time, such as integrity, strength, warmth, environmental friendliness of the material and the beauty of its textured pattern.
As you know, the first enemy of wood is moisture, which, when it penetrates the structure of the material, has a destructive effect on its fibers. As a result, they swell and deform, losing elasticity and strength. Inside a house with damp walls, various fumes that are unpleasant for the senses inevitably dominate, which easily permeate the structure of the wood. In addition, dampness always “kicks off” the biological decomposition of wood, causing the appearance of mold and blue stains, which, in turn, in addition to creating an unhealthy atmosphere in the premises, also weaken the strength of the building material.
Paint and varnish products, as well as special protective compounds, are primarily designed to protect wood from negative external influences and preserve its structure from destruction. And, of course, the task is always to preserve the aesthetic texture of the wood unchanged or to decorate it in accordance with the intended interior design.
Reasons for grinding
Sanding wooden walls before finishing allows you to make the surfaces smooth and beautiful. The wood will look attractive, clean, light, without stains, splinters and any other defects that may appear during the shrinkage of the structure. The owners are interested in sanding because this work:
- Gives surfaces smoothness and evenness. Sanded walls are much easier to cover; any finishing materials will fit perfectly on them with minimal consumption.
- Reveals the beauty of wood. Removing defects and irregularities makes it possible to achieve a bright and clearly visible wood texture. It is the beauty of natural material that is often the reason for choosing it for construction.
- Improve the technical characteristics of the material. After treatment, the timber becomes more durable, since smooth walls better absorb protective materials: fire retardants and antiseptics.
Work order
As it has already become clear, the main goal when choosing a product for painting the outside of a log house is to protect it from various types of influence
But to ensure 100% protection, it is not enough to buy a high-quality coating; it is also important to carry out the painting work correctly. Here are some valuable tips that should help
It's better to paint it yourself. This will not only save the family budget, but will also provide benefits in paint quality.
It is important for the construction team to deliver a beautiful object visually, so they will not worry about the thorough processing of each element. Namely, small unpainted places can later cause the appearance of rot, fungus and other troubles.
Proper preparation of a log house for painting. Before painting, it is worth preparing the log house for this stage of finishing work. First, the surface of the wood is cleaned of dust and dirt. It is best to wash the wood and then let it dry. It wouldn't hurt to do some sanding. After this, several layers are applied to the surface of the wood:
- primer;
- antiseptic;
- fire protection agent.
Figure 5 – Painting a wooden frame with sealant treatment
It is best to paint the ends of the logs with lime or a similar composition. This is worth doing so that steam can move along the log along the fibers, as when a tree grows. This is much better than across.
There is no need to leave gaps when painting. To do this, add a little colored tint to the colorless antiseptic. After applying it, let it dry thoroughly. This way you can avoid the presence of even the smallest unpainted areas, which can subsequently lead to quite serious problems.
In conclusion, it should be advised that when choosing, you should focus on the most beautiful options, because a bathhouse should please not only the soul, but the eye.
Tool selection
Theoretically, grinding can also be done using improvised abrasive devices such as sandpaper with files and a chisel. But this approach will take a lot of time and is unlikely to provide high-quality results. Therefore, it is recommended to immediately focus on the following equipment:
- Eccentric sander. The most flexible technique in terms of machining, performing rotational and reciprocating movements. It is optimally suited for rounded logs precisely due to the general processing trajectory, which is close to an ellipse. How much does it cost to polish log walls with such a machine? Despite the high performance of the device, the costs can be kept at 2-3 thousand rubles. even complete with consumables.
- Angle Grinder. Also known as "grinder". This is not the best tool for delicate mechanical processing of a log house, but due to its prevalence and accessibility, angle grinders are often used. The strengths of the grinder include the ability to effectively rough clean in difficult areas. Such a device costs about 3-5 thousand rubles. for an average model.
- Polishing grinder. A specialized tool with a reduced speed, which in this case can be used as a finishing tool. It is especially suitable if you need to refine the material in areas of complex shape - in corners, grooves and ends. Such machines are available on the market at the same price, about 3-4 thousand rubles. for an average device.
Brief conclusions
I will answer a possible question - is it possible to paint a stove in a bath with oil, alkyd, vinyl, latex, acrylic, dispersion and other paints. I answer - it is possible. Just bake, don’t heat it later...
Tikkurila - heat-resistant paint
There is another option - experiment. For example, a friend decided to use paint for car mufflers, someone is trying something based on liquid glass, and so on. There are many different forums. If you do not want to paint an iron stove, you can do bluing. We associate this word with firearms. A good low budget option. How long will it last? Don't know. But good heat-resistant enamel is promised by manufacturers to last for at least 15 years.
I hope the article was useful to you. If yes, then subscribe to the blog and recommend it to your good friends through social networks.
Anecdote: “My husband comes in the morning covered in lipstick, powder, and red hair.
Wife: - Where have you been?
“You won’t believe it, my dear, I fought with a clown all night.”
Wisdom Quote: Pleasure should be the reward for work.
Do-it-yourself sanding of walls and ends of a timber frame
The photo at the beginning of the article is a real shot from the wall of the log house of my future bathhouse, in order to begin to discuss whether sanding of the walls and ends of the log house is necessary. Needed! - the question disappears immediately.
Definitely sand the walls! According to most paint manufacturers, sanding begins after the log house has dried sufficiently and “settled”. Dry wood is easy to sand, but I doubt it about waiting for shrinkage. So I sanded it right away.
If you paint raw wood without sanding, then after painting there is a high probability of cracking the timber and thus exposing areas of the wood. Many Internet sites recommend painting a dry frame.
Protecting the wood in the log house comes first! Despite the fact that when sanding walls made of raw timber, the pile lifts up and it becomes “shaggy”, I would not tolerate the sanding work. The primary task in building a log house is to install the box, cover it with a roof and preserve the walls. Drying will be more uniform, etc.
What does grinding do?
- after a week or two weeks of exposure to the sun, the surface of the wood acquires a yellowish color and sanding returns the original, attractive appearance of the log house;
- the surface of the timber acquires the ability to evenly absorb paint, varnishes and antiseptics, reducing the number of pigment spots on the surface;
- sanding together with a millimeter-thick top layer completely removes all defects and mold and fungal lesions of wood;
- During installation, some parts are used as scaffolding and simply get dirty when walked on. Sanding removes traces of dirt, etc.;
- Under some circumstances, such defects in timber processing may occur as in the main photo of the article. With special processing methods, even such a complex flaw can be eliminated.
Tools and attachments for grinding logs
Sanding the walls and ends of a log house is done with one tool and may include the following tools and devices:
- at the manufacturer - a grinding machine that processes the entire part (rarely used);
- belt hand sander (used often);
- angle grinder (grinder with a disk attachment) (used often);
- drill with a grinding attachment (used often).
A drill and an angle grinder are the most common tools for grinding, as they are in the arsenal of any home craftsman or just a good owner. All other devices are used mainly by professional workers and not everyone has them in their garage.
I would like to add a couple more “tools” that are very necessary. They cannot be classified as tools, but the need for them is great - a respirator and glasses. Oh, how I missed them in windless weather, when dust flew into my mouth and eyes! In windy weather the situation was better - the dust blew away on its own.
Regardless of what tools you use, the quality of sanding will depend on the parameters of the sandpaper and the hardness of the attachments. I used 80 and 120 grit sandpaper wheels. Larger ones (No. 80) were used for the ends and rough defects of the timber. 120 - for cleaning dirt and aesthetically finishing walls.
My experienced grinder did not go through the entire cycle of grinding work, so I finished sanding the frame with a drill (watch the video).
Loghouse wall grinding technology
I’ll start this point with the fact that first of all it is necessary to examine the log house for the presence of defects in the “radial structure of the wood” which, when planed, produces such pile as in the title photo of the article - entire petals of the tree structure peel off.
Before grinding, you need to treat such areas of the timber with adhesive (grease generously) and let it dry for 24 hours to protect yourself from further ruffling of the surface during sanding.
This technology allows you to save the tool and grinding wheels in subsequent operations.
Any grinding should be completed by treating the surface of the log house with antiseptics.
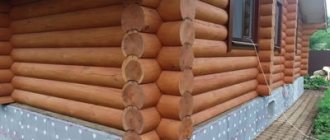
What should you pay attention to? Grinding the ends. The ends are the weakest point in a log house; they are more susceptible to cracking, getting wet, and exposed to sunlight to a greater extent than the walls.
How to prime the log house?
Of “our” “priming” products on the market, I would like to highlight Neomid. What distinguishes it is good quality and reasonable price. The line of products for wood allows you to “close” almost all needs: Fire protection, bio-antiseptic, moisture protection, etc. Reviews for the brand are good.
Another Russian manufacturer, the Senezh company, which produces a rich line of products. The assortment includes several protective compounds for different purposes (I mean, intended specifically for outdoor woodwork). In addition to primers, there are varnishes and paints on an organic and synthetic basis (acrylate, oil, etc.).
Profiled and laminated timber: differences in the process
Sanding allows you to improve the appearance of walls and prepare them for high-quality painting, waxing or varnishing. For profiled and glued material, the process is different:
Profiled timber. Usually processed in two steps. The first time is sanded with a coarse abrasive (a wheel with a grit size of No. 40), even at the construction stage. The second treatment (final polishing) of the walls is carried out after completion of the shrinkage process.
Glued laminated timber. This building material is carefully processed at the production stage, does not shrink strongly and therefore does not require preliminary deep grinding like its profiled counterpart. To process walls made of laminated veneer lumber, nozzles with a circle are used, starting from No. 80
Sanding must be done with care - excessive force may damage the outer lamella.
Safety precautions and remedies
Sanding a log house is accompanied by the release of a large amount of wood dust, which can also be mixed with mold fungi from the affected areas. Inhalation of such dust is very harmful to the human body, so work must be carried out in a respirator. Some models of grinding machines are equipped with special outlets for connecting them to vacuum cleaners. This is very convenient, as it allows you to immediately remove dust from the sanding site. Safety glasses must be used to protect your eyes.
Workers' hands must be protected with thick gloves made of rubber, tarpaulin or split leather. Do not use knitted or woven gloves, as they may get caught on the grinding wheel or sanding machine belt during operation. In this case, injury is inevitable. When working with a vibration grinder, you can use special gloves with a vibration-damping effect.
If the work is done correctly, sanding will help restore the log house to its excellent appearance, and subsequent processing will preserve it for many years.
How to sand timber walls
The tools used are the same as for processing logs. A specific choice can only be made by assessing how deeply you need to remove the top layer of wood.
If the bathhouse is made of profiled or laminated timber, most likely you do not need to level anything. Just remove the top darkened layer, if there is one. In this case, if you have a sufficient level of proficiency with an angle grinder, you can work with it. If you don't have enough experience, use an eccentric sander. It will take longer, but the result will be guaranteed to be at least good.
If the walls are made of ordinary timber, then you will have to do a lot of leveling. You can’t do without a grinder here. Moreover, in some places it will be necessary to remove a couple of millimeters of excess - non-ideal geometry and errors in cutting bowls lead to the fact that the difference can be quite significant.
I found a video fragment about a very interesting Pobedit grinding disk, which, it seems, can easily cope with rough grinding and easily remove excess thickness.
If the walls are made of ordinary timber, then you will have to do a lot of leveling. You can’t do without a grinder here. Moreover, in some places it will be necessary to remove a couple of millimeters of excess - non-ideal geometry and errors in cutting bowls lead to the fact that the difference can be quite significant.
Unlike hand-cut logs, rounded logs and beams have a smooth surface, which causes certain difficulties when processing them with a grinder. One awkward movement - and deep grooves and depressions will appear on the surface of a beam or rounded log that will remain there forever.
Working with an angle grinder is not for beginners; it requires certain skills. An angle grinder is a high-speed machine and, if handled improperly, can damage the surface. Do not press the tool too hard onto the area being treated. Sanding should be done with smooth circular movements, holding the grinder at an angle of 45 degrees. Grinding and polishing of timber should be done at low speeds. High speeds can lead to thermal destruction of the top layer of wood.
Before starting grinding work, the walls need to be inspected. If there are pieces of the “Radial Structure”, in other words, peeling off, then during grinding they will become shaggy and damage the tool. Such places are treated with an adhesive composition, after which the walls are allowed to dry for about a day. This technology has proven itself not only for timber with natural moisture, but also for chamber drying.
After sanding, you should not wait, but it is better to immediately treat the walls with special compounds.
When grinding, special attention should be paid to the ends
Sanding the ends
Our grandfathers used a blowtorch or a hammer to save the ends. Roasting is an old and proven method that really increases the life of wood. But at the same time, the appearance of the timber changes to unattractive, as in the photo. The ends were tapped with a hammer to completely connect the fibers and plug the channels. This makes the surface hard and smooth.
Modern methods and numerous attachments allow processing until the ends are completely smooth. To do this, first use nozzle No. 35 and gradually reach 120. With proper sanding, the ends will not absorb paint as forcefully and are less likely to crack. They need to be treated with special compounds for the ends. You can use liquid glass.
After sanding, all dust from the walls must be carefully removed.
Particular attention is paid to connecting locks. Indoors, dust can be removed using a simple vacuum cleaner and a long-bristled brush. It is blown out from the outside and cleaned with the same brush
It is blown out from the outside and cleaned with the same brush.
Corner processing
For grinding corners, it is recommended to use the same grinding attachments, but having previously upgraded them. The rubber part of the nozzle is cut to 6-7 cm in diameter. This makes it easy to treat hard-to-reach places.
If there are completely inaccessible areas, then you can use a chisel or a block with sanding paper.
The rounded log needs to be sanded dry, after shrinkage at home. Before sanding, check the caulk and reapply if cracks appear.
It is important to caulk before sanding, as it can be damaged while working.
There is no need to process a rounded log with coarse attachments. They use a grinder for grinding; it is more difficult to work with a machine on rounded surfaces. At the first stage, the rounded log is sanded with a grinder with nozzle No. 100. It will raise the hairiness. Then No. 125 which will level the surface. Corners and connecting parts are processed manually.
If you sand without errors, the surface will look smooth as in the photo and pleasant to the touch.
Is it necessary to sand wood before painting?
In order for the paint or glaze to be absorbed and lay on the surface of the wood, performing all the declared protective and aesthetic functions in full, it is necessary to prepare the wood in advance and follow the application technology recommended by the manufacturer:
First stage: sanding the wood
Any wood that was processed using machines or manually before painting: for example, logs, timber, lining, blockhouse, has compressed wood fibers that form a surface comparable in its properties to film or glass. This makes it difficult to saturate wood with biocidal and paint-and-varnish compositions to a sufficient depth, saturating wood with a concentration lower than necessary for long-term protection from mold, blue stains and ultraviolet radiation. Sanding opens the pores on the surface of the wood and promotes maximum penetration of the compounds. Coatings applied to unsanded wood have insufficient adhesion and may peel off after a certain time. Sanding increases the service life of paint and varnish coatings by almost 2 times. Test stains on wood - on sanded and unsanded areas - help to understand the difference.
Wood processing after sanding
After completing all work related to grinding the material, it must be coated with appropriate products. This stage of work should not be postponed until later; it is better to apply special compounds immediately after cleaning the wood, since after sanding it is unprotected from bacteria, dirt and other “enemies”. External treatment is carried out using different products, which are applied in several layers.
It is important to understand that wooden houses also need to be treated inside, for which water-based or combined products are used. Although the conditions inside the house are not as harsh as those outside, wood can still be susceptible to the development of mold and mildew.
Before using the product you choose, be sure to check whether the manufacturer provides for its use for interior work.
The base layer is antiseptic substances. Next comes the treatment of the material with fire retardants. They provide increased wood resistance to fire. Salt and non-salt flame retardants are available for sale. During contact with fire, salt products release gases, which minimizes the risk of fire, and non-salt fire retardants form foam on the surface of the wood, which also protects the natural material from fire.
Biopyrenes, which combine the characteristics of fire retardants and antiseptics, are also very popular today. They are suitable for internal and external processing. You can paint a wooden house after priming the coating, during which water-soluble products are used.
For painting, you can use façade paint or special glazing compounds that perfectly reveal the beauty of the natural material. This is discussed in more detail in the next article. There is a wide variety of such compositions on sale, available in different shades. The use of facade paint allows you to save money, but this solution hides the sophistication of the wood.
From our article you learned: why you need to sand a log house, how to choose the right tool, choose the right abrasive, and also not make mistakes in order to get a beautiful and modern house facade. But in any case, this type of work requires excellent knowledge, experience and skills developed over several years of constant work, so it is better to turn to professionals. The Plotnitskaya Artel company performs a full range of works on finishing the walls of a house made of logs or timber.
In addition to sanding the frame, our craftsmen can perform caulking or warm seam, paint your house with various paints and oils, install casing, install floors and ceilings, and much more...
More articles about construction and renovation:
- External and internal finishing of the bath
- Wood sealant, which one to choose?
- Painting a wooden house. Applied materials and technologies
- We protect a wooden house: antiseptic, oil, wax
- How and how to properly caulk a log house: materials and technologies
- Tips: how to properly make a bathhouse, stages of construction
- Hand-cut log house
- Exterior finishing of a frame house
- Repair of a country house: major or cosmetic?
- Attic in a wooden house
- Wooden houses. Advantages and disadvantages of materials for construction.
- Technology and stages of construction of a frame house
- Types of foundation piles, classification, how they are made
- Concrete septic tank made of rings in the house, types, installation technology
- Roofing types, classification, materials
- Prefabricated houses: types, advantages, disadvantages, construction features
- Arrangement of a country house site, practical advice
Why and from what wood needs to be protected
The outer layer of wood, devoid of bark, is completely defenseless both from the destructive effects of wind and sudden fluctuations in humidity, and from insect pests. The risk increases if the house is located in a rural or wooded area. This is explained as follows:
- As a result of complete cleaning of the wood surface from bark, it is easier for wood-boring beetles to access it.
- Under the influence of constantly changing relative humidity levels throughout the year, mold appears on wooden houses over time (usually in inconspicuous places, where it is most difficult to remove).
- Moisture stains remaining on an unprotected surface provoke the development of fungal diseases on the wood.
- With constant weathering, the surface of the building changes its natural color, becoming dull brown, which is why a wooden house loses its aesthetic appearance.
Based on this, when a wooden house is ready, it should be subjected to surface sanding, antiseptic treatment, and then painting.
Painting logs on the outside has a number of advantages:
- paint and varnish materials prevent destruction, dampness and rotting;
- antiseptic treatment protects the log house from pests, fungal mold and corrosion;
- Exterior painting provides an opportunity to create a façade that fits perfectly into the architecture of the house and landscape solutions.
Where in Moscow can I buy this product for impregnation and painting of ends?
Everything is simple here. Brushes and rollers are:
- made of synthetic materials - nylon, polyester, etc.;
- from natural ones - bristles (pork), and wool - for rollers;
- combined - equal parts of both.
Synthetics – for water-soluble coatings. If the packaging of your paint says “solvent: white spirit” (or another organic solvent - less common), then take a brush exclusively with natural bristles, because organics dissolve synthetics. For the same reason, you can use combination brushes for water-soluble paints, but not for paintwork materials with white spirit.
A good brush will hold the bristles tightly. You can ventilate the quality by tugging on the pile - the hairs should not fall out.
To apply some wax-based compounds, brushes with short, hard bristles and felt rags are used.
You can buy these protective agents for painting and impregnating lumber, log ends and beam ends from our company. Call!
Preparing the house for painting
By the time of treatment, the wall surface should be clean and smooth. A set of appropriate measures can achieve this. First, you should wash the surfaces using soft abrasives. For example, a brush with plastic bristles can remove the most severe dirt, dust deposits, etc.
Next is washing. At this stage, it is advisable to use special sprayers and washers with high pressure, or use a regular garden hose. In extreme cases, wet cleaning with a rag is performed.
Next, the technological process of preparing the log house for painting involves cleaning it using a hard abrasive. If at the first stage the brush eliminated foreign bodies, then this time the purpose of the mechanical action will be to refine the structure of the tree itself. Use hand sanders or brushes with metal fibers to polish the wood.
Then the washing operation is repeated again, which will complete the preparation for painting.
Advantages of log sanding
Sanding timber is a rather labor-intensive and time-consuming process, but, as they say, “If you’re afraid of the wolf, don’t go into the forest.”
Before you start work, you need to realize the importance of the matter so that the mosquito does not undermine your nose
Sanding logs:
- perfectly levels the surface;
- ideally cleans raw materials;
- helps maintain the original shade;
- provides high adhesion to paints and varnishes;
- reduces the cost of finishing materials;
- allows antiseptic impregnation to be evenly distributed over the surface without the formation of pigment spots;
- prevents wood aging;
- protects the material from rotting, mold and insects;
- increases resistance to the negative effects of climatic, thermal, mechanical, and chemical factors.
The result of the work is walls, as in advertising photographs of presentable construction companies.
How to paint a log house correctly
To protect the walls of the house from the influence of precipitation, sunlight, wind, insects and mold, the walls of the log house are impregnated with special protective solutions and painted. In this way, the tree is protected from darkening, cracking of the ends of the logs, and the release of resin from cut knots.
When choosing a method of painting natural wood after sanding, they try to preserve its natural properties, leave the wood the opportunity to independently regulate the humidity in the house, and maintain the vapor permeability of the walls.
Sometimes only the outside surface of the walls is painted. For example, such a finish is often sufficient for an oak bathhouse. The walls are not painted to avoid harmful fumes inside the sauna under the influence of heat and moisture and to preserve the vapor permeability of the wood. The walls of a residential building are also treated inside.
Advantages of log sanding
Sanding timber is a rather labor-intensive and time-consuming process, but, as they say, “If you’re afraid of the wolf, don’t go into the forest.”
Before you start work, you need to realize the importance of the matter so that the mosquito does not undermine your nose
- perfectly levels the surface;
- ideally cleans raw materials;
- helps maintain the original shade;
- provides high adhesion to paints and varnishes;
- reduces the cost of finishing materials;
- allows antiseptic impregnation to be evenly distributed over the surface without the formation of pigment spots;
- prevents wood aging;
- protects the material from rotting, mold and insects;
- increases resistance to the negative effects of climatic, thermal, mechanical, and chemical factors.
The result of the work is walls, as in advertising photographs of presentable construction companies.
Why do you need to paint?
Many owners do not paint the walls of their house. Logs look quite aesthetically pleasing, giving the premises a colorful look, but special processing of wooden structures is still necessary. This is done for a number of reasons:
- The use of specialized mixtures will help reduce the risk of fire.
- Preventing the process of rotting. By covering the wood with special solutions, you can preserve it in its original form for a long time.
- The paint coating prevents the appearance of various mechanical defects.
- Coloring will hide minor imperfections in the material.
- Applying a paint coating will prevent the appearance of various wood beetles and parasites in the wood.
Advantages and disadvantages of oil processing
The oil has the following valuable properties:
- is a natural antiseptic, penetrates deeply into the layers of wood, protecting it from exposure to bad weather and pests;
- very easy to apply and also easy to remove from the surface;
- environmentally friendly product;
- has good adhesion;
- hides scratches, chips and other surface defects
- oil treatment is relatively cheap.
It should be noted that only natural oils have beneficial properties. Therefore, when impregnating wood, it is better to choose natural oils that do not contain hazardous components and are harmless to humans.
However, oil processing has some disadvantages:
- Wood treated with oil loses its original appearance after some time. The procedure must be repeated regularly at intervals of several years.
- Grease stains are very noticeable on an oiled surface. Therefore, if grease gets in, it is necessary to re-soak the wood with oil.
Manufacturers and product prices
Bath paint is produced by domestic and foreign manufacturers. Its price depends on the material used and the quantity in the jar.
Belinka
The manufacturer's product range consists of paints, glazing compounds, varnishes, and impregnations. They have a wide range of colors, which allows you to bring any design idea to life. When using materials, the structure of the wood is preserved. Belinka produces polyacrylate paints that have water-repellent and vapor-permeable properties.
Tex
Paint from the Russian manufacturer Tex has protective qualities, which guarantees an increase in service life. The company produces soil and glaze antiseptics, drying oils, wax compositions, and fire-retardant impregnation. This allows you to choose an acceptable option for painting the bathhouse.
Tikkurila
The compositions are produced by a Finnish company in accordance with innovative developments. After production, the compositions were tested in harsh climatic conditions. The materials are developed using special components that protect the coating from ultraviolet rays and the wall from excessive absorption of moisture and rot.
The range consists of acrylate, oil and polyacrylate compounds. The paints are certified by the European Union, which ensures their environmental friendliness. The paint has a high cost, which is explained by its excellent technical characteristics. Before applying the composition, areas that cannot be painted are covered.
Saikos
The compositions of the German manufacturer are developed on the basis of natural oils and waxes. This ensures the preservation of the structure for many years.
What tools are best to equip yourself for polishing a log house?
Sanding wood with a grinder is the most common and affordable way to sand a wooden house. Typically, an angle grinder is used for grinding a frame made of planed logs. Using a grinder is also convenient for sanding grooves and ends of logs. Actually, with this tool, if you have the skills, you can process any lumber.
Model selection
There are both household and professional models that differ in power and performance. You shouldn’t buy the cheapest grinder; its power is unlikely to be enough to polish the entire frame. Expensive professional models are also not the best choice for home use. They operate at high speeds and are distinguished by considerable weight and power. A non-specialist, without the knowledge of working with such a tool, can simply ruin the surface being sanded, leaving dents on it.
It is best to opt for:
semi-professional models with power from 800 to 1000 W
This will be quite enough to polish the frame. It is advisable to buy a tool with a rear air intake rather than a side one, so it will become less clogged with dust
You should also pay attention to the cable length. The cord is too short and inconvenient to use
Nozzles for an angle grinder
To work, you will have to stock up on attachments on which the abrasive is fixed. There are two types of nozzles:
- Rubber
- Plastic.
Abrasive wheels
For grinding use regular
or flap grinding wheels. Sanding a log frame is a very dusty job. A lot of dust is released, which, together with tree resin, gets clogged into the disc, the abrasive quickly wears off, so the grinding wheels quickly become unusable.
During rough processing, one disk is enough for about 3-5 meters of log, then it has to be changed. Consumption depends on the condition of the wood and the type of surface. How many fine grinding discs are needed depends on how thoroughly the initial processing was carried out.
The alpha disk, which is a metal disk with pobedite chips soldered onto its body, has a longer service life. Grinding timber with an alpha disc allows you to significantly save on consumables. A disk clogged with sawdust can simply be cleaned with a wire brush and you can continue to work calmly.
Today it is not difficult to acquire the necessary tools for carrying out the procedure. You should arm yourself with:
- grinding machine;
- cutting machine;
- chisel.
Important! When choosing tools, you should pay attention to weight, so as not to put too much strain on your hands and power. Tools with low power will heat up, significantly reducing productivity. High-quality tools are produced by Makita, Bosh, DeWalt, and the domestic Interskol is also worthy of attention.
High-quality tools are produced by Makita, Bosh, DeWalt, and the domestic Interskol is also worthy of attention.
High quality, durable equipment
High-quality tools are produced by Makita, Bosh, DeWalt, and the domestic Interskol is also worthy of attention. The equipment is high quality and durable.
For a timber frame you need a belt sander; its use will ensure a smooth surface. Equipped with a special dust collection bag, the machine will make subsequent cleaning of the room easier. I'll round the surface of the logs with a belt machine, it's difficult, a grinder and special attachments will come in handy here.
The correct power of the cutting machine is 600-900 W. Nozzles with different degrees of grain. Initially, use a coarse-grained nozzle (40), then take a nozzle 80-100. Disc 125mm, speed 10-12 thousand, preference should be given to a machine with a rear air intake and a long cord that provides freedom of action.
Important! For work, it is more convenient to use two machines, so as not to overheat and not change attachments; first work with the attachment with large grains, then with fine ones. Using plastic attachments; flexible plastic with an abrasive layer is more convenient, leaves no marks and lasts longer.
General recommendations
How to paint a wooden house from the inside? Every homeowner has asked this question at least once in their life. Painting a log house is not an easy task. Many owners, doing this themselves, skip the preparatory stage and immediately proceed to painting.
Because of this error, various troubles with painted surfaces are possible, for example, wood rotting and the appearance of parasites in it. You need to paint the wood according to the above description. Therefore, painting timber and timber houses will take a lot of time and effort.
Paint for the interior decoration of a wooden house must be environmentally friendly, dry quickly and have no odor. The decorative finishing of a room, as well as its design, directly depends on the correct choice of this material. When choosing paint, carefully study the labels and consult with store clerks.