If the main tools of a blacksmith are a hammer and an anvil, then for a carpenter there is nothing “more familiar” than his workbench. For people who work with wood, it can at the same time be a cutting platform and an assembly table, a stop and stand, a device for storing tools and even, if you want, a small carpentry machine, and sometimes a means of earning money. This article tells you how to make woodworking tables with your own hands. The instructions, photographs and drawings presented in it will help even a beginner to install this structure.
Osya member of FORUMHOUSE
First of all, after building a workshop, you need to make yourself a table. A table like a workbench, essentially. This is a table for work - fitting, assembling small things made of wood (stools, shelves, etc.). I'll call it an assembly table.
In fact, the second name for a workbench is an “assembly table.” But, as you already understand, its purpose goes far beyond assembly operations. Therefore, the design of a multifunctional workbench in a carpentry can be quite intricate (see drawing below), and its development (in the absence of experience) can be spent as much time as it takes to design the carpentry workshop itself.
How tall should the workbench be?
- What should be the optimal height?
- Standard options
- How to calculate?
A carpentry or metal workbench is a necessary piece of equipment that is available in almost every workshop. With the help of this special table, the master has the opportunity to perform his work in comfortable conditions, when all the tools he needs are at hand and do not fall on the floor.
In order to conveniently place all the devices and tools for processing wood or metal workpieces, it is important to correctly calculate not only the width and length of the tabletop, but also the height of the workbench.
If you choose the right dimensions of the workplace, then by working for several hours in a comfortable position, the master will be able not only to preserve the health of the spine and joints, but also to increase the productivity of his work.
Selecting a place to install the table
The choice of the main location for installing the workbench should be thought out in advance. Usually this is a workshop, a place on the site next to the technical unit or in the garage.
In addition to the placement location, you need to think through a few more technical nuances:
- From which side will the approach to the workbench be? To work with small objects, an approach from one edge is sufficient; such a device can be installed against a wall. For large-scale work, a free approach from all sides is required.
- Which side will the items be placed on the table? It is important to think through this point so as not to touch other furniture with long boards.
- Do not place the workbench next to a door or window. Usually such work takes a lot of time. There are always drafts near a window or door; if you stay here for a long time, you can catch a cold.
When setting up a workbench, think carefully about where the power tool will be connected.
Working through these points will make work in the future comfortable and safe.
What should be the optimal height?
To optimally select the height level of a workbench - carpentry or metalworking, its size is determined taking into account the work of the master in a standing position. The most important parameter in this case is the height of the person’s elbow, located above the floor level.
When performing work in a garage or workshop, the master will feel most comfortable if his elbow, together with the plane of the working tool, is in the same horizontal direction. Thus, the arms and shoulder girdle muscles and joints will not be overworked and cause discomfort and fatigue.
When working at a workbench, the master bends his arm - it, as a rule, is at the level of the height of the jaws of the vice located on the tabletop. This position is the most physiological and comfortable for doing work. To adjust the distance from the elbow to the floor or table top, the carpentry or metal workbench must be adjusted in accordance with the person’s height. For example, if your height is 170 cm, then the level from the tabletop of the workbench should be at a distance of 70 cm from the floor level. The calculation here is very simple: you need to subtract 100 cm from the height of the master, expressed in cm.
It should be taken into account that the distance from the level of the workbench tabletop to the worker’s eye line must correspond to the standard size - from 45 to 50 cm.
If the dimensions of a carpentry or metal workbench do not correspond to the height of the worker, and the design of this device itself is not adjustable, various types of floor stands are used, the height of which is selected based on the height of the person for the convenience of his work. A carpenter or mechanic daily performs their work functions near a workbench, and they have to work the entire shift with a long body tilt forward. This forced position is required for processing workpieces throughout the entire work cycle.
At this time, a person experiences a very noticeable load on the joints and muscles of the arms, lower back and legs. In the process of long-term work, the muscles of the back, neck, and joints can become very tired, which, if repeated regularly, can lead to deterioration in health, and in case of joint disease, to disability.
Therefore, it is so important to carefully approach the issue of selecting the height of the workbench in such a way that a person does not experience unnecessary, unjustified stress while performing his work duties.
Workbench installation
As practice shows, making a workbench is not difficult. Installing a workbench is no different from assembling an ordinary wooden table. The vertical supports are fastened together using vertical boards and self-tapping screws. The working surface should also be secured to the supports using self-tapping screws.
In order to save space in the carpentry workshop, some craftsmen make a homemade workbench folding. It is mounted on the wall. This type of installation means that carpentry work will only be carried out when necessary.
In the past, in cramped conditions, I had a workbench board - a laminated MDF board 24 mm thick, with dimensions 1200x2200. It had minor modifications, such as: holes and grooves for attaching a hand router and circular saw, a flush-mounted metal frame with threaded holes for attaching rulers, and mustache nuts at the bottom, located in the places where the hand plane and drilling machine from a drill with a rocker are attached. The tabletop was attached to the wall on three hinges. During non-working hours, it was raised vertically and fixed to the wall. Under the board, also on hinges, are two triangles from the same board. She laid herself on them while working.
This design is an excellent way out of a situation in which the interior space of the workshop is very limited. But such a carpentry table does not withstand intense loads well, and it can only be made independently in exceptional cases.
After you have mounted the frame and working surface of the product, a simple carpentry table can be considered ready. But in order for it to turn into a full-fledged workbench and begin carpentry work, its functionality needs to be slightly expanded by adding specialized equipment to the design.
Taking into account the special specifics of the activity, the carpenter’s workbench must be equipped with appropriate equipment. And if the necessary tools are always at hand, then this is an excellent indicator. And the structural elements of the workbench itself will help you correctly arrange devices, fastening materials and power tools.
Standard options
In the process of selecting the location of the workbench tabletop level, it is necessary to determine what type of workpieces will be processed on it. If the main volume of work with wood blanks is envisaged, then in this case the workbench should have a smooth and even wooden tabletop , and if the work is more related to the processing of metal parts, then you will need a metalwork version of the table, the surface of which is covered with durable materials, for example , metal.
On a mechanic's workbench, in addition to the basic and necessary additional devices, it is recommended to equip a special mechanism for lifting heavy parts , as well as provide a system for mechanical adjustment of the height of the tabletop, which can be changed depending on the height of the worker.
There are various ways to determine the height of a carpenter's or benchtop from floor to tabletop: The worker will need to take measurements from the top of his head to his chin. Then, from the resulting figure in cm, you need to subtract the size obtained as a result of measuring the hand from the tip of the fingers to the corner of the elbow, also in cm. Next, from the result obtained, you need to additionally subtract the height of the vice, which the worker will constantly deal with, since they are the ones hold any parts during the entire processing cycle.
Height of metalwork table
Product sizes are selected individually. In this case, the parameters of the room also matter.
Compact product
In small workshops they prefer to use a workbench due to its small dimensions.
In order not to make changes to the location later, it is installed in accordance with GOST requirements and must correspond to the standard height.
The following must be taken into account:
Wooden workbench
Schools and specialized educational institutions adhere to the same rules when teaching children in a professional direction. Since the bench machine does not require working with large parts, changing the height for different types of work is not required.
About carpentry workbenches
Design and purpose of the workbench
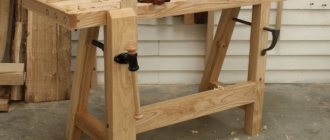
A carpentry workbench is a work table for manual and mechanical processing of wooden products. The design and ergonomics of a classic carpentry workbench allow you to fix parts in various spatial positions and perform basic carpentry operations with maximum convenience: making wooden parts, assembling structures, coating them with finishing compounds. A traditional carpenter's table is designed to work with lumber up to 3-3.5 m long. To process longer workpieces, a carpenter's workbench is used.
A table for carpentry work consists of a bench board (cover) and a bench (supporting frame). A traditional workbench is equipped with front (front) and rear (end) vices, with the help of which the workpieces are fixed in the required spatial positions.
There are holes in the table top and the wooden jaws of the vice. They are designed for installing clamps and stops of various sections and heights.
Having placed the stops in the desired configuration, the part is placed between them and pressed with the screw mechanism of the vice. This way the workpiece is securely fixed in a horizontal position. Based on the thickness of the wooden part, use a stop of appropriate height that will not protrude beyond the edge of the workpiece and interfere with processing.
How to choose the optimal workbench height?
The height of carpentry workbenches varies between 85-95 cm. The optimal table height is selected based on the height of the craftsman. If, standing at the workbench, your palms rest freely on its lid, then the size has been selected correctly. At such a workbench it will be convenient to perform all basic operations, without frequent bending and stretching, which lead to rapid fatigue.
What materials are best to make the structure from?
A carpentry workbench must have sufficient strength and rigidity, since during operation it is subjected to large loads, both static, formed under the weight of massive workpieces, and dynamic, arising in the process of sawing, drilling, impacts, etc. Sufficient strength characteristics are ensured not only by the features of the fastening units, but also the type of materials used.
Coniferous wood is traditionally used to make the base. The table top is made of durable wood: oak, beech, ash, maple, etc. The lumber used to create the bench board must be dry (humidity about 12%) without knots and other defects.
About making a workbench cover
Experience shows that when making a carpentry workbench with your own hands, it is more advisable to purchase a ready-made glued board, which will become a blank for the lid. The effort and time spent on cutting, jointing edges, gluing the shield and leveling it when creating such a massive part will be incomparable with the funds saved.
When performing work that increases the risk of damage to the lid: drilling, chiselling, etc., it is better to cover the working surface of the workbench with a thick plywood sheet or fiberboard cut to the shape of the lid. It is advisable to make this simple flooring immediately together with the workbench.
Workbench in the garage: types of designs and their features
The primary purpose of a workbench for a garage is to create an ergonomic workspace for plumbing and carpentry work. The article describes the types of desktops and the features of their designs.
The material offered below contains information about the pros and cons of wooden and metal models and the features of their configuration. You will become familiar with the criteria for selecting equipment and organizing the workplace.
About the types of workbenches
Car owners regularly face the need to perform a variety of repair work.
For everyone involved in carpentry and plumbing (no matter at a professional or amateur level), proper equipment of the workplace helps to distribute energy and time more economically, and also ensures better results. A workbench is suitable for the role of universal equipment suitable for use in garage conditions.
Initially, the workbench arose as a carpenter's workplace intended for processing wood. With the advent of various (including electrical) equipment and the division of professions, the workbench began to specialize. Today, in addition to carpentry, there are carpentry and metalworking workbenches, as well as combined varieties.
Basic equipment
A workbench in a garage is an equipped workbench consisting of various modular elements, which include:
- Metal frame (table). Its design is designed for a significant weight, from 70 to 300 kg (depending on the model). Tables designed for working with heavy and large parts (for example, wheels) are strengthened with additional diagonal connections.
- Tabletop for carpentry and plumbing work. Depending on the functions performed, it can be made of galvanized or stainless steel, chipboard, or plywood. The safety margin of the tabletop is designed to withstand dynamic and shock loads, and contact with chemically active compounds.
- Accessories. The workbench serves not only as a work area, but also as a place to store tools, spare parts and other equipment. Therefore, the mandatory components of the design are cabinets, screens, drivers (drawers), shelves, and hanging holders.
For many car enthusiasts, the garage is a second home, so they approach its arrangement with due attention. A particularly important point is the purchase of a workbench; the selection criterion may be the purpose for which it is intended. In most cases, such equipment is installed to perform the following work:
- For regular inspection and maintenance of the vehicle.
- For minor plumbing work, minor repairs, correction of defects related to the maintenance of the house and garden area.
- If plumbing or carpentry is part of your hobby.
The first question that arises when choosing is the material of manufacture. There are wooden (most often homemade) and metal workbenches offered by various manufacturers, both domestic and foreign.
Wooden workbenches
A wooden workbench for the garage, made entirely or partially from wood, is suitable for periodic and short-term work with simple parts; it is not well suited for machining complex metal components.
The frame of such models is made of strong wood (beech or oak) and secured with self-tapping screws. The stability of the table is ensured by additional spacers, transverse or x-shaped. Wooden models are usually equipped with shelves or drawers for storage.
The wooden tabletop is trimmed with metal along the edge. A common model is a design of two massive cabinets connected by a tabletop.
This option looks quite practical, since it solves most of the problems associated with the placement of tools.
Despite the relative cheapness and good (albeit somewhat limited) functionality, many believe that a workbench in a wooden garage has significant disadvantages:
- A wooden bench is not designed to withstand heavy loads.
- With increased use, the service life of the frame is significantly reduced.
- The table area does not allow placing several types of equipment at the same time.
- The wooden surface of the countertop under the influence of chemical agents (paints, solvents) and metal dust becomes unusable over time, and traces of oils remain forever.
- Wood is a fire hazardous material; in combination with the collection of chemical substances located nearby, this property increases many times over.
Metal workbenches
To assemble a functional metal bench, you will need special equipment and skills in working with metal (the fragments are connected by welding).
Metal models, assembled in workshop conditions, have a durable construction and modern design.
Despite the higher price due to the cost of metal and a more complex assembly process, metal equipment has many advantages, including:
- Long service life. Stainless steel models boast an impeccable service life of 50 years.
- Large selection of models and their configurations. Manufacturers offer both universal and highly specialized options.
- Multifunctionality. You can perform any type of work, including turning, cutting, grinding.
- Mobility and compactness. Many models can be disassembled (in whole or in part), and, if necessary, new tools (vises, clamps) can be added.
- Light weight while maintaining strength. The tabletop is resistant to deformation and damage (scratches).
- Minimal care. The design is characterized by increased resistance to corrosion processes and does not require painting. Cleaning metal dust and shavings from the surface of the countertop does not take much time.
Workbench options
To determine the size of the workbench, you need to understand how much space in the garage you are willing to allocate for a workplace. The choice of design for arranging a garage is based on several indicators:
- Depth. Most garages have modest dimensions. Taking into account this limitation, for use at home, workbenches with a tabletop depth (width) not exceeding 0.5-0.6 m are preferable.
- Length. An important parameter that should not be reduced unless absolutely necessary. The longer the tabletop, the more convenient it is to perform metalwork work on it and install auxiliary tools. If you intend to use a circular saw or an electric jigsaw, you will also have to allocate part of the countertop for this work. In practice, most garage owners prefer to install workbenches about 1.5-2 m long.
- Height of a workbench in a garage. It is determined by the convenience of the owner and depends on his height. On average, the location of the tabletop at the level of the middle of the hands is considered convenient (if you stand next to each other).
- Technical gap. For high-quality cleaning, it is convenient for the lower part of the structure to be raised above the floor by 15 cm.
- Strength. Welded structures with a supporting frame support of 6-8 legs have the necessary strength. Since most car maintenance work is metalworking, a metal workbench is the best choice.
- Functionality. To make work comfortable, a spacious countertop is not enough. Racks, shelves and drawers are of great importance. All of them should be located at a convenient distance from the working area; It’s good when tools, power points, materials and containers for small items do not interfere with the work, but are always at hand.
DIY carpenter's table
If the main tools of a blacksmith are a hammer and an anvil, then for a carpenter there is nothing “more familiar” than his workbench. For people who work with wood, it can at the same time be a cutting platform and an assembly table, a stop and stand, a device for storing tools and even, if you want, a small carpentry machine, and sometimes a means of earning money. This article tells you how to make woodworking tables with your own hands. The instructions, photographs and drawings presented in it will help even a beginner to install this structure.
Universal machine height
Universal machines are an intermediate option between carpentry and metalworking. It is convenient for the garage, taking into account the minimal space for additional furniture. These tables are made of metal. They have a widened and elongated shape and can be adjusted.
Product with adjustment for standing work
Since the machine is universal, it is mainly equipped with mechanisms for changing the height of the tabletop. This is convenient, as you can adjust the height for different types of work relative to the equipment on the table.
General description of the carpentry workbench
At the heart of any carpentry workbench, regardless of the number of operations that are supposed to be performed with its help, there is always an ordinary wooden table. It is on it that the master will do carpentry, drill parts, process surfaces, assemble wooden trinkets into one complex structure and surprise others with his skills.
A good solid table is the basis. And everything else - vices, clamps, boxes with tools and fasteners - all these are constant attributes of the most useful tool in a carpentry workshop.
Main types of workbenches
There are several types of workbenches, which differ in their functional purpose. Complex devices combine several types at once. Simpler ones have limited functions.
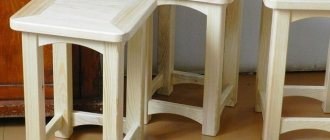
- Carpenter's table. It is an ordinary high table with a flat, even tabletop. It is designed for processing and sawing small parts. But it is difficult to process large boards on it.
- Long workbench. It is a long structure with a vice for securing boards and logs. Its main purpose is to process these types of parts. However, it is impossible to collect small items here.
- Universal table. It has a flat, wide table top, nearby holes for dumping debris and a long mount with a vice. The most advanced models are reinforced on individual sides with metal sheets or tape, which makes it possible to process metal and stone products on it.
There is also a gradation of workbenches by type of assembly. There may be the following options:
- Mobile workbench. It is small in size and weight. Designed for carrying from place to place and processing small products.
- Stationary table. These structures are heavy and, as a rule, securely attached to the floor. They process heavy logs, boards, and large parts. Typically, such options are used in private homes, where the owner quite often does carpentry or other work. Most often, these workbenches are universal with a large number of accessories.
- Folding table. This is an intermediate option between a mobile device and a large stationary table. Prefabricated workbenches are also quite large in size, but can be removed fairly quickly. They are suitable for garages or small private houses.
According to its design characteristics, a carpentry workbench is a table on which shelves for tools, drawers and additional equipment are located.
Workbench project
To make a carpentry workbench with your own hands, you must first understand its parameters that are optimal for you.
The dimensions of the workbench for work are chosen in such a way that you can work while standing at full height and without slouching. For a person of average height, the height of the table should be within 70...90 cm. But it is better to focus on the features of your own anatomy. It is optimal if the upper cut of the legs is at the level of your lowered arms. When a few centimeters are added to this height (the thickness of the workbench lid), you will understand that working while standing at such a table is a pleasure.
It is better to make the workbench cover, as well as the working surface, from solid wood or plywood. There are people who use particle board materials, light chipboard sheets, etc. for these purposes. We strongly do not recommend that you follow their example. This is a bad design - after all, the loads on the surface of the structure can be quite noticeable, and the particle board under such conditions will quickly fail.
5 years ago I received 2 sheets of plywood as a gift from a neighbor. It was decided to use it in the construction of a workbench. The size of the workbench was determined immediately - it was a pity to cut such a sheet. Experience has shown that there are no extra centimeters at the table. The height was determined by the height of the palms from the floor and amounted to 850 mm.
Ideally, a homemade workbench should have a special tray on the lid for storing tools and wood pieces involved in the work, as well as special holes (sockets) for wedges and combs. Using wedges and (or) combs, parts and workpieces will be secured to the table surface. It is on the cover that auxiliary clamps (vises) should be mounted to fix the processed lumber.
The dimensions of the workbench may vary depending on the size of your workshop. But, as practice shows, the optimal dimensions of the lid are 700 mm wide and 2000 mm long.
The supports (legs) of the workbench can be made from wooden beams 120*120 mm, no more. This will be quite enough to ensure that the structure is stable and does not become loose under the influence of brute physical force.
Operating rules
In order for the carpenter's table to last a long time and to work at it safely, it is important to follow the basic operating rules:
- All table parts must be firmly secured. If they start to wobble, they need to be tightened or secured. Any unsteady position can result in serious injury. It will not be very pleasant if the saw or jigsaw comes off the part at the most inopportune moment.
- All items for work should also be held well on the table. This will make the work more accurate.
- The device must be protected from moisture. Wooden boards will warp and crack with sudden changes in humidity. If there is high humidity, mold may grow here.
- When working with heavy objects, you need to evenly distribute the load on the tabletop.
Making a carpentry workbench yourself is not a quick task, but it is exciting, because you need to take into account not only your needs, but also the ergonomics of the entire workspace.
Proper assembly of this device and its correct operation will bring joy from carpentry work, which will give inspiration for creativity.
Rear and front clamps
Rear and side (front) screw clamps are those elements without which no workbench simply can fulfill its main purpose. Therefore, this part of the structure should be built first.
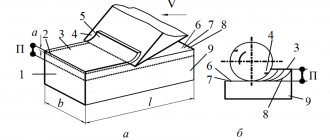
The rear clamp is designed to hold lumber while planing. As shown in the diagram, its vice blocks move along the front edge of the workbench, allowing the workpiece to be securely secured using lead screws.
The side screw clamp (which, due to its special location, is called the front clamp by many) has the same purpose as the rear clamp. And these elements differ from each other only in their location. Here are the drawings of a carpentry table for making it yourself.
What types of work is the workbench intended for?
The functionality of a workbench depends on its equipment. Factories and workshops often need tools that can handle a wide range of tasks, but in the garage you can get by with a workbench designed only for specific functions.
Here are the main functions for which the workbench is designed:
Naturally, in order to perform this or that operation efficiently, in addition to layout, you will also need a specific tool. A workbench is just a durable work surface and a way to organize the storage of numerous tools.
The set of plumbing tools will depend on the tasks that the master performs, but in 99.9% of cases, the workplace cannot do without a bench vice . This tool is mounted on the workbench tabletop and is intended for fixing various workpieces and parts so that they can be worked with comfortably. Vices are made of steel or cast iron, plates are usually made of steel. In the work of a mechanic, different types of vices are used, but parallel vices are still the most popular.
Podverstache
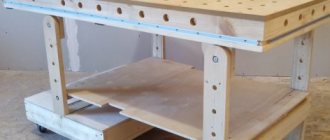
In the conditions of a large accumulation of individual cabinets, carpentry machines and additional accessories in the carpentry, it would be simply a crime not to use the free space under the workbench with maximum benefit for yourself. Therefore, creating a massive base (underbench) in the space under the upper plane of the workbench is a convenient technique that many craftsmen have long neglected when creating additional conveniences.
The fact of the matter is that in the design of a workbench, a lower shelf is absolutely necessary (especially on a mobile workbench). We use a lot of tools and have nowhere to put them outside while working. And it’s also inconvenient in the workshop - climbing back and forth on cabinets and shelves. Fold the same tool 10 times per hour.
The underbench can be adapted for storing power tools. For greater convenience, you can install cabinets and shelves here for small parts, fixtures and hand tools.
Having made a workbench that has all the listed elements, you can begin your carpentry activities. In the process of further work, you may need additional devices. But each master will be able to guess for himself what options to use and what elements to add.
You can learn how to properly dry wood, from which you can later make various products on your carpentry workbench, from our previous article. You can get acquainted with practical ideas regarding creating a carpentry workbench in the corresponding section of our forum. Any FORUMHOUSE visitor can become familiar with the rules and features of using a hand-held circular saw by visiting a special topic created for discussion.
How to buy workbenches in Moscow
Other cities where you can buy our workbenches
Arzamas, Belgorod, Bryansk, Vladivostok, Vladimir, Volgograd, Vologda, Voronezh, Dzerzhinsk, Yekaterinburg, Ivanovo, Izhevsk, Irkutsk, Kazan, Kaluga, Kirov, Klin, Krasnodar, Krasnoyarsk, Crimea, Kursk, Labytnangi, Lipetsk, Naberezhnye Chelny, Nizhny Novgorod, Novosibirsk, Orel, Penza, Perm, Pskov, Pyatigorsk, Rostov-on-Don, Samara, St. Petersburg, Saratov, Smolensk, Stavropol, Stary Oskol, Surgut, Syktyvkar, Tambov, Tver, Tolyatti, Tomsk, Tula, Tyumen, Ulyanovsk , Ukhta, Khabarovsk, Cheboksary, Chelyabinsk, Yaroslavl.
We offer our customers delivery and installation services.
Plywood workbench
To make a workbench from plywood, you need to prepare:
- two-meter rule;
- electric circular saw;
- special glue for plywood (you can use plywood glue from the “Moment” line);
- clamps;
- spatula with teeth;
- wooden beam (section size 4 cm by 6 cm);
- glue brush;
- screwdriver;
- plywood (sheets 1.8 cm thick);
- a tool for cutting plywood and wooden beams (for example, a grinder or saw);
- fastening elements (screws 8 * 12 mm);
- drill;
- a strip of plywood 15 cm thick.
Let's consider an example of manufacturing a rectangular workbench with dimensions of 1.5 m by 60 cm and a cover thickness of 7.2 cm.
Instructions “How to make a carpentry workbench from plywood”:
- cut four rectangular pieces of plywood with dimensions 150 * 60 mm;
- if there is a suspicion that the plywood is not flat, you need to check this fact: fold the sheets together or use a rule;
- fold the plywood sheets together so that the convex side of each piece “looks” down;
- apply glue to one sheet and glue it to the second, repeat with all four pieces of material;
One of the options for a wooden plywood workbench (dimensions - in centimeters) Source pinimg.com
By the way! When gluing plywood sheets, for convenience, they can be compressed with clamps. The evenness of the tabletop plane when tightening the clamps must be constantly monitored using a rule.
Wood-metal workbench
Let's figure out how to make a bench with dimensions of 2.2 m * 0.75 m * 0.95 m and six drawers (three on each side). For work, in addition to tools and sheets of plywood, you will need a two-millimeter profile pipe with dimensions 6 cm * 4 cm:
- 3 pieces of 2.2 m for both sides of the table top and the lower rear stiffener of the workbench;
- 6 pieces of 0.75 m each for the other two sides of the tabletop (end), as well as to form a frame for retractable drawers;
- 4 pieces of 0.95 m each for the legs of the workbench table;
- 5 pieces of 0.7 m each for assembling frames intended for drawers, as well as for the jumper (foot rest).
To make a workbench out of wood and metal, you need to start by assembling the basic structure. To do this, you will need to weld the future tabletop from two long corrugated pipes and two 75-centimeter ones. At the second stage, four legs are attached to the corners of the structure in the same way (in this example they are 95 cm long). At the next stage, you need to weld the third long pipe at the bottom, in the back of the product so that it is parallel to the floor, 25 centimeters above it.
Additional Dimensional Drawings
Before you start creating a workbench, you need to carefully consider its design and draw up a working drawing. First of all, you need to decide on the size. The following criteria must be met:
- workshop size;
- own height, body type (arm length, left-handed or right-handed, etc.);
- dimensions of processed parts.
Workbench height is a tricky issue. Some sources recommend subtracting 70-90 cm from your height to determine the optimal size. This method does not take into account the length of your arms or other body features. A more traditional method is to place your hands loosely on the surface of the lid. This option better takes into account individual preferences. It is also important to remember that the work must be done with pieces of different sizes, which requires different heights of the support platform.
The lid area should also be carefully considered. Often they choose too large tabletop sizes, arguing that sometimes the workpieces need to be processed at all. However, such situations rarely happen, and a large tabletop takes up unnecessary space in the workshop and is constantly littered with foreign objects.
Having decided on the dimensions, you need to decide what the base of the workbench will be made of. The classic version is made entirely of wood, but the durability of the metal base is much greater. Also, if the height of the table is chosen poorly, the metal base is much easier to assemble or cut without losing strength and reliability. You should also decide if you need a basic cabinet to store tools or supplies.
After all the details have been thought out and determined, a working drawing should be drawn up. It is not necessary to follow all the rules, but the dimensions and main components must be presented in order to clarify the assembly sequence, draw up a specification, calculate the amount of materials, etc. If creating a sketch is too difficult, you can use ready-made drawings found on the Internet.
Figure 1 Figure 2 Figure 3 Figure 4
When choosing a suitable project, you need to take into account your abilities and skills. It is almost impossible for a novice carpenter to create a complex product. It is more convenient to choose a simple project that will later be modernized.
Workbench table top for carpentry work
For the workbench top, use sheets of MDF, chipboard or plywood with a thickness of 16–20 mm. Glue the slabs in two layers and get a tabletop 32–40 mm thick.
Drawing and diagram of the workbench covering: 1 - edge strips (birch, maple); 2 - working surface (hard fiberboard); 3 - base plate (chipboard, plywood or MDF).
For the countertop, you can take chipboard sheets left over from unnecessary furniture. For example, closet walls are suitable. Take them as a basis and add small parts to make the top of the workbench measuring 670x1940 mm.
Place the narrow slabs toward the back wall and toward the center of the workbench. Place large sheets on the top layer of the countertop. Glue the cut pieces.
Secure the sheets with self-tapping screws, deepening them into secret holes. Trim the edges with a hand-held circular saw 20mm from the edge.
Align the tabletop with the frame and secure it with screws.
Cut slats for borders. Saw the bevels at a 45° angle and cut the boards to size. Lay the fiberboard on top of the workbench, add a flat panel on top and clamp everything together.
This makes it easier to put on the pads. Align the ends with the mating edges and press the strip to the panel; the top plane will be flush with the workbench top. Supporting the board with one hand, drill pilot holes and secure the pieces with screws.
Move the accessory to the other side and install the remaining pads. Treat the boards with a grinder.
Drill a hole in the corner of the board so that the fiberboard can be easily pulled out of the hole when replacing it.
Clean the surfaces from dust and cover the wooden parts of the frame with stain. Place the fiberboard into the hole in the lid. If you are using pieces of material, secure them with double-sided tape. Place the carpenter's vise on the workbench.