When you need to connect a pair of workpieces at an angle of 90 degrees, we recommend using special clamps - corner clamps. What are they good for?
These simple devices are easy to use and provide reliable fixation of workpieces during gluing (for example, when making wooden frames with your own hands) or welding.
We tell you how to quickly and inexpensively assemble them with your own hands.
Homemade corner clamps for the home workshop can be divided into two main groups (according to the scope of application):
- for metalwork (welding);
- for carpentry work (furniture).
Bench bars are usually made from scrap metal and are used when workpieces need to be held in a stationary position during welding.
Carpentry is made from leftover lumber (plywood, MDF) or wood (blocks or boards). Used in furniture assembly or in the manufacture of other wooden structures.
The necessary materials for making homemade corner clamps with your own hands can be easily found in the workshop and garage - use what is available.
Structurally, both options are not particularly different. They consist of three main elements:
- base;
- persistent shelves;
- clamp
The clamp of the corner clamp itself can have a semicircular or triangular shape. Driven by a lead screw.
What is an angle clamp?
In most cases, duralumin is used in the manufacture of the main part of the structure. That is why it is characterized by high strength. Ease of use is ensured by the presence of special fasteners. Among the features of the corner clamp, we note the following points:
- In most cases, the tool is used for parts such as frames, as well as various corners and similar structures.
- A situation often occurs when, when assembling furniture, individual elements are fixed. This is required when applying glue and carrying out other similar work.
The corner clamp is purchased by mechanics and layout designers. At the same time, such equipment is also useful when working in a private workshop. The structural elements can be called the following:
- Clamp with two elements acting as a stop.
- A block characterized by increased mobility.
- Lever mechanism, which ensures the transmission of high force.
- A screw that is used to clamp a moving part in a desired position.
- Runners for a device designed for weaker clamping of the workpiece.
Knowing the basic elements of a corner clamp, you can make it yourself. In this case, a variety of materials can be used, most often metal, characterized by increased resistance to high humidity.
How to do which
Any of the clamps described above can be made independently in a home workshop. Carpentry clamps are made of metal - the wooden frame and jaws of the tool will not withstand the back pressure of the material of the part(s), the clamp will weaken during operation, and the clamp itself will become unusable. With welded and soldered clamps it’s already clear: only metal; wood is a flammable material.
Carpentry clamps for working with valuable wood or products are best made of wood, but you can also use metal ones with spacers made of plywood or even shingles. It is better to use wooden clamps for gluing into a layer (on thick workpieces from several thin ones), even if metal or plastic is being glued - wooden jaws provide a more uniform distribution of pressure over the plane and, accordingly, better gluing quality. Fragile parts (glass, etc.) are compressed for gluing only with wooden clamps.
G-shaped
The frames of factory-produced G-clamps are cast. It is impossible to organize a steel foundry in a garage or barn, even in a forge on your own property. Since G-clamps, being the most “graspy” ones, are used mainly in metalworking and welding work with rather long and/or heavy parts, a homemade G-shaped clamp must be made of welded or solid metal.
Craftsmen often weld themselves clamps from sheet steel, pos. 1 in Fig.:
Apparently, copying the profile of the frames of factory products, which in this case is incorrect. Profiles of cast frames of clamps are shown in pos. 2. Pay attention to the fairings and fillets (shown by arrows). Smoothing the profile is necessary to avoid the concentration of mechanical stress: they “love” corners and crevices, like bed bugs. But the weld does not work like a fillet! No, the clamp most likely will not break or bend. However, the recoil of the clamped part will move the frame a little, and it will be difficult to achieve precise fixation, and it is possible that the part may rotate when the clamp is tightened.
Homemade clamps made from channel sections are quite reliable (item 3). Disadvantages: labor-intensive, disproportionately heavy compared to the working width. You can cut a channel into clamp frames if you need to compress the parts very tightly. The best option for clamp frames for normal work is made from a square profile pipe, pos. 4. Depending on the size and wall thickness of the workpiece, clamps from corrugated pipe can be made for a working width of up to 1 m or more.
Quick-clamping
Pistol type clamp. When the trigger is pressed, the jaws move apart. By releasing the locking screw, you can change the gap between the jaws. The clamping force is small. You can make it yourself, but it is not economically profitable. It's a lot of work, but it's inexpensive.
Clamp in the form of a caliper
Devices that are shaped like calipers are used to firmly hold small parts. For a homemade clamp, you will need, as before, plywood and small thickness bars.
For screws, it is best to take studs with rectangular or trapezoidal threads. The thread pitch is 2 turns per cm. It is very good if the stud has a rear sight on one side of a slightly smaller diameter than the thread. It can be used to seat the handle. On the other hand, a rear sight with a slightly larger diameter to accommodate the bearing is desirable.
So, in the simplest clamp, one end will be stationary, and the second will move through a worm gear.
To release the workpiece, you need to move the bracket to the required distance and turn the knob a few turns. This will fix the element. After this, you can release the mechanism and the workpiece will be released.
The simplest version of this model is equipped with a rail structure. The guides, which are arranged in parallel, have cut grooves at equal distances. Fixed stops are secured using rods made of metal. They can move exactly along the width of the workpieces. At the end of the beams, fixed stops should be installed, which have a worm mechanism. The usual method is to clamp it with a hairpin and a furniture nut.
Self-clamping option
For gluing parts, it is better to choose the simplest clamp model, which has an F-shape. The stores sell various models that consist not only of wood, but also of metal. The cost of such instruments is high. Therefore, many craftsmen prefer to make them with their own hands.
For small jobs, a cam-type clamp is ideal. For example, if you need to glue small parts or fix workpieces. This model works in the same way as the f-shaped element. The tool includes 2 jaws and guide bars. Sponges: movable and fixed. For reliable clamping, it is necessary to fix the workpiece well and rotate the cam 90 degrees.
You can make such a tool yourself with a minimum set of tools and materials. Before you begin, you should draw a drawing of the product. You can use any material for manufacturing, and also change the standard sizes as you wish.
The tire is made of wood or metal. Small bolts and rivets can be used instead of metal pins. It is recommended to make movable and fixed jaws at the same time, since they mirror each other. Their width and length can be changed to increase the grip of the product.
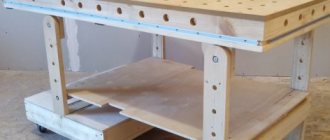
For gluing boards (boards)
Clamps are needed for fixing sections, which, after the glue has dried, are used for furniture panels. Such products differ from simple ones in their length. In other words, they have a large jaw span. If you buy such material in a store, you will have to pay a decent amount. Therefore, craftsmen prefer to make clamping mechanisms themselves.
Types of clamps
There are several types of clamps that can provide reliable fixation of workpieces. All of them are divided into three main categories:
- Simple ones are designed to fix the product relative to the working part of the workbench.
- Angular ones are characterized by a design that allows you to fix two parts relative to each other in the required position.
- Volumetric ones are characterized by a more complex design that allows the fixation of three workpieces relative to each other in the required position.
The first type is characterized by a C-shape, which has a special bracket with a threaded clamp. The workpiece can be very different - plastic, wood, metal and many other materials. The second type is extremely common, as it is required to perform large, similar jobs.
Factory devices are very expensive, but are characterized by higher performance characteristics. The corner version is made on the basis of a simple design. The main characteristics, as well as strength, largely depend on the type of material used.
Materials and assembly steps
In order to make tree clamps, you will need the following elements:
- beech or birch block;
- feather drill;
- pipe 2.5 cm;
- mortise nuts of suitable diameter;
- a nut that has a rounded knob (used for decoration);
- a cutter with a diameter of 2.5 cm and a long pin.
The basis of the material is a pipe, from which a piece of the required length is cut. Depending on the size of the jaws, it is necessary to cut the block. The pieces should be from 15 to 20 cm. For free movement of the timber along the pipe, a hole with a diameter of 2.5 cm should be made at a distance of 2.5 cm from the edge. Parallel to the hole, a cut should be made from the same end. To fix the sponge on the pipe, connect the hole to the end.
For the driving nut, you need to drill an additional hole on the side of the cut. You need to drive a nut into it and tighten it with a bolt on the back side. To fix the sponge, clamp the pipe in the hole. To move the pipe, you need to unscrew the bolt, then move the element and repeat all the steps again.
The lower clamping part has 2 jaws; it is slightly larger than the upper one and has an additional nut. The structure of both parts is identical. An additional driving nut is located at the opposite end of the pipe into which a stud with a wing nut is installed.
In the second collapsible moving part there are no clamping parts such as cuts and nuts. The dimensions of such an element are also rather large. In this part it is necessary to make a recess for the stud device.
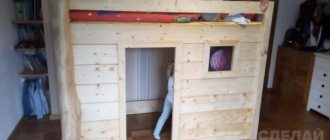
Plywood clamps
When assembling furniture, chipboard sheets are often used, which are considered a very common material. They can be fixed relative to each other at right angles. To carry out such work, you need a tool that can be assembled independently. A plywood clamp is created using the following materials:
- The base is made using plywood or chipboard, the thickness is about 8-12 mm.
- The emphasis is created by using rectangular or square timber from various types of wood.
- You will also need a hacksaw for the job.
- A drill with various bits is also required.
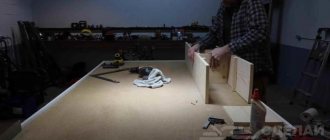
After finding all the required materials and tools, you can begin directly assembling the mechanism. The sequence of actions is as follows:
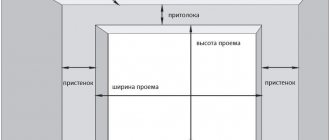
- From plywood, two triangles with legs are created, the length of which is 30-40 cm. In this case, it is important to maintain an angle of 90 degrees between the sides of the triangle, since otherwise the resulting product will be characterized by low accuracy.
- A hole is drilled in each corner of the created blanks. Their size is selected in accordance with what clamps will be used.
Having created the product in question, you can begin to use your homemade design. Due to the use of a metal fixing element, high reliability of fastening is ensured, since even a slight displacement of the workpiece can lead to serious defects.
Blueprints
A drawing of a homemade rectangular clamp for welding has the following dimensions.
- Running pin – M14 bolt.
- The collar is a reinforcement (without figured ribs, a simple smooth rod) with a diameter of 12 mm.
- Internal and external clamping parts - professional pipe from 20*40 to 30*60 mm.
- A running strip of 5 mm steel – up to 15 cm, with a section width of up to 4 cm – is welded to the main plate.
- The length of each side of the corner of the outer jaws is 20 cm, the inner jaws are 15 cm.
- A square sheet (or half of it in the form of a triangle) - with a side of 20 cm, the length of the outer jaws of the clamp. If a triangle is used, its legs are 20 cm long, a right angle is required. The sheet section prevents the frame from breaking its right angle; this strengthens it.
- A box-shaped assembly at the end of the sheet steel strip guides the movement of the clamp. It consists of square pieces of steel 4*4 cm, to which lock nuts are welded.
- Triangular strips reinforcing the moving part are welded on both sides. They are selected according to the size of the internal free space formed by the pressure jaw on the side of the lead screw. The running nut is also welded to it.
So, to make a rectangular clamp you need:
- sheet of steel 3-5 mm thick;
- a piece of professional pipe 20*40 or 30*60 cm;
- M14 stud, washers and nuts for it;
- M12 bolts, washers and nuts for them (optional).
These are used as tools.
- Welding machine, electrodes. A protective helmet that blocks up to 98% of arc light is required.
- Grinder with cutting discs for metal. Be sure to use a protective steel cover to protect the disc from flying sparks.
- A hammer drill with an adapter head for conventional metal drills or a smaller electric drill. You also need drills with a diameter of less than 12 mm.
- A screwdriver with a wrench attachment (optional, depending on the preference of the master). You can also use an adjustable wrench for bolts with heads up to 30-40 mm - such wrenches are used, for example, by plumbers and gas workers.
- Square ruler (right angle), construction marker. Non-drying markers are produced - oil-based.
- Cutter for cutting internal threads (M12). It is used when there are solid pieces of square reinforcement, and additional nuts could not be obtained.
Angle Clamps for Metal Workpieces
The use of a clamping device is also possible if it is necessary to ensure reliable fixation of metal elements. Also, for fastening metal parts, corner clamps are used, made using metal. This is due to the fact that metal workpieces must be fastened more securely, since serious stress occurs during processing.
It is worth considering that a metal corner clamp is made in the same way as a wooden one.
In this case, sheet metal is used as a base, the thickness of which is 8-10 mm. To significantly increase the fastening, individual elements are welded.
Useful tips
The clamp, like any other tool, must lie in the designated place. You can use a shelf in your garage or a toolbox for this. If you don’t have time to make a tool, then you can use your own ingenuity. It is easy to fix the round workpiece on the rings that are pre-stuffed onto the frame. The simplest clamp looks like a pair of bars wrapped in tape. In such a tool you can clamp a pipe or metal rod.
Benefits of the tool
The tool in question has a fairly large number of advantages. The main ones are the following:
- Long service life. As practice shows, an angle clamp can last for several years, the main thing is not to apply critical force. Otherwise, there is a possibility of deformation of the main elements.
- The device is reliable. When the device is used correctly, the possibility of workpiece displacement is eliminated.
- At the time of work, reliable fixation of the workpieces relative to each other is ensured. This ensures the most favorable conditions for processing the workpiece.
- Wide range of applications. In some cases gluing is carried out, in others processing.
- Relatively low cost. Even industrial mechanisms are inexpensive. At the same time, there are simply a huge number of different versions on sale.
- Possibility of assembling the structure with your own hands. Due to this, you can save a lot, since improvised materials are used during the work. A homemade mechanism is practically not inferior to an industrial one, and is also characterized by a wide range of applications.
In general, we can say that there are simply a huge number of different advantages that determine the spread of corner clamps.
Operating principle
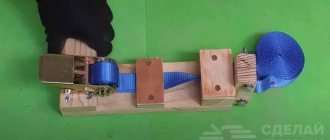
The principle of operation of the clamp is very simple. It is necessary to separate the jaws so that they are separated from each other at a distance of 3 cm greater than the width of the shield that will be installed. Next you need to fix them on the pipe. To do this, tighten the nuts that are located at the edges. The blanks must be placed on the tubes and sealed with glue. Then they need to be pulled together by rotating the “lamb”.
If you know how to use a grinder and a welding machine, you can make the same clamp for gluing wood from metal.
To maintain the plane of the plot with tubes, it is recommended to arrange the clamps in a checkerboard pattern. The main advantage of such a tool is its ease of manufacture and operation.
Purpose
The corner clamp has become very widespread. In this case, the main purpose is only one - fixing the workpieces relative to each other. Among the features we note the following:
- When machining, reliable fixation must be carried out. Otherwise, there is a possibility of a significant reduction in the quality of the resulting surface.
- The angular design provides strong pressure and reliable fixation of the two elements when gluing them together.
The design of the clamp may differ slightly, it all depends on the specific case. When fixing fragile materials, an elastic gasket is used, which eliminates the possibility of damage to the surface layer.
Terms of use
There are several different rules regarding the use of the device. Among the features we note the following:
- Care must be taken to ensure that the surface is completely adjacent to the working part of the tool.
- When clamping, pay attention to the force applied. Too high an indicator causes damage to the surface layer.
- Do not forget that the corner clamp itself must also be securely fastened when machining the workpiece. Otherwise, the processing becomes significantly more complicated.
The simplicity of the mechanism means that it is quite easy to use. You don't need to have any special skills.
How to make a carpenter's clamp with your own hands, step-by-step instructions with drawings?
If you need to reduce costs, a do-it-yourself corner clamp can be created from various available materials. On the Internet you can find quite a large number of different drawings according to which the device is assembled. It is worth considering that it is important to choose the right material. An angle clamp for welding can only be made using metal, since the hot alloy can damage the wood. To make a corner clamp, which will be used when assembling furniture, the following materials are required:
- Plate.
- Two bars.
- Bolts made of corrosion-resistant metal.
- Self-tapping screws.
- Some tools that are often found in a home kit.
For assembling furniture, a homemade design is only suitable when using soft sponges, which eliminate the possibility of damage to the surface layer. Assembly recommendations are as follows:
- Two long slats are placed on the desktop, one with an edge, the second with a wider part.
- Using a drill, several holes are created that are required to connect individual elements.
- One of the plates is attached to the bottom of the block, after which the second is fixed in parallel. The gap can be adjusted using a self-tapping screw.
- A hole is drilled at the ends and a plate is attached to them. An angle of 90 degrees must be strictly maintained between individual elements.
On the Internet you can find a drawing and specification that are used when making your own corner clamp. When considering how to make a corner clamp with your own hands, we will pay attention to the fact that all individual elements must be fixed relative to each other with high precision.
In conclusion, we note that it is practically impossible to do without the device in question. At the same time, it is inexpensive and can last for a long period. It is recommended to purchase metal with increased protection from moisture, since corrosion can significantly reduce the service life.
Manufacturing technology
A do-it-yourself metal clamp is much more reliable and practical than a wooden structure. To manufacture homemade units, you will need welding equipment and plumbing units.
Tools for making any type of clamp
1 option
Following the instructions, you can make a homemade clamp from metal reinforcement.
Let's start:
- We cut the reinforcement into separate elements to begin making the jaw for fixation, as shown in the photo with instructions.
- First we make the sliding part and add a nut to the moving arm.
- Then we begin to make a screw and a rotating stand for turning.
- We cut a thread in the rod, then construct the shoulder.
- The final stage will be the manufacture of handles and panels on the jaw.
Option 2
To make a corner clamping tool with your own hands, we will need the following materials: steel scraps from a corner 40*40, 50*50 and 30*50 200 mm each, 2 F-shaped clamps and a strip 10*50 to 250 mm long.
Let's get started:
- Using a construction locksmith angle, we place all the parts as in the photo.
- We turn the corner face down and weld the strip to the corner.
- Then we weld a clamp to the base to make the structure more secure.
Purchasing clamps in hardware stores is quite expensive. Everyone wants to save themselves from unnecessary costs if there are alternative options. You may need several such tools at once, this is especially true when assembling, manufacturing or repairing pieces of furniture. Homemade clamps will replace your hand vice, as you can choose the model, type and size of the tool. By following the instructions in the photo and video, you can quickly understand the manufacturing mechanism and quickly make a manual clamp from scrap materials.