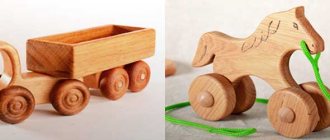
Accessories for hand router
How to make picture frames with a hand router
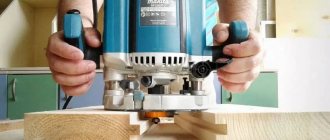
Creating frames for pictures and photos is one of the easiest ways to make woodworking products. These are several wooden slats cut using a cross-cutting jig and joined together to form a frame. First of all, in any frame the main role is played by the profile of the shaped part of the rail. To make the profile of the slats, we will need a milling table and a set of standard cutters. Next, we will consider ways to form various profiles for the slats of future frames.
This frame (see photo above) is one of the popular models because it is basic and looks attractive. The milling sequence is shown in Fig. 1-4.
The frame described above provides a good basis for creating many options, see fig. 5-6.
Simply forming profiles with a router and gluing them together will help create the option shown in the photo below. Here the strip is made of contrasting wood, see fig. 1-4.
You can add a different color to the frame using a frame of the desired color. In the photo below, a stripe painted with gold paint has been added to the inside of the frame to highlight the inner edge of the frame, see fig. 1-4.
You can give the frame a nice, smooth look by rounding the edges of the rail and creating a merging effect, see photo below. Increase the width of the rail and this frame will be good for large paintings or photographs, see fig. 1-4.
Even in small frames, you can add a contrasting strip (insert) for decoration. The second strip creates a cutout for photos, paintings and glass, see fig. 1-4.
It's hard to find a home or office that doesn't have space for paintings and photographs. But simply attaching a photograph or a masterpiece of art to the wall will be ugly and absurd. It is precisely in order to frame photographs and paintings that frames were invented. With their help, you can refine the interior and add comfort to the premises. Nowadays there are millions of frame options in stores, but it is not always possible to find what suits your home. That is why we will tell you how to make a frame with your own hands, while spending a minimum of money and effort. You need to start by choosing a design for your future craft.
Material selection
There are no special restrictions on the material. The only thing that remains unchanged is the base on which the decorations will be glued. It should be dense, strong and not get wet from glue. Thick cardboard and, of course, wood work well for the frame. Moreover, the wooden frame itself is already a completed craft. It can be varnished and will be appropriate for any interior. You can decorate the product with any available means. This could be pasta, pebbles, clothespins, buttons, beads. But do not forget that the chosen material should complement the picture. So, for example, shells will go well with a seascape, and a frame of pasta with the addition of cereals will be perfect for the kitchen.
Let's look at the two main materials from which frames are most often made - wood and polyurethane foam.
How to choose a cutter for a CNC milling machine?
Tool selection begins with the type and diameter of the shank - it must match the spindle taper and collet diameter. High-speed and high-performance machining on CNC machines requires durable high-speed steel tools.
Purpose and assigned tasks
Milling cutters for a CNC wood milling machine are classified according to the technological operations performed:
- roughing;
- cutting grooves, grooves, depressions and grooves;
- finishing corners from the ends;
- finishing treatment of the entire surface;
- creation of three-dimensional drawings.
Peeling is carried out with a multi-blade tool with an intermittent blade arranged in a spiral. Grooves and grooves are cut using cylindrical and shaped tools, in shape and size corresponding to the sample configuration.
Finishing is carried out with a carbide multi-edge tool with cutting edges along different planes. The patterns are created using cutters with a conical end similar to a drill. Spiral blades, 2–4 pcs.
Rules for working with material
In advertising production, for cutting soft wood and plastic, cylindrical cutters for a wood milling machine with one spiral cutting edge are used. When processing these materials, large chips are formed. With more blades, it will clog the grooves and break the tool. Hardwood, plywood and wood-based panels are processed with two-edge tools.
High-speed milling of hard and brittle materials is carried out using cutters with 2 or more blades. Crushing of chips and their removal from the cutting zone is ensured by special grooves with increased depth. To obtain a clean cut on wood and soft materials, use a two-edge spiral cutter. Due to the symmetrical arrangement of the cutting edges, the stresses arising during cutting compensate each other.
When cutting wood, plywood and other fibrous materials, lint forms on the cut surface. You can get a clean, smooth surface by using left-hand helix wood router bits. When rotating to the right, the chips are removed downwards, the fibers are cut evenly, without “fluffing”.
Milling cutters for a wood milling machine of different types and configurations increase the number of operations performed on a wood milling machine and turn it into multifunctional equipment. A specialist who is seriously involved in the manufacture of furniture and wooden crafts has a large number of different tools in his stock. It quickly and efficiently cuts out any part elements.
Wooden frame
Wood is a classic material used to make picture frames. Such designs are durable and fit almost any picture and room design.
To make a wooden frame, you don’t have to go to the forest to get wood, then process it and cut out the planks. You can go to a hardware store and purchase wooden skirting boards there. They are perfect for a product like this.
What you need:
- Wooden plinth. Its length and width should correspond to the size of the picture. Therefore, be sure to measure the picture before buying a plinth and do not forget that the frame will be longer than the canvas.
- Well sharpened knife.
- Scissors.
- Sandpaper.
- Furniture glue. PVA will do.
- Hacksaw.
- Small nails.
- Hammer.
- Ruler. It would be better if it was angular.
- Cardboard or plywood.
What to do:
For a richer look, you can use carved wooden baseboards. Their price corresponds to their appearance, so you will have to pay a decent amount for such material for the frame, but upon completion of the work it will be worth it.
Polyurethane foam frame
For women, “polyurethane foam” sounds threatening, but there is no need to be afraid, because it is ordinary polystyrene foam, only stronger. Ceiling plinths are made from it, which are now used to renovate apartments. Their price is low, but the variety of patterns is impressive. There is no difference in manufacturing with wooden baseboards. But don’t forget that this is not wood, so you should handle polyurethane foam more carefully. Any blow can lead to dents, or even break the entire structure.
What you need:
- Ceiling plinth.
- Hacksaw or sharp knife.
- Glue.
- Ruler.
- Plywood or cardboard (depending on the size and strength of the catrina).
Contemporary artists often sell paintings without frames. They believe that a person has the right to choose which frame to use, and whether it is necessary at all. In specialized stores you can buy ready-made picture frames, but they are of a certain size. And if the canvas does not correspond to them, then you will have to somehow get out of the situation. The best option is to do everything yourself, because it is not difficult. This way a person will receive a decent frame for a picture of the required size, as well as a design that, in his opinion, suits him perfectly.
Now we will describe in detail how to make a picture frame with your own hands from wood. This is classic material. The first frames began to be made from it back when fine art was just in its infancy. Therefore, let's start with it.
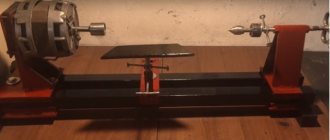
Preparing cutters and slats
Profile manufacturing begins when cutters and material are available.
Prepared material and cutters.
Milling cutter preparation stage
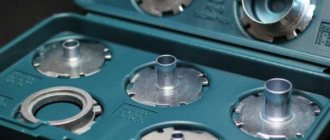
To produce the intended profile, 3 cutters are used:
- groove fillet cutter with a diameter of 20 mm;
- two edge molding cutters with bearings with diameters of 32 mm and 35 mm.
Cutters for a given profile
The dimensions of the cutters are checked with a caliper.
Measuring a cutter with a diameter of 32mm
Measuring a cutter with a diameter of 35mm
The stage of preparing slats for a wooden cornice
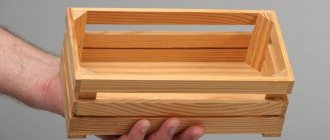
The profile will consist of two glued figured slats.
Glued profile
To get a beautiful profile, you need narrow and wide slats.
2.1. A narrow rail is made measuring 21 x 34 mm
Measuring narrow slats
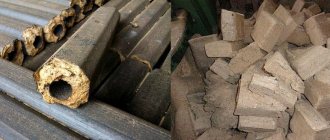
For a narrow strip, ash trimmings of lumber are used. A wane is a section of a tree with remains of bark. At this point the board is stronger than at the core.
Wane billet
A lath of the required dimensions is obtained when a workpiece 23 mm thick is driven through a thickness planer. The machine makes the slats the same thickness along the entire length. Planed along the grain, the lath becomes very smooth.
A chamfer is selected in place of the bark. After processing, a high-quality strip is obtained, since under the removed bark there is the highest quality part of the tree.
Chamfer selection location
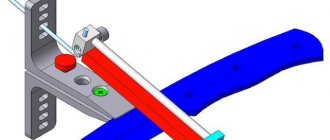
To get a shaped edge, use a 35 mm shaped cutter. During milling, the support bearing of the cutter moves along the surface of the rack, so there should be no unevenness or potholes on it. If this condition is not met, the profile will be damaged.
Before milling, the rail must be secured in the machine, since for safety reasons it is impossible to hold the material in your hands when processing with a manual milling machine.
Milling a narrow strip
2.2. The wide rail is made with dimensions of 47 x 17 mm
Measuring the dimensions of a wide rail
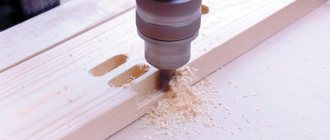
To have 2 fillets on a wide lath, take a 20 mm fillet cutter. This cutter selects straight semicircular grooves.
Fillet cutter for two grooves
After passing through the fillet cutter, two grooves appear on the wide lath. The outermost fillet is made in such a way that during its rounding, the support bearing of the cutter moves in the center of the fillet.
Choosing a location for fillets
Two fillets on a wide strip
At the final stage of preparing a wide lath, the outermost fillet is rounded with a 32 mm milling cutter.
Rounding the extreme fillet
Selection and quality of material
First you need to select the slats. The wood for their production is not cured in a certain way, so in places where there are knots, cracks and unevenness appear when the material subsequently dries out. It is for this reason that you need to carefully select material that does not have flaws. However, if in the design of the frame you need to show the structure of the wood fibers, then it is better to make the slats for the baguette yourself. This type of production of picture frames requires seasoned wood, only the knots in it do not have cracks, because it was dried using a special technology for a year.
Tools for creating corners when cutting baguette
Wooden picture frames must have right angles, unless, of course, their shape is to be traditional. It is very difficult to saw a baguette and maintain the exact degrees of its angles. To do this, it is better to use a special device such as a miter saw. It is not cheap, but the result justifies the money. But still, how to make a picture frame with your own hands without a special machine? If engaging in such production is not part of your plans, then buying such an expensive tool is not advisable. Therefore, it is better to purchase a miter box for sawing baguette. If you still can’t cut out the corners perfectly, you can always refine them using sandpaper. It will allow you to carefully sharpen the corner so that everything fits together.
Gluing the frame and the tools needed for it
Now the manufactured frame parts need to be glued together. Titebond II glue is ideal for this; it has been tested by many woodworkers. It is very important to clamp all parts of the frame tightly. To do this, use a special tool - tape clamps. They allow you to tighten all parts of the frame evenly and tightly and maintain perfectly right angles. This simple device is easy to use, even if you are making a picture frame out of baseboard. And it doesn’t matter whether it’s plastic, foam or wood. The most important thing is to initially cut out even corners. You can fasten the frame without glue; for this, metal corners are used that are driven into the joint. However, such fastening is not as reliable as gluing.
Frame Surface Finish
We understood in detail how to make a picture frame with our own hands, and now as for decorating it and covering it with a protective composition. For this purpose, stain and varnish are used. If you need to achieve a dark color, cover it with stain and then varnish. When they want to leave the natural color of the wood, they take a transparent varnish - then all the fibers seem to stand out a little, creating a great look. If you want to add color to the frame, for example, make the wood pinkish, then you can add a little potassium permanganate to the varnish. All compounds that are applied must be of the highest quality. If you take cheap ones, you can easily damage the frame. If everything is applied to the surface using a spray gun or airbrush, then the risk of damage to the product is reduced due to the finest spray.
Creating a carved frame
First of all, the image that is going to be cut is drawn or translated on the blank. After this, it is cut out with a jigsaw. Well, then they begin the most difficult part - wood carving. This process cannot be described in words; it can only be comprehended in practice. It is better to start with simple drawings and gradually move on to more complex ones. Now about the tree. For carving, only seasoned material from soft rocks (for example, linden) is taken. All other processes are identical to the above.
The presented picture frames, the photo of which clearly displays all types of their coatings, as well as the main shapes, look simply amazing. The main thing is to want and try.
We fully understand how to make a picture frame with our own hands, now all that remains is to assemble all its parts. To do this, you need to place the frame face down on a clean surface and insert everything in the following sequence:
- glass;
- painting;
- piece of cardboard.
After this, you need to secure everything with nails driven into the frame. This is quite a responsible process, so it is worth dwelling on it in detail. To successfully fix a picture in a frame, you need to be careful and careful. After all, making picture frames is a rather labor-intensive process, not to mention painting canvases, so you need to do everything perfectly.
We attach the nail to the frame with light blows. It should press the cardboard, picture and glass tightly enough. Then a ruler is slipped under this baited nail. Place the head of the hammer on top and, carefully sliding along the surface, make blows until the nail is driven deep enough so that it can hold everything tightly. In this way, all the nails that are necessary to tightly hold all parts of the picture are driven in.
In this article, we examined in detail how to make a picture frame with your own hands and assemble it. All that remains is to do everything in a practical way and get what you want.
All photos from the article
If you have a lot of photographs or any paintings and other compositions that you would like to hang on the wall, then you can’t do without frames; any of the above options will look much better with them. The cost of ready-made options is quite high, but if you wish, you can make frames on your own, which is what this article will focus on.
About frame design
A picture frame should highlight the image in its surroundings and draw attention to it. In some cases (see below), the frame aesthetically coordinates the image with the surroundings, but in no case is it an integral part of the composition semantically, i.e. The meaning of the image should remain the same with or without a frame. Therefore, the “hyperdesign” of picture frames (see figure) is only permissible in one single case: if the semantics of the picture are so weak that without a frame it escapes the viewer’s attention altogether. Simply put, if the picture is a product of bad taste and without a frame, it is not worth more than a fleeting glance. This does not concern the purely physiological aspects of its perception, but then we should no longer be talking about the art and artistic value of the image - “interestingness” can also be different. Such reasoning may seem sophisticatedly aesthetic, but quite specific ones directly follow from them, incl. technical requirements for the picture frame.
Picture frames that distract the viewer from the meaning of the image
Baguette profile
Even ancient cabinetmakers figured out the easiest way to concentrate the viewer’s attention on the picture. To do this, a sufficiently wide baguette for the picture should rise smoothly from the image carrier outward. This is also a physiological way of attracting attention, but without “switching on” base instincts. Since primitive times, it has been common for man to peer into all sorts of holes: after all, there may be edible prey, water, or danger lurking there. Children do not immediately lose their original spontaneity of perception of the world, which is why they are tempted to look into wells, caves, utility hatches, drainage pipes, etc.
However, a hole that is too deep suggests something more dangerous than useful - what you need in it is difficult to access, and the danger may turn out to be too big and biting or poisonous. Therefore, the same old-time masters, through trial and error, determined the optimal camber of the sides of the baguette: the tangent to the envelope of its profile at its lowest internal point should form an angle of 15-40 degrees with the image plane. the wider the baguette is compared to the picture, the larger this angle can be, but there is no more or less exact formula, this is a matter of taste and skill of the master. Such a frame forms around the image something like the eyepiece of a large telescope, through which the viewer examines another world - in the picture.
Note: a correctly profiled baguette also performs, so to speak, an aesthetic and protective function - it softens or completely eliminates glare and natural shadows in the picture under oblique lighting.
As for the outer edge, there are 2 options. If the picture is placed on an aesthetically favorable background (not overly bright and variegated), then it is better to make the outer edge of the baguette also beveled at an angle, generally approx. twice the size of the internal one, pos. 1 in Fig.:
Correct and incorrect profiling of a baguette for a picture frame
If the picture needs to be highlighted more strongly against the background, then one of the options is a baguette hanging slightly from the outside, pos. 2, so it will obscure the brightly lit background directly next to the picture, and the background on the shadow side will not “clog” the image so much. In industrially produced baguettes, a manually labor-intensive, but in every sense optimal solution is used - a concave profile of the outer edge of the baguette (see profiles of MDF baguettes in the figure above).
In any case, it is unacceptable, firstly, any overhang of the inner edge of the frame over the image (positions 3 and 4 in the figure) - a shadow edging on the picture will sharply reduce its visual appeal. Secondly, the straight high outer edge of the frame (item 5) - the picture “in a box” will receive some added utilitarianism, most often inappropriate. The only exception in this case is deep modular compositions. They don’t look good at all in wide “flattened” frames, and then you still need to make a “box”, but paint or trim the outside so that it blends better into the background.
Picture in frame with “milk”
The “milk” in the frame of the picture is more akin to the “milk” of a shooting target than to the milky shot in cinematography. In our case, “milk” is a semantically empty field between the outer edge of the image and the inner edge of the frame. Simply – the inner frame of the picture.
Most often, a frame with “milk” for a picture needs to be made if the backgrounds of the picture and the surrounding ones are close to each other in brightness and color tone, on the left in Fig. If the picture as a whole is light, then its internal frame can be dark to pure black or light to white; if it is dark, then only white.
Examples of paintings in frames with internal framing
In the center in Fig. - an infrequent, but interesting and difficult case to solve aesthetically. An additional fragment (a blue vase) that perfectly harmonizes with the main semantic elements had to be placed near the so-called Golden Ratio Zone - the area in the image that most attracts the eye. To “drag” the viewer’s attention to the daisies, the author found a non-standard solution - he painted a narrow slatted frame to match the vase. According to the physiology of visual perception, the viewer’s attention in this case is in the position of Buridan’s donkey, but the “carrot” under his nose – a bouquet in a vase – prevents him from dying of hunger between two identical armfuls of hay. However, without the “milk,” the frame and the vase would have formed something semantically common, which the artist did not intend and which would have spoiled the painting. The internal frame of a contrasting blue, but much duller and paler tone solves the problem - the blue elements do not tire the eyesight, but the vase, due to the fact that it is almost in the golden ratio, is not lost from view. In general, this is the same case as mentioned above - the frame emphasizes the meaning of the image without changing it.
The second case (on the right in the figure) is even more complex and subtle; This is already the highest aerobatics of image framing. What is obvious about it is that a ceremonial portrait without a magnificent frame is no longer a ceremonial portrait. If the picture depicted a white woman, there would be no need for “milk”: powder her face, put on jewelry, and a bright light main semantic spot is exactly where it is needed according to the rules of the central vertical composition. The “milk” tone in the overall image tells the viewer’s subconscious that the frame here is only a symbol of etiquette, and the essence is expressed in the lady on the canvas. But why exactly in the tone of the image? And why is it made quite monochromatic, and not in contrast to the color of the model’s skin? These are, unfortunately, too complex questions for detailed analysis here. Just look closely at the same picture next to it, on a white background. Even from a small-scale JPEG it is noticeable that the character’s facial expression is somewhat different here and there. And if on white we see just a posing model, then in a frame with “milk” to match the color of the skin on the face, a certain hidden essence is revealed. And no photoshopped photos - just copied to the clipboard and placed next to it on white. This is what the internal framing of a framed painting can mean.
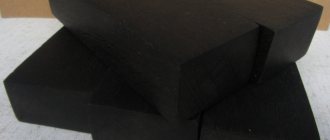
Material for “milk”, and not only
Front (smooth) side of rough fiberboard
The inner frame of the picture is in the center in Fig. above (probably together with the subframe) seems to be made from rough fiberboard. Its smooth side is just the right tone and finely textured, like wood that is always pleasing to the eye, see fig. on right. White fiberboard for the backs of furniture is no worse than ordinary “milk” for paintings; Any fiberboard can be easily painted or covered with textured self-adhesive. According to its mechanical characteristics, fiberboard is suitable for the manufacture of almost all elements of the load-bearing part of a picture frame. Fiberboard does not generate dust, does not stain anything, does not emit toxic fumes, and can be cut with a mounting knife. It’s a little difficult, really - to cut through a 4-mm slab, you need 3-5 passes with a fresh, never-used blade. But no dust, no sawdust or shavings, no noise or rumble. In general, fiberboard is an excellent material for a picture frame, which is what we will now do directly.
What do you need for work?
Let's figure out what materials and equipment will be needed when carrying out the work:
| Wooden elements | These can be a wide variety of options: from slats and remnants of plinth or platband to any other similar materials. If you want to create a very skillful product, you can purchase ready-made wooden baguettes and use them |
| Saw and miter box | With this simple kit, you will be able to file joints at a perfect 45-degree angle, so the joints will be of the highest quality, which has a very positive effect not only on the reliability of the products, but also on their appearance |
| Carnations and glue | Connections can be made in two ways: either using finishing nails and reduced heads, or by using wood glue, which can also provide good reliability. If very high strength is needed, then the options can be used together |
| Special clamp | If you are going to make frames more than once or perfect quality is important to you, we recommend purchasing this type of equipment, since with its help you can press the parts very well when gluing, while maintaining the ideal geometry of the structure |
Important! And don’t forget about paints and varnishes; a wide variety of options can be used – from varnishes and impregnations to stains, and special compositions to give products an antique look with gilding and patina.
Mounted: features and classification
Attachment cutters for a wood milling machine consist of a working part with cutting edges on the outside and a hole for mounting on a mandrel. The main advantage of this design is the saving of metal per shank for each cutter.
Prefabricated
A design feature of prefabricated shell cutters is that the cutting edges are bolted. Advantages of tool models:
- do not require labor-intensive sharpening;
- quick change of cutting plates;
- the ability to install elements of different configurations on one body;
- minimal consumption of materials;
- precise diameter adjustment;
- long service life.
The disadvantages include the likelihood of the knife flying out during overload and high-speed processing.
Important!
Prefabricated cutters for a wood milling machine have a complex configuration and high strength. They are widely used in processing hard wood and non-ferrous metal alloys.
Composite
In composite cutter designs, the cutting elements are not removed. They are soldered to the body and perform only one type of processing. It is not possible to change the dimensions and processing configuration. Features of composite models include:
- rigid fastening of cutting edges;
- saving of carbide materials;
- high blade durability;
- the ability to create blocks of several cutters of different diameters.
The cutting edges gradually become dull. Sharpening is done by backing in a complex configuration. At the same time, the dimensions of the cutter for a wood milling machine change - the diameter decreases.
One body lasts a long time. As it wears out, a new set of cutting elements is soldered onto it.
One-piece
Solid wood router bits are cut from a single piece of tool steel. After processing, hardening and sharpening are carried out. Advantages of the models:
- simple manufacturing technology;
- rigid, durable design;
- can have any shape;
- sharpening along the cutting edge.
In the manufacture of solid cutters for wood, tool steels are used. They are much cheaper than high speed and tungsten inserts. The disadvantage of solid cutters is that the worn-out tool is disposed of and cannot be restored.
Solid wood router bits are used for processing soft woods. On hard wood they quickly wear out and break.
The working process
Even those who have never engaged in such activities can figure out the question of how to make a wooden frame with their own hands. We'll go over the workflow to make your job even easier.
Preparing everything you need and cutting the workpieces
First of all, you need to select photographs, paintings, collages, embroidery and other compositions that you want to arrange in frames, this is necessary in order to take actual dimensions and make exactly the configuration that you need, and not to adjust the elements to a ready-made version , this is a huge advantage of homemade frames.
As for the process, it happens as follows:
- If the photo contains mats (frames made of cardboard), then they need to be made in advance and the dimensions of the frames can be taken from them. With the exact parameters, you can move on to choosing the material for manufacturing, both and other options will be suitable, you can find many blanks on sale, price which are low, they are perfect in our case;
- Next, you need to take measurements, it is important to do this carefully so as not to make mistakes, otherwise the finished product will come out crooked. Make sure paired elements are the same size;
- Cutting workpieces at precise angles used to be considered a difficult and painstaking job, but these days you can buy a miter box with a saw for little money and cut wooden elements very accurately and very quickly. The most important thing here is to use a saw with a fine tooth so that it provides the best cutting quality; the more perfect the edges, the better the elements will connect and the more attractive the finished product will be;
- Lastly, on the back side of the blanks you need to select a groove for the glass; its depth should be 3-4 mm greater than the thickness of the glass so that it can be fixed with small nails.
Product assembly
The instructions for this stage are very simple and clear:
- First, you need to connect the two elements and securely fix them, as noted above, the best method of fixation is to use a special corner clamp, with its help you will securely fix the parts in the desired position, and they will not move when dry, the geometry of the connection will be ideal;
- After gluing, you can begin further work, first of all, this is the decor of the wooden frame, here your imagination is not limited by anything, so the design style and the chosen color scheme depend only on you;
Important! You can achieve the effect of antiquity by painting the frame first with dark paint, and then with light paint, after which the top layer is wiped in some places with fine sandpaper.
- Then you need to insert the glass, behind it there is a passe-partout, if available, or immediately a photo, then you need to insert thick cardboard for rigidity and fix this entire system with nails or attach special small rotary fasteners;
- To mount it on the wall, you can attach special eyes on the back side (they can be purchased at furniture hardware stores) or drill a hole along the diameter of the fastener so that you can simply put the frame on the head of a protruding nail or self-tapping screw.
Further improvement
If you look at a picture in a frame in an engineering way, you will notice an obvious discrepancy: the stretcher, which already carries the most valuable thing - the image - is also loaded by the frame. Which can also be a non-destructive damper when a painting falls. How to eliminate the first and achieve the second? From a technical point of view, it’s trivial. It is necessary to strengthen the stiffening rib of the frame under the plaster molding, then it will become self-supporting, and the stretcher with the painting will simply lie in the frame. How to strengthen? Yes, replace the slats with timber, which is technologically no more difficult, not much more expensive and, on the whole, inexpensive. For brevity, we will call the resulting main power unit of the frame a frame, since there is already a subframe. For images on a thin base (paper, fabric, film), we use the same principles of fiberboard. Now, if a painting falls, all you have to do is lift it, check the hanger and hook, adjust them if necessary, and hang the frame with the painting in place.
For "real oil"
The construction of a reinforced frame for paintings on a stretcher is shown in section in the figure:
Construction of a reinforced frame for a painting on a stretcher
At pos. A – without internal frame; on pos. B with "milk". At pos. B – detailed section of the frame; board with timber and form a frame. The glass thickness is 4 mm, the same as a standard fiberboard. If glazing is not provided, the spacer between the board and the baguette is excluded. Foam inserts act as soft springs holding the subframe in place; wooden wedges sometimes tear the canvas, but foam plastic certainly does not. The thickness of the inserts is 3-4 mm greater than the width of the gap between the subframe and plywood gussets; material – coarse-grained packaging foam. The manufacture of a reinforced frame is carried out at the same time as it frames the picture:
- Blanks are cut out to assemble a frame from half-timbered timber using screws and glue. The inside dimensions of the frame are 2-3 mm larger than the width and height of the stretcher with the canvas. It is convenient to make cuts for joints with a metal hacksaw; it cuts wood well both across and along the grain, and the cut is smooth. Installation (pioneer) holes are drilled under the self-tapping screws with a diameter along the body of the hardware without threads and a depth of 2/3 - 3/4 of its length. For self-tapping screws 3.5x20 - with a diameter of 2.5-2.7 and a depth of 12-15 mm;
- the stretcher with canvas along the edge is wrapped with PE film;
- the timber frame is assembled roughly: without gluing, and the screws are not screwed in completely;
- the rough frame is placed on the subframe from behind (from the back), so its distortion is automatically corrected;
- Apply 2-3 drops of liquid nails or PVA into the joints and tighten the screws. A minimum of glue is also allowed on the back side so that it does not leak onto the front side of the canvas;
- when the glue sets, carefully remove the frame from the back;
- Once the glue has completely dried, install the boards under the baguette, the glass gasket and the internal frame (both if necessary);
- in plywood gussets, holes are drilled along the full diameter of the screws, and in a frame made of timber, respectively. im installation;
- put the glass in place. You can glue it along the edge with a few drops of silicone;
- glue the baguette, rub its diagonal seams and paint (see below);
- put the stretcher with the picture into the socket of the frame;
- if the painting is especially valuable in a frame with glazing, put a bag or several with silica gel in the back niche, and the entire rear is sealed with cardboard, soaked in PVA diluted 3-5 times with water, and completely dry - so that the glass does not fog up from the inside;
- lay foam inserts;
- put the plywood gussets in place. Without gluing, so that you can remove and remove the picture from the frame if necessary;
- They attach the pendant, hang the picture in place, admire it, rub their hands and say to themselves: “Oh, what a great fellow I am!”
Baguette substitutes
A factory-made frame baguette is still not cheap. As its substitutes for frames, without any special pretensions, they most often offer semi-urethane ceiling friezes (in trade - ceiling plinths or ceiling moldings) or floor plinths made of wood or MDF.
How to choose a profile for a ceiling plinth on a baguette for a picture
Polyurethane is easily processed at home, but not every ceiling frieze profile is suitable for a picture molding. From those shown in Fig. friezes at pos. are more or less suitable for this. 1 and 2, if you glue them to the board as shown there. Ceiling plinth for pos. 3, no matter how you place it, will give a large geometricized outer edge, and the painting will appear “in the box”, see above. Thin-walled friezes for LED lighting (pos. 4) along the profile on a baguette frame are most often suitable, but are fragile.
Gluing, puttying and painting of semi-retane substitutes
Semi-urethane baguette blanks for paintings are cut at the edges at 45 degrees. When manufacturing a reinforced frame using the technology described above, perfectly precise fitting to the size of the subframe is not required; A cutting accuracy of 1 mm is sufficient. Polyurethane is quickly and firmly glued to wood with polystyrene glue. It is easy to prepare it yourself on the balcony or in another well-ventilated area. To do this, add polystyrene foam granules little by little into 20-50 ml of technical (not fuel!) gasoline or kerosene until you get a composition with the consistency of sour cream. You will need a lot of polystyrene foam, and you cannot throw it all into the solvent at once: the granules hiss and foam.
Note: it is on this “self-adhesive” that homemade SIP panels are assembled. Frozen foam “self-adhesive”, unlike branded polyurethane, becomes brittle in the cold. There is no need to explain how this affects the strength, durability and safety of SIP buildings.
Any white putty is rubbed into the joining seams of the polyurethane baguette parts. After 5-15 minutes, residues (external smears, drips) are removed with a slightly damp cloth. After another day, the baguette can be painted with oil, acrylic or water-dispersed paint; alkyd enamel can corrode the material - depending on its quality, which is visually impossible to determine in advance.
A high-quality polyurethane molding with imitation wood carvings can also be painted to resemble old bronze:
- The first layer of blacksmith's patina (such paint is sold in art stores) is applied with a soft painter's brush. It doesn’t have to be an expensive kolinka, the simplest of hairs from a bull’s ear will do.
- When the patina begins to set, use a slightly damp sponge to go over the protrusions until the base shows through, without “rubbing” into the depressions.
- Using a spongy or fleecy roller, again without pressing it into the depressions, apply bronze (copper, gold, silver) metallic paint.
- The metallic that has begun to set is shaded like the patina, but not on the bumps, but in the recesses.
Note: painting with “antique metal” requires, in addition to accuracy, also solid skill, so it is better to first practice on a piece of the same baguette. Also about making picture frames from ceiling plinth, see the video below:
Video: picture frame made from ceiling plinth
An important advantage of a polyurethane baguette is the imitation of wood carving, however, if you look closely, the fake is noticeable, and the material is fragile. Substitutes for baguettes made from wood materials: natural wood or MDF look much more reliable and solid. Affordable ones are produced without complex terrain, but this is more than compensated for by durability and naturalness. A noble material is a noble material, especially since the technique of texturing MDF to imitate valuable wood has reached a high degree of perfection, and ceremonial portraits in pompous frames are now out of fashion even among oligarchs..
Floor plinths and boards for platbands, suitable for painting frames
From the floor plinths (on the left in the figure) you can select paintings suitable for framing on a bright, colorful wall - a large outer overhang slanted inwards will highlight it. A picture in a frame made of boards for platbands (in the center) will look great in the interior of modern laconic styles, and from furniture beads (shaped edges and edgings, on the right) in styles with a decorative bias such as Art Deco shabby chic or haberdashery, as well as traditional ( country, rustic, colonial, etc.).
Putty and grouting
A picture frame made from wood substitutes for baguette looks best if its front connecting seams are invisible. The procedure for completely grouting the seams of wooden parts is painstaking, but you can master it the first time:
- The putty is acrylic, as close in tone as possible to the front side of the frame, but not darker. Available in pure white or dark brown under the trade names “pine” (yellowish), “oak” (light brown), “walnut” (brown), etc.
- You also need to prepare some acrylic paint exactly to match the wood. To do this, gradually add brown or dark brown paint into the white paint. Each additive is thoroughly mixed, then a drop is taken, dried with a household hairdryer (dries quickly) on glass, a piece of white PVC, etc., and compared with the tone of the wood surface.
- The seams are rubbed with putty as described above.
- When the putty dries from the surface (this is 10-20 minutes), apply a few drops of paint to the seam at intervals of 1-2 cm along the length and immediately rub it with a slightly damp, clean white cloth both along and across the seam.
- Touch-up and rubbing is repeated until the seam matches the tone of the main surface. Usually 2-3 passes are enough for this.
Fiberboard frame for drawings and embroideries
Few people paint or buy canvas paintings. Images on thin flexible media are much more accessible: watercolors, appliqués, drawings, etchings, engravings, offset printed images, photographs, embroideries, paintings on silk. The last four, if antique and old lithographs, can be of considerable commercial value. For such pictures it is much easier to make a frame from fiberboard.
The construction of a durable fiberboard frame for images on a thin base, with the possibility of glazing and creating an internal frame, is shown in the figure:
Making a frame made of fiberboard for pictures on a thin flexible base
The entire structure is designed to be edged with a starting profile for plasterboard (pos. D) of a suitable standard size. "Pocket" for children. And it’s only needed for pictures on paper or cardboard. The assembly of such a frame is also carried out at the same time as the picture frame:
- cut out children A, B and C;
- for children And they immediately make a suspension;
- cut, trim the ends at 45 degrees and cut to size according to the details. And the sidewalls and lengths of the outer frame. Rough trimming is done with side cutters, and precise fitting is done with a mounting knife and rubbing on a board with emery or a file;
- for children And they stick on PVA children. B. The glue is applied closer to the edges so that drops of it do not squeeze out;
- if the picture is on fabric or a charcoal drawing on paper, it is immediately put in place and PVA is glued to the corners. In this case, further work will require increased accuracy;
- for children B stick children. B with the same precautions as in paragraph 3;
- The bottom and side strips of the outer frame are glued with mounting glue;
- glass is inserted;
- if the picture is more or less permanent on paper or cardboard, insert it into place through the pocket on the child. A;
- put the top bar of the outer frame in place;
- fill the seams with PVC mastic (see below) - the picture in the frame is ready.
Mastic for PVC
To prepare mastic for sealing joints on PVC, you will need 2 glass medicine bottles with a double gas-tight stopper. One, with dichloroethane, is purchased. The second, for ready-made mastic, for example. from hydrogen peroxide or ammonia, filled with small scraps and crumbs of the same plasterboard profile, and filled half with dichloroethane. You need to prepare mastic outdoors or in a well-ventilated area - dichloroethane is a volatile, very toxic and fire hazardous substance.
After a day or two, when the PVC has dissolved, check the consistency of the composition; it should be creamy. If it is too thick or the filler has not completely dissolved, add a little solvent. The finished mastic is taken in drops with a toothpick or other pointed stick, applied to the seam and “stretched” along it with the tip of the same stick. There is no need to smear, smooth or rub very much, it will spread as it should. Complete drying within 24 hours.
Note: a stronger and more durable frame of the same design can be made from thin plywood, but you will have to work with a jigsaw. Manual - electric will not work beautifully.