Some creative experiments of parents are repeated with interest by their children. Only the name of the hobby may change. “Wood burning for beginners” was the name of a popular circle in the Pioneer Houses in Soviet times, but today such a circle may be called “Fundamentals of Pyrography.” But the essence of the direction is still the same: wood burning, obtaining unusual pictures on the wood structure.
In this article you will learn what materials and tools are useful for a beginner, how to choose a suitable image and what stages the burning process itself consists of. We will tell you how to format the finished work and how to properly organize your workplace.
Materials and tools
Burning apparatus
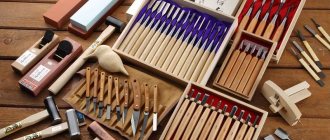
To burn wood, first of all, you will have to purchase a burning apparatus. Previously, a pyrograph was a plastic box with a small soldering iron inside. The tip of this device resembled a paper clip. A modern machine is a more serious device, improved and more comfortable to use. The best choice for a beginner would be a burner with hard feathers.
Pyrographs are sold in special boxes (often plastic), so they are convenient for transportation. The standard kit includes a soldering iron stand and a set of attachments. Modern kits offer the pyrographer about 20 different attachments, from those necessary for every burning process to shaped ones, which are not needed so often, but expand the range of the master’s capabilities.
For information on how to choose a pyrograph, read the article: “How to choose a wood burning machine for adults and children: description, principle of operation, top best manufacturers.”
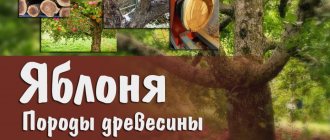
The next purchase is wood. It has special requirements.
What kind of wood should be used for burning:
- the structure of the wood is homogeneous and finely porous, without cracks, scratches, or mechanical defects;
- not resinous;
- light shades - such a background always looks more advantageous;
- hard rocks;
- with a clean and smooth surface.
Linden, alder, poplar, birch, chestnut and aspen - these species allow you to burn images of varying complexity on them.
But the best choice for a beginner would be a ready-made burning kit. This kit does not include a pyrograph, but there are boards with a printed image. The set may also contain blank boards and sketches that the pyrographer will independently transfer to the base (stencils).
Burning set
There are two types of pyrographs: a device with a solid tip and a constant temperature, similar to a soldering iron, and a device with a wire pen and an adjustable temperature (loop burner). What are their pros and cons?
The soldering iron-type burning set has a number of advantages, thanks to the brass nozzles included in the set. This is a universal attachment, handwriting (for writing text), linear (drawing contour lines), and dotted (applying dots).
There is also an attachment for graphic work, with which individual areas are shaded and shaded. Also interesting are the stamp attachments.
The soldering iron takes a long time to heat up and takes a long time to cool down. The patterns are rougher than with a wire nozzle, but for beginners this is the best option. But the main disadvantage is that if the soldering iron breaks, you have to buy a new one.
The second type pyrograph has a box with a thermostat and a handle with a nichrome wire loop, up to 0.3 to 1.5 mm thick.
The advantages are obvious: you can regulate the temperature, and also change the wire loops as they burn out. Used to apply thinner, curved lines, frequent raster (background in the form of hatching).
Image selection
The first requirement is that the drawing must have a clearly defined outline. There are a lot of such works on various thematic sites, make your choice and print out the sketch that you like best. Whether it is an ordinary pattern, a simple landscape or still life, or maybe a plot scene, it is not so important. Of course, you need to start with simpler works, gradually complicating the drawings and honing your skills.
Types of pyrography (relative to images):
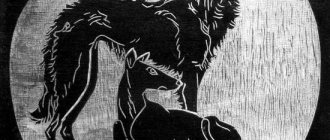
- Negative pyrography. She shows the pattern that surrounds the burnt surface. The drawing itself stands out with a light, clear relief in a dark frame. You can achieve this result by adding a background or removing a picture.
- Contour burning. Conventionally, the simplest type of burning, which is what children pyrographers do. But no matter how old you are, you can learn at any age. Start mastering contour burning, and then learn how to do work with relief, background, combined, etc.
The drawing is transferred to the surface using carbon paper; small details and lines need careful drawing. The simplest drawings are burned evenly, but there are works where the laws of chiaroscuro come into force. Interesting tone transitions can be achieved by applying light strokes while lowering the temperature or reducing the burning time.
Tips for Beginners
To ensure that the first point does not stand out and the lines are smooth, blow lightly on the tip.
- Follow the outline with one line. Work slowly. You can help yourself by moving the base with your other hand.
- Fill with medium heating temperature of the device. Perform slow circular movements.
- Using a metal scouring pad, clean the tip several times as you work.
- It is impossible to erase an already scorched line, so work carefully and focused.
- Thick lines can be obtained by moving the tool very slowly across the surface. And thin ones are the opposite - draw lines quickly.
- The higher the temperature of the device, the darker your lines will be.
To get smooth tonal transitions in one line, use a small table fan. It will cool the tip and the lines will be smooth. But be careful and attentive!
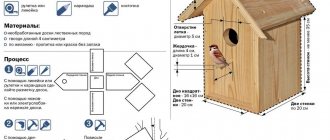
Preparation of the workplace
To get started, you only need a pyrograph and a burning kit (boards and sketches). If you take up pyrography more seriously, then your workshop will have a hacksaw or jigsaw, pliers or pliers, wire cutters, a screwdriver, sandpaper, a wire brush for cleaning the pen, a steel ruler, pencils, an eraser, adhesive tape, carbon paper, templates, etc. . But a beginner doesn’t need all this yet, but a good work surface (table), a sufficient light source (natural or table lamp), a towel (a roller to support the wrist) and a respirator will come in handy already at the start of work.
A fan will also be useful; it will protect your lungs from dust, without which the burning process, alas, cannot be done.
Remember that the light on the work surface must fall at an acute angle. With this light, you will be able to see the subtle shadows cast by the different-sized grooves. You will be able to evaluate the visual result of the shading even at the moment of its creation.
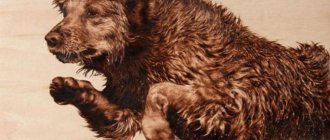
Portrait of a girl
For work you will need the following tools and materials:
- Copy paper;
- Plywood sheet;
- Sandpaper;
- A simple black pencil;
- Burnout apparatus;
- Brush;
- Clear nail polish.
First you need to prepare the image itself. We do this using a special program and print it out. Then we level the surface of the plywood using sandpaper.
We attach the carbon paper and the printed sketch to the plywood. Let's circle. Afterwards, be sure to check whether all the lines are printed.
We connect the burning device to the mains and wait until it heats up. We burn it out. Cover with a layer of colorless varnish.
This is the picture we got!
Master class on burning
If everything is ready to go, you can get started. The creative process begins with preparing the board. The master must clean it with fine sandpaper, after which it will not be superfluous to rub it with a water-chalk solution. The board must be dry and you can work on a dry surface.
Burning out in stages:
- Apply the selected sketch to the dry surface of the board (use copy paper or a stencil).
- Turn on the pyrograph, observing all safety regulations prescribed for the device. Wait until the pen of the device heats up and turns red.
- Place the board on the work surface so that it is convenient for you to work with the pyrograph. Using equal pressure, move the pen along the contour and all elements of the picture so that an expressive dark brown stripe appears on the processed lines.
- It is better to start burning from the outer lines; after working them out, switch to the main part of the drawing. Secondary fragments are burned last. If the picture is complex, mentally break it into fragments, burn each fragment step by step, without jumping from one part of the work to another.
- Burning will end as soon as all the lines and details of the sketch are drawn. When the sketch processed by the pyrograph turns into a finished drawing, you can turn off the device.
- Don't forget to change the nozzles if the pattern requires it. And beginners should not be afraid of frequently changing attachments: such experience quickly teaches them how to burn, analyze the results, and also introduces them to the capabilities of the pyrograph.
- If you want to get a combined work, you can additionally paint it with watercolors or simply cover it with colorless varnish.
This video shows the burning process, starting with the translation of the drawing and ending with the full detailing of the image.
Before you even start burning, make sure you know how the pyrograph works. The soldering element must heat up to the required temperature (modern devices are equipped with a heating indicator sensor).
Newbie tips:
- during your first burning lessons, try to make strokes and lines of different thicknesses, adjusting the burning intensity;
- To make the line thin, move the pyrograph pen quickly, but without strong pressure;
- Slow burning is used for beautiful thick strokes;
- the saturation of the shade corrects the increase in the temperature of the pen (but high heat is fraught with frequent burnout of the coil).
For the first works, it is recommended to choose simple images.
Often in pyrography textbooks they write that wood burning is something between drawing and engraving. But still there are more engravings in this work. Therefore, beginners who quickly master burning with modern safe devices understand that lightweight and simple pyrographs often cannot realize all the master’s ideas. And the works that were completed 20-40 years ago look more convincing, although the pyrographs of those times were bulky and not so “toothless.”
But you will always have time to switch to professional devices, and if a child is learning to burn, then small and convenient devices will definitely not discourage him from creating.
Safety precautions
When working with a burning tool, you should adhere to the following rules:
- When the tool is turned on, only grip it by the handle to avoid burns. The device is very hot. Avoid touching the tip to other parts of the body.
- Place the instrument only on a special stand.
- Nozzles cannot be changed with bare hands. Use pliers for this.
- Do not allow the tool to overheat, otherwise it will quickly break. While working, turn off the tool for a while and rest.
- Do not leave the device turned on unattended, even for a couple of minutes.
- If exposed wires or other damage appears on the device, it is recommended to replace the device. Such damage is very dangerous and can lead to fire.
If your child is engaged in such an activity, always keep an eye on him, do not leave him unattended, and always check that everything is fine. Of course, before starting work, tell him the safety rules.
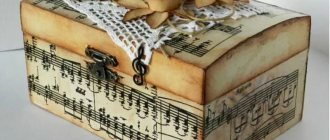
Registration of the finished work
A wood burning master class cannot be complete without a description of the design of the work.
Sometimes the natural texture of wood makes the best decoration
What options are there:
- patterned frame, which is part of the design itself;
- if you are burning a piece of wood, then the outline of the cut itself will be a beautiful frame, you just need to think about how to fix the work on the wall;
- standard – frame, glass;
- specially ordered baguette;
- homemade frame from PVC skirting board, etc.
Important! If it is decided to varnish the work, this is the task of an adult; the child should not come into contact with toxic materials.
Take things step by step, follow the principle of “from simple to complex,” don’t be afraid to make mistakes and don’t be too critical. Pyrography is an interesting and popular trend, the practice of which can turn from an ordinary hobby into a way to earn money.
Variety of options
The very first way is to process the image in Photoshop. The image is processed so that it is all in small strokes. Then the drawings are printed on parchment paper. They attach it to the wood and begin to burn it.
Read this: DIY cat house: photos of the best options for a pet
The second method is when an image of a person is printed on a laser printer in a schematic extension. For this, it is best to use special thin photo paper. It is attached to the board with the wrong side and burning begins.
Please note that the heating temperature of the burning apparatus must be as low as possible, otherwise the paper may ignite.
This method will not take you much time. Because of this, he is the best in portrait burning not only for experienced craftsmen, but also for beginners. After burning, you need to remove the pieces of paper. To do this, it is necessary that the portrait is completely cooled. Then take a cotton pad, moisten it with water and wipe the finished work.
The third way is to use a special-purpose laser machine. This method is not cheap, but it also does not require much time and effort. This laser is attached to a personal computer. It performs the function of the brain. We load the photo into it, process it and send it to the laser to complete the work. Then the laser itself begins to burn out the image it received. You just need to varnish the finished portrait.
Read this: DIY Birthday Cards for Family and Friends
Now let's look at several master classes on burning portraits.
Pyrography is a great hobby
Thanks to the advent of the electric pyrograph in the second half of the 20th century, burning became a mass hobby, and not just the lot of craftsmen, because anyone can buy a pyrograph device and use it. Pyrography differs from other types of fine art in that it is not necessary to have drawing skills to practice it. Perseverance, accuracy and patience are much more important. To create your own patterns, a developed imagination will be useful.
Another significant advantage of this hobby is that it does not require significant financial investments , and if you master pyrography at a sufficient level, you can begin to make a profit from this activity. Currently, handmade jewelry and interior items, especially those made from environmentally friendly materials, are very popular. In addition, you can always pleasantly surprise your loved ones with a unique gift made by yourself.
To practice burning, first of all you should choose a high-quality and convenient pyrograph . You can start with a simple Russian-made device, familiar to everyone since childhood. These burners are reliable and easy to use, and come with several replacement needles. The price of such devices is usually low, and they are easy to find in any children's store or in a craft supply store.