Wood moisture concept
The percentage ratio of the weight of the liquid contained to the weight of completely dry wood of a certain volume is called absolute humidity. The percentage of the mass of water removed (determined by two weighings) to the original weight of the wood is called relative humidity.
The degree of suitability for use is determined taking into account the relative humidity indicator. The value indicates the readiness of the material for gluing and drying; with a value above 30%, there is a danger of developing a fungal infection.
Depending on the indicator, wood is divided into categories:
- wet - with a relative humidity of more than 23%;
- semi-dry – within the range from 18 to 23%;
- dry – with a humidity value from 6 to 18%.
Types of fruit dryers
Currently, the consumer can independently produce three types of dryers:
- electrical;
- infrared;
- devices “powered” by the sun.
In the first device, moisture from the fruit will evaporate by exposure to hot air, which will be forcibly heated by the built-in fan. Such devices delight with efficiency, reliability and long service life.
Infrared models' drying method resembles a process involving sunlight. Only the role of the source will be performed by a special heater that transfers thermal energy to the products. Moisture will be removed from the fruits, and they will retain their color and presentable appearance.
Solar dryers are devices in which fruits are dried using a natural method under the influence of sunlight.
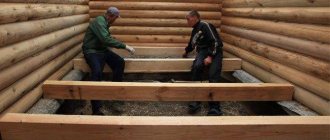
Drying wood in natural conditions
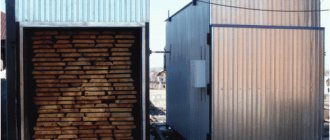
With this method of removing moisture, a drying chamber for lumber is not used; the liquid evaporates under the influence of atmospheric air. Dry the material under a canopy located in a draft. The sun's rays unevenly heat the outer and inner layers of wood, which leads to the appearance of deformations and cracks.
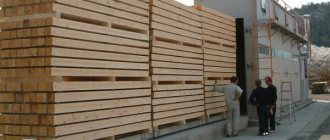
If the site does not have a drying chamber for lumber, an attic, a ventilated shed, or an equipped shed are well suited for drying. The material is stored in a stack; the first layer must be placed on stands with a height of at least 50 cm made of any durable material. Rows of lumber are laid with dried slats, all subsequent boards and logs are placed above the previous blanks to create vertical air wells.
Logs sawn lengthwise and finished boards are laid with the inside facing up to reduce the size of the deformation. For the same purpose, a stack of wood is pressed from above with a heavy load. Due to the formation of cracking at the ends of the workpiece when drying the material, select the length of the workpiece to be 20-25 cm longer than the intended part.
The ends of the lumber are carefully treated with oil-based paint, drying oil or hot bitumen to prevent cracks. Before stacking, the log trunks are cleared of bark to reduce the likelihood of wood beetles breeding. Removing moisture from wood naturally is considered an economical method.
Ventilation and release of moist air
Warm, moist air must escape somewhere from the cabinet during the heating process. To do this, a hole (d-100mm) is cut from the top and a plastic pipe is inserted there.
If you want to do without plastic and pipes, make not one, but three holes of a smaller diameter (35mm) around the perimeter.
It is only advisable not to leave all these holes open, but to install some kind of protective grille or mesh there to prevent flies and insects.
But still, as operating experience shows, with one hole in the form of a pipe it is possible to maintain a more stable temperature regime than with three.
All dampness, smell and steam will go outside through this hood. During the drying process, do not forget to swap the trays, because the bottom row dries much faster due to the close proximity of the fan heater.
With a large harvest, processing it with a relatively small factory dryer is a very non-trivial and tedious task. And with the help of such a large cabinet you will do it quickly and with pleasure.
Solar wood dryer
The second method, the cost of which quickly pays off, is drying chambers for lumber. The manufacturing drawings are quite simple; you just need to understand the operating principle of such a device. The chamber is an assembled plywood or metal container, the roof of which is made of transparent materials.
The size of the glazed roof surface is calculated depending on the total horizontal area of all lumber laid for drying. The area of the transparent coating should be one tenth of the total surface of the boards. The roof of the building is made pitched, the amount of slope depends on the geographical location of the area. In cold northern regions, where the sun does not rise high above the horizon, the roof slope is made steep. The southern sun warms up the gently sloping surfaces well.
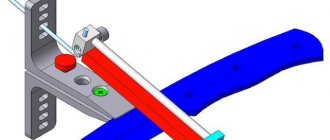
Connecting wires
After assembling the structure, solder the wires to the film, as discussed above, and lead them out through the holes in the side leg.
There, on the side, in order to hide all the wires out of sight, screw the cable channel.
And at the bottom you mount a switch to turn the dryer on and off. For power up to 2 kW, models with a rated current of 10 A are suitable.
You will have several conductors. Twice as many shelves. In our version there are five. Five on one side of the leg (phase), five on the other (zero).
To connect them together and output them with one cable, use a junction box.
Using two Wago clamps for six terminals, connect everything to one point (zero on one side, phase on the other) and connect one two-core 220V power cable here.
Roughly speaking, all the wires from the film on the right side are twisted into one wire. And all the wires from the left to the other. The result is two wires or two twists. It is to them that you need to connect a two-wire power cable with a plug.
Be sure to plug the plug into an outlet that is protected by an RCD or a circuit breaker!
When drying, it is recommended not to place pieces of fruits and vegetables directly on the film.
This film is made from the thermoplastic polymer PET (polyethylene terephthalate). And it can be food or non-food. In heated floors, as you understand, the second option is used.
Therefore, as mentioned above, be sure to cover the surface with baking paper. It also helps dry foods with a high juice content (berries).
Firstly, you will not have any direct contact with anything. Secondly, you will forever forget what sticking and cleaning the film from sweet spots means.
How to make a drying chamber for lumber?
The frame of the building is made of metal or timber treated with an antiseptic under pressure. The lining of the walls and floor of the chamber is made of moisture-resistant materials, the fences are insulated with mineral wool or hard foam boards. The internal surfaces of the walls are treated with water-repellent compounds, aluminum powder is applied to them, and then painted black.
Fresh air blowers should not contain blades made of plastic, fusible materials. If the drying chamber for lumber is not used constantly, then the room is used for drying herbs, vegetables, berries or a seasonal greenhouse. After laying all the wooden blanks for drying, a distance of about 30-40 cm should remain between the stack and the wall on all sides.
heating element or heater
What causes the temperature to rise, where does it come from and how does the heating occur? Everything is very simple - a floor-mounted wind blower room heater is used as a heating element and a fan at the same time.
Try not to use open heating elements for this. Firstly, it is a fire hazard. And secondly, you will have a problem installing them on the wooden base of the box while maintaining the permissible distances.
You'll have to think hard about what to lay them on or how to secure them. For example, someone “figured out” to put asbestos under the tile heating element.
Once again - ASBESTOS! In the fruit drying box! Don't ever do this.
There are no problems with the wind blower. Just place it on the bottom of the cabinet, and on the back wall to allow fresh air to flow in, use a jigsaw to cut a hole the size of the fan.
The hole must be made, otherwise the heater will simply overheat itself and catch fire.
Through the same “hole” the power wires with a plug are output.
Basic equipment for dryers
Whatever type of forced wood drying chamber is used, standard groups of equipment are allocated for all.
Transportation equipment is designed for loading and unloading logs or boards into the drying room. Includes machines and mechanical devices for storing workpieces in a stack or package, and carries out raising and lowering of lumber.
The thermal equipment of the chamber serves to raise the temperature of the internal air in the chamber and consists of many systems that determine the interconnected work of producing and transferring heat. These include heat exchange tanks, heaters, pipes for the passage of steam or hot water, devices for removing condensate, shut-off valves and control devices.
The fuel is gas and liquid fuel. For small volumes of work, a drying chamber for wood-burning lumber is equipped. The coolant is saturated steam, water, gas obtained from combustion of the furnace, and organic fillers of the system that have a high boiling point. Electric heaters are widely used, where current energy is converted into a thermal component.
Circulation equipment is designed for the organized movement of air masses in the drying chamber. The elements of the system are fans, injectors and joint installations of these elements. To increase the efficiency of wood drying, automation of lumber drying chambers is used.
Thermal insulation of the drying cabinet
The inside of the entire cabinet and the door itself are covered with reflective foil material.
For example, this type is used for sauna cladding. It can withstand high temperatures and is absolutely harmless when heated to no more than 45C.
Attach it to staples from a construction stapler, or better yet, to self-tapping screws with a wide head.
Without this reflector, heat will be quickly transferred to the wooden walls. Firstly, it will delay the whole process. And secondly, if you used chipboard or fiberboard when assembling the frame, they will heat up, which will ultimately lead to food poisoning.
Also, do not line the walls with mirrored sheet metal.
Tin is primarily a metal. It will heat up and transfer all the heat to the wooden body. The thermal efficiency of such a dryer will drop sharply.
And from such heating, the body will gradually deform and wide cracks will form.
Drying chamber fence
To isolate the wood from the effects of the environment, a chamber fence is installed, which consists of a floor, ceiling, walls and intermediate partitions. Requirements for partitions:
- should not allow steam to pass through;
- fences must have low thermal conductivity;
- must have a long service life.
Fences are made separately from various building materials or can be prefabricated with a set of standard metal elements.
The first type of cameras has a longer operating life, but has a longer commissioning time, which is not always justified. Prefabricated metal frames are installed quickly, they are equipped with control and thermal devices, but the steel is subject to the destructive effects of wet and thermal conditions.
Assembling an infrared dryer
An infrared dryer is suitable for mushrooms, vegetables, nuts and fruits. It’s quite easy to make it yourself. To do this you will need the following materials:
- iron wire with a diameter of 5 to 8 mm;
- a cardboard box, for example, from a vacuum cleaner;
- aluminium foil;
- metal mesh;
- light bulb socket;
- awl;
- screwdriver;
- self-tapping screws;
- socket for a regular light bulb with fasteners;
- thermometer;
- infrared lamp;
- aluminum tape or glue.
The installation is created in the following sequence.
- The insides of the box are covered with aluminum foil using tape or glue.
- Shelves are made from mesh according to the size of the box.
- On any wall near the bottom, make a hole for the supply wire and secure the cartridge with self-tapping screws.
- Screw in the infrared bulb.
- A thermometer is attached to any sidewall.
- Cut the wire into pieces that are approximately 5 mm longer than the width of the box.
- Punch holes in the sides for the rods for the shelving.
- They insert a wire into them and seal its protruding ends with tape on the outside.
- Stack the shelves.
As a result, after all the manipulations, you will get an installation similar to that shown in the photo below.
The recommended temperature for drying vegetables and fruits is 40-45 degrees. It is adjusted by turning the light bulb on and off, or by opening the top.
The lid can be the side parts of the box, or it can be made separately from the same cardboard. If you want to automate the design, you should use a temperature sensor. Under his control, the light will turn on automatically.
Also in the created design you can use an incandescent lamp (its sufficient power is 60 W) or a heating film used to create heated floors. In the latter case, at home, a piece of 50 by 100 cm with a power of 110 W is sufficient. In general, the length of the fragment is selected based on the box used.
When using film you will also need:
- insulation, for example, bitumen, used to create heated floors;
- a set consisting of 2 clamps, two eyelets and the same number of terminal rings, which is intended for connecting power to the film.
PVC tape is laid on top of the bitumen insulation. To connect the film, you will need to solder wires and contacts.
This dryer allows you to reach temperatures of almost 60 degrees. It can be rolled up and placed on the bottom of a box made using the previously indicated method.
Making a drying chamber yourself
Private developers dry wood in their yard; for this purpose, they install a drying chamber for lumber with their own hands. Its installation will require a large room, a heat source and a device for distributing air between drying packages of wooden blanks.
You can, of course, purchase second-hand lumber drying chambers, but the degree of wear cannot always be determined correctly; it is much more profitable to arrange a room for drying wood yourself. This is an opportunity to get excellent results at a low cost.
How to connect infrared heating film
The main headache for many is connecting such a film to wires with a plug. For this you will need a soldering iron.
In fact, there is nothing complicated here. Everything is done literally one, two, three times.
To avoid burning the material, manufacturers recommend using a soldering iron with a power of no more than 60W.
First
Use a soldering iron to heat it up and remove the insulation from the side of the copper conductive strip.
The phase wire is connected on one side, and the neutral wire on the other.
Second
Drip tin onto this place.
Third
Press the tinned copper conductor onto the prepared surface and solder the contact.
That's all. Be sure to insulate the soldering areas with pieces of adhesive tape so that there are no exposed conductive parts left anywhere.
If even such a simple connection does not suit you (you don’t have a soldering iron and that’s it), then ask the store for special terminals.
Their price really bites, and the contact turns out to be less reliable. Therefore, soldering in this case is considered the best option.
Construction stages
You will need material for the frame, usually metal racks from a corner or channel; a wooden beam is used after careful treatment with an antiseptic. Metal sheets, moisture-resistant plywood panels, and profiled steel are used as wall coverings. Thermal insulation is carried out using mineral moisture-resistant wool and polystyrene foam.
Before construction begins, the location of one dryer or several is determined, which serves as a plan for constructing a concrete foundation. The foundation is made for the stability of the structure and uniform distribution of the load on the ground. If a ready-made railway container is taken for the camera, then four columnar foundations are made for the corners of the car.
The metal frame is assembled using welding or bolted connections. When installing, check the verticality and horizontality with a building level, trying to strictly observe the geometric dimensions. After securing the frame in the installation position, they begin to cover the outer walls, simultaneously inserting doors and ventilation windows.
The thermal insulation layer of the floor, walls and ceiling must be at least 12-15 cm, the base is insulated from moisture with rolled material. After this, the chamber is checked for leaks. To lay the first layer, stationary supports made of metal or wood are installed. Install a heat source, usually a powerful fan heater, position it so that the direction of the hot air is parallel to the lying boards.
Drying wood is a necessary condition for obtaining quality raw materials. Building a house or making fillings for openings from damp lumber is fraught with distortions and damage to integrity. In order to carry out work with wood without problems, you need to take seriously the removal of excess moisture from the material.
Do-it-yourself dehydrator for meat and fish
A dryer for meat and fish can be easily made from a plastic container. For this you will need:
- fan;
- plastic container equipped with a lid;
- steel rods with a cross section of 5 mm or studs with threads, washers and nuts;
- pipe cut or coupling.
The entire process of making a dehydrator for drying fish, meat and drying other products from a plastic container is demonstrated in the video:
It’s easy to assemble a dehydrator for fish, meat, vegetables, fruits and other products from scrap materials: plywood, boxes, a refrigerator. Various working old fans are suitable for blowing. In each case, you will, of course, need to think over a way to secure them, but the economic costs will be reduced. In small installations, you can use a fan from a computer, having previously provided the required supply voltage. If you automate the dryer, then in terms of functionality it will be able to compete with factory analogues. When drying meat and fish, it is imperative to prevent flies from entering the interior of the installation so that they do not spoil the products.
How to assemble a structure
The required number of boxes are placed on the constructed structure. Each box is a drying container. If the cells at the bottom of the box are large, then you can cover the bottom with a mosquito net with medium cells. The assembled pyramid must be wrapped with stretch film - at least 7 layers for packaging film and at least 10 for food film. This ensures overall sealing of the structure. It is necessary to wrap all the boxes except the bottom one (which is intended for air flow).
After the process of sealing the dryer is completed, it is necessary to make sure that the boxes can be used individually. To do this, use scissors or a sharp knife to carefully cut the film at the junction of the boxes with each other. To keep the film tightly, it must be glued to the box along the bottom edge with adhesive tape.
The mode suitable for drying is set on the fan heater as follows: the temperature is set to the maximum, and the power of the device is set to the average value. In this mode, the fan heater will not overheat too much, and, accordingly, will not turn off spontaneously. The optimal temperature for drying is +40-45 degrees.
That's it, the dryer is ready for use. The drying process in such a device takes from 8 to 12 hours.
Expert recommendations
Using three strips of thin steel, the gables should be made. At the bottom of each strip it is necessary to make longitudinal bends that will not allow rain to penetrate inside. Such useful homemade products necessarily include a roof, which is made of two sheets of polycarbonate. The principle of operation of the device is ventilation; for this, a box should be installed. Air will penetrate through the mesh pan, removing moisture. Through the roof, where there are gable and side gaps, excess moisture will evaporate. To increase the intensity of traction, the back wall should be covered with black film.
What types of dryers for vegetables and fruits are there?
There are several main parameters by which dryers differ from each other:
Airflow type.
Dryers come with vertical and horizontal airflow. Vertical dryers have a round shape, the fan is located at the bottom and directs the air flow upward. Such dryers, as a rule, are cheaper, but have a number of significant disadvantages: uneven drying of products on different levels, less capacity, inconvenient rearrangement of trays, mixing of odors of products from different shelves. Horizontal dehydrators are a little more expensive, but are distinguished by uniform drying, greater capacity, and convenient rearrangement of trays. These dryer models have a rectangular shape; the fan is located on the back wall and evenly blows food on all shelves, so that odors do not mix.
Choose horizontal dehydrators - they are characterized by more uniform drying and ease of use.
Capacity.
Among horizontal dehydrators there are models with 6, 7, 10 and even 20 trays - for any needs. The most popular are dryers with 7 or 10 trays - this capacity is sufficient for home use even in large families or for drying crops. One of the most compact models is the Dream Vitamin DDV-07 dehydrator with 7 trays. And for large volumes of products, there are super-capacity dryers with 20 trays. A 10-tray dehydrator is the golden mean, which is suitable for almost any need - city residents, summer residents, gardeners, large families with children.
Materials.
When choosing a dehydrator, you should pay attention to the material of the trays. To protect products as much as possible from the absorption of toxic substances, we do not recommend models with trays made of ordinary plastic
Dryers with steel racks, such as the Dream Vitamin DDV-10, are preferable. If the durability of the case is an important factor for you, then you can choose a model with a stainless steel case, for example, Dream Pro.
Give preference to dehydrators with steel trays - they are safer and more durable.
Time and temperature settings.
Modern dryers for vegetables and fruits allow you to set the drying time, after which the device will turn off automatically
Another important function is setting the drying temperature. For raw foodists, models with the ability to set the temperature no higher than 40°C are suitable.
This function is provided, for example, in the Dream Vitamin dehydrator. This means that with it you can naturally preserve vegetables, fruits, berries, herbs, and mushrooms for many years, while preserving the nutrients of the food - vitamins, enzymes and microelements.
Plus, the Dream Vitamin control panel contains useful tips for drying different foods.
How to prepare boxes
Place a fan heater in the lowest row so that the warm air moves upward. To do this, a hole is cut in the box with a diameter slightly smaller than the fan. It is necessary that it fits tightly in the hole made.
The resulting structure must be installed on the same box. This must be done so that the wire does not get pinched (it will be located freely in the lowest drawer), and there will be constant air access to the fan heater. You need to install another one on the box with the fan, and make holes in it for access to the power and temperature regulators.