Today, thanks to the abundance of special compounds for protecting wood, everything is much simpler. It is enough to use them according to the manufacturer's instructions, and you will get the desired result. We will tell you below how to protect the ends of a log frame for years and even decades.
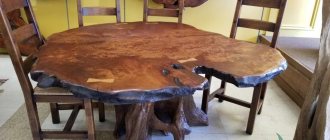
Properly processed ends retain their appearance for decades
Why is it so important to properly process the ends?
The ends of the logs are one of the most vulnerable places in a log house. If they are not treated with a protective compound during construction, after 1-2 years they will become covered with cracks. These holes very soon become a source of proliferation of fungi, insects and bacteria. Moisture also gets into them. All these factors eventually destroy the log and the entire house.
Cracks at the ends are formed due to wood shrinkage. This is the gradual evaporation of moisture from it, which comes out through the edges of the logs much faster. At this time, the middle is still moist. This discrepancy causes the ends to crack. Wood shrinkage can take from months to years depending on the surrounding climate. For example, in the southern regions it lasts about 1 year, and in the central and northern regions - from 1 to 3 years. The warmer the climate, the faster moisture evaporates.
By treating the ends of logs with a protective compound, we solve 2 problems. Firstly, we protect the tree from the penetration of fungal spores, moisture and insect larvae. Secondly, we let the wood “breathe” without interfering with the uniform evaporation of moisture. This helps reduce the number of cracks at the ends or avoid their occurrence altogether.
How not to make a mistake with the manufacturer of protective equipment for log houses
How to treat a log house and how to make it safe and reliable for a long time? This question has become relevant for many, because a huge amount of materials are offered on the construction market. Experts have compiled several rules, following which you will never make a fatal mistake:
- All selected products must be from a trusted manufacturer only. If you make a choice in favor of a well-known brand, then the chance of making a mistake and receiving a low-quality product will be minimal. Tikkurila protective products have proven themselves to be of high quality and reasonable price.
- It is necessary to choose natural protective and fire-fighting products that do not contain preservatives.
- You should not buy products in the markets without a receipt, this increases the chance of receiving a low-quality product with toxic components inside.
- You should always read the label carefully. A good product provides protection against rot, insects, fungus, and mold.
- External treatment must be repeated after a certain period. Even if the manufacturer specifies a long shelf life, the applied composition will wash out and need to be renewed.
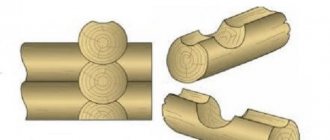
How the ends are processed
Treatment of the ends of the log house with protective compounds takes place in 2 stages. The first begins immediately after construction. First, trimming is carried out - trimming the ends of the logs, which after the construction of the walls have different lengths. For crosscutting, use a gasoline or electric saw. After it, the ends of the logs should line up in an even vertical line.
After trimming, the ends are sanded. In this case, it is necessary to remove all surface irregularities and defects from them. For this, a belt sander with a coarse abrasive P40-60 is used. After all the ends have a clean, flat surface, they go over it with an ordinary grinder. Important: sanding should only be done in dry weather. If you work with a damp wood surface, fine lint will form on it. Because of this, it will be impossible to properly process the ends.
Only after sanding can you proceed to applying a protective composition. But first you need to make sure that the wood is dry. Air humidity should not be higher than 20%. Otherwise, the composition will not be absorbed well, and its consumption will be higher. The product must be applied with a paint brush; a roller cannot be used. Otherwise, the product will be distributed unevenly and may not get into some irregularities. Otherwise, when applying, you must follow the manufacturer's recommendations. It is necessary to process the ends of the log house, even if they are covered with siding or other decorative materials.
The second stage of processing the ends of the log house occurs after complete shrinkage of the wood. A special sealant or paint is applied to the ends. This is the finishing layer that will protect vulnerable areas from all adverse external factors.
Folk remedies for processing the ends of a log house
The advantage of traditional methods for processing the ends of timber is the low cost of the materials used. There are also several significant disadvantages. But more about them later.
You can inexpensively process timber from the ends using:
- lime;
- engine oil waste;
- PVA glue;
- wax or paraffin.
Also, the ends of the beams are often not treated with anything special at all, since they are painted with the same paint that is used to paint the facade. This is also possible. But the disadvantages will be the same as in the case of using all the materials listed above.
The main disadvantage of traditional methods is their fragility. For example, if you prefer lime mortar, then the treatment will have to be repeated once a year, or even more often. The second important disadvantage is poor efficiency. For example, waste motor oil absorbs well, but also dries well in the summer heat. This means it ceases to protect the ends of the beam. The paint cracks and, moreover, completely blocks the path of moisture that should come out of the timber during the first stages of operation of the house.
Torvens end oil and its features
For primary processing of log ends there is Torvens oil. The service life of its coating reaches 10 years. This has been confirmed by climate tests. Among the composition features:
- Resistance to precipitation.
- Wide temperature range. From -50 °C to +80 °C.
- Protecting wood from moisture, ultraviolet radiation, fungi and mold.
- Creates a breathable film, allowing moisture from the wood to evaporate.
- Quick and easy to apply.
- The surface of the ends does not crack or peel after treatment.
Torvens oil is suitable for decks, timber and other outdoor wood parts. Moreover, it can be updated without cleaning the surface. It is based on modified linseed oil, wax and antiseptic additives.
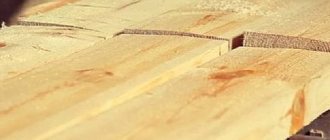
An example of competent processing of the end when it did not crack due to shrinkage
Why is prevention needed?
After going through all the procedures at a timber processing plant, lumber in any form retains its natural ability to absorb moisture. Moreover, from the side of the once existing root system, this process manifests itself to a greater extent. This is one of the most important reasons for the need to protect the end part with preventative agents.
Impregnation of the log house is also carried out in order to slow down the aging of wood and cracking. There are compositions that “repel” insects feeding or living between the fibers or prevent the development of fungi and mold. Among other things, this prevents putrefactive processes and discoloration of surface layers under the influence of ultraviolet rays. That is, in total, it all comes down to maximizing the extension of the natural state of the lumber.
Source kraski-net.ru
How to apply Torvens oil correctly
Before applying, the oil must be carefully applied with a brush for 3-5 minutes. This will give it a uniform consistency. Then you need to do the following:
- Apply the composition evenly with a soft-bristled paint brush. In this case, the ambient temperature should be from +5 ° C to +35 ° C, the weather and the tree itself should be dry.
- Leave the first layer to dry for 8 hours.
- Apply the next layer 16-24 hours after the first has dried.
Torvens end oil for initial application gives a consumption of 1 liter per 14 m2. During application of the second layer, the consumption will be 1 liter per 8 m2.
Antiseptic protection
The next stage of protection should be antiseptic treatment. The purchased product is used to treat both external and internal walls. Experts say that treating a log house with an antiseptic directly depends on its type. The outside of a wooden house should be protected with a hard-to-wash antiseptic.
It necessarily contains synthetic and natural oils. Its formula protects the structure from moisture entering. The product does not wash out, but after application it has a long drying time. You can use washable products inside your home. They do not provide high levels of protection against moisture, but it is not needed.
Treatment of the log house after installation with antiseptics is carried out in several stages. Each subsequent layer should be applied only after the previous one has completely dried. Experts emphasize that antiseptic treatment cannot be carried out in rainy weather. To apply the composition you can use a spray bottle or a brush. If you use a brush, it is better to paint with a colored product so that you can see all the painted areas.
When choosing a treatment product, you need to carefully read its composition. It is preferable to choose oil-containing formulations; they have always provided excellent results.
Treating a log house with an antiseptic can be done with a product based on beeswax or tree resin. Synthetic compounds are also offered on the market. They give excellent results, but the presence of preservatives can have a detrimental effect on the health of people who will live in the house.
Repair materials
Processing the timber after building the frame of the house implies complete waterproofing, vapor barrier, and sealing of joints.
To ensure that cracks do not pose a danger to building elements, they must be treated with a material that does not allow moisture to pass through . The composition must be firmly fixed to the timber and not be afraid of external influences.
Before application, the damaged element is prepared: the nicks are removed, leveled, and sanded.
Sawdust and PVA
A moisture-resistant mixture of these ingredients creates a coating that is resistant to external manifestations and is not afraid of humidity and cold.
You cannot use shavings to create mass; only small sawdust forms a viscous consistency. It is mixed with moisture-insensitive PVA glue and applied to the crack with a spatula. Afterwards, the excess is removed, wait until the mixture dries and sand.
How can I replace PVA and sawdust?:
- Wood glue with a different composition. This will not affect the properties of the mixture in terms of crack size, but it will become stronger. The material tolerates moisture better and lasts longer.
- Wood dust. The consistency of the composition becomes less loose and more homogeneous.
Since the composition contains wood materials, when mixed with glue they moisturize. When the crack is repaired, the PVA hardens, the sawdust dries out and decreases in size.
It is not recommended to use the mixture to eliminate large cracks.
Slivers
The material is suitable for repairing cracks of any size. Before starting work, the wood chips need to be sharpened into a wedge shape and used to fill the gap. The element is driven into the split until it stops, and fixed with PVA or carpentry glue. The essence of the method: the chip restores the pressure from which the timber was relieved after receiving a defect.
Instead of wood chips, you can use butterfly dowels 1-1.5 cm thick . These are specially cut pieces of veneer that will prevent the cracks from opening even further. Externally, they are shaped like an hourglass. To install the butterfly, a groove is milled in the split, and a key generously lubricated with glue is inserted into it. The excess is removed and waited for complete drying.
A gap can not only become a defect, but also decorate a building if it is located in a visible place and looks beautiful. Butterfly dowels allow you to maintain the shape of the split; it does not increase in size, retains its shape and is not dangerous.
Tyrsa
This word refers to the waste that is formed after processing limestone. The composition also contains no more than 10% clay, which creates additional density .
To seal a crack, the mixture must be moistened and the free space in the timber must be tightly filled with it. It will set, dry and become a strong, moisture-resistant bond for wood. After the work is completed, the surface is sanded.
Wood putty
The material is intended for repairing small cracks with a depth of no more than 3 mm. If you use putty for large splits, the composition will crack after drying and lose its properties. Another reason against thick layers is the shrinkage of the material, which entails detachment from the base. The putty is made on the basis of acrylic resins.
When finished, the mass is very plastic and easily falls on the timber.
There are two types of wood putty :
- With one leading component. It can be acrylic or alkyd resin, water. Before application, mix the mixture thoroughly.
- With two components. It consists of substances that need to be mixed: filler and hardener. They are characterized by a high solidification rate, high strength and ductility. The mixture practically does not shrink and is not afraid of moisture and solvents.
To apply the composition, use a rubber spatula, grind the surface after drying with a fine-grain abrasive. The putty is chosen by color; it must match the wood. After repair, the surface is covered with protective compounds or finishing materials.
When air temperature or humidity changes, the material changes shape relative to the wood and may peel off. Therefore, it is recommended to use wood putty for the inside of walls and structures located indoors.
Arbogypsum
The material consists of sawdust and a binder - alabaster, in a ratio of 3:1. To create alabaster, gypsum is diluted with water in a 2:1 ratio. The mass is prepared immediately before the start of repair work.
Instead of sawdust you can use:
- tyrsa;
- crushed bark;
- chopped straw.
The resulting composition can be diluted with an alkaline solution from soap or shampoo for plasticity. The material adheres well to wood and has a long service life.
When creating a mass, you need to eliminate all lumps and achieve maximum homogeneity of the composition. The mixture reliably holds the wood together, works for a long time, and does not shrink.
Epoxy resin
One of the best materials to combine with wood. Creates a strong, durable filling and prevents further splitting.
It has a viscous, viscous consistency, thanks to which the resin evenly fills the entire crack. If you mix resin with glue, it helps restore the integrity of the timber. Also used for repairing chips and potholes . After drying, shrinkage does not occur, the material performs a reinforcing function, and the defect will not increase.
Sealant
Suitable for medium-depth splits up to 5 mm. Before application, the crack must be processed, the jags removed, for better adhesion to the acrylic-based sealant. If the crack is deep, experts recommend placing a silicone or polymer cord inside to reduce its size.
The sealant blocks the function of moisture exchange in wood. The cord inside enhances this effect and can cause moisture accumulation, subsequent rotting and bacterial damage.
But there are also advantages from using this material.:
- the sealant is thick, elastic, fills the crack completely;
- not afraid of frost and moisture;
- can be used on extended cracks;
- dries quickly.
Wax corrector
Visually it looks like a stick made of hard wax. Used as a material for repairing small defects. The color of the corrector should be chosen according to the color of the wood ; you can mix shades if you don’t find a suitable one.
Work is carried out at a temperature not lower than +10 degrees; it can also be used for furniture repair. Before starting work, the split is cleaned of nicks and dust.
Wood shrinkage
Shrinkage of timber logs takes about two years. And in the future, wood is a natural material that constantly gains moisture and dries out. These processes go on continuously. And to protect it from moisture accumulation, it is coated with special compounds.
But, in the first year of a log house’s life, painting of logs should be done only so that the logs do not lose their freshness. And the protective composition must be chosen so that it does not interfere with the drying of the wood:
- removal of moisture from the inner layers of wood of the log along the longitudinal fibers to the ends
- removal of moisture from the inner layers of wood along the transverse fibers to the outer surface of the log
- evaporation of moisture from the surface of the outer layers of the log
Yes, the system for removing moisture from wood is quite complex. And it doesn't work evenly:
- Along the longitudinal fibers, moisture reaches the ends of the logs faster than along the transverse fibers - to the outer surface
- due to uneven evaporation of moisture through the ends and side surfaces, stresses arise inside the wood, which leads to the formation of cracks in places of greatest stress
Impregnation products
The use of impregnation for the ends can be carried out with various compositions that protect the wood and repel excessive moisture absorption:
- End protection with impregnants and septic tanks. These substances protect wood from mold, mildew and insects. Impregnants and septic substances are applied with a brush in two or three layers to the log, with intervals of 12 hours for drying.
- The sealant has a water-repellent property, keeping the logs from rotting and forming a protective film. It is recommended to apply this material in two layers.
- Machine oil is the most economical option for processing wood ends. The product must be used twice, every 10-12 hours.
- Paints diluted with a solvent will seal the timber from the penetration of insects or moisture, as well as prevent the appearance of fungus.
- The use of lime is the most ancient and well-known method of processing wood, protecting the wood from moisture and insects.
Consumables and tools
To repair splits in timber use :
- fine sandpaper for cleaning the crack from nicks and debris, final sanding;
- dry rag to remove sawdust;
- masking tape to protect the surface from dirt;
- sealant gun;
- rubber spatula for putty;
- a clean small container if you need to mix filler ingredients;
- water (for compositions or cleaning after work);
- rubber hammer (if you need to hammer in a chip);
- a damp cloth to get rid of excess solutions;
- gloves.
Causes of cracks
Timber is a material consisting entirely of natural wood. It is prone to cracks and there are several main reasons for this:
Poorly dried timber.
Cracks in such material appear already in the first stages of operation of the structure, after the elements dry out naturally. You can check the moisture content of the timber before starting construction with a special device; the indicator should not exceed 14%.If it turns out that the material has not dried completely, you need to lay it on a hill (30 cm from the ground) in the shade. Each element is laid separately. Then it dries to the desired humidity percentage.
During the construction process, part of the timber remains on the street, part inside the house. As a result, half dries out faster, the stress in the elements is distributed unevenly, the wood cannot withstand it and cracks.
- Frame overload .
The material is often used to create a frame structure. To reduce the number of walls and partitions inside the house, 15*15 or 20*20 cm timber is installed in the form of single columns. If installed incorrectly, cracks appear in the wall and on the frame, and the seams may come apart. To avoid this, installation must be carried out meticulously. Builders should not forget about expansion gaps. - Heating. A house made of timber must be allowed to shrink for at least 6 months before completing the installation of window openings and doors. According to the rules, the building cannot be heated for a year after the construction of the box.
One more point: intermittent heating has a detrimental effect on the integrity of the timber. For example, the owner comes to the dacha for the weekend in the fall and heats the house. After he leaves, he turns off the heating. A week or two later he comes again and heats the house again.During the cold period, the walls gain moisture, during the heating process they dry out sharply, after which the process is repeated and cracks appear. It is recommended to maintain a positive temperature, even during departure, if the house is regularly visited by the owners.
The appearance of cracks is influenced by untimely and inappropriate maintenance. The material must be treated with an antiseptic; hydro- and vapor barrier is required. It is also worth remembering the expiration dates of protective compounds.
Why do you need to fix the defect?
A crack is a suddenly formed free space, which carries with it several dangers :
- Reduced thermal insulation properties of the material. Splits make the timber thinner, additional cold bridges appear, and the temperature inside the building drops.
- The service life of the building is reduced. Cracks can appear unnoticed by the eye; insects can settle inside and increase the effect of destruction. As a result, the house becomes uninhabitable and even life-threatening.
- The appearance of microorganisms. Free space, warm, filled with oxygen, is an ideal environment for the development of mold and mildew. Part of the building begins to rot, and it becomes dangerous to stay in the house for a long time.
- Additional expenses. First of all, cracks increase heating costs. Then you have to spend money on eliminating splits and repairing thermal insulation.
- Loss of strength. The split disrupts the structure of the material, it becomes brittle.
- Not aesthetic appearance. A wooden house with cracks looks unkempt. A crack spoils the appearance of a building, despite the fact that it is a natural process.
As a rule, only one crack can be present in one element. The main task of home owners is to eliminate the defect in a timely manner so that the split does not increase and spread.
Difficulties and errors
What you need to consider when repairing cracks in timber walls:
The material must be clean and dry before application. Jagged edges and debris are removed for better adhesion of the surface to the filler.- You cannot use repair mixtures on the inner surface of the wall outside the building. They will be of no practical use; the cracks will increase in size.
- Gaps need to be repaired in a timely manner, without waiting for the building to completely collapse. This also applies to small cracks, which must be repaired immediately after detection.
- Mixtures and solutions for sealing cracks are used immediately after combining the main substances (arbogypsum, putty and the like), otherwise they will harden before they hit the wall. Prepare solutions in small portions.
- Be sure to let the wet ingredients dry and leave the crack for the period required according to the instructions for the substance. Do not cover with finishing materials until the composition in the split is completely dry.
List of expenses
The cost of repairing cracks in houses made of timber starts from 100 rubles/sq m. It may vary due to the complexity, volume, and material used to perform the work. Attracting highly qualified specialists increases the price several times.
Average cost of materials:
- carpentry PVA + sawdust – 150 RUR/piece + 120 RUR. per bag;
- wood putty - about 200 rubles. per kg, the manufacturer and volume of the can matter;
- epoxy resin 500-600 rubles, depends on the volume and manufacturer;
- sealant – 150 rub. per packaging;
- wax corrector 110-150 rub. per piece;
- tyrsa – 35 rubles. per bag.
Step-by-step repair instructions
How the repair process is carried out:
- If a crack is detected, examine it, check the depth and decide on the material for repair.
- Using sandpaper, carefully clean the surface from nicks and debris.
- Remove the sawdust, check that there is no excess left inside the split and that it is clean.
- Cover the edges of the crack with masking tape so as not to stain the surface.
- If the crack is deep and a sealant is used, a cord is placed inside using a long thin object (for example, a knitting needle or a toothpick). It should fill the inside so that 5 mm is left free from the edge. Afterwards, the sealant is filled carefully, leaving no empty spaces.
- The remaining materials are used according to the same principle - they fill the gap with them, trying to fill the maximum possible space. If you use a sliver, use a rubber mallet to hammer it into the split so that it holds tightly using a rubber mallet, using careful movements.
- Remove excess liquid material with a damp cloth.
- Wait for the filler to dry completely and remove the masking tape.
- Using sandpaper, level the surface, remove debris and nicks. If necessary, cover with protective and finishing materials.