One of the main rules for working with a plane, chisel or chisel is the need to work only with a well-sharpened tool. The meaning of this rule is extremely simple - when working with a sharp tool, the risk of damaging the workpiece is reduced to almost zero. That is why every master must not only be well versed in the intricacies of using the tool, but also be able to sharpen and tune it correctly. And you can do this quickly and correctly using a device for sharpening plane knives, which is easy to make yourself from a block of wood and a couple of bolts.
Determining the need for sharpening
The relevance of this issue primarily concerns carpentry tools, because working with wood does not tolerate inaccuracies.
If something is cut off too much or the cut is oblique and does not correspond to the specified parameters, then the whole work will have to be redone. Therefore, characteristics such as serviceability and quality are fundamental and require timely determination. This also applies to all types of planes, or more precisely, their knives, which must always be sharpened and ready for use.
To identify the need for sharpening, you need to pay attention to the following subtleties:
- The knife blade is in constant contact with different materials, which leads to their gradual dulling. It must be remembered that it is located at a certain angle, and its sharpness ensures the accuracy and correctness of the cut.
- In an electric planer, the knives are located directly on the rotating drum and have two cutting edges. When at least one of them becomes dull, the knife begins to turn over. Despite the fact that such knives are made of steel endowed with high strength (tungsten carbide), they also successfully become dull over time.
It is known that different shapes are an indicator inherent in all kinds of plane models. They can be straight, rounded and wavy. Some amateurs believe that straight-shaped knives become dull the most, but this is incorrect, this process can affect any structure, so it is necessary to monitor the condition.
People who, due to their professional duties, work almost constantly with wood processing, are more likely to encounter this phenomenon. Typically, changes are reflected in the quality and speed of work performed and are accompanied by the following symptoms:
- difficulty making movements;
- surfaces that have been worked with for a long time do not change their shape;
- the appearance of a shiny thread-like strip on the chamfer (cutting edge).
Installation recommendations
The blades are located on the rotating drum of the tool. Their purpose is to remove the top coating of wood during processing. The planer design can be equipped with one or a pair of knives. The last cutting parts are rotatable.
If any side becomes dull, the position of the blade can be easily changed. These parts are typically made from tool steel alloy or tungsten carbide. Steel knives can be sharpened repeatedly on a manual or automatic sharpening wheel.
Knives for electric planes are classified according to their shape:
- Rounded - used for processing wide surfaces, because the transitions should be as smooth as possible.
- Direct ones are designed for processing small products and in the process of selecting quarters.
- Wavy (curly). Such blades are used to age the material.
Before working at home, you should make sure that the knives are installed and adjusted correctly. If there are any errors, then certain actions should be taken. The cutting edge of the part should be positioned strictly parallel to the bottom of the electric planer and protrude slightly upward. Correct adjustments can be determined by visual inspection of the instrument.
Sharpening plane knives on a machine and adjusting them
Electric planer knives are consumables.
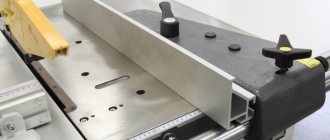
In most cases, when sharpening a plane, a special machine is used. Learning how to properly sharpen a tool on it is quite simple - just read the instructions. Such equipment includes the Tormek machine (image 4). It is equipped with a powerful engine, has low speeds, and can sharpen the tool over a fairly long period of time. High purity and sharpening accuracy is ensured by water cooling of the knife edge.
The knives to be sharpened are clamped with holders that are mounted on a support. When the machine is operating, it is possible to adjust the clamping force, chamfer width, and wheel rotation speed. The machine can sharpen tools made of any metal. The process of operating the machine itself is very simple, you just need to follow some safety rules.
A common type of hand plane is its electric version. His knives are considered consumables. As a rule, there are 2 of them. They are mounted on a special drum and remove the top layer of wood on the workpiece. These products are made from a special grade of tool steel. They lend themselves well to sharpening. For some models, they are made of tungsten carbide, which is particularly durable.
The angle of the plane should be sharpened at an angle of 45 to 60 degrees.
The knives also differ in their shapes. They are:
- straight;
- rounded;
- curly.
Straight blades are used for cutting narrow workpieces and cutting quarters. Wide surfaces are processed with rounded blades. The rounded ends make neat transitions between the plane's passage lines. Wave-shaped curly blades are needed to imitate various aged surfaces. Before you start working with the plane, you need to check that the knives are installed correctly. To do this, you need to turn the plane upside down and look at the blade: its cutting edge should protrude above the sole by 0.3-0.5 mm.
Planers Interskol and Baikal are of very good quality, compared to other manufacturers.
If necessary, the blades are adjusted. To adjust, the fastening screws are loosened, then the adjusting screws are turned in different directions until the knives take their place. After that, all that remains is to secure them. New electric planes most often come from the factory adjusted. They can be used immediately. But the settings must be checked periodically, because they can change when the blade meets a knot or nail. After adjustment, the plane is checked on an unnecessary block or board.
The Baikal and Interskol planes have very reliable and durable blades. They are slightly wider than other models, and their thickness is also slightly greater. They are sharpened in the usual ways. The sharpening angle is approximately 30 degrees. In order for the quality of planing to be high, the cutting edge should not have any burrs. To do this, sharpened knives need to be straightened using a grinding wheel. The piece of iron is installed in the device and moved from one side to the other. The pressure on the circle or touchstone should be minimal so as not to overheat the part. Thanks to this manipulation, the knife will become especially sharp.
When finishing using various types of whetstones, water, oil, and kerosene are used as a coolant. If the whetstone has a different structure on each side, then use the coarse-grained side first, then the fine-grained side. The whetstone needs to be washed periodically so that it does not become greasy.
Tormek sharpening machine
The Tormek is a low speed grinding machine with a powerful motor and significant torque. The machine allows sharpening work to be carried out continuously over a long period of time. High sharpening frequency is ensured by low speeds (up to 90 rpm) and water cooling of the cutting edge of the tool being sharpened. The design and operating principle of the machine for sharpening knives for planes is quite simple. The tool to be sharpened is clamped into the holder.
The holder with the attached tool is secured to a universal support. Then the sharpening machine is turned on. Sharpening of knives or other tools occurs at low speeds using a sharpening wheel immersed in water. The sharpening process is visible, at any time it is possible to adjust and control the clamping force, the width of the sharpening chamfer and the rotation speed of the grinding wheel. When sharpening a tool, burnout of the tool is completely eliminated. The use of various sharpening stones allows you to sharpen any metal.
You can learn how to operate a sharpening machine in a few sessions. Therefore, sharpening knives with your own hands will not be difficult. For greater confidence in the work and practice of sharpening plane knives, you can watch the video.
Let us remind you that sharpening work always requires attention and compliance with safety regulations.
How to sharpen a plane knife correctly
And so, both sides of the knife have exhausted their sharpness, let’s start sharpening. The general rule is that from the first movement to the final edit, the angle of contact between the knife and the sharpening tool should remain unchanged. The movement of the emery should be made across the cutting surface.
There are several ways:
Manual sharpening with non-adjustable lock
A special sharpening device is used - a knife holder (conductor). With even force, we make circular movements along the whetstone or whetstone, carefully ensuring that the entire cutting edge is processed.
You can use sandpaper laid out on a flat surface. This option is only suitable for short knives.
Such holders often come complete with an electric planer. A significant drawback is the inability to adjust the sharpening angle. Knives made of hard alloys cannot be sharpened in this way.
Manual sharpening with adjustable lock
This method is semi-professional. The quality of processing is at the highest level, but small mechanization is not used. The role of a device that fixes the angle is a stop with adjustable height. For convenience, it can be equipped with a roller.
- By moving the knife longitudinally along the abrasive surface, you can achieve high quality processing.
- The pressure is adjusted by hand.
- This device allows you to sharpen knives of any width at home, it all depends on the area of the sandpaper.
The main condition is a perfectly flat surface. It is convenient to use thick glass as a substrate. Waterproof sandpaper moistened with water is fixed on it. The process begins with the coarse fraction, gradually moving to the “zero” fraction. The sharpening angle should be about 25-30 degrees; it can be easily controlled by the height of the stop.
The disadvantage of this method is that it takes a lot of time. This more than pays off with the high quality of work. Sharpening carbide knives using this method is almost impossible.
Manual sharpening with an emery guide
In this case, the knife is rigidly fixed, and the emery stone has the ability to move along the surface being processed at a constant angle.
If you ensure that the direction of movement of the emery is perpendicular to the surface being sharpened, the result will be of high quality. One of the options is shown in the diagram.
The process is painstaking, but manufacturing the device actually does not require financial costs. It should be noted that this option is not suitable for processing hard alloys.
Mechanized sharpening methods
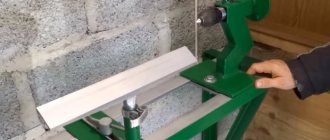
Small sharpening machines with an adjustable jig are used. They can be purchased at the store, but the cost of such products is high. Therefore, most home craftsmen prefer to make such machines themselves.
Using a guide located along the axis of rotation, the knife moves across the emery without changing the “angle of attack.” The sharpening is of high quality, the time required is minimal. By changing the wheels, you can both sharpen and edit your knives.
It is necessary to sharpen until barely noticeable burrs appear, similar to foil. They are removed with a whetstone, which must be drawn along the back side of the cut parallel to the knife.
The disadvantage of this method is the complexity of the design and the relatively high cost of components. In this case, there are no restrictions either on the size or hardness of the processed incisors.
The final stage is editing the knife
In this case, the surface is brought to an almost mirror-like shine. The sharpness of the edge is checked with paper. It should cut like a razor blade. Editing is done in the same way as sharpening.
You can straighten the edge of an electric planer knife manually; see how to do this in this video.
Only the grain size of the abrasive should be practically zero. The ideal option is to use Japanese waterproof sandpaper with a grain size of 2000-3000 at the final stage.
You can bring the surface to a mirror shine using polishing paste and a felt wheel. But don’t get carried away with the appearance, so as not to dull the edge.
Why do you need a sharpener?
A living relic of our days is the Finnish hunting knife. Not a gangster Finnish knife, sometimes of a bizarre shape, but a Finnish-type hunting knife, on the left in the figure. Traditional hunting knives (center and left) are similar in shape, but the difference between them is very large.
Finnish knife and classic hunting knives
The blade of a Finnish knife is forged from cast iron, which can be smelted right in your yard from swamp ore in a furnace-furnace, without resorting to the blast furnace process, puddling, and other methods of converting cast iron into iron and steel. The viscosity of crinkly iron is excellent; it is very difficult to break a blade made from it. But the hardness is also low, somewhere around HRS55, the knife becomes dull quite quickly. Finnish hunters did not care about this: a blade of such hardness can be sharpened (sharpened) by beating on many natural stones, and there were always enough smoothed moraine boulders in Fennoscandia.
They sharpen a knife by beating it in much the same way as beating a scythe, only the whetstone is motionless and the blade is moved. First, they pull it along the whetstone with the butt away from you, then they turn it over and pull it with the butt towards you. The position of the cutting edge (CR) on the whetstone is always dragging; quick movements: shirk-shirk! During each movement, you need to keep the contact patch of the blade with the touchstone (see below), but the requirements for maintaining the angle of inclination are not so strict. Learning to sharpen a knife by beating is not very difficult, and with some skill you can create a smoothly running profile on the blade, see below. However, the Finnish knife is, in general, a dead end in the evolution of a cutting tool, surviving in special natural conditions.
A good knife has never been cheap, and in extreme situations, the durability of the blade, combined with the toughness of the blade, became vital factors. Therefore, even in ancient times, they learned to harden knife blades from the surface and cement them: the core remained viscous, not brittle, and a hard, red-hot crust formed on the outside, see next. rice.:
Structure of a knife blade with surface hardening and carburization
It is still possible to sharpen a knife with a cemented blade, but you need a skill that is not given to everyone. And the abrasive is already needed from a special type of stone - lithographic grunstein slate. There is little of it in nature; Grünstein is still considered a strategic raw material. There is no artificial grenstein and it is not expected. It’s as easy as shelling pears to ruin a cemented knife with inept beating - a little somewhere the cementation bark will be stripped down to raw metal (this is not visible to the eye), the knife will only have to be thrown away, the blade will immediately become dull and begin to crumble.
Service knives do not require the same durability and toughness as hunting and hiking knives, and they should cost much less. As a result, special steels and powder metallurgy are widely used in the production of utility knives. The blade of an “eternal” kitchen knife is structured like a rodent’s incisor: in longitudinal layers, the hardness of which decreases from the core outward. In any case, you have to sharpen the knife less often, but chipping is definitely ruled out - the blade immediately becomes discolored.
Sharpening electric planer knives
The main features of knives for drive-type planes are their double-sidedness, as well as work exclusively along the wood fibers. If the knives are made of tool steels, then they can be sharpened, while carbide knives will have to be replaced. When one part of the knife becomes dull, it is turned over to the opposite side and continued to be used.
The following versions of electric planer knives are distinguished:
- Straight - they are used for working with narrow grooves on products;
- Rounded – suitable for planing wider surfaces;
- Curly or wavy, which are used to form textured surfaces on the product.
Knives also differ in their sizes, in particular, in length. For imported tools, the standard size is 82 mm; in practice, such knives are called “plates”. However, some domestic manufacturers produce knives that are compatible with foreign-made tools. High-power electric planers (designed for working with more durable wood) are equipped with thicker knives with a width of 110 mm. A special feature of these knives is the presence of mounting holes.
The longer the knife, the easier it is to sharpen it
As in the previous case, it is important to know the material from which the knife is made. The process of sharpening knives for electric planers is as follows
First, the current state of the cutting edge is determined. If a shiny stripe is clearly visible on the bevel of the knife, then such a tool needs to be sharpened. It is carried out at a sharpening angle of 30°, using a grinding wheel with a guide jig, pre-moistened with water. Grinding can be performed using both reciprocating and circular movements of the knife. In the first option, movements should be performed across the working surface of the blade. Cooling during the grinding process is mandatory: electric planer knives operate at much higher speeds and are therefore extremely sensitive to a decrease in hardness. This is exactly what will happen if grinding is carried out in ordinary air: the steel is released, and its hardness drops.
It should be noted that all models of electric planers are equipped with special holders. By securing a knife in such a holder, you can sharpen it relatively conveniently on a regular grinding block. During the sharpening process, the condition of the blade surface is visually monitored: the working edge should have a mirror surface.
After finishing work, the surface of the grinding wheel or block should be thoroughly cleaned of grease.
Manufacturing process
You can make the device yourself. The instructions are as follows:
- To begin with, an abrasive of the required grain size is selected.
- The next step is to create a template at the required angle. A wooden block is ideal for this, from which the material is removed at the required angle.
It is quite difficult to create a full-fledged machine driven by an electric motor. This is due to the fact that accurate calculations need to be made.
In conclusion, we note that a plane with timely sharpening of knives can last for a very long period. In the manufacture of the blade, tool steel is used, which is characterized by increased resistance to mechanical stress.
How to sharpen a plane knife
The first attempt at straightening the cutting edge showed good performance of the created device for sharpening carpentry tools, but immediately pointed out its shortcomings, which were made in a hurry.
What complicates the work of the sharpening trolley
About the body height
To create a high-quality cutting edge, you need to set the sharpening angle correctly. It is formed by extending the blade of a plane, used as the hypotenuse of a right triangle.
This factor must be taken into account when creating the cart height. To form the sharpest corners, I needed to extend the knife out of the sharpening device as much as possible, and this is not very convenient.
Therefore, when setting up, I reduced the height of the device to a minimum by cutting off part of the body. It only took a few minutes, and the capabilities and ease of use of the tool expanded.
About the width of the distance between the wheels
A mistake was made here too. A wide cart requires a large whetstone or large area sandpaper. It's not economical.
I reduced the distance between the ball bearings as much as possible, and they began to fit on a homemade whetstone I made from ceramic tiles. With its help, it is convenient to fine-tune the cutting edge after straightening it on coarse-grained sandpaper.
Other recommendations
The block body I made is more conveniently made from three components:
- lower, serving as an axis for fastening the wheels and attached to the upper adapter;
- medium rectangular;
- the top of the fixed mounting plate.
The lower blank with bearings can be made narrower than the width of the plane blade and secured with separate screws to the middle one, and the studs can be placed in the middle and upper parts. In this case, the cutting tool will become more convenient.
Sharpening technology
There is nothing complicated in this matter if you install the plane blade correctly. Its plane of supply must lie exactly on the surface of the grindstone at the moment when the trolley is in the working position
We need to pay attention to:
- density and uniformity of surface contact;
- strictly perpendicular position of the cutting edge relative to the direction of movement of the sharpening cart;
- no obstacles in the way of the wheels.
The sharpening itself is quick. My assistant, a primary school student, performed this simple job with great interest, rolling the prepared device along an evenly spread strip of sandpaper.
He got a fairly satisfactory result: a completely normal, smooth cutting edge, but not a fully formed bevel plane at the bottom.
I just have a little work left to do to fix this defect. Then I brought the cutting surface to good condition on a homemade fine-grit whetstone.
Surface quality has improved. Next you need to edit the leather or rubber with GOI paste.
But even in this state, the plane began to plane the wood well, creating thin and uniform chips.
In concluding the presentation of the material, I would like to draw your attention to the fact that the devices for sharpening the knives of a plane, chisel and other carpentry tools have different designs. The simplest ones are created from an ordinary wooden block, in which a cut is made at an angle to attach the cutting blade
This whetstone is used to guide the grindstone. The sharpening is quite satisfactory, but additional friction occurs on the wood, which also gradually wears down. And in the described design, rolling bearings relieve this load.
The design I recommend is intended for beginners without practical experience. Professional carpenters use expensive and high-precision tools.
Andrey Yarmolkevich talks about them in detail in his video “Sharpening a hand plane.”
https://youtube.com/watch?v=hc_cFxP4C2s
Useful products
- Wood carving blades
- Tool for opening the tablet case
- Laser level with 3 operating modes
How to make a sharpening device and sharpen a plane knife or chisel with your own hands
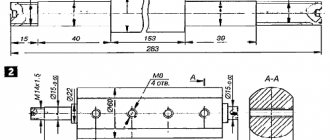
If one corner of the piece of iron protrudes, then it is corrected by lightly hitting the piece of iron with a hammer from the side of the protruding corner (Fig. 4c).
After the iron is installed correctly, it is finally secured with a wedge. The wedge should not be driven too hard to avoid splitting the shoulders.
Rice. 4 Setting up the plane: a - correct grip; b - technique of knocking out a knife (piece of iron); d — correction of metal misalignment (front view)
Metal plows are adjusted using a clamping screw. After tuning, the instrument should be tested on a board. A well-tuned plane easily removes chips and planes smoothly, without burrs or scratches.
Carpentry. Mastery lessons. Content
Knife design
The knife of a hand plane consists of a working and a supporting part. In the configuration of the working part of the knife there are:
- A chamfer that forms on the back of a blade. It reduces the force of cutting the knife into wood by eliminating friction of the rear part against the workpiece material.
- The rake angle, which in most cases coincides with the accepted inclination of the knife in the plane body.
- The back corner of the chamfer itself.
- The working angle of the sharpening, which is equal to the difference between the values of the chamfer angle and the angle of inclination of the knife in the plane.
For the durability of the tool in question, the rake angle is of greatest importance: it is this that determines the smoothness of the planed surface, the conditions for removing chips from the processing zone and the load on the blade.
When choosing the optimal value for a given angle, the following factors are taken into account:
- Physico-mechanical properties of the processed material. In particular, as hardness increases, the angle must be increased. For processing soft wood (linden, aspen, pine, larch) it is recommended to set the knife at an angle of 45±5°, for working on harder wood (hornbeam, oak, pear) - 60±5°, and when processing even harder materials - even up to 80°. Such recommendations are associated with the abrasive action produced by the passage of chips as they rise from the planing zone;
- Type of planing. Almost every type of wood requires a certain angle of inclination of the plane to the plane of the workpiece being processed. For example, pine is best planed when the tool is tilted at a sharpening angle of the knives of a hand plane of 40...50 ° from the axis of the board. Less soft varieties are processed at sharpening angles of 25...30°. This technique provides better planing quality, but the knife heats up more and, therefore, becomes dull faster;
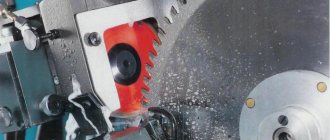
- Knife material and hardness. High-speed steels P12 or even P18 are most suitable for these purposes (for this reason, some home craftsmen use parts of friction saw blades that work under similar conditions to make plane knives). Planer knives made from ordinary tool steel type U7 or U8 will be less durable.
Rating of high-quality models with a metal body
BISON Professional No. 3 210x55 mm
A high-quality, reliable model produced by a popular brand, which is intended for household and professional use. This device can be actively used both when carrying out carpentry and when performing a variety of carpentry work. Thanks to the use of this model, a high level of quality of processed surfaces is ensured. It is characterized by a long period of operation, simplicity, and ease of use.
Equipped with ergonomic handles that provide a high level of safety when processing wooden surfaces. In the manufacture of the body of this model, cast iron was used. The cutting blade is made of high quality U8A steel, which has undergone a hardening procedure. The width of the knife is 45 mm. The dimensions of the sole are 210x55 mm. Weight - 1075 grams.
BISON Professional No. 3 210x55 mm
Advantages:
- Quality of materials;
- Reliable case;
- Ergonomic handle;
- Easy to adjust planing depth;
- High-quality knife blade (good sharpening).
Flaws:
- High price (1680 rubles);
- Some users indicate that the knife needs some fine-tuning;
- A bit heavy.
STANLEY 60 ½ 1-12-060
A high-quality device for processing the ends of workpieces, which is produced under a popular, well-known brand. Allows you to process even hard wood with high quality. High accuracy of adjustment of the cutting element is ensured by a special mechanism that allows you to set the work table in the desired position.
High-quality metal was used in the manufacture of the case, as well as the working components of this model. The handles have a high level of ergonomics and provide a comfortable, tenacious grip. The width of the knife is 35 mm, while its installation angle is 13 degrees. Sole length – 150 mm.
STANLEY 60 ½ 1-12-060
Advantages:
- Durable housing;
- Reliable design;
- High quality material;
- Convenient to use;
- Durability.
Flaws:
- According to some users, this model has slight irregularities in the geometry of the case;
- Cost (2328 rubles).
BISON Expert Metal semi-jointer 18505-35_z01
It is a reliable device that is specially designed for planing wooden surfaces, performing a variety of carpentry, as well as all kinds of carpentry tasks. High-quality tool steel was used in the manufacture of knives. It is worth noting that the knives have been hardened, which ensures a long period of their operation.
This model is equipped with a cast iron body. Supports adjustment of knives in two planes. Equipped with ergonomic, comfortable handles. Used for finishing planing. Knife width – 50 mm. Sole length – 350 mm.
BISON Expert Metal semi-jointer 18505-35_z01
Advantages:
- Good knife sharpening;
- Hard wood can be processed;
- Good ergonomics of the handles;
- Possibility of universal use.
Flaws:
- Price (3009 rubles);
- No frog;
- Some users indicate that when performing work, the handle can rotate, which creates some inconvenience and discomfort.
Sparta 210795 black 245x58 mm
It is an inexpensive, reliable planer that is perfect for processing small workpieces. Copes with removing excess wood layer and obtaining smooth surfaces in hard-to-reach areas of the workpiece. It is equipped with a high-quality cast iron body, which is distinguished by a durable, well-thought-out design that is not subject to deformation.
High-speed steel was used in the manufacture of the knife. The design of this device is equipped with a mechanism that allows automatic centering of the knife being used. It is additionally equipped with a chipbreaker, which allows for final processing of products.
Sparta 210795 black 245x58 mm
Advantages:
- Price (850 rubles);
- Dimensions;
- Case quality.
Flaws:
- Rough processing of the sole;
- There is a slight play on the lever;
- Low quality of components;
- Suitable as a budget option for home use, rough processing of various products.
Checking Blade Adjustment
After sharpening, you should not immediately put the knife into use. It is necessary to check and adjust the position of the blade in the plane. When the blades are processed and installed, it is necessary to carefully inspect the plane and evaluate the distance to which the knife extends from its position. The optimal parameters are as follows.
- The protrusion of the blade should not exceed a distance of 0.5 mm. If rough processing is required, then the cutting element can be extended by 1 mm.
- A large gap results in large chips. To improve the quality of work, you should reduce the gap between the surface of the wood and the blade. Then the chips will be minimal, and this will reduce metal wear.
Additionally, it is worth considering that when comparing a plane with other tools, it will differ from them in its ability to be used for fine processing. This can only be achieved by correctly adjusting the location of the knives in the design of the tool and by choosing a suitable angle. When all the procedures for sharpening and adjusting the knives are completed, it is necessary to evaluate the performance of the plane. To do this, you should try treating the surface of the wood. If it becomes smooth during processing, it means that the sharpening was done correctly.
The nuances of sharpening a hand plane knife are in the video below.
Operating rules
In order for the processing of a wooden surface with a plane to be of high quality, it is necessary to take into account a few simple rules.
- Before starting work, you need to configure the tool. The chips must be continuous and uniform in thickness.
- When working with a plane, you need to stand to the right of it so that the body is parallel to the surface being processed and moves with the device. Movements should be uniform. This will be achieved by placing your leg forward, which will be responsible for redistributing the load.
- For successful work, it is recommended to securely fix the part. The tool is held with the hands and the surface is processed by running it parallel to the installed workpiece.
A planer is a dangerous tool, so you should avoid any contact of the device’s blades with the surface or your hands. These rules will help make operation comfortable.
In the next video you can learn more about the nuances of sharpening planer knives.
Features of the work
Plane knives are sharpened at the factory at the most suitable angle, but when it becomes necessary to sharpen a tool that has lost its sharpness, it is necessary to preserve the existing sharpening features
If you carry out work without the use of appropriate devices, then you will have to pay special attention to the correct position of the surface to be sharpened when exposed to abrasive. But if there is a need to change the sharpening angle, you will need to use special devices
Their description will be presented below, and it is no coincidence that they are intended for manual sharpening, since sharpeners powered by electricity do not allow achieving high results. Large revolutions of the abrasive surface cause the blade being processed to become soft after the next sharpening and become dull in a shorter time. A number of specialists have not used electric sharpeners for a long time when sharpening tools with their own hands.
Preparatory stage
The work begins with the preparatory stage. It looks like this:
- First, download the drawings with step-by-step instructions.
- The next step is to select the required materials.
- Certain tools are also required to process the material.
There are quite a large number of different sharpeners that you can make yourself. Hand tools have become widespread because they are quite easy to use.
Overview of species
Depending on the quality of the planer knives, the operating speed of the tool is determined, as well as the final result.
Also, the type of blade affects the way the surface is processed and the shape that can be obtained at the end of the work. Manufacturers of machine tool equipment produce several types of planes, each of which differs mainly in the type of blade provided in the design.
If we classify planes according to the method of surface treatment, then the following types of knives are distinguished.
Direct
With their help, it is possible to process small-sized workpieces. If desired, you can choose a quarter to carry out the necessary work. The blades have a classic straight shape and are positioned at a specific angle to create the desired result.
Rounded
Demanded for processing large surfaces. Such blades are used when it is necessary to organize a neat and smooth transition between planing planes.
Curly
This category includes planes, the knives of which allow you to achieve complex geometric shapes when processing a wooden surface. Structurally, the blades resemble the knives of classic planes, however, they have a number of features. By using curly knives, they create a wave-like surface shape and imitate “aged” wood. To determine a suitable knife, manufacturers use special markings that can be found on the surface. This way, when purchasing a blade, you can quickly choose the appropriate option.
Flat type planing
Speaking about which plane to choose for planing this type, it is worth noting that the above category of tools consists of samples, using which you can perform almost any processing of the product.
All planes, which are called single, and which are used for quickly leveling wood surfaces, have a straight blade that is additionally slightly rounded with a neat edge.
After using such a tool, there will be no burrs left. It is usually used when it is necessary to finish planing any object after completing rough-type processing.
Looking at the photo of a hand plane, you can see that for the final leveling of the product, a cross-cut type of plane is often used. Their main blade, as a rule, is always duplicated by a knife used to break chips.