Machine tools and tools in finished form are available in a wide range in specialized stores. However, their price is not affordable for everyone, especially a novice master. Homemade machines are a way out of a situation with a limited budget. Let's consider the features of their use and manufacture. Let's talk about the most popular devices. The information will help you decide on the choice of necessary equipment for organizing work in the workshop.
Using a non-factory electric grinder Source notperfect.ru
Using homemade machines in the workshop
The work that is performed in the workshop affects the equipment of the room with special devices. Typically, equipment is placed if the free area is at least 3 m2.
Workshops are often set up in small rooms, outbuildings, and garages. The best place is a separate building. In this case, the noise from the work being performed will not disturb other residents of the house.
Universal workshops are often set up to perform various jobs. If a person is engaged in the production of any products, then specific homemade tools and devices are made. Often workshops are equipped with machines for carpentry and processing of metal blanks. Often, premises for the repair of wheeled vehicles are also set up.
Basically the workshop is equipped with:
- devices that allow you to prepare tools, facilitate labor and mechanize operations;
- homemade products for processing metal parts;
- workbenches.
A workbench made of wooden elements Source skilljob.ru
It is also necessary to install shelves in the room where various tools will be stored. At the same time, they ensure unhindered access to them and compliance with fire safety rules.
Equipment and devices: types and types
In the West, there is a saying among milling operators: “fixtures are where you make your money,” which translates roughly as: “Fixtures are what you make money from.” If you can make gadgets that save time, you will reap big profits.
T-slots
T-slots are the most common method of positioning and holding your work fixture. They are simple, reliable and work. To attach anything to a T-slot table, use T-slot nuts and matching studs or other fasteners that fit the nuts.
T-slot nuts
Although they are common, they have some disadvantages compared to other solutions. Aside from the fact that T-slots can collect chips and other debris, their biggest disadvantage is that it makes it difficult to return your vise or other table mount fixture to the exact same location and orientation. This can result in additional work each time the machine must be set up with new work attachments for a new job. Over time, the cost of such inefficiency can be quite high.
Just imagine what if, instead of a tool changer and tool table, you had to dial in each tool every time you used it? Wouldn't this be a huge barrier to improving the productivity of your processing workflow? Well, setup time can also be a big hindrance to productivity, and T-slots don't help here.
There are a few solutions that tried to make them a little better:
Workbench for a carpenter
This type of equipment is a table. It is distinguished by its high strength and the presence of 2 vices on the tabletop. The table is also equipped with clamps that clamp the workpieces during planing. In addition, the workbench may still have places where other homemade devices, such as a router, will be attached.
A special table must have a comfortable height. She matches the height of the master. The minimum length of the workbench is 1000 mm. Often it is equal to 1700 mm or even 2000 mm. The standard width is 800 mm.
Before making a workbench for carpentry, get acquainted with its main parts Source infourok.ru
A workbench table is created as follows:
- The table surface is created - this is a shield, which is made from oak, beech or hornbeam boards with a minimum thickness of 55 mm. They are tightly fitted to each other. The boards used are impregnated with drying oil before joining. To create a rigid structure, a 50 mm block is used. It is fixed around the perimeter of the working surface.
- The supporting elements of the workbench are made. To do this, use linden or pine timber. Its size is 120*120 mm or 150*150 mm, and its length is approximately 1200 mm. The supports are connected by jumpers in the horizontal plane. To do this, take boards that are fixed at a distance of 300 mm from the floor.
- Make homemade devices to accommodate the tool. These are shelves located under the countertop. When they are open, they are often replaced with bedside tables.
- Attach a vice.
If a stationary workbench is created, its supporting elements are fixed to the floor. Depending on the specifics of the work being performed, mobile and collapsible tables are also manufactured.
Mobile workbench on wheels Source foamin.ru
Carpenter's workbench vice
This homemade tool is made using a screw rod. Its thread length must be at least 160 mm. In this case, the diameter of the rod itself must be 20 mm. For the vice you will also need wooden blocks and metal pins. The manufacturing sequence is as follows:
- Prepare a block of 200*300 mm. Its minimum thickness should be 50 mm. This will be one of the sponges. A hole for a screw is drilled in the center of the workpiece. On the sides of it, two more holes are made for the studs.
- A second movable jaw 200*180 mm is cut out and similar holes are drilled in it.
- A threaded pin is inserted into the workpiece. A handle is installed at one end. To prevent the jaws from moving, pins with a cross section of 10 mm are passed through other holes.
Wooden vice for a carpenter Source infradom.ru
What factors should you pay attention to when choosing a tool?
Regardless of what kind of devices you want to purchase, there are a number of criteria that any device of this kind must meet:
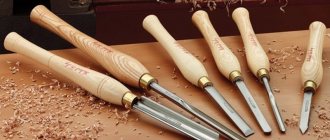
| Quality of materials | The first factor is the quality of the materials used in production; if the tool does not seem to inspire confidence, then questions will most likely arise during operation. This is especially true for hand-held devices, because they work at the expense of your effort - a dull chisel or low-quality hacksaw teeth will significantly reduce labor productivity |
| Convenience of devices | It is very important that the tool fits well in the hand, since prolonged work with an uncomfortable tool will cause increased fatigue and negatively affect the quality of processing. It is best if the products are equipped with anti-slip handles and have an ergonomic shape |
| Purposes of use | If you are going to engage in wood processing constantly, then it is advisable to purchase a power tool; if the work will be periodic, then it is better to pay attention to manual options, their price is much lower |
Important! We recommend purchasing products from well-known manufacturers, whose quality is well known in the market, especially when it comes to power tools; nowadays there are a huge number of cheap Asian products on sale, which very often fail.
The Makita brand is an excellent solution that is reliable and reasonably priced
Metal workbench for a mechanic
All useful homemade products and devices simplify the processing of workpieces. Such devices include a workbench for a mechanic. Its minimum dimensions are:
- length – 1800 mm;
- width – 700 mm;
- height – 900 mm.
The table is created in the following sequence:
- frame assembly;
- installation of 2 cabinets, covered with metal;
- securing a working surface consisting of a wooden base in the form of a shield, on which a sheet of metal of a suitable size is placed on top;
- assembly and installation of a rack at the back of the workbench to strengthen the entire structure and accommodate tools.
When assembling a bench, use:
- beams as racks - four corrugated pipes 40*60 mm with a wall thickness of at least 2 mm;
- three beams 50*40 mm to connect the racks and ensure longitudinal rigidity of the structure;
- corrugated pipe 40*30 mm with a wall of at least 1 mm in the amount of 9 pieces to create the frame of the cabinets;
- metal corner 50*50 mm for the manufacture of shelving racks, the height of which will be a maximum of 2000 mm;
- board 50 mm thick for the tabletop panel;
- a sheet of metal no thinner than 6 mm to cover the top surface of the workbench.
Sheet metal Source glavmetall.com
See also: Catalog of construction companies that have their own production of materials and components for the construction of houses
Making a metal workbench with your own hands: how to make a metal structure
For plumbing work, it is better to make a metal workbench with your own hands, because a wooden one will not be suitable for this. The fact is that wood is not that durable. In addition, when working with metal workpieces, a tabletop made of this material will be constantly damaged and will quickly become unusable.
In the general drawing of a do-it-yourself bench, you can identify five main components of the design:
- For longitudinal rigidity of the product, horizontal beams (3 pieces) measuring 6x4 cm are used. Length – slightly exceeds 2 m.
- Rack-mounted small-sized beams (9 pcs.) made of profiled pipes measuring 6x4 cm. They are used to assemble the frame part of the cabinets. In the corner area there are welded spacers made of steel strips. Due to all these elements, the frame is rigid and very durable.
- Rack beams (4 pcs.) 9-10 cm long (section 6x4 cm). To do this, it is better to use metal profile pipes with thick walls (more than 2 mm).
- Corner No. 50 (4 pcs.), which will be used as vertical posts. The height of these elements is 1.7-2 m. Working tools will be attached here.
Dimensions of the bench:
| Workbench options | Size, cm |
| Structure length | 2200 |
| Structure width | 750 |
| Structure height | 950 |
| Width of cabinet with drawers | 750 |
| Clearance between cabinets | 700 |
Do-it-yourself workbench manufacturing technology: how to assemble
Making a universal workbench with your own hands begins with assembling the frame. To do this, you need to take a couple of short and a couple of long beams. During the welding process, these elements may become twisted.
To prevent this, you must:
Installation diagram of a metal workbench
Then the rear vertical racks and the rear beam (long, one of three) are attached. You definitely need to check how evenly they are placed in relation to each other. If there are any deviations, the beams can be carefully bent using a hammer. At the end, the remaining vertical rack elements are assembled, as well as elements that provide rigidity.
When the frame is ready, corners can be welded to it to strengthen the structure. The tabletop is formed from wooden boards. They must first be soaked in a fire-resistant liquid. Then a sheet of metal is laid on top.
A plywood tool shield can be mounted on the vertical rack elements. The same material is used to sew up the cabinets. For boxes, you can use metal boxes or make wooden structures.
You can use the video below to understand in more detail the technology of making a workbench with your own hands:
Wood lathe for lathe
There are various homemade machines and machines for the workshop. They all make the job easier. These include a lathe. Its structural elements are:
- Durable frame made of metal angle or pipe. Sometimes it is created from wooden blocks. The bed is fixed to the floor, and its lower part is weighted.
- A support, which is a supporting element for the cutters. This part of the machine must provide reliable fixation and allow the workpiece to move to the side. For this purpose, the design provides a screw rod.
- The clamping spindle, also called the headstock. The head of a powerful electric drill is often used as it.
The head of an electric drill is often used as a headstock. Source woodtoolsimg.ru
- Tailstock used for longitudinal movement of the workpiece. It is recommended to use the factory spindle, which has four cams.
- Electric drive providing rotation of 1500 rpm. Its power should be from 250 to 400 W. Often a washing machine motor is used as an electric motor. The design also includes a belt drive. This is a transmission, for the operation of which it is necessary to install pulleys on the shafts.
The electric motor of washing machines is often used as a drive for a lathe. Source dobro-teh.ru
Cutters for the machine
It is recommended to equip homemade devices with factory cutters. After all, they are sharpened with high quality using special equipment. As a last resort, for production use:
- old files without significant defects;
- steel square reinforcement is the optimal material for making cutters;
- square or rectangular spring from the car.
Subsequently, the existing workpieces are sharpened. Creates a semi-circular cutting edge for roughing wood parts. Finish turning work is carried out with a cutter that has a straight blade.
After sharpening, the cutting elements are hardened. During this process, the cutters are first heated and then placed in machine oil.
Wood boring tools for a lathe Source 24aul.ru
DIY knife sharpening devices: drawings and recommendations
To make a sharpener from a washing machine motor with your own hands, you can limit yourself to a motor from an old Soviet design, for example, SMR-1.5 or Riga-17. A power of 200 W will be enough, although you can increase this figure to 400 W by choosing a different engine option.
The list of parts needed for a DIY sharpening machine includes:
- tube (to grind the flange);
- a nut for fixing the stone on the pulley;
Homemade knife sharpening device
- metal for making a protective casing for a sharpener with your own hands (thickness 2.-2.5 mm);
- whetstone;
- an electrical cable cord having a plug;
- starting device;
- a corner made of metal or a block of wood (for the frame).
The diameter of the flange must match the dimensions of the bushing on the motor. In addition, a sharpening stone will be placed on this part. On one side, this element is threaded. The indentation should be equal to the thickness of the circle multiplied by 2. The thread is applied with a tap. On the other hand, the flange must be pressed onto the motor shaft using heat. Fixation is carried out by bolting or welding.
The working winding of the motor is connected to the cable. It has a resistance of 12 ohms, which can be calculated using a multimeter. The starting winding for a DIY knife sharpener will have 30 ohms. Then the bed is made. It is recommended to take a metal corner for it.
Assembly drawing of a homemade universal knife sharpener
Some people need a chainsaw chain sharpener. You can make such a structure with your own hands from a frame with 3 supports, two spindles, a stepper motor (2 kW) and pipes used as holders.
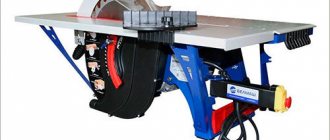
Stationary circulation saw
The stationary circular saw is placed on a sturdy table. Its working surface is usually made of metal sheet. It is reinforced with stiffening ribs. For their manufacture, a steel angle is used.
On the working surface there are usually:
- stops;
- guides;
- elements for adjustment;
- cutting disc.
On a note! The circular saw is powered by an electric motor. Its power should be approximately 800 W, and its rotation should be 1700 rpm. The electric motor of the angle grinder corresponds to these characteristics.
Angle grinder for a stationary circular saw Source tdrim.ru
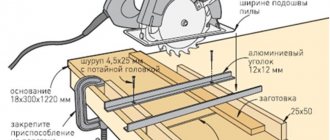
Before making a device for sawing wooden parts, prepare a working angle grinder with the necessary characteristics. Further actions are performed in the following order:
- Assembling the frame.
- Prepare a worktop in which a slot is made for the cutting disc.
- Two wooden blocks are fastened in parallel. They will be used as stops.
- Set the scale necessary to control the cutting of wooden parts.
- Clamps are installed so that workpieces and guides can be fixed.
- The grinder is secured by first installing the disk into the previously created slot in the table top. The power tool is fixed from below the working surface.
Ball locks and other solutions for quick tool insert changes
By now I hope you can see how much setup time you can save by using tooling plates. What could be better? There are at least two different ways to make setting up fixtures and accessories even easier: quick-change tool plates and trays.
With the Quick Change system, the time required to handle locating pins and fasteners is reduced with some kind of integrated solution that allows for precise positioning and very fast locking. One of them is the ball lock system:
Ball lock system
Ball locks are a system for quickly removing and installing tool plates. This system provides precise positioning and secure retention with 4 ball locks. Simply align the plate with the accessory plate (which has receiver bushings and is mounted on the table), drop the retainer ball shanks into the hole, tighten the bolt on top of the retainer ball shank, and you're done. It's really quick and easy to install four bolts without fiddling with locating pins or additional fasteners. We are talking about a 30-second changeover time, which is really very fast.
Drilling machine
Interesting homemade products and devices often help craftsmen out when making various products in the workshop. One such device is a drilling machine. Its main parts include:
- electric drill;
- base made of metal parts with the ability to secure the workpiece;
- a stand for fixing an electric drill, which is created using chipboard with a thickness of 20 to 25 mm or an old photographic enlarger;
- a unit that supplies the drilling tool.
The drill press stand must have guide rails. They are necessary for the electric drill to move strictly in a vertical direction. There are different options for feeding an electric tool, but the most common design is a lever with a spring. It is manually controlled by simply pressing. The design of the machine also includes stops. They are needed to adjust the depth of the hole created in the part.
Pallets
The next step is pallets. It's like automatic tool plates when everything else was manual. A typical pallet machine allows you to adjust one while the machine is working on another. Changing the pallet occurs by removing the old pallet outside the milling zone of the machine and installing a new one. This minimizes the amount of time the machine must be idle and allows adjustments to be made in parallel with processing.
Some machines have what are called "pallet pools", which allow you to set up multiple pallets in advance and schedule them to run. A pallet pool can allow a machine to run unattended for quite some time and can be a useful part for full automation.
Pallets are typically only seen on horizontal machining centers and some high-performance vertical machining centers. This is a full production feature that is quite expensive, so the cost needs to be justified.
CNC router
There are homemade machines and devices of complex design. Such devices include a CNC router. It is made for processing metal and wooden parts.
Work with a CNC router is carried out to a higher quality. This machine has advanced capabilities. When creating it, an LPT port is used, and numerical control is also provided. The copying unit is created from printer carriages with a matrix of needles.
The milling device is assembled as follows:
- The tabletop is made using a plywood sheet. Instead, chipboard with a thickness of at least 15 mm is used.
- A cutout is created to accommodate the cutter.
- The milling unit is installed.
- The electric drive is located.
- The transmission is secured.
- The spindle is mounted.
- The stops are fixed.
The process of creating a wood router Source tmklazer.rf
A CNC milling machine for processing metal workpieces is made with a more durable frame. The device is created in the following sequence:
- The column and frame are mounted when using a channel. From them a structure in the shape of the letter “P” is created. In it, the bridge between two supporting elements is formed by a part that is the base of the milling unit.
- Guides are made from angle iron. They are fixed with bolts on the column.
- Guide consoles are created from a pipe with a rectangular cross-section. To move them to a height of maximum 150 mm, the design provides a car jack.
- A threaded pin is inserted into the console.
- A working surface is created.
- A vice, fixing elements and guides are installed.
- The rotating unit is mounted. In this case, they strictly ensure that the shaft is in a vertical plane.
Manufacturing of cutters
Blanks for the manufacture of cutters must have adequate strength and a hard edge responsible for the thread, and be securely inserted into the clamp.
Suitable for making cutters:
- Small pieces of steel rods corresponding to the dimensions of the parts and having a square cross-section.
- Failed files and rasps that do not have strong chips or cracks.
- Car springs. The workpiece is first given the shape of a square - using welding or autogenous.
To install cutters on a machine, you need a specially modified housing with parts for installation. All elements must be made of high-strength material that can withstand heavy loads.
After the cutter is made, it is sharpened. To increase strength, the cutting part is hardened by heating to the desired temperature and dipping into machine oil. By repeating this process several times, a durable tool is obtained.
Thicknesser
Crafts for the workshop are often created to perform woodworking. The material always has to be planed. It is to solve this problem that a surface planer is made. The machine consists of the following parts:
- The frame consists of two frame structures, which are welded from 40*40 mm corners. The frames are fastened with studs.
- Tabletop made of metal or lumber, pre-impregnated with drying oil. The working surface is bolted to the frame.
Bed with a steel tabletop for thickness planer Source prostanki.com
- A broach consisting of rubber rollers. They are taken from a broken washing machine. The rollers are provided with smooth rotation by sliding them onto bearings.
- A casing that protects rotating parts. It is made of sheet metal about 5 mm thick and fixed to a frame made of corners measuring 20*20 mm.
- Electric motor with a power of 6 kW, which can rotate at a speed of at least 3000 rpm.
Clamps are used to secure the thickness planer. The device is fixed on the working surface. Do not forget about the required gap, when setting it, take into account the thickness of the workpiece.
Benefits of wood
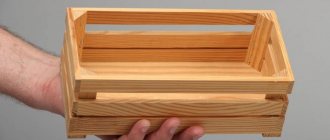
Wood, as a material for creativity, has the following advantages:
- Easy to create homemade products.
- Unique texture.
- Availability.
- Environmental Safety.
- Special energy.
- Relatively low cost.
- Practicality.
- Aesthetics.
In addition, wood has the ability to retain heat. So, wooden objects are pleasant to touch.
- Angorka. What it is?
- Flowers as gifts.
Dream Island - a place for a family holiday
Thus, we found out that the design of wooden crafts can be very different. To decorate a dacha, both deliberately rough products and finely crafted items are appropriate.
But it's better to choose one style and stick to it. It is also necessary to remember that the size of garden decor and its quantity must correspond to the area of the site.
Wood sanding machine
The design of such a machine has a cylinder on which sandpaper is placed. This unit rotates while processing the part. The assembly of a homemade machine is often performed for grinding cylindrical workpieces. A device is also made to create a flat surface of the workpiece.
When fixing the sanding paper, follow these rules:
- the width of the abrasive cloth should be approximately 250 mm;
- the sanding belt is connected without a gap exclusively end-to-end;
- The sandpaper is attached using a high-quality adhesive;
- at the edges of the shaft for the abrasive cloth there must be a side, the protrusion of which is from 2.5 to 4 mm;
- a rubber backing should be placed under the tape.
The shaft of the device is rotated by an electric motor. These two parts of the machine are connected by a belt drive. The design of the frame itself can have different designs. The option is chosen depending on the size of the workpieces being processed.
Device for polishing wooden parts Source notperfect.ru
Briefly about the main thing
Typically, craftsmen assemble machines for their workshops if the area of the room is at least 3 m2. Universal devices are manufactured or to perform a specific type of work. In addition to shelves and racks, in the workshop you can often find a workbench for carpentry work made of boards and bars, which is equipped with a vice.
Craftsmen also make a metal workbench from corrugated steel pipes, angles, and sheet metal. They also assemble a lathe on a metal frame, with a clamping spindle in the form of a drill head and an electric drive. Also popular in the workshop are a stationary circular saw based on a grinder, a drilling machine made from an electric drill, a surface planer made from an electric planer, and a CNC router.
4th axis, journals and tool columns
Sometimes it is useful to be able to apply another dimension to our thinking - in this case, the 4th Axis. In CNC, the 4th axis is usually the rotary axis. It is aligned to rotate along an axis parallel to one of the other three axes of the machine. On vertical machines, the 4th axis is often parallel to X or Y and routed downwards. On horizontal ones, the 4th axis is also parallel to X or Y, but it is vertical.
From a workplace perspective, the 4th axis can be used to introduce new orientations for two purposes:
1. It allows access to more sides of the part so processing can continue without the need to turn parts over by hand.
2. This allows access to more parts that can be positioned around the 4th axis.
To learn more about these applications, check out our excellent 4th Axis Basics series.