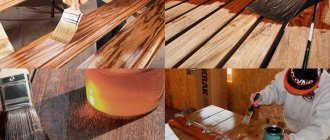
Painting the facades of wooden houses is not an easy task. How to paint wood correctly in order to maintain its aesthetic appeal and so that the work does not turn out to be too difficult? The answer to the first part of the question presupposes knowledge of wood coloring technology, and the answer to the second question will be the use of special products for coloring wood.
A spray gun for painting wood can only be used if a translucent composition is not used.
Let's take a closer look at how to paint wood with a spray gun.
Wood painting technology
Wood is a natural, environmentally friendly material with high aesthetic and performance characteristics. However, there are also disadvantages, the main one of which is exposure to the following factors:
- warping as a result of periodic swelling and drying of layers due to changes in humidity;
- biological damage by various microorganisms at high humidity;
- destruction of the structure due to exposure to ultraviolet radiation.
All this requires taking special measures, among which the main role is played by varnishing and painting the wood.
Painting technology largely depends on what grade and type of wood is used for wooden products. Hardwoods are more durable, in some cases do not require prior priming and may contain extracts that slow down the drying process. The pores of oak, for example, require filling, and teak has an oily deposit that must be removed with a solvent. Painting wood furniture begins with choosing the type of paint. The main options are alkyd enamel (oil paint) and acrylic. The first is relatively inexpensive, has good hiding power and weather resistance. But a more aesthetic, reliable and high-quality option is acrylic paints, which are often used to coat real designer furniture. Let's briefly look at the main stages of painting wood.
Application of hammer paint
Hammer paint is usually used to paint metal parts. It helps protect the surface from rust and hide unevenness. In addition, when applying hammer paint, a decorative pattern is obtained, which can give the product the appearance of a decorative element.
Hammer paint is easy to use and dries very quickly, which makes its use advantageous for uneven or old metal surfaces. It is often used to decorate car elements and metal furniture parts. When finishing work on wood surfaces with metal parts, hammer enamel is also used.
Although experts recommend using a roller to work with hammer paint, a spray gun can also be used. In this case, there will be no textured pattern, which is quite suitable for painting rusty car parts. .
[my_custom_ad_shortcode4]
Selecting a spray gun
Novice craftsmen often try to save money by choosing a paint sprayer with a minimal price tag when purchasing. However, when buying cheap equipment, you need to understand that the low price is a consequence of not the highest quality materials and the maximum technological simplification of the spray gun. Therefore, you should not save too much on buying a sprayer - this will affect the quality of the varnish.
When choosing a spray gun for varnish, it is recommended to pay attention to the following parameters:
- The material from which the nozzle cover is made. The best material for this part is stainless steel.
- Tightness of the structure. The spray gun maintains a certain pressure, so its components must be sealed, otherwise it will be impossible to obtain an evenly painted surface. Sealing is ensured by gaskets, and the best material for them is Teflon.
- Receiver location. This parameter does not have a direct effect on the operation of the equipment; however, if the tank is located at the bottom, it will be somewhat more difficult to control the spray gun, since such a device must be held strictly vertically.
- The material from which the tank is made. Metal tanks are easier to clean from paint or varnish residues, but in this case it is difficult to control the consumption of material. Plastic containers have exactly the opposite characteristics: they are difficult to clean, but it is easy to track the consumption of paint and varnish composition.
- The material from which the spray gun itself is made. The best option is high-strength plastic. It is not as heavy as metal, which means it will be physically easier to work with such equipment. On the other hand, many craftsmen recommend purchasing paint sprayers made of stainless steel, motivating this choice by the durability of this material.
- Torch width. This parameter indicates the area that can be processed per unit of time. The width of the torch is greatly influenced by the length of the hose. It is worth noting that not all jobs require a large flame width. For example, for processing small parts, a thin jet is much preferable. But for large-scale surfaces it is better to have a larger torch width.
- Correspondence between the performance of the spray gun and the external compressor. A situation where the power of the spray gun is greater than the power of the compressor is unacceptable.
- Ease of access to device controls. All buttons on the device must be easily accessible, since they are used to control the compressed air pressure and other functions.
Note! The diameter of the nozzle and the grain of the sprayed composition are interdependent parameters. The smaller the grain, the smaller the nozzle should be. It is wise to purchase several replacement nozzles and needles at once.
You should choose a specific model based on your real needs. Some people will prefer a paint sprayer with a plastic tank, while others will prefer a metal one, some will prefer a wide torch, while others will prefer a narrow one. In many cases, there is no need to spend money on professional pneumatic equipment and it is easier to get by with an electric or even manual device.
Spray gun design
Spray gun "Wagner"
As an example, let’s look at the features of the German W670 model spray gun. The spray gun includes a fine spray nozzle, a container for paint and varnish composition, an electric motor, an extension cord and a hose.
The Wagner paint sprayer allows you to work with any type of varnish: both water-based and soluble organic solvents. By changing the working nozzle (there are several included in the set), you can apply varnish of any viscosity level.
The model is characterized by a large spray angle, which allows the maximum possible surface area to be treated when applying varnish. The extension handle further expands the working area. The paint supply rate is controlled by a roller device.
The spray gun is equipped with an I-Spray nozzle, which gives two types of jet: flat horizontally and flat vertically. Another nozzle - PS800 - is designed specifically for spraying a thin layer of liquid compositions, primarily varnishes.
- Spray method: air.
- Power supply: 220 V mains.
- The required power is 350 W.
- Spray power - 120 W.
- Permissible soil viscosity is 3300 mPa/s.
- The maximum flow is 375 milliliters per minute.
- Tank volume - 0.8 l or 1.8 l.
- The length of the extension cable is 60 centimeters.
- The length of the air hose is 3.5 meters.
- Weight - 4.3 kg.
- spray gun;
- I-Spray nozzle and 1.8 liter tank;
- nozzle for liquid compounds PS800 and a 0.8 liter tank;
- air hose;
- extension;
- handle;
- shoulder strap;
- filler funnel;
- user manual;
- warranty card.
Features of surface treatment
Preparation work
- The quality of varnishing will largely depend on how the varnish spray gun is chosen, as well as how well the surface was prepared. For this reason, you should first remove the old coating and sand it well, and also degrease the surface. Pay special attention to the condition of the wood, whether there are signs of rotting on it. If affected areas are found, they must be well puttied and sanded with fine-grained sandpaper.
- Unfold the spray gun suction tube with the curved end facing forward. In this position, the varnish from the container will flow evenly into the nozzle.
- Set the power switch to 2. This mode is needed for working with viscous compounds.
Please note that soft wood species should first be primed with a “pile fixation”. Next, you should sand the surface again.
When applying the varnish composition, a number of technological requirements must be adhered to. For example, you should know that previously released varnish usually had a non-uniform composition - clumps of the mixture fly out of the sprayer. For this reason, before applying varnish to a finished surface, you should spray a little varnish composition onto a sampler (a piece of wood, cardboard, paper, etc.). We do test spraying with both horizontal and vertical nozzle positions.
Recommendations for applying varnish composition
- After making sure that the torch has acquired the desired shape and width, and the composition begins to release evenly, begin varnishing the surfaces.
- Apply the varnish with smooth movements from the shoulder, namely with the whole hand - due to this style of movement it is easier to maintain a good distance to the surface of the treatment.
- If spraying of varnish has started, it will stop only when the entire surface has been treated, since otherwise unevenness and stains may appear.
- If the work needs to be completed, then first you should move the sprayer away from the treatment area and then turn everything off.
- Move the sprayer away from you so that excess paint and varnish mixture gets onto untreated areas.
- Try to maintain the same distance from the machine to the treatment surface.
After the varnish layer has dried, the surface should be sanded, cleaned of dust and applied another layer of varnish.
Coloring materials
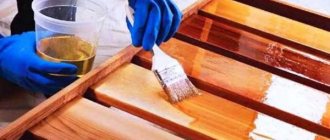
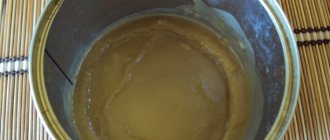
The paint also needs to be properly prepared:
- Check for viscosity.
- To ensure that there are no lumps left in the substance, it must be passed through a filter.
- If necessary, dilute the ready-to-use paint with a solvent.
It’s easy to check the density. It is enough to stir a small amount of it with a wooden stick and, lifting it above the container, watch how the drops flow. At high viscosity, the paint slides off slowly, in a thick stream. In this case, it should be diluted.
Information about the amount of solvent is contained on the packaging of paints and varnishes. After dilution, you need to check the density again. At normal viscosity, drops flow from the stick approximately one every second.
Next, the paint must be filtered. You can use a ready-made filter for this or make it yourself by stretching a nylon mesh over a clean container. Only after this, making sure that all foreign lumps and inclusions have been removed, will the paint be ready for use.
.
[my_custom_ad_shortcode6]
Types of spray guns, their pros and cons
On the specialized market you can find mechanical, pneumatic and electric types of spray guns. The latter are also divided into air, plunger and battery subtypes.
Mechanical spray guns
This budget solution is usually used for whitewashing trees; its operating principle is similar to the primitive pumping chamber presented in a children's water pistol. The advantages of the model come down to low cost, ease of use and the ability to create a uniform layer. But there are also disadvantages, for example, manual air pumping and lack of accuracy. Such a spray causes a strong dispersion of the suspension.
Preparing the room and surface for varnishing
Varnishing wood is a simple job, but it must be done correctly. Varnishing is carried out in three stages and begins with the preparation of the processed products. To process wood at home, you must first prepare the room in which the work will be carried out, and then the surface to be treated.
Varnishes have a long drying time, and therefore before repairs you should thoroughly clean the house and ensure a flow of clean air into the rooms. It is strongly not recommended to varnish wood in dusty rooms, as dust can get on the finished product and negatively affect its attractiveness.
Before starting varnishing, it is recommended to thoroughly wash the floor in the room and protect it with film (newspaper) from possible contamination. It is best to carry out painting work indoors at an air temperature of no higher than 20 degrees Celsius and with good ventilation. It is very important to prepare high-quality lighting for the workplace so as not to strain your eyes too much.
After preparing the work site, you need to clean the surface of the varnished wood from dirt and dust, and then sand it with fine-grained sandpaper along the wood grain. Next, you need to clean the products from dust; you can use rags for small items, and a vacuum cleaner for large items.
If the surface of the product was previously varnished or painted, the old coating will need to be completely removed using coarse sandpaper.
Sometimes it makes sense to varnish a product after priming the wooden surface. The primer provides not only better adhesion of the varnish, but also less consumption. After applying the primer, be sure to wait until it dries completely, no matter how long it takes.
The old coating must be completely removed before varnishing.
Now all that remains is to prepare the necessary consumables and tools for varnishing surfaces and you can begin the repair work. For work you will need personal protective equipment:
- gloves;
- respirator;
- clothes made of rough fabric;
- glasses.
To apply paint and varnish compositions, you can use different tools: a swab, a brush or a spray gun. The swab is suitable for treating wood with alcohol-containing varnishes, the brush is suitable for oil-based compositions. The spray bottle can be used to work with any varnish.
Step-by-step instruction
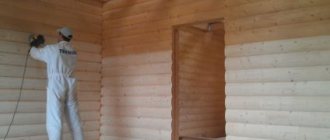
- Before starting painting, visually divide the facade into several zones. Select those that will be more important for the desired effect and will be a priority when painting the surface. For more free orientation, you can drive in pegs, lay down slats, or use other landmarks.
- Start painting the walls from the least significant area. As you color them, move on to more “important” ones.
- Press the trigger of the spray gun, pointing the nozzle at the edge of the surface to be painted.
- Strive to ensure that the distance between the nozzle of the equipment you use and the wall you are painting is constant. It is not advisable to tilt the gun while guiding it.
- Release the trigger of the unit only after the flow of sprayed paint has left the boundaries of the painted area.
- When painting wooden walls, the trajectory of your movements should correspond to the direction of the wood grain.
- Be careful to ensure that the stripes of paint you apply overlap each other. If gaps appear, they should be immediately
- paint over it rather than wait for the paint to dry.
- It is better to paint vertical surfaces in several passes. This will avoid the occurrence of smudges on the walls.
- Painting external walls is best done on a sunny day at a temperature of 15–30 °C and a humidity of no more than 55%.
- Be sure to protect surfaces that you do not plan to paint with plastic wrap or other protective material.
We hope that our story will help you in your work and answer all your questions. Below you can watch a video on how to paint a wall with a spray gun.
To evenly paint surfaces made of different materials, including walls, cars, furniture, you should know how to properly paint with a spray gun. To make the coating truly smooth and uniform, you need to have some knowledge of the process technology.
The spray gun is used mainly for painting large areas with various paint compositions. But small parts can also be painted using the unit, especially if the elements are located in a hard-to-reach place and it is quite problematic to reach them with a brush.
.
[my_custom_ad_shortcode3]
A few words about the manufacturers
So, choose an electric spray gun from well-known brands. Wagner painting tools are presented in a huge range, including painting stations for professional work and mobile hand tools. The main feature is the ability to adjust the pressure when applying a specific type of material. This ensures maximum streak-free paint quality in difficult areas such as corners, cornices and textured or patterned surfaces such as wood carvings or internal cavities.
Another German manufacturer, Bosch, produces a painting tool in a green casing. Household electric spray guns from this brand impress with their high speed of work, ease of use, compact body and, most importantly, affordable price.
Among tools for small-scale production and home use, BORT - one of the cheapest on the market. If the job needs to be done quickly and one-time, without particularly worrying about the service life of the tool, this is the best choice. Among the disadvantages of sprayers of this brand, users note that the piston jams when working with some types of paint. Therefore, you should pay attention to the list of recommended materials that the manufacturer indicates in the instructions.
Better assembled tools with protection from moisture and dust, STURM can work with paints, varnishes and primers. The built-in paint adjustment function allows you to customize the tools for different tasks.
Preparatory work
When painting with a spray gun, you must use safety glasses and a respirator with a reinforced double filter. You will also need special workplace equipment. A chamber equipped with a hood is best suited. Although when using water-based paint, it is quite possible to simply work in a well-ventilated area.
You should also remember the role of lighting. To prevent smudges and sagging from drying out, the lighting should be at an acute angle relative to the surface being painted.
.
[my_custom_ad_shortcode4]
Tinting
The preparatory stage is the most tedious in the varnishing process. When finished, carefully remove wood dust from the surface of the canvas. Then, from the lower and upper ends, a pair of nails 150-200 mm are driven into the door to a depth sufficient to hold it on the painting trestles (this is for sure, 3-4 centimeters). They are driven in at such a distance that the door on the trestles can be conveniently turned over.
On a note. If you drive in three nails (two on the sides of the lower end, one in the middle of the upper), the trestle door can be turned over without a partner.
Before use, it doesn’t matter whether it’s varnish or stain, they are filtered. This can be done by taking old women's tights and putting them on a container of varnish. I hope there won't be any problems with this.
dish sponge is better suited for these purposes . It is used to rub the stain into the wood and remove excess. Try how it lays down and dries on an unnecessary block, then move on to the “finishing” part.
If necessary, apply several layers of stain and wait until it dries completely. Then the door is very carefully sanded with fine (P240) sandpaper and a second layer is applied.
Attention! After the last layer of stain, the wood is not sanded; the first layer of varnish is immediately applied to consolidate the result.
Surface treatment features
Preparatory work
- The quality of varnishing largely depends on how thoroughly the surface has been prepared. Therefore, first we remove the old coating and thoroughly sand and degrease the surface. We pay special attention to the condition of the wood and the presence of traces of rotting on it. If affected areas are found, we also carefully putty them and sand them with fine-grained sandpaper.
- We unfold the suction tube of the paint sprayer with the curved end facing forward. In this position, the varnish from the container will flow more evenly into the nozzle.
- Set the power switch to two. This mode is designed for working with viscous compounds.
Note! Softwoods must first be primed with a “pile fixation”. Then you should sand the surface again.
When applying varnish, you must adhere to a number of technological requirements. For example, you should know that the initially released varnish usually has a heterogeneous composition: clumps of the mixture fly out of the sprayer. Therefore, before applying varnish to the finished surface, you need to spray a little varnish onto a sample (cardboard, piece of wood, paper, etc.). We do test spraying with both horizontal and vertical position of the nozzles.
Tips for applying varnish
- Having made sure that the torch has acquired the desired shape and width, and the composition is released evenly, we begin varnishing the surface.
- We apply the varnish with smooth movements from the shoulder, that is, with the whole hand - thanks to this style of movement, it is easier to maintain the recommended distance to the surface to be treated.
- Once spraying of varnish has started, you can stop only when the entire surface has been treated, otherwise unevenness and stains may form.
- If the work needs to be completed, you should first move the sprayer away from the area being treated and only then turn it off.
- We move the sprayer away from ourselves so that excess paint and varnish composition falls on untreated areas.
- We try to maintain the same distance from the device to the surface being treated.
After the varnish layer has dried, sand the surface, clean it of dust and apply the next layer of varnish.