Home / Wood processing / Wood bending
Curvilinear furniture frame structures are difficult to produce, and large curves cut from straight sections of wood will require complex manufacturing techniques to avoid the weakness of short fiber and large, uneconomic waste. However, using dry or wet bending techniques, complex curved shapes can be produced quite economically, and since the fibers will run along the bend rather than across it, the finished product will be stronger. Dry bending involves first dividing the wood into thin sections, but thicker pieces can be bent by soaking or steaming.
Michael Toneti's bent café chairs and rocking chairs are classic examples of bent furniture made by steaming, and in the thirties of the 20th century, furniture made from laminated materials became an element of high fashion, after the invention of industrial methods for producing various grades of plywood. Both steam bending and layer bending can be accomplished in the home workshop, and both methods continue to be used in the antique furniture industry and by skilled craftsmen and designers.
Steamed wood can bend with a relatively large bending angle. The steam softens the wood fibers enough to bend them and mold them into the desired shape. It may require significant bending force, but it is quite achievable in a home workshop using basic equipment. You will need to make a template, a clamping clamp and a steam chamber. Wood bending is not a precise procedure. There are many options, and often trial and error is the only possible way to obtain the desired result.
Wood bending
Thin wooden pieces do not require preliminary preparation. The minimum radius to which it can be bent will depend on the thickness and natural properties of the wood species. Thin wood, in the absence of deformation limiters (and in the form of, for example, a template), when bent freely, will take the shape of a ring if the ends of the workpiece are brought together. To obtain a greater bending steepness, the wood must be steamed and “kept” fixed on the template so that, having taken the desired shape, it is stabilized in this position due to internal residual deformation. When thick wood is bent, it is necessary to limit the stretching of the outer layers to prevent them from peeling off or breaking. The method described here is intended for bending relatively thick pieces of wood.
Wood preparation
For bending, choose straight-grained wood without knots or cracks. Any defect or flaw is potentially a weak point, so certain failures are possible. There are dozens of types of wood that can be successfully steam-bent, and many of them are hardwoods. In the table below you can find a short list of suitable types of material for bending. You can bend well-dried wood, but freshly cut wood is easier to process. Atmospherically seasoned wood bends better than chamber- or oven-dried wood. If the wood is too dry and difficult to work with, you can soak it for several hours before steaming.
Depending on the type of workpiece, you can cut it to size in advance or do it with a saw, plow or stapler after bending. The latter method is often used in the production of bent furniture such as Windsor chairs and armchairs. Wood with a flat, smooth surface finish is less likely to delaminate and will make the final finish of the entire piece easier. Green wood shrinks more than seasoned wood, and when turned on a lathe before bending, it tends to take on an oval cross-section when drying. Regardless of the shape and size, make the length of the workpiece approximately 100 mm longer than the length of the finished product. Then, in case of delamination or splitting of the ends after bending, it will be possible to trim off the damaged areas.
To calculate the length, make a drawing of the bend shape on a scale of 1:1. Measure the outside of the curved piece to get the correct length. This will prevent unnecessary stretching of the external fibers, which could lead to cracking under the influence of internal stresses. The softened inner fibers will be able to shrink enough to take the shape of a smaller inner bend.
PREFACE
This book aims to provide the necessary information about the methods and techniques of bending wood, about the equipment and devices used for welding, steaming and bending. The book also provides basic information about the wood used in aircraft construction, its preparation for bending, and the organization of the bender's workplace. The book can serve as a guide for individual and team training of workers of the 3rd and 4th categories. The manual was compiled under the methodological guidance of the Personnel Training Laboratory of the Scientific Research Institute Orgaviaprom. Special editing was carried out by Professor P. P. Uspassky and engineer Z. I. Itskovich. The following literature was used in compiling the manual: P. P. Uspassky, Joiner-assembler. A manual for a new worker, Orgaviaprom, Oborongiz, 1944. P. I. Bologov, Wood and its processing in aircraft construction, Oborongiz, 1941. Orgaviaprom, Guidelines for standardization - bending of wooden products.
Making a clamp clamp
The key to making a tight bend is to use a flexible clamp. Make a clamp from mild steel, 2mm thick and at least as wide as the workpiece you bend. This will work for almost any job you might need to do. To avoid possible contamination of the surface of the part as a result of reactions between the chemical elements of wood, metal and the environment, make the clamp from stainless steel or galvanized steel or use a polyethylene gasket.
Install end stops or stops on the clamp to secure the ends of the workpiece, thereby preventing the fibers on the outside of the curved part from stretching and delaminating. These stops must be strong enough to withstand significant pressure on them, and be of sufficient size so that the end of the workpiece can rest against the stop with its entire surface. You can make them from thick angle metal or from solid wood, which is usually easier to do.
To equip the clamp with reliable end stops, install wooden blocks approximately 225 mm long at the ends of the metal strip. Along the center lines of each block, drill two holes with a diameter of 9 mm at a distance of about 150 mm from each other. Mark and drill the clamp strip for the end stop mounting bolts. The distance between the stops must be equal to the length of the workpiece, including the allowance. To ensure that the clamp has a lever action that is convenient for operation, attach sufficiently strong wooden blocks to the ends of the strip on its back side using long bolts for fastening the stops.
Making a template
Steamed wood is bent into a pattern that defines the shape of the bend and provides support for the fibers of the interior of the curved piece. The template must be very strong and have a width that is at least equal to the width of the part being bent. It must provide certain possibilities for fixing the workpiece on it using clamps or other clamps.
You can make a template from thick wood, setting the mold on a base made of artificial wood materials, or use sheets of plywood glued together. Because bent wood tends to straighten after the clamp is released, it is necessary to adjust the shape of the template to account for the straightening of the part. To do this, you will have to use the most reliable, although not always pleasant, method - trial and error to determine the parameters of such correction.
Types of wood for bending with steaming
- Ash Fraxinus excelsior Fraxinus amcricana
- Beech Fagus grandifolia Fagus sylvatica
- Birch Betula pendula Benda alleghaniensis
- Elm Ulmus americana Ulmus procera Ulmus liollandica Ulmus thomasii
- Hickory Cartja spp.
- Oak Quercus rubra Quercus petraea
- Nut Juglans nigra Juglans regia
- Yew Taxus baccara
Making a steam chamber
Make a steam chamber from plywood for outdoor use or use plastic or metal pipe boxes. Plywood allows you to create a simple structure using glue and screws exactly to your specific requirements. This type of chamber is ideal if you plan to steam entire batches of wood. A chamber made of plastic or metal pipe limits the size range, but is quite suitable for small workpieces.
Cut a piece of pipe to the required length in accordance with the dimensions of the workpiece. The length of 1 m is a convenient size that allows you to process entire workpieces or even parts of increased length if you need to bend only its end part. Make removable push-in end flaps from plywood for outdoor use. Drill a hole in one of them for the steam pipe and use a plane to plan the lower part of the edge of the other damper to create ventilation and a drainage hole. Make special “open” flaps with a hole for long workpieces. Place wooden supports inside the corpses so that the workpiece does not touch the bottom of the chamber. Insulate the chamber using polystyrene foam or wooden blocks, securing them to the chamber with wire. Place the camera on stands with a slight inclination to allow condensation to drain out. Provide a receptacle for any leaking water.
Steam can be obtained using a small electric evaporator or a factory-made steam generator, or you can make your own evaporator from a 20-25 liter metal tank with a removable lid or cap. Connect one end of a short rubber hose to a pipe or valve (valve) soldered into the tank, and insert the other into the hole in the chamber damper. To heat the water, you can use a heating device, such as an electric or gas stove. Fill the tank halfway with water and heat it to 100 °C. to ensure a constant flow of steam. As a guide, wood should be steamed for 1 hour for every 25 mm of thickness. Longer steaming will not necessarily improve the ductility of the wood, but may destroy its internal structure.
Communities › DIY › Blog › Do-it-yourself steam generator for smokehouse
Good morning everyone, I continue to develop the topic of smoking, I wrote about the smoke generator and smokehouse in a previous entry: www.drive2.ru/c/575295271051722779/
Today the topic will be about the steam generator.
The steam generator itself is a stainless steel pipe, 120 mm in diameter, wall thickness 0.5 mm, pipe length 0.5 mm.
For it we take 2 plugs with a condensate drain, one external and one internal. We also take a small heating element that we can find.
In the inner plug we make 2 holes according to the diameter of the heating element contacts, in the end you should get something like this:
Next, the argon welding process begins, we weld the seam of the outlet itself, and also insert the plug into the pipe until it stops and weld the seam.
We put on a 3/4 faucet and a heating element and get this design:
Inside it looks like this:
We screw a flexible hose onto the top cover, I installed one made of stainless steel, and connect the whole thing to the smokehouse.
If you smoke in winter, don’t forget to insulate it, I have a steam generator with a 1.5 kW heating element, it boils within 10 minutes.
And not a big video:
How to make a steam generator for engine washing with your own hands - nuances
Very often, steam machines are used in professional car washes. Steam provides effective cleansing of dirt and germs. Such machines are among the noisiest such special devices in the state (due to the running compressor).
Steam generator working in a car repair shop
Usually this is a unit on wheels, somewhat reminiscent of a vacuum cleaner, with water supplied to it. The operator operates something like a pistol. In this case, steam is supplied under sufficient pressure. But a homemade steam generator for a car can be used for purging the engine and heating hoses.
By the way, containers for a steam generator do not always have to be metal
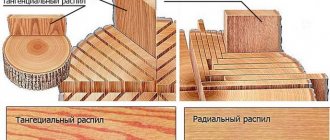
BONDING WITH SIMULTANEOUS BENDING
When bending wood
the fibers on the inner side are compressed, and on the outer side they are stretched. Wood “tolerates” fiber compression relatively easily, especially if it is pre-steamed. It is almost impossible to stretch it.
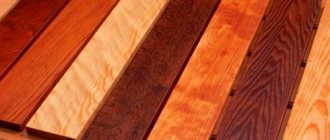
Flexibility also depends on the type of wood and the thickness of the workpieces. For example, hard wood from temperate climate zones - beech, oak, ash, elm - is easier to bend than tropical wood species (mahogany, teak, sipo, etc.). Conifers are too tough for this.
Features of assembling a solid fuel steam generator for a home using wood or coal
To assemble a classic wood-burning boiler, metal pipes of different diameters are used. This is somewhat reminiscent of a layered cake with the widest layer at the bottom, this will be the loading chamber.
The device of a steam generator with a solid fuel combustion chamber
Some craftsmen say that the efficiency of a potbelly stove is much higher than the efficiency of electric steam generators. But that's not true. It’s just that assembling such a boiler is less expensive. The next layer is the water tank, it is located directly above the firebox. An adapter with a pipe is welded to it, through which steam will flow into the bathhouse. If you want to learn more about how to make a solid fuel steam generator with your own hands, watch this video.
Steam generator installation
Installation of a steam generator, especially in rooms with a potentially large number of people (baths or saunas), should be carried out under the supervision of specialists. In this case, it is highly not recommended to use home-made installations, in particular steam generators without a self-shutdown function. Such devices must be selected based on the power of the device and the type of load on it. Typically, the RCD power is in the range of 10-30 mA. In addition, do not forget that the steam generator is also an electrical device, and it must be connected using a ground loop.
How to make a steam generator for a moonshine still – nuances
It's no secret that steam production is an integral part of the operation of a moonshine still. Typically, glass or, preferably, enamel containers are used for such purposes; the container should be spacious enough. The easiest way is to use an old pressure cooker for this purpose. There are two reasons for this: the container already has the necessary tightness, in addition, there is no need to look for a heating element.
To relieve pressure, it is necessary to install a safety valve; a fitting is useful to release excess vapors
If you carefully watched Arkady Daneliya’s film about moonshiners, you probably remember that the device is equipped with special rods that supply liquid to the steam converter. To control the temperature, a standard thermometer is usually installed. How to make a steam generator for a moonshine still with your own hands can be seen in the diagram.
Scheme of an industrial moonshine still made of stainless steel
Tags: smoke generator, smoking, do it yourself
Comments 42
First smoke, then steam.
How does the heating element behave in the environment of steam that sits inside the smokehouse, it brings up the temperature (dry so to speak). If it’s not difficult, make a post on how the electrics are implemented. Are there control units or does everything turn on separately
No problem. And it behaves perfectly, when steam is supplied it practically does not work.
There is a person on YouTube from Belarus on the MaccAlexTER channel, have you watched how the steam generator is implemented? He has very good decisions.
spare our drool...
And I’m just eating, I’m fine)
And when the heating element burns out, how to change it?
unscrew 2 nuts, remove the wires, 2 more and take out the heating element. no more than 5 minutes in time.
This is as clear as day) is your bottom welded, your top is bolted?
there is no top, it’s like a lid - opened and closed. The video showed how everything opens. You just need to make the latches, the steam blows out the lid.
unscrew 2 nuts, remove the wires, 2 more and take out the heating element. no more than 5 minutes in time.
That's it, thank you, I loaded the video, it became clear)
After watching the video and delving into the problem of a dry heating element. The design of a regular electric kettle immediately came to mind - at the bottom of even the most budget kettle there is a thermal switch for controlling dry start-up. Usually it is integral with the lower contacts that go to the stand. If you discard all unnecessary things and screw the thermal switch directly to the bottom of the steam generator, you will get a simple and inexpensive protection design. The protection shutdown temperature is approximately 105-107C and the contacts in it are not fixed - it cooled down and turned on again
What kind of device do you have? Did you cook it without additives?
Source
How to make a steam generator for a bath from a gas cylinder with your own hands
This type of assembly is most popular among craftsmen. Firstly, the cylinder itself is made of high-quality sheet iron. Finding one like this is almost impossible. The metal will withstand almost any temperature and is resistant to pressure changes. You can watch how to make a steam generator with your own hands from a gas cylinder in this video.
What tools and materials are needed for the job?
The welded seams of the cylinder can withstand sufficient pressure. The metal is not afraid of corrosion and is resistant to high temperatures. Preparing a cylinder consists of important stages: removing gas and vapor residues (as we discussed above), cutting off the top part and processing the ends.
For the work we will need the following plumbing tools: welding machine, tape measure, grinder, fasteners, electrical tape, drill, drills, metal scissors and keys
Advice! Prepare all consumables in advance: metal sheets, plates, sensors for measuring pressure, pipes, ball valves, adapters.
Selection and preparation of a container for a steam generator
We explain why it is a gas cylinder. The diameter of its base is universal and is suitable for selecting a heating element from a conventional electric kettle. In this case, the heating element is the heating bottom. Which in itself is an innovative solution, as it saves money and time on installing another heating system.
Before starting installation work, the cylinder must be emptied of water and dried! All welding work should only be carried out after you have completely ensured that there is no gas fumes of any kind. Take a sniff; the tank should be completely free of the smell of propane.
This is what your steam generator could end up looking like. Don't forget to come up with a handle to carry it
Installation of heating elements
Heating elements are the most important component of any steam generator. The main rule is that if you use heating elements, and not a heating surface as such (some models of electric kettles have heating elements under the bottom), they should not touch either the bottom or the walls.
Usually, to attach the heating element, a hole is specially drilled slightly above the bottom, at least 1 cm. Water should be poured below the level of the heating element.
It is important to maintain the distance, otherwise the bottom may burn out and be damaged. We recommend using at least two insulating washers with special heat-resistant silicone gaskets. Don't forget to provide valves for draining and supplying water. In some designs, to ensure liquid injection, an additional container is used, usually of a larger volume, or it is connected to centralized networks.
The choice of heating element depends on the volume of water and the planned load on the unit. You should select a device based on power based on the calculation of 3 kW heating element for every 10 liters of liquid.
Installation of additional elements
For reliable fixation of cranes and automation, special fasteners are used. They are located at the top of the steam generator. These are a filling valve, a pressure relief valve and a ball valve, as well as drain valves.
Drain valve for steam generator
All these elements must be selected most carefully, as they respond to the metabolic processes of the cylinder. Incorrect installation, in the wrong order or at the wrong height can lead to poor performance of the equipment.
Valve modifications
If you are using a gas cylinder, then most likely you still have a brass valve, which can easily be used in the operation of the steam generator. It can easily be converted into a ball valve. To do this, the valve is disassembled, the pin is removed, a thread is cut into it, and the valve is screwed in. This design will be required to select steam flows.
However, you can also use this homemade product - an alternative version of the drain valve
Checking the safety of the steam generator
The main condition for the operation of the steam generator is proper heating and water supply. To do this, it is important to control the process at each stage. That is why most homemade steam generators are equipped with special automatic control systems.
One of the most necessary is a pressure gauge. It helps keep track of temperature as well as pressure data
It is important to organize a control circuit: when a certain pressure is built up, the heating element is turned off.
Do-it-yourself steam generator: how to avoid mistakes when assembling yourself
It would seem that steam could be simpler. However, not everyone notices how much we need it. And we’re not just talking about a steam room or a sauna. Steam is an excellent cleanser and disinfectant; it penetrates into the thinnest crevices, is absorbed into the depths of pillows and fabrics, helps iron laundry, and cleans fabrics and mechanisms under pressure. Sometimes it becomes necessary to assemble a steam generator with your own hands. A homemade device can work great when cleaning such quickly dirty devices as an air conditioner filter or, for example, a range hood. Today, in our HouseChief editorial review, we’ll tell you what a steam generator is, where it can be used, and what elements it consists of. Our review also contains simple instructions for assembling the unit with your own hands, as well as an analysis of possible mistakes that beginners may make.
Steaming and bending video
We present to your attention a video about the technological process of bending wood:
Good luck and success! Until we meet again, Andrey Noak was with you!
—Categories
- Textiles. Various ideas for working with materials (868)
- Rag rug or what can be made from old things (275)
- Sewing (175)
- Teddy bears (120)
- Leather (97)
- Clothing designers, fashion (57)
- Fabric flowers (48)
- Batik (33)
- Indian patchwork (11)
- Soutache (7)
- Knitting (854)
- Spokes (502)
- Hook (244)
- On the fork (9)
- On fingers (7)
- Furniture and everything related to wood (518)
- Wood carving. (96)
- DIY furniture (65)
- Wood painting (38)
- Birch bark (31)
- Sawing (30)
- Burnout (13)
- Leaf products (12)
- Furniture of the 21st century. (12)
- Screen (12)
- Products made from matches (7)
- Art Nouveau. Furniture and craftsmen (5)
- Art Deco. Furniture and craftsmen (1)
- Home renovation and design (517)
- Interior detail (148)
- Interior (123)
- Mosaic (93)
- Interior painting or frescoes (42)
- Stained glass (39)
- Cleaning and means for it. (36)
- Everything from garbage (16)
- Cooking (450)
- Baking (173)
- All meat (91)
- Blanks (41)
- Drinks (18)
- Korean dishes (13)
- Soups (12)
- Salads (10)
- Milk and dairy products (10)
- Fish (5)
- Sauces (5)
- Embroidery (434)
- Beads (80)
- ribbon embroidery (41)
- Cross stitch (24)
- Satin embroidery (10)
- All made of paper (291)
- Papier mache (60)
- Cardboard (36)
- Corrugated cardboard (7)
- Arte Francese (4)
- Paper mosaic (4)
- Weaving (227)
- Macrame (36)
- Wire (24)
- Wicker furniture (8)
- Notebook (217)
- Painting (186)
- Modeling (177)
- Plaster (78)
- Cold porcelain (20)
- Salt dough (7)
- Art history. Cultural studies (168)
- Philosophy Stars (3)
- Art (157)
- Watercolor (32)
- Health. (150)
- Felt (140)
- Cottage.Garden.Vegetable garden (100)
- Stories from life. Life in France (46)
- Plastic and everything made from it (43)
- Introduction to Drawing (42)
- Eggshell carving and embroidery (30)
- Sculpture (30)
- Metal. Working with it (18)
- Candles (16)
- Glass.Working with it (13)
- Bone (8)
-I'm a photographer
Types of steam generators and their use in the household
Steam generators are most often used for defrosting pipes, arranging baths, saunas and steam rooms. A simple steam converter will cost several times less than building a full-fledged furnace with stones. In order to start using the device, you just need to plug it into the network. Steam converters are used to clean complex mesh or porous equipment and help effectively warm car engines in winter.
If not so long ago it was possible to find powerful steam generators for solid fuel generators running on wood, for example, Perevalov’s steam generator, today most craftsmen prefer models powered by electricity. After all, there is nothing easier than simply connecting the device to an outlet. And finding an old kettle or steamer for a person who has set himself the goal of assembling the device with his own hands is not difficult.
This is also a steam cleaner, but you can only work with it if you need a sender for clothes. It is not suitable for serious work
Based on power, it is customary to divide devices into industrial and household. The former require connection to special networks with a power of 380 V. And household ones, as one would expect, operate from a 220 V electrical outlet. Such a steam oven can also heat water in different ways. Let's consider the main types of such systems:
Steam box heating
First you need to prepare the steam box. It can be made by yourself. Its main task is to hold the tree that needs to be bent. There should be a hole in it to allow the steam pressure to escape. Otherwise it will explode.
The steam outlet should be located in the bottom of the box. In addition, the box should have a removable lid through which you can pull out the bent wood after it has acquired the desired shape. To hold the bent wood piece in the desired shape, clamps should be used. You can make them yourself from wood or buy them at a specialty store.
You should make round scraps of wood - several pieces. Off-center holes are drilled in them. After this, you need to push the bolts through them, and then drill another hole through the sides to push them in tightly. Such simple crafts can become excellent clips.
Now it’s time to steam the wood; to do this, you should take care of the heat source and close the wood piece in the steam box. For every 2.5 cm of thickness of the workpiece, the product needs to be steamed for about an hour. After time has passed, the tree must be removed from the box and given the required shape. The process must be completed very quickly. The workpiece bends neatly and softly.
Some types of wood bend more easily than others due to different elasticity. Different methods require different amounts of force to be applied.
Once the desired result is achieved, the bent tree must be fixed in this position. You can secure the tree while shaping it. This makes it easier to control the process.