The rafter system is the “skeleton” of any roofing structure. The reliability, quality and durability of the roof directly depends on the correctness of its manufacture and installation. If desired, you can handle the arrangement of the rafter system yourself. Want to know how? Check out the following guide!
DIY rafters
Elements of the roof truss system
Types of rafter systems
There are layered and hanging rafter systems. According to statistics, layered structures are most often used. When arranging such a system, the rafters rest against the mauerlat. The function of the central part is performed by a simple ridge run. To increase the strength of the system, supporting beams are installed.
Types of rafter systems
Construction of a gable roof rafter system
In the case of hanging rafters, the system design is equipped with additional racks that promote optimal load distribution over the entire area of the roof structure.
Types of rafters
The manufacture and installation of rafters of both types is carried out in a similar sequence, but taking into account the above-listed features and differences.
Video - Rafter system
Rafter system design
Construction of the rafter system
Any rafter system consists of the following main components:
- rafter legs. Mounted parallel to the slopes. Prevents deflection of the roof structure;
- run. It is a transverse beam installed longitudinally from above;
- beds and racks - support the purlins of the rafter structure;
- struts are components of a sub-rafter truss that provide additional stability to the rafters.
Rafter diagram
To calculate, use the rafter leg length calculator.
Creating a gash
Fixing beams without cutting is used for sliding connections. The corner for attaching the rafters to the mauerlat allows you to securely fasten the beams. The fixation method does not allow the roof structure to withstand significant loads, so it is used to cover a hipped roof with small spans.
You can get a reliable support unit using a cut or a blocking tooth. The insert is made in the rafter leg at a quarter of the thickness of the product. In practice, several options for the device are used:
- Rigid fastening - works to compress the inner side of the support beam.
- A movable fastening is obtained when a tooth is formed on the outer side of the beam (to prevent the rafters from slipping out of the Mauerlat, they are additionally secured with brackets or corners).
- Instead of sawing, a persistent beam can be used, which is nailed to the beam.
What are the rafters made of?
What to make rafters from
Attachment unit to the beam
Most often, rafters are made of coniferous wood. This is a relatively inexpensive, fairly durable and easy to process material.
If you make your own rafters, it is best to use timber with a section of 10x10 or 15x15 cm.
Also, when choosing wood, you need to pay attention to its moisture content. The maximum allowable rate is 20%. At higher values, the material will shrink, which will lead to disruption of the configuration of the entire roofing system.
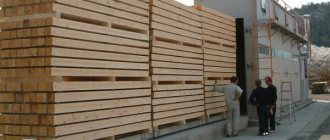
Prices for various types of timber
timber
Video - Roof construction mistakes
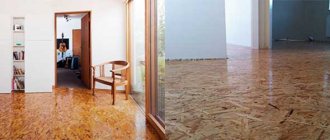
Choosing a roofing covering
A timber roof is universal, allowing you to choose any type of roofing covering. The following roofing options are popular in private housing construction:
- Seam roofing.
- Metal tiles.
- Ondulin.
- Profiled sheeting.
All these types of roofing materials are characterized by high strength and durability. The most affordable is ondulin, made from cellulose and polymers. Metal tiles are more expensive, but have a presentable appearance and require minimal maintenance. The disadvantages of roofing made from these materials include the need for sound insulation, because... every blow, precipitation and gusts of wind will be heard in the house. Also, such a roof necessarily requires insulation.
Separately, it is worth mentioning soft tiles - this is a relatively new roofing material based on synthetic bitumen. The material has a beautiful design, is silent, and is not subject to corrosion or rotting. A significant disadvantage of flexible tiles is their relatively high cost.
Preliminary calculations
Roof rafter system
We calculate the optimal length of the rafters. The standard length of factory-made products is 450 or 600 cm. If necessary, the length of the rafters can be changed.
To determine the optimal cross-section of timber you need to know the following:
- rafter length;
- element installation step;
- estimated indicators of future loads.
The required information is shown in the following table.
Table 1. Selection of rafter installation step depending on their length and cross-section
| Rafter length, m | Distance between rafters, cm | Rafter beam cross-section size, cm |
| Until 3 | 120 | 8x10 |
| Until 3 | 180 | 9x10 |
| Up to 4 | 100 | 8x16 |
| Up to 4 | 140 | 8x18 |
| Up to 4 | 180 | 9x18 |
| Until 6 | 100 | 8x20 |
| Until 6 | 140 | 10x20 |
The remaining elements of the roofing system should have the following sections:
- Mauerlat - 10x10 or 15x15 cm. It is also possible to install a Mauerlat from timber with a section of 10x15 cm;
- diagonal rafter legs and valleys - 10x20 cm;
- puffs – 5x15 cm;
- purlins – 10x10, 10x20 cm;
- struts - 10x10 or 15x15 cm;
- hemming boards – 2.5x10 cm;
- crossbars – 10x15 or 10x20 cm.
Calculation of the load on the rafters
Knowing the length and cross-section of the rafters, as well as the step of their installation, you can easily calculate the required number of elements, focusing on the length of the building wall.
Calculation of the rafter system
Additionally, the rafters must be calculated for deflection. That is, you need to find out how much the rafters can bend before they break. For example, when designing an attic roof structure, the calculation of the truss must be done so that the deflection is no more than 1/250 of the length of the section that is subject to pressure.
Calculation of the rafter system
Based on the above, if the length of the rafters is 500 cm, the maximum permissible deflection value will be 0.2 cm. The indicator seems insignificant, but if it is exceeded, the deflection of the roof will be visually noticeable, and this will not have the best effect on the reliability of the structure.
Shed roof rafters
If possible, when designing a house, it is advisable to ensure that the length of the rafters does not exceed 6 meters
To determine the length of the rafters, use the Pythagorean theorem
The calculation of the cross-section of the rafters depends on the roofing material
Video - Calculation of rafters with your own hands
Roof options
The beauty of the architectural appearance largely depends on the shape of the roof. Beautiful houses are crowned with broken, complex structures with turrets, window openings, and arched elements. The construction of such structures requires engineering knowledge, special skills and experience.
There are several types of roofs:
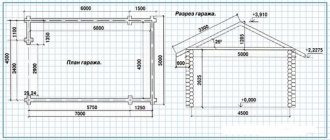
- single-pitched, used mainly for outbuildings and garages;
- gable, the most common and not difficult to install;
- gable, gable, with a separate pointed element resembling a birdhouse;
- hipped, including hip ones;
- broken, multi-level with a residential interior, an attic.
Each type has its own options, for example, hipped ones can be hipped, half-hipped, or spire. Different types of roofing are used for all structures.
Important! A single-pitched type definitely cannot be used for a residential building; this will not only spoil, make it primitive, and simplify its appearance, but will also narrow the living space (there is no attic) and complicate the task of creating a high-quality microclimate necessary for comfortable living.
Look at the ready-made baths at the link; more often in such small buildings they use a sloping version. Which is more convenient to transport.
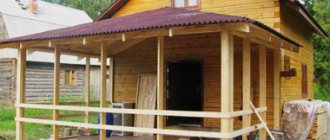
The advantages of a gable roof for a house made of timber are the compatibility of materials, simplicity of design, and relative ease of installation. It is possible to crown a house with a gable structure without the involvement of construction crews, and it is convenient and easy to insulate it. The attic space is quite spacious and can be used as a living space or as a warehouse. The budget is not large, especially if you build it yourself; in addition, the ability to use literally all existing roofing materials makes the gable roof the most popular. Disadvantages include difficult maintenance during operation and windage.
A hip roof is more convenient in terms of operation and repair. Four slopes provide high-quality snow and rain flows. The design is more reliable and durable than all others. Due to its low height, it has excellent wind resistance. The attic is large, it is easier to insulate the attic space inside, but it is much more difficult to arrange a hip roof structure. It will require calculations using formulas, precise measurements, careful and scrupulous. You can make a hip roof with your own hands, but you can’t do it without consulting with specialists.
Important! The roof of a house made of timber should not burden the load-bearing walls and foundation with great weight. The more complex the design, the greater the weight. Calculating the total roof load, consisting of its own weight, taking into account the influence of wind, is a paramount task.
We turn wooden beams into rafters
We are making a template with which further work will be performed. The rafters have the same design, so the template will save you time and effort.
Use a template to mark and trim rafters
Use a template to mark and trim rafters
We connect two boards along one edge with a nail. The result should be a design that resembles scissors.
Making a template
Template outline
We place the free edges of the “scissors” on supports at the points of future placement of the rafters. This will allow you to determine the slope of the roof slope.
We take an extra pair of nails and fix the angle set between the boards. The template is ready. Additionally, secure it with a crossbar. To ensure that the set slope angle of the roof slope does not change under the influence of loads, fasten the crossbar with self-tapping screws.
Be extremely careful when creating the template. Even the slightest deviations can cause the entire structure to deteriorate.
Next, we make a new template for preparing mounting cuts on the system elements. Use plywood 0.5 cm thick. For reinforcement, use a 2.5 cm board. Select the dimensions of the cuts taking into account the cross-section of the rafters used.
Using ready-made templates, we make cuts and begin to assemble the truss.
Marking the opposite end of the rafters
Marking the opposite end of the rafters
Full size rafter template
Video - Gable roof rafter system
Material requirements
The types of wood used for construction depend on local availability . But, as a rule, three main types of wood are used: spruce, yellow pine and red cedar. This timber can be strengthened by applying glue or by laminating thinner pieces glued together to form a beam with an oversized cross-section.
Before use, the beams are thoroughly dried: the moisture content of the lumber should not exceed 20%.
Important : it is permissible to use planks made of laminated veneer. Their length can be up to 5 times longer than a standard wooden beam.
In addition to wood, sometimes there are recommendations for installing metal trusses , the elements of which are made of construction grades of steel.
Despite the assurances of manufacturers, such rods are not an adequate replacement for wood, since they not only increase the weight of the entire structure, but also complicate the process of installing the rafter system.
Failures with steel structures are due to the fact that
metal is not a material that can withstand heat as effectively as wood .
The situation is even worse with corrosion and electrical safety. Therefore, to avoid problems in the future, it is better to choose wood instead of metal. Solid wood boards are used to make floor lathing and counter lathing. Coniferous species are predominantly used, with pine being better than spruce. A more expensive option is larch. These rocks are already naturally protected from rotting by the resin secreted. The boards are laid side by side to then be connected to the beams of the rafter system. The elements can then be securely fastened using nails or steel staples.
It is recommended to make the main lathing from boards with a rectangular cross-section 30x100 mm; the counter-lathing is often made from square beams measuring 50x50 mm.
Farm assembly procedure
For convenience, you can build scaffolding.
The structure includes supporting legs and connecting components. The farm resembles a triangle. Carry out the work in the specified sequence, and the finished structure will be able to adequately withstand all incoming loads.
Installation of the ridge beam and the first rafters
Use the calculator to calculate the height of the ridge of the rafter system.
The farm can be made on the ground with further rise to the top, or directly on the roof. The first option is simpler and easier to implement.
Another rafter in place
Type of installed rafters
We assemble the truss in the following order. First, we cut the prepared material to the required size, join the bars at the top edges and fasten them with screws. To prevent cracks from appearing at the fastening points, we pre-drill holes in the bars with a diameter slightly smaller than the size of the fasteners.
Installation of rafters
Ridge beams
We also use a crossbar to connect the rafter legs. We fix it half a meter below the top point of fastening the elements. Crossbars will help increase the rigidity of the structure and eliminate the risk of deflection. We fasten the crossbars in recesses previously prepared in the rafters by cutting down.
If necessary, the rafters are cut at an angle if this is required by the features of the roofing structure being installed.
Glossary of terms
To better understand the process and speak the same language with the construction team, it is recommended to study the terminology before starting work.
roof is the upper part of the building structure assembly; roofing the top covering of the roof; Mauerlat support beam along the perimeter of the walls of the house; lying support beam, on the internal load-bearing walls of the building; rafters (rafter legs) structural elements of the roof that support the roof covering; purlins are horizontal longitudinal beams supporting the rafters from the inside; beams connecting the legs of one pair of rafters; crossbar tightening installed directly in front of the ridge of the structure; ridge is a horizontal rib located at the junction of the slopes at the very top of the roof; racks are vertical beams placed on a bench or other support, designed to support the purlin; struts (rafter legs) inclined beams connecting the rafters to the supporting elements and located at an angle of 45°; counter-lattice - rows of boards laid along the rafters on top of waterproofing material; sheathing rows of boards laid on the rafters/counter-lattice at an angle of 90°; cornice is the hanging part of the roof, which covers the upper part of the external walls from the negative effects of atmospheric manifestations; fillets , through which you can lengthen the rafter leg; valley internal angle formed at the junction of two slopes in multi-gable roofs; hip triangular roof slope at the ends / covered gable with a slope; pediment is the upper part of the facade of a building, which is limited by two slopes.
Installation of a roof truss
Options for cutting rafters into beams
Measurements and marking of hip rafters
Installation of roof trusses is carried out in the following sequence:
- we install end trusses;
- we fix the central trusses.
When installing edge trusses, we adhere to the following important rules:
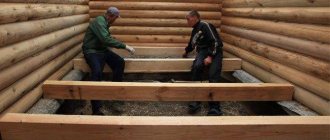
- we install the base of the triangle on the mauerlat or the upper frame in the case of arranging the roof of a wooden structure;
- first we make several holes in the base for its subsequent fastening to the log house;
- Be sure to check the straightness of the installation of the truss. To do this, we use a plumb line attached to the crossbar;
- We fix the base of the truss only after confirming the evenness of its installation;
- To ensure additional stability of the farm, we attach the jibs from the log house to the rafter leg. Select the length according to the situation, it is not of fundamental importance;
- Before tightening the jib with screws, we again make sure that its placement is straight.
Rafter system
Manufacturing of lower chords of roof trusses
Assembling a roof truss
Assembling a roof truss
Rafter trusses are installed in the design position
After completing the installation of the outer trusses, we proceed to fixing the central and subsequent structures, if their placement is provided for by the project. The optimal installation step for trusses is 100 cm.
To secure the central rafter triangle, we use temporary jibs. After the visor is installed, the jibs can be removed. Recommendations for fastening the central and other trusses are the same as in the case of the outer structures.
After installing all structural elements, we begin attaching the sheathing and further arranging the roofing system: moisture, heat and vapor insulation, as well as installation of the selected finishing coating.
House frame with rafters
Good luck!
Assembling a ridge truss
Installation of a ridge truss
Installation of rafters
Installation of rafters
Prices for various types of fasteners for rafters
Rafter fasteners