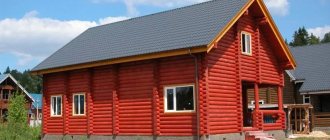
Despite the abundance of buildings made of brick and concrete, the wooden frame has not lost its relevance and popularity. The attractiveness of solid wood lies in its availability, ease of processing and environmental safety.
However, lumber also has significant disadvantages. Wood is very dependent on the external environment, so sooner or later it may be necessary to replace the lower crowns of a wooden house. The work is painstaking, but overall not difficult, so it can be done with your own hands.
Content:
- Methods for replacing lower crowns
- Partial replacement of the lower crown without lifting the structure
- How to perform partial repairs of embedded elements
- Types of jacks for raising a house
- Precautions when lifting wooden houses
- Technology for raising a wooden house
- Video on the topic of replacing the lower crowns of a wooden house
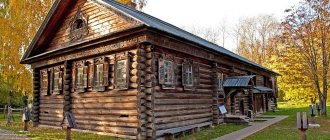
For wooden houses, the declared service life is more than 50 years, but in practice everything is not always so rosy.
Defects in construction, poor waterproofing, low-quality wood lead to the destruction of the house much earlier, and the weak link here is the lower crown of the house, since it is in contact with water the most. Competent builders advise making the lower part of the house from larch, since this tree has amazing properties - it only becomes stronger from moisture.
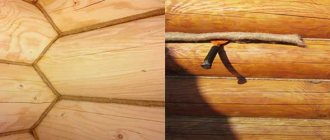
Probably not everyone knows what crowns are in a wooden house. The crown of the house is four fastened logs, perpendicular to each other, that is, one row of a log house. If you look from the side, it really resembles a crown (a wreath, but only square).
Replacing the lower crowns of a wooden house begins with dismantling the old foundation.
Next, the logs are inspected and tapped (a dull sound is a sign of damaged timber, even if there are no external symptoms, then it is enough to pick with a chisel to see the damage).
It is determined how many rows will need to be changed. You need to keep in mind that damage tends to creep up the log house, so you need to carefully inspect all the nearby logs of the house.
As a rule, until the foundation is broken, it is very difficult to judge what condition the crowns are in and how much will need to be replaced. And only after this stage can you choose a way to change the crowns.
Repairing wall cladding
The interior decoration of a bathhouse is the first to fail, since it is mainly made of wood. Due to temperature changes and high humidity, it begins to rot and warp. It is necessary to tap the walls to determine the problem area. Replacing a deformed section of finishing will not be difficult.
It is much more difficult when you need to completely change the skin
| Actions | Subtleties |
| You must first bring the lining into the room. | It is necessary that it adapts to the temperature regime of the bath. |
| The surface of the walls must first be leveled so that the lining does not subsequently resemble “sea waves”. | This is achieved using lathing. Frame slats are installed perpendicular to the floor in increments of 0.7 m using a level, starting from the corner of the bathhouse. A thin string is pulled between them to align the horizontal slats. Separate bars are attached near windows and doors. The sheathing must be fastened with stainless or galvanized self-tapping screws that do not corrode. |
| The lining is installed on the ideal sheathing, starting from the corner, in a vertical direction (so that moisture drains easily without lingering on the panel). | Experts advise lining the steam room with deciduous wood; you can use coniferous wood to decorate the washing room and rest room. |
To prevent rotting and destruction, it is necessary to treat the wooden elements of the bathhouse with antiseptic impregnations. If you decide to tile the wooden walls of your bath rooms, then just follow the following recommendations.
- Lay the tiles on a flat and clean surface. To enhance the moisture resistance of the walls, they are first sheathed with roofing felt. To add strength, a metal mesh is sometimes attached to it. Then they plaster and apply a primer.
- To determine the angle for laying the first tile, you need to stand at the front door and choose the most noticeable one.
- The glue is applied directly to the tile, and not to the work surface (this will make it more convenient to attach the material). The glue quickly becomes unusable, so it does not need to be prepared in large quantities.
- To ensure that the gaps between the tiles are of the same thickness, special fasteners (dividing crosses) are used. They help to install beautiful tiles without various defects, which will increase the service life of the tiles.
Methods for replacing lower crowns
It is better to entrust the restoration of a house to professionals, since without experience it will not be possible to avoid mistakes that can lead to the destruction of individual structures, or even the entire house.
Depending on the condition of the crowns, the design of the building, the presence of a stove and extensions, it is chosen how to replace the lower crown, that is, in what way the repair will be carried out.
Partial replacement of the lower crown without lifting the structure
If it was possible to spot the problem at the very beginning, and the damage affected only one or several logs of the crown, then it is these parts that can be replaced, and not the entire crown.
This option greatly simplifies and reduces the cost of home renovation. In addition, replacing the lower crown of a wooden house can be done with your own hands.
Of course, there are also disadvantages, since the strength of the structure is weakened, and new joints contribute to heat loss.
The procedure for performing partial repairs of crowns:
- Use a chisel to clear the damaged area and determine where the good wood begins.
- On the sides of the damaged area, at a distance of 40-50 cm, screeds with a height equal to 3 crowns are installed.
- The screed is nailed to the frame from the inside and outside. Wide boards (40 cm) act as ties.
- The damaged part of the crown is cut out with a chainsaw.
- Grooves are made in the crown for inserting a future patch.
- A patch is prepared from a new log; it must perfectly match the removed element. A notch is also made on the patch.
- The patch is installed in its rightful place, it may be difficult to enter, then you can drive it with a sledgehammer.
- Three dowels are driven in at the junction of the old log and the patch. Now the adhesion of the elements is quite reliable.
- The gaps can be insulated with jute or tow.
Since the structure ceases to be unified, it still affects the strength of the house, so this solution should be considered as temporary.
On a strip foundation
The work is more complicated because it requires partial destruction of the foundation and cutting out niches for jacks. Niches are cut into the rotten crowns, affecting the floor and part of the foundation. This installation is necessary so that the jack can move up and down freely.
An alternative option can be used: a lever system. As a lever, you can take a hardwood log or a metal channel number 10-12.
- A niche is made in the upper log of the lower crown for a channel or rail. To do this, wood is selected at a distance of 1-1.5 m from each corner.
- The channel is inserted into the niche.
- The corner of the house is raised with a jack.
- Wooden wedges are driven between the foundation and the channel.
- When the lower log is free from load, it is removed.
- The wedges are knocked out, the jack is lowered, and the channel is removed.
- Temporary supports are installed.
- The upper logs of the lower crown are removed.
- Again they take the channel, hammer in the wedges and raise the house.
- The temporary supports are removed, the logs are replaced, the wedges are removed, and the frame is placed on new crowns.
How to perform partial repairs of embedded elements
A good alternative may be to replace the rotted crowns of the house with brickwork. Depending on the foundation and age of the building, such a replacement can be performed with or without lifting.
For a house without a foundation, that is, if it stands on the ground, you can do without raising it.
As in the first case, the damaged areas are cut out with a chainsaw.
The foundation is built from brickwork. In this case, the upper part of the masonry is brought under whole logs.
If the decision is made to raise the house, then this is done with a hydraulic or screw device.
Repair stages:
- The building rises at the corners.
- Temporary support is installed at the corners.
- The old foundation of the house is being dismantled.
- Brickwork for the foundation is being built and waterproofing is being installed.
- The building is being lowered onto a new foundation.
Of course, if you do not take into account the cost of work and general labor costs, the complexity of the process, then the most preferable method of repair can be called the latter - with raising the house. In this case, the repair is really a major one, and it is possible to update the waterproofing of the foundation, which will also affect the durability of the building.
Waterproofing
Waterproofing before laying the first crown
So, before you start laying waterproofing, you need to check and inspect the top of the foundation. To perform this action, you will need to prepare a hydraulic level. If the difference is more than 1 cm on the surface of the foundation, then it is worth carrying out additional work related to its leveling. As a rule, this will require preparing a concrete solution.
Experts recommend initially laying two layers of waterproofing material, then a laying board and then another layer of waterproofing. The materials used for this process must be fastened so that they extend beyond the edges by 25 cm on either side.
Search for quality material for the first crown
The material for building a house made of timber for laying should be prepared in advance. The first crown should be made of high quality material. It should be:
- With a minimum number of knots on the surface;
- With a perfectly flat surface;
- The material should not have a blue tint; this is not suitable for laying the first crown;
- The density of the beam rings should be maximum - then it becomes clear that this material is made from the middle of the tree.
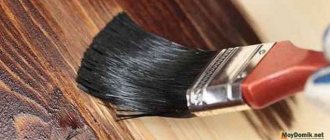
Before placing the first crown (larch), it must be treated with an antiseptic
After selecting the timber, you need to thoroughly lubricate it with bitumen mastic, previously mixed with the waste. A similar composition is needed so that the impregnation is well absorbed into the wood. It is not worth treating the ends of the timber, otherwise the moisture will not be able to “leave” the tree. The thoroughness of processing and impregnation will influence many factors, including the durability and reliability of the first crown, and, consequently, the entire house made of timber.
Types of jacks for raising a house
To update the lower part of the house you will need to raise it to a certain height. And here you cannot do without a special tool - a jack for lifting.
There are only two types - screw and hydraulic. It doesn’t really matter which one to choose for lifting a house; the main factor of choice is the load-carrying capacity of the tool.
As a rule, a jack is selected that can lift 10 tons or more.
But before starting work, an experienced craftsman will calculate the approximate weight of the house and select a jack with the required characteristics. The weight is calculated approximately - based on the sum of the weight of the walls, partitions, roofing, ceilings, and a margin of 25% is added.
A hydraulic or screw jack for a wooden house must be selected with a reserve load capacity.
How can you raise a log house?
Raising the frame with a jack is the only way to provide access to the foundation without dismantling the building itself. With due care, it is possible to raise the building with minimal damage, replace rickety or destroyed pillars, and also remove the lower logs, after which the frame is lowered into place.
The same work is carried out if the building begins to sink into the ground after the destruction of the foundation. In rural areas you can still find old log houses placed on wooden decks: such a foundation has a minimum service life and will still have to be replaced.
To carefully lift the structure, it is better to use several jacks with a load capacity of at least 5 tons. They can be hydraulic or mechanical, and a log jack screw is often used. How to lift a log house with jacks? Before starting the ascent itself, several preparatory steps should be completed:
How to lift a log house with jacks? Before starting the ascent itself, several preparatory steps should be completed:
- The basement cladding (if any) is dismantled; access to the foundation needs to be cleared along the entire perimeter. A trench is being dug, which will allow you to see the entire foundation of the house and assess any existing damage.
- The condition of the lower crowns is checked: they should be inspected; tapping with a hammer will determine the presence of sore spots. If there are signs of rot or deep cracks, the lower crown must be replaced.
In addition, it is important to determine the cause: logs rot due to improperly performed waterproofing, initially of poor quality, cracks may appear due to soil movements, etc. If the cause of destruction is not eliminated, repairs will have to be repeated very soon
If the cause of the damage is not eliminated, the repairs will have to be repeated very soon.
- It is advisable to prepare the house in advance to prevent possible damage: remove the window sashes so as not to damage the glass, temporarily remove the doors from their hinges, and sometimes dismantle the subfloor.
- Everything for work needs to be delivered to the site: jacks for raising log houses, material for the foundation, material for temporary supports, prepared logs for the new lower crown, etc.
It is also necessary to ensure that the jacks are installed on a durable base that can support the weight of the house and not sink into the ground. This can be a strong metal plate or at least a square wooden shield with a side of at least half a meter.
Log raising technology
Raising a log house with a jack is not an easy, but completely doable task.
It is important to take your time to avoid any serious damage.
If the building has a columnar foundation, it will not be difficult to place jacks under the lower crown, but if the building has a strip foundation, you will have to make recesses in the logs. In this case, you need to make a through hole in the log, into which you insert a lever and lift the wall with a jack.
The main stages of lifting a log house with your own hands:
- Work begins from the most damaged corner. Most often, the most serious damage is observed on the north side of the house. In a small structure, for example, in a small bathhouse, a log jack can only be installed at corners; in a permanent house, intermediate lifting and securing of the walls will be required, otherwise the logs will begin to sag.
- If you only have to use one jack to lift, the work will have to be done gradually. The wall is raised by a maximum of 2 cm, after which a support made of a concrete block, log or other durable material is placed under it, then the jack is moved to the next point, and the operation is repeated.
Gradually the building rises along its entire perimeter. Usually, to carry out repair work, it is not necessary to lift it by more than 3-4 cm at a time. As a result, the building must be installed on strong temporary supports at the required height, after which you can proceed to restoring the foundation.
If a columnar base is used, the destroyed columns are broken and removed, after which they are replaced with new ones. If the house has a strip foundation, you will need to remove the remains of the destroyed foundation, deepen the trench and pour a layer of sand at the bottom.
Reinforcement is placed in the trench, formwork is installed, after which a new foundation for the house is poured. If the foundation has only minor damage, it is simply secured with an additional monolithic concrete belt.
Precautions when lifting wooden houses
Raising a wooden house is fraught with risks and danger, and here you must follow the rules, which will help you avoid unpleasant situations:
- Everything that can be taken out (furniture, appliances, etc.) is removed from the house.
- Electricity and gas supplies, water supply, sewerage and heating systems are turned off.
- The logs of the house must be reinforced with boards, cables or metal brackets.
- The windows also require strengthening - the glass can be pulled out if possible, the windows themselves can be removed, and spacer beams can be installed in the opening. Doors are strengthened in the same way.
- To install the jack, you need to dig a hole. A solid base is provided, for which you can use a thick and wide board, and the tool itself is placed on it. The jack must remain motionless.
- A high-quality inspection of the strength of the crown logs is a guarantee that the house will not crumble when lifted. If damage to the crown elements is observed, then these places require reinforcement with metal beams.
- To prevent the lifting element of the jack from piercing the crown logs, a steel plate must be placed at the stop.
- Weather conditions also play an important role; for repair work you need to choose dry weather.
Strapping device and materials
For the bottom trim, a wooden beam with a cross-section of 15 by 15 or 20 by 20 cm is most often used. The size of the cross-section can be calculated using calculations. One piece of advice worth taking into account is that the section size should not be less than the thickness of the wall.
The harness can be made of metal or wood . In most cases, for frame houses, the second option is preferred. Metal grillage is not popular for the following reasons:
- The heavy weight of the steel framing elements creates a large load on the foundation of the house. When using metal elements, a stronger foundation is needed.
- The large mass of the metal grillage complicates installation.
- Steel costs much more than wood.
It is worth noting that it is not advisable to combine metal with wooden elements. These materials have completely different physical properties.
Tying the foundation of a frame house is not required in the following situations:
- Panel-frame construction.
- Construction of houses using Canadian-Finnish technology.
Technology for raising a wooden house
Professional companies use jacks with centralized control to raise the house, where all four jacks lift the structure at the same time. This, of course, is fast, convenient and expensive, and therefore only those who earn money from it every day can afford such an installation.
Depending on how many jacks you managed to get hold of, the procedure is as follows:
If there is only one jack, then the structure is raised to a height of 5 cm alternately on each side. That is, we raise one corner by 5 cm, substitute the beams, move to the other, raise it by 5 cm, substitute the beams, and so on all four corners, until we reach a lifting height that is comfortable for work.
Five centimeters is an important value; if you raise it higher, the house will warp.
If there are two jacks, then everything happens the same as in the case of one jack, but the process goes a little faster. The corners are also raised one by one.
If you are lucky and have 4 jacks, then everything happens quite simply - the jacks are placed under the corners of the house and also alternately (this is important!) raised by 5 cm at a time. If you work with four people, you can ensure the synchronous lifting of all corners, calling out commands to the workers.
The technology for replacing the lower crowns, regardless of the number of jacks, is the same - gradually raising the corners of the house. Only the speed and convenience of completing the task depends on the number of jacks.
When replacing crowns in a wooden house, you need to treat them with an antiseptic drug, just as during construction. How to treat the lower crown of a wooden house is decided depending on the available budget, but it is better to choose proven, certified products, since traditional ones (oil, drying oil, etc.) in practice lose in effectiveness.
The question arises whether it would be easier to simply dismantle the house and build a new one. As practice shows, replacing part of the logs by raising the house is much cheaper, so home owners often choose this particular option for home renovation.
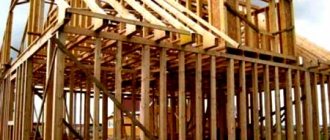
In frame version
Frame preparation
Any frame must be strengthened for successful lifting. To achieve this, it is enough to attach the boards on both sides at the level of the window blocks. Boards can be taken with a thickness of 50 millimeters, and they should be secured with studs or long bolts. First of all, the boards are attached to the frame posts with nails, and only then they begin to drill holes so that the boards can later be attached with bolts. In the event that we are dealing with a strip foundation, it will have to be partially destroyed in order to prepare a place for installing a jack. Typically this is done from both corners of the house.
Next, you need to install the jack itself and make sure that it works properly - without necessarily lifting the house itself. This will ensure that the rod is coming out of the hydraulic cylinder.
In this case, you should carefully check the height of its exit - it should not exceed half of its length. This is necessary for security reasons.
If everything is in order with the jack, support posts are prepared, with which you can fix the house after it is lifted. In these cases, a beam of 100 by 80 centimeters is usually used. As a rule, racks are installed on only one side - the outer one, and this does not require dismantling the floor, and, therefore, significantly saves time on replacing the embedded crown. In the illustration, the support block (B) strengthens the support post (A) and ensures that the support post will not tip over when loaded. In order to increase the support area of the rack, a special transverse connecting beam (B) is used.
Replacing the bottom beam
To lift the house, four people will be required, since this process uses two jacks, which are installed at the corners, and the distance from the corners should not be more than a meter. The only exception is a log house, which can be lifted with one jack. In order to eliminate the possibility of the house skewing, it must be lifted simultaneously from both sides. Two people will work with the jacks, and two more will place a piece of timber under the side walls of the house being lifted so that the beam of the lower frame does not break while the house is in a raised state. After the house has been raised to the required height, support posts should be installed, the distance between which should not exceed one and a half meters.
With one side these supports are inserted under the attached board, and with the other they are rested against a pre-prepared base, and this must be done securely so that the support cannot move to the side after the jacks are pulled out. If you want the supports to stay securely in place, you should make angled cuts at their ends. In the event that it is assumed that the support may rest against the blind area, it is necessary to make appropriate recesses of 3 or 5 centimeters in the blind area itself, suitable in size for the corner cut. Next, we take out the embedded beam, for which we use a hacksaw with large teeth or a chainsaw, with which we cut it at the junction of the crown. You can further make the task easier for yourself if you cut the embedded beam into several parts. It is necessary to make notches in advance on the new embedded beam, and when installing the notches should be facing upward. After the timber is in place, the jacks should be re-positioned in the folded state. When lowering a house, synchronized operation of the jacks is also very important to avoid distortion or damage to the frame. After changing the embedding beam under one wall, you can move under the next.