In most cases, when it comes to foundations, we mean a strip type.
It is the most common and has an optimal combination of performance qualities and cost-effectiveness of construction.
In addition, strip bases have a lot of design options, which expands their capabilities and allows you to choose the most successful option.
Such qualities have made the tape a recognized leader among all alternative options.
Despite some negative aspects, this type of foundation is the most preferable for the construction of buildings for various purposes, especially for private houses.
Types of strip foundations for a timber house
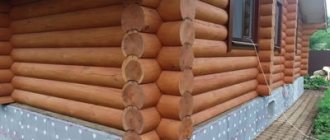
A characteristic feature of wooden houses is their low weight. The material has excellent heat-saving properties, so creating thick walls is impractical.
In addition, the specific gravity of wood is significantly less than that of brick, concrete or other dense material.
Therefore, the load on the foundation is significantly reduced, which makes it possible to use a lightweight version of the foundation.
Suitable for a house made of timber:
- Shallow strip foundation.
- Recessed strip foundation.
The first option allows you to get a fairly reliable foundation, making do with less excavation and construction work. At the same time, there are some limitations associated with hydrogeological conditions, complex soil composition, the presence and depth of groundwater.
The second option requires a lot of labor and money, so for log houses it is considered irrational and is used only in difficult conditions.
IMPORTANT!
It is impossible to unambiguously determine the most successful type of foundation based on the material of the walls. It is necessary to consider the specific conditions and factors influencing the choice of tape type.
To help the tape builder
Anyone can build a strip foundation for a house, provided all calculations are completed and all work is carried out responsibly. Our users, without much construction experience, made their monolithic strip foundations and structures from FBS, literally following the technology and strictly observing SNiPs. The materials on our portal will help you achieve a successful result.
On FORUMHOUSE you can get all the necessary theory, documents, constructs, reports, find step-by-step instructions for making a strip foundation with your own hands, study the strip design algorithm, read articles with arguments against carrying out geotechnical surveys and finally decide for yourself the main question: is it true? you need a sand cushion under the tape.
Our video talks about how to independently build a reliable foundation on problematic soils.
Subscribe to our Telegram channelExclusive posts every week
Shallow strip foundation
A shallow strip foundation differs from the classic version in its shallow depth of immersion into the ground. The traditional type requires immersion to a level below the freezing point. This requires creating a trench 2 m or more deep.
Increases the size of the tape, automatically increasing the consumption of building materials and money. Shallow foundations are immersed to a relatively shallow depth, not exceeding the freezing level of the soil.
The option is attractive, but it can create problems with frost heaving, so it is necessary to first study the hydrogeological situation on the site, find out the depth of groundwater, explore the composition of the soil and other data.
However, for light buildings, the use of a shallow strip foundation is considered the most rational solution.
Regulatory Requirements
The construction of a shallow foundation strip under a one-story house is possible even on a bed of sand and gravel; this helps save money and speed up the work without any risk. But this work can only be done on certain soils:
- not prone to heaving;
- completely dry;
- characterized by uniform freezing.
A reinforced concrete strip with a shallow recess under a small private house is made 0.3-0.5 m wide underground, the height of the base is at least 0.3 m. For the greatest accuracy, work begins with markings, then dig trenches, the walls of which must be vertically smooth . A shallow foundation makes it possible to get by with trenches 0.5 m deep and 0.6 to 0.8 m wide. When the excavations are dug and leveled, a sand cushion of 200-400 mm is made. It should be compacted, because the denser the base, the less subsidence of the entire house will be over time.
Sand is backfilled in layers of 150 mm; it must be moistened before compacting. For the highest mechanical strength, gravel is poured on top and watered with liquid concrete mortar.
To form the formwork, use boards sanded on one side 2 cm thick. Instead of them, you can also take:
- slate in the form of flat sheets;
- sheet metal;
- plywood
The formwork is strengthened using spacers and support stakes; it must be aligned vertically and horizontally. The inside of the structure is laid with dense waterproofing material. To ensure that the required thickness of this material is smaller, the laying depth should be selected based on the level and movement of groundwater.
The foundation in the form of a strip for a two-story brick house is placed in a pit filled with 0.3 m of sand. Since the house will have to be equipped with bathrooms, it is recommended to add a cement and sand screed up to 0.1 m thick over the water and sewer pipes.
Waterproofing is placed on the hardened screed, but a thermal insulation layer is not always needed. Then comes the frame, created from a reinforcing steel network, then the formwork. Only after this can the tape be filled in as such. The base of the foundation under the house must necessarily go 200-250 mm deeper than the freezing line. Houses made of foam blocks are lighter than brick buildings of similar size.
But this does not automatically mean that you can lay the foundation closer to the surface. We will have to analyze all the parameters characterizing the geological structure of the site
Additionally, the weight of the project's ceilings, furniture products, and snow load, which may be present on the roof even for a short period, are taken into account. Among the different options for laying in depth, you should choose the one that you can afford, for financial reasons.
The soil in different areas freezes to 100-180 cm, and in most cases a depth of up to 150 cm is chosen.
It should be taken into account that even when using geological exploration information and SNiP standards in calculations, it is possible to find only the minimum required values.
Trenches are thought out and dug out immediately with reserve for all the necessary layers of bedding, screeds and additional structures. A relatively light house on soil that is not prone to heaving can be placed on a base 600 mm deep, made in the format of a floating tape. Such a design must be carefully calculated; this is the only way to avoid destruction during movements of soil masses.
The tape for aerated concrete must be designed no less carefully than for brick or other heavy material. The lightness of above-ground structures is deceptive; without careful calculations of the strength and load-bearing capacity of the support, they will turn out to be unreliable. The foundation design should be prepared by suppressing the buoyant force as much as possible. For heavier wall materials it is insignificant, but lightweight aerated concrete blocks are easily pushed out of the soil.
If, nevertheless, the choice is made in favor of a filler support, when calculating, they are guided primarily by:
- the mass of the walls and the pressure they exert per 1 linear. m;
- the mass of all floors;
- the severity of roofing materials and underlying structures.
How to choose concrete
The optimal choice of material is M300 concrete. Heavier grades are used for multi-storey residential or industrial buildings. The use of less dense and durable grades is impractical, since practically no savings or advantages are achieved, but the margin of safety of the base disappears.
Therefore, in practice, no one thinks about the choice, using a proven and reliable option.
Calculation of the sole based on load-bearing capacity
The strip foundation, the calculation of which must be performed, requires the use of only one formula. To select the dimensions of the strip foundation, consider this:
B = P/(L*R),
Here the letter B means the width of the foundations that needs to be found. P is the mass of the entire building, taking into account the underground part, which can be found by calculating the collection of loads. R is the strength of the foundation from the first table of the article. L is the total perimeter of the strip structure. To correctly calculate the foundation, you need to include both the external and internal walls of the basement in the perimeter.
Foundation dimensions
Laying depth
Shallow foundations are usually immersed to a depth of 40-70 cm. This is an average value, but in practice it is necessary to consider the composition of the soil, heaving loads and other criteria. The more negative factors, the deeper the tape should be immersed.
At the same time, it is necessary to take into account the magnitude of frost heaving, which creates high loads on the side surface of the tape and forces the foundation to be strengthened. Sometimes the solution to the problem is to reduce the depth of the foundation, reducing the loads and balancing them along the entire length of the belt.
It is also necessary to take into account the size of the base, which is recommended to be at least 30-40 cm.
Calculation of loads
Before calculating the foundation for the house, you will need to calculate the load. It is more convenient to collect foundation loads in tabular form. All loads are divided into two types: permanent and temporary. The latter are temporary, conditionally, since they include furniture, equipment, etc. The permanent ones consist of the mass of the building structures.
The calculation of the load on the foundation can be done completely independently, taking into account the exact characteristics of the materials used. But it will be enough to use the table below. It shows average values, but the load on the foundation will change uncritically.
| Design | Load value, kg/m2 | Reliability factor |
| Brick wall 510 mm | 920 | 1,3 |
| Brick wall 640 mm | 1150 | |
| Timber wall 150 mm | 120 | 1,1 |
| Timber wall 200 mm | 160 | |
| Wall on a wooden frame with 150 mm insulation | 30-50 | |
| Partitions made of plasterboard 80 mm | 30 | |
| Flooring made of PC slabs with cement screed | 625 | 1,2 |
| Wooden ceiling with insulation | 150 | 1,1 |
| Reinforced concrete foundation in kg/m3 (!) | 2500 | 1.2 - for prefabricated 1.3 - for monolithic |
| Roof depending on the type of covering | ||
| Metal | 60 | 1,05 |
| Ceramics | 120 | 1,2 |
| Bituminous materials | 70 | 1,1 |
| Live loads | ||
| From people and furniture | 150 | 1,2 |
| Snow cover | According to SP “Loads and impacts” table. 10.1 taking into account the location of the construction site | 1,4 |
In order to correctly calculate the cross-section, the load on the foundation of each type is multiplied by the reliability coefficient.
General installation diagram
Work progress in order:
- Preparing the site, removing topsoil and leveling the surface.
- Marking the trench.
- Digging a trench to a specified depth.
- Backfilling the sand cushion.
- Installation of formwork.
- Creation of an armored belt.
- Concrete pouring, curing.
- Completion of work.
The procedure for creating a strip base almost never changes, which makes it more understandable and increases the reliability of the result.
Width of strip foundation for timber
The width of the tape is a value that requires calculation. The methodology and specifics of this event do not allow obtaining correct results without experience and preparation. Contacting specialists is the best option to resolve the issue, but this will require a certain fee and will take an unknown amount of time.
Usually the issue is resolved by using online calculators, obtaining quite high-quality calculations, or they act “like everyone else,” taking the width of the tape at least 10 cm larger than the thickness of the walls. In any case, it is not recommended to make a tape narrower than 30 cm, since additional loads may appear during operation.
It is also possible to change hydrogeological conditions, which requires a certain margin of safety and stability.
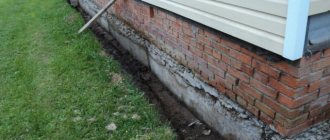
Waterproofing
Waterproofing is carried out in order to cut off moisture from the concrete strip. This will keep it in normal condition and prevent the material from being destroyed by frozen water in the winter. Waterproofing also helps improve the microclimate in the house and prevent walls from getting wet due to capillary absorption.
For a house made of timber, this is very important, since the wood is prone to rotting, which makes waterproofing treated with increased responsibility.
There are two types of waterproofing:
- Vertical. It is applied to the side surfaces of the tape, both outside and inside. Different materials are used - impregnations, coatings, rolls, etc.
- Horizontal. A lower waterproofing is used, separating the sand cushion from the tape, and an upper one, separating concrete and wood. Most often, in both cases a double layer of roofing material is used.
Choosing concrete and reinforcement
For a shallow strip foundation, you can use a lighter type of concrete - M200. At the same time, there will not be a significant difference in cost, and the strength of the tape will be lower than when using the optimal option - concrete grade M300. The foundation is a critical element of the building, which requires the use of the most reliable materials.
The choice of reinforcement is determined by the width of the tape. In practice, they usually proceed from the ratio of 30 cm width - 12 mm diameter of the rods. Accordingly, 40 - 14, 50 - 16, etc. Usually there are no problems, but for those who want to clarify their choice, there is a calculation option.
The cross-sectional area of the tape is calculated. The total cross-sectional area of the reinforcement is 0.1% of the ribbon cross-section. The resulting value is divided by 4 or 6 (the number of working rods in the arm belt). After this, the most suitable diameter of the rods is determined from the SNiP tables.
NOTE!
You can use thicker rods, but you should not choose thinner rods.
Marking
Marking is carried out by marking on the ground both the external and internal boundaries of the future foundation. To do this, it is best to use pegs or reinforcement rods and ropes. But it will be more effective to use special devices, such as laser levels. Remember that large errors in markings will noticeably affect the appearance of the finished building.
To achieve ideal results you need:
- determine the axis of the structure being built
- use a plumb line to mark an angle, and from it, at an angle of 90 degrees, pull a rope to two more corners of the structure
- use a square to determine another angle
- check the angles, focusing on the diagonals. If the test gives positive results, pull a rope between them
- take on the internal markings, retreating from the external markings to the distance of the thickness of the future foundation
When you are finished with the markings, study the differences in the surface at the construction site and select the lowest point to measure the depth of the trench and eliminate the difference in the height of the foundation. If the building is planned to be small, then the depth of the pit can be 40 cm.
Pillow under the foundation
Sand and gravel preparation performs drainage and leveling functions. The bottom of the trench does not have an ideal surface, so a layer of backfill allows you to obtain a horizontal and level supporting platform for pouring the tape.
Water entering the layer passes into the lower layers and is either absorbed into the soil or removed through the drainage system outside the trench.
The standard backfill option is sand preparation 10-15 cm thick, a layer of fine crushed stone 10-15 cm and a surface leveling layer of sand. Pure river sand that does not contain organic inclusions is used.
Each layer is carefully compacted to maximum density. The criterion for determining the quality of compaction is the absence of shoe marks when walking on the backfill.
Installation of formwork
Formwork is a form into which concrete is poured. It is assembled from edged boards 25-40 mm thick. The shields are made outside the trench, but in close proximity to it for ease of carrying and installation.
The assembled panels are lowered into the trench, aligned along the axes and secured with spacers. They determine the width of the tape. From the outside, the panels are fixed with vertical strips driven into the ground, and stops are also used to ensure the formwork remains stationary when pouring concrete.
Columnar foundation structures
The dimensions of the columnar foundation are determined depending on the number of support points. Be sure to install posts at corner points and at the intersection points of walls. The dimensions of an individual pillar are determined depending on the pitch. The minimum column spacing is one meter. More is possible, less is not rational.
Columnar foundations are often confused with pile foundations, but they are fundamentally different both in the mechanics of their work and in their design dimensions. Firstly, columnar supports use a high grillage, and the above-ground part of the structure makes up up to 90 percent of the total mass, which will never be found in pile supports.
Secondly, the cross-section of the column is rarely less than 30 centimeters, when the diameter of the piles can be only 10-20 cm. Thirdly, columnar foundations can be made according to the principle of brickwork from small-piece elements, which fundamentally changes the installation technology. Thus, the dimensions of the columnar support will be a multiple of the number of masonry elements per size of the end side.
Most often, columnar foundations are made from hollow metal pipes, which are driven into the ground and subsequently concreted. Sometimes they are made of monolithic reinforced concrete. It is the ratio of the underground part to the above-ground part that determines whether a foundation is piled or columnar.
Watch the video on how to make a foundation for a log house with your own hands.
Reinforcement
The specificity of concrete is its lack of resistance to axial tensile loads. The material is capable of withstanding enormous pressures, but when the load vector changes, it immediately breaks. To strengthen the tape, an armored belt assembled from metal ribbed rods is installed inside.
The frame consists of horizontal (working) and vertical (auxiliary) rods. The working rods perform the functions of an armored belt, ensuring the integrity of the belt and taking on all the loads.
Vertical reinforcement is needed only to support the working rods in the desired position until the concrete is poured, so its thickness is less. The use of smooth rods is allowed. To assemble the frame, a special soft wire is used, but welding is also allowed.
Fill
You can mix concrete for pouring yourself, but this is a very labor-intensive and time-consuming task. It is easier and more correct to purchase the required amount of ready-made concrete, which will be delivered directly to the site and poured from a mixer.
The quality of the material produced using industrial equipment will in any case be higher than that of home-made concrete. It is also more convenient to do the pouring from a mixer, as it is faster, which will result in uniform quality of the concrete strip in any area.
IMPORTANT!
You cannot pour concrete in one place, hoping that it will spill throughout the formwork. You need to approach it from different points and pour the material evenly. This will allow you to obtain a casting with the same properties.
After pouring, it is necessary to water the casting with water every 4 hours for 3 days, and then, for a week, three times a day. The formwork can be removed after 10 days, but final hardening will occur after 28 days.
Slab foundation structures
Slab foundations are direct successors to a solid monolithic grillage. Determining the size of a slab foundation for a log house is not difficult. If a 6x6 house is planned to be placed on a solid foundation, then the dimensions of the slab will be similar. It is important to fit within the perimeter of the house, and a small protrusion beyond the outer boundaries of the wall structures will not interfere with the work of the foundation - 5-10 centimeters of reserve will be enough. It is not recommended to leave the wall overhang, since it is important to rest the entire wall base on the edge of the foundation. The depth of the slab foundation is another important dimension.
Insulation of a slab foundation is a very important stage, since it often serves as both a support and a ceiling for the first floor. Whatever insulation is chosen, it will not affect the dimensions of the foundation in plan - the vertical size of a slab foundation is calculated based on the load-bearing part, without taking into account the insulation and protective structures.
Construction of a log house on a slab
Usually, they tend to make such foundations for a log house prefabricated, and in order to save money, floor slabs are laid on the ground, the dimensions of which depend on the parameters of the material used.
Typically, these are hollow-core floor slabs with a thickness of 220-250 centimeters. If you plan to fill a monolithic slab, you should take a minimum thickness of 30 centimeters.
Concrete works well in compression, but practically cannot withstand tensile loads, so reinforcement is laid - this thickness will ensure uniform distribution of two rows of flat reinforcement frame and leave room for a protective layer of concrete, which should not be less than 1.5 cm.