Floor repair
The main signs of the need for repair Types of work when repairing a floor The main causes of damage to floors Technology of constructing a wooden floor Main stages of construction Prices for floor repair work Features of repairing a floor in a country house
Now that any materials are available and if all construction standards are observed, a wooden house can last for decades and from time to time require only minor cosmetic repairs. 20-30 years ago the situation was radically different. What can we say about buildings half a century ago and older. Everything that could be found at that time was used in construction. From scrap boards to railroad sleepers. And the fact that such houses still stand is solely the merit of our older generation. But unfortunately, the quality of the materials makes itself felt. Recently, cases of technology violations during the construction of houses have also become more frequent. As a result of banal ignorance or simply carelessness. Brigades from neighboring countries are especially guilty of this. In both cases, the service life of the house is reduced and those parts of the building that bear the heaviest load, as well as the proximity of the ground, are the first to suffer. In wooden houses and cottages this is, of course, the floor and joists!
| Service type | Price,. |
| Turnkey floor repair (complete replacement) | from 1500 rub. m2 |
| Dismantling of floors | 250 rub. m2 |
| Construction of rough floors | 250 rub. m2 |
| Installation of 100 mm insulation | 120 rub. m2 |
| Installation of tongue and groove boards | 450 rub. m2 |
| You can find the detailed price list at the bottom of the page. |
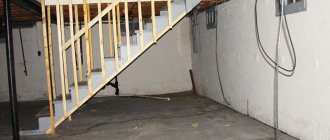
In the process of renovation. Dismantled finishing and subfloor, partially replaced logs
Design parameters of the base
If the old plank floor is leaky, it must be replaced with a new
one. The floor is a complex multi-layer structure that provides the ability to walk around the room, as well as thermal insulation, sound insulation, and protection from moisture penetration from below.
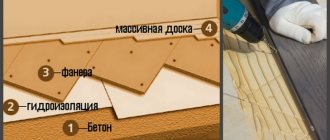
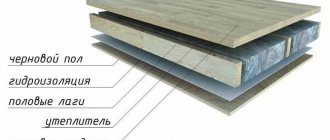
Approximate floor design on joists:
- subfloor or base - in a private house it is in contact with a sand and gravel pad or serves as the ceiling of the basement;
- load-bearing beams - logs, massive supports that can withstand the load created by people and furniture;
- thermal insulation - a layer of insulation that prevents heat loss from the room;
- waterproofing – protects the insulation from condensation;
- counter-lattice - a frame made of thin slats on which the flooring is mounted;
- finishing floor
The materials and characteristics of each layer of the “pie” depend on the base. Concrete and wood are suitable for a wooden house.
Concrete floor
If the boards are not rotten, they can be poured over them with concrete.
What is most attractive about this design is its simplicity and economy. The filling process is extremely simple, especially if special mixtures are used. It is enough to place levels on a sand-gravel or earthen cushion and fill with the mixture. After hardening, an absolutely flat, reliable floor is obtained.
The base is strong; finishing and constructing the “pie” will require less time and materials. The floor price is lower.
The disadvantage is the completion time: concrete reaches strength in at least 4 weeks and it is impossible to carry out any other work during this time. In addition, it creates a large load on the foundation.
When pouring a concrete base, it is necessary to install damping elements and divide the base itself into several sections. Otherwise, under the influence of vibrations of wooden walls, the floor will crack.
Wooden floor
An option for replacing a floor is laying new boards on old joists.
Replacing floors in a wooden house often involves using the same material. Wood has excellent heat and sound insulation qualities, remains warm to the touch even when the heating is turned off, does not emit harmful substances and remains attractive throughout its entire service life.
On the other hand, wood requires care and careful preparation, as it is afraid of moisture: it swells, dries out, and rots. Laying a wooden floor is difficult and takes more time. It is quite difficult to achieve ideal evenness of the coating.
There are single and double layer floors. In the first case, installation can be done without beams. In the second, cavities automatically appear in which insulation is placed. Here you can install a “warm floor” heating system.
Professional advice on choosing lags
Coniferous wood should be used for logs.
Larch logs
If possible, materials should be impregnated with antiseptics. These are very effective means for protecting wood not only from fungi, but also from many pests.
wood antiseptic
Antiseptic for wood
Antiseptic
Always select joists with a safety margin, especially in cases where the installation method involves bending loads. It must be remembered that correcting mistakes made during the construction of flooring always costs much more than carrying out the work with high-quality materials and in compliance with recommended technologies.
Logs from boards
Choose your joist boards carefully. They must be absolutely healthy without signs of rot. The presence of through cracks and rotten knots is completely prohibited. If there are large healthy through knots, then you need to install the joists in such a way that there is a stop under them.
When attaching the logs, do not allow the possibility of wobbling.
Fix the joists firmly
Most loose joists cause very unpleasant squeaks in the flooring while walking. To eliminate such phenomena, you will have to remove floor coverings; this is time-consuming and expensive; it is not always possible to keep the dismantled materials in a condition suitable for reuse.
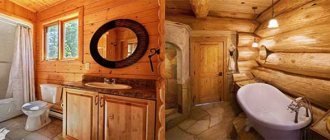
Features of replacing a wooden floor
Replacing a wooden floor in a country house is not the easiest job and is very dirty. The speed and complexity depend on the condition of the old coating. Other factors also influence this:
- Before removing the flooring, you need to make sure that communications are not hidden under it - wires, pipes, ventilation.
- Dismantling is carried out using steel scrap or crowbar. The work is noisy and requires strength.
- It is necessary to remove not only the top flooring, but also the entire system: joists, insulation, rough flooring. All that remains is a cushion of sand or earth.
- For arranging a concrete base, it is recommended to use self-leveling mixtures, as they significantly simplify installation.
- It is easier and faster to use bitumen mastic as a waterproofing material. However, when laying a purely wooden structure, roll waterproofing will be required.
The nature of the flooring is determined by the style of the room and design features. Laminate or parquet is quite suitable for installation on a “warm floor” system; linoleum cannot be used in this capacity.
Surface grinding
Sanding of wooden surfaces is carried out using a sanding machine. This treatment will make the floor perfectly smooth and give the board an attractive appearance. For processing you will need two machines. One is for grinding the main surface, the other is for use in hard-to-reach places.
Grinding takes place in several stages:
- the room is cleared of furniture;
- curtain doorways with wet cloth;
- remove the baseboard;
- if necessary, repair the coating;
- hammer in visible nail heads;
- spray the surface with water;
- Rough scraping is carried out 2-4 times with abrasive No. 40;
- sequentially treated with abrasives No. 60 and No. 120;
- treat hard-to-reach places;
- remove remaining debris.
Simple wood floor repair
Replacing rotten boards with new ones
Complete replacement of floors in a wooden house can be avoided if individual elements are repaired in a timely manner. As soon as chips, cracks, abrasions, or squeaks appear, repairs must begin immediately.
- Deep stains, abrasions, cracks and chips can be eliminated by sanding the flooring.
- Deeper cracks are sealed with putty, a mixture of sawdust and polished.
- If the board begins to rot, become deformed, or become covered with plaque, it must be replaced immediately.
- If the beams are rotting, you cannot see it. To check their condition, the floorboards are tapped with a hammer. If instead of a ringing sound there is a dull sound, the logs have become unusable. In this case, you will have to dismantle the covering and replace the damaged beams.
- Creaks and loud noises mean that the floorboards do not fit together well. It is recommended to tighten them.
- If an unpleasant smell of rot appears in the house, both the finished and rough flooring, joists and even embedded crowns must be replaced.
Repairs will also be required if the floor sag. In this case, the wooden parts may not have any defects. Repair comes down to installing additional supports made of steel pipes or bricks under the floor beams.
New flooring
Now you will lay the boards, gradually, one after another, with a distance of about 2 mm between the floorboards. The boards should not touch, but there should not be a large gap between them. Floorboards are nailed to the joists with nails whose length will be greater than the thickness of the board. You can fasten the boards with screws and self-tapping screws, whichever is more convenient for you. Start laying from the far wall, moving towards the doors.
When the flooring is ready, you can begin processing the coating in order to give it beauty. At your service will be wood paint, stain and varnish for floor coverings. By combining with additives for paints and stains you can achieve stunning effects and the play of light and shadow on your plank floor. By the way, plank floors fit wonderfully into any home interior.
Removing old floors and preparing the base
Insulation of the floor when replacing the covering
Replacing floors in a private house begins with removing the old covering.
- Wooden deck boards or other material are removed using suitable tools. Boards, joists, and all construction waste are removed from the house.
- The new base is laid on a layer of crushed stone and sand or on an old screed, if the latter is strong enough and has not suffered from mold. Level the surface as much as possible. If this fails, fill it with screed.
- Before laying, the base is treated with a primer with an antiseptic effect. Its task is to improve the adhesion of the base to concrete.
- Waterproof with bitumen mastic. To proceed to the next stage of work, you need to wait until the mastic dries. If necessary, duplicate waterproofing with roll materials. All joints are treated with mastic.
- Insulation is laid on the waterproofing layer. Under the concrete floor, slab materials are used - polystyrene foam, penoplex, and less often mineral wool. If the floor is installed on joists, expanded clay, basalt and mineral mats are used.
Dismantling an old concrete base is extremely rare. To remove it, you need to use a hammer drill.
Elimination of gaps of different sizes
Large cracks, such as in the photo, can be sealed using wedges. To make them, they take scraps of boards and slats. One of their sides is cut into a wedge shape, then treated with wood glue and hammered into the hole. After the adhesive composition has hardened, the excess material protruding above the floor surface is cut off with a plane.
Also, a large gap is eliminated using twine or rope, which is pre-coated with glue. After 24 hours, the place where the floor was repaired in a Stalin building with wooden floors is puttied with a compound made independently from linoleum softened in acetone without a backing.
Redevelopment
Redevelopment means any change in the configuration of a room. This fully includes changing the floor design. For such work you need to obtain permission.
You need to figure out what these changes are:
- Repairing the floor in a country house with your own hands, if it does not belong to the category of residential buildings, does not require permits.
- Changing the flooring - boards or insulation - does not change the configuration of the room and is done independently.
- If during the renovation process new communications are laid and old ones are removed, you will need to create a project and have it approved by the relevant authorities.
- Replacing a wooden floor on joists with a concrete base with a “warm floor” system also requires permission. Concrete floors are much heavier, putting additional stress on the foundation and reducing the height of the room.
Current repairs and redevelopment that do not change the living space do not require permission, but are recorded in the technical passport of the building.
Panel buildings
They are much newer than Khrushchev and Stalin buildings. But the floor in them also has to be replaced and repaired.
In a panel house, the floor base is concrete. There is no such complex structure here. Therefore, if replacement is necessary, we remove the old coating and thoroughly clean the base.
Usually we create a screed here: dry, semi-dry or wet.
In the first option, expanded clay is used. We cover it with slabs with gypsum fibers.
In the second case, we mix the composition so that the proportions of water in it are very small.
In the third option, we use sand, cement and plasticizers, as well as insulation - expanded clay.
This is a popular method. But we don’t use it when the floor slabs are already heavily loaded.
Today, people are increasingly ordering self-leveling floors. They are easy to prepare and sell, both in panel houses and in older ones.
You might be interested
What floor to install in an apartment Warm floor in an apartment: a modern choice How to fill the floor in an apartment
Replacing the floor in a private house with your own hands
OSB boards under a wooden covering
Most often, a wooden floor on joists is replaced with the same one. Such a foundation is lighter and does not require additional strengthening of the foundation.
- The base floor is leveled, cracks are sealed with polyurethane foam and cement mortar. If the base is wooden, use a mixture with sawdust. Treat the surface with antiseptics.
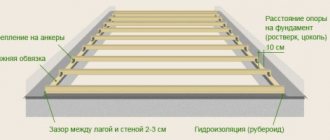
- Waterproof the floor with bitumen mastic. The material is applied not only to the base, but also to the walls to a height of 10 cm.
- The logs are laid in increments of 50 to 80 cm. The distance depends on the flooring material.
- Insulation is laid between the joists. You can take expanded clay, it is much cheaper. More often, mats made of mineral and basalt wool are used.
- The thermal insulation layer is covered with rolled waterproofing material. It is better to use a special film, since polyethylene does not allow steam to pass through. The joints are treated with mastic or other composition with similar properties.
- If the logs form a flat surface, the finished floor can be mounted directly on them. However, it is better to make a counter-lattice from thin slats placed in the opposite direction to the beams.
- Lay the finishing flooring: boards, parquet modules, laminate.
If the covering is a soft material, such as linoleum or cork boards, sheets of plywood are placed on the sheathing.
Replacing the flooring in a private house is a difficult, dirty and time-consuming job. The timing and costs depend on what the new foundation will be, what material is used for the flooring, and whether a floor heating system will be installed.
Technical characteristics of logs and requirements for their installation
Logs are distinguished from beams by their smaller size and mobility. If beams cannot be moved after installation, and repairs are very long and labor-intensive, then logs are a mobile architectural element. They are much easier to install and, if necessary, repairs are carried out faster.
Distance between joists
Optimal section proportions
Before you start building a floor, you need to study the requirements of regulatory documents for the size of the joists and the distance between them, taking into account the thickness of the floorboards.
Table of lag sections at a pitch of 70 cm
| Distance between joist supports | Linear dimensions of logs |
| 200 cm | 110×660 mm |
| 300 cm | 150×80 mm |
| 400 cm | 180×100 mm |
| 500 cm | 200×150 mm |
| 600 cm | 220×180 mm |
Table of distance between joists depending on the thickness of the board
| Thickness of pine floorboard, mm | Distance between adjacent joists, cm |
| 20 | 30 |
| 25 | 40 |
| 30 | 50 |
| 35 | 60 |
| 40 | 70 |
| 45 | 80 |
In order to learn how to independently make calculations based on tables, it will be useful to consider a simple example. Initial data: the length of the room is 10 m, take a floorboard 30 mm thick.
floorboard
Lags
Batten
Calculation method
According to the table, with such a thickness of the board, the distance between the logs is 50 cm; with a room length of 10 m, 20 logs will be needed. The distance between the logs and the walls cannot exceed 30 cm. This means that we will have to increase their number by one piece, the distance between the others will decrease to 45 centimeters.
Important note. During calculations, all roundings should be done only downwards, thus creating an additional margin of safety.
There is no need to calculate dimensions and distances accurate to the millimeter; no one takes such measurements. By the way, during construction, the vast majority of architectural elements and structures are measured in centimeters, the greatest accuracy is half a centimeter. Millimeters are almost never used during measurements.
Floor joists
A wooden beam of rectangular cross-section can be used as a log
Purpose
Groundwater is found in almost all regions of our country and in all climatic zones. Even in the driest areas, the soil contains moisture. The only difference is at what depth it is located. The depth of its occurrence is called the groundwater level (GWL). Based on the height of their occurrence, the following levels are distinguished:
- high – depth up to two meters from the surface of the earth;
- low - more than two meters.
At any water level, moisture will gradually rise from the soil to the surface through the capillaries present in any soil. According to the laws of physics, the height of water rising in capillaries can reach 12 m. This is enough not only to moisten the walls, but also to completely flood some rooms. It should also be taken into account that the construction of a house will necessarily raise the groundwater level in the construction zone, again, according to the laws of physics.
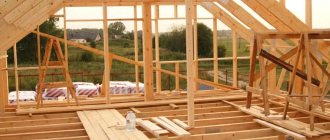
Preparatory work
Regardless of whether a structure is being erected on a foundation, earth, screw piles, or simply on brick pillars, the arrangement of the floor begins with preparatory work.
First, prepare the walls by installing ventilation holes in them. Lack of air access to the underground will lead to rapid destruction of the wooden components of the structure.
The materials necessary for arranging the ceiling must be correctly calculated. A wood supply of 10-15 percent would also be useful.
Installation can begin when the bars and boards are sufficiently dry. When the humidity becomes normal, the material is inspected, sorted and treated with anti-rot and fungal agents.
There are several ways to lay a floor on the ground. If you lower the floor to the minimum, you can compact the earth, lay out a bed of sand, gravel or expanded clay, and then fill it with concrete. True, this option is more suitable for a garage, and not for places intended for permanent residence of people.
In a light country house used for seasonal stays, the floor needs to be done differently. First you need to place brick pillars around the entire perimeter
It is very important to ensure that the surfaces of the supports have a uniform height (to the same horizon). Each support must be covered with a layer of roofing felt or roofing felt.
A wooden lining 3 cm thick, treated with an antiseptic, should be placed on the waterproofing layer.
This entire structure is closed by beams, along which logs are placed with constant horizontal adjustments. The structure is finally fixed with fasteners. The floor is located on the joists if the production is carried out with a single flooring.
A double floor requires the installation of insulation, hydro- and vapor barriers, and, if necessary, other components between the rough and finished floors.