From time to time, hobbies that were forgotten for a while return to our lives. For example, making toys with your own hands is now at the peak of popularity.
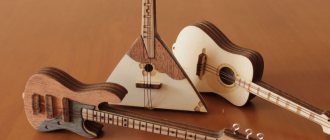
Movable toys made of plywood are of particular interest, especially since the price of the finished toy will pleasantly please you, inspiring you to create new masterpieces.
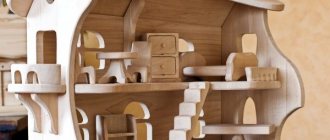
The photo shows the original palace made of plywood.
Why is this necessary?
Quite often, manufacturing turns from a hobby into a profitable business.
Original colorful toys are used as:
- home interior decoration;
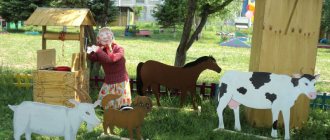
- decor for garden plots and flower beds;
- as memorable souvenirs;
- in the form of safe (environmentally friendly) educational toys.
In the photo there is a plywood toy as an element of a lamp.
Plywood is an inexpensive material that you won’t have any problems purchasing. Having mastered the basics, you will easily navigate the choice of sheet thickness for a specific toy.
Having insignificant weight and thickness, plywood is quite durable and can withstand serious loads.
The qualitative characteristics of the material allow you to create toys of various levels of complexity and sizes:
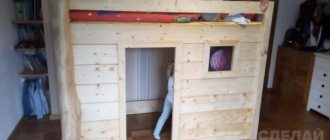
- doll and children's furniture;
- houses;
- designers;
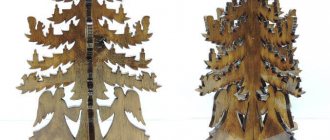
- original New Year's toys decorated with carvings.
If you decide to make a toy with your own hands, you need to start with the simplest product. As you gain practical experience, you can make the task more difficult.
First of all, you need to prepare diagrams of plywood toys with your own hands. This is the basis on the quality of which the external characteristics and functionality of the toy depend. The drawing must be made to a real scale, thus avoiding errors and inaccuracies.
Once you are sure that the drawing is perfect, transfer it to cardboard or paper. The next stage is transferring the image onto plywood.
Plywood jigsaw and fantasy - elements of personality development
Indeed, a plywood sheet in skillful hands can become a beautiful piece of furniture. And even for beginners who have encountered and become interested in making original wooden crafts for the first time, this will certainly be an interesting and exciting activity. And at the same time useful, honing the skills of decorative woodworking.
This activity is a great opportunity to have a great time with interest and benefit. Relax and at the same time enthusiastically do what you love, giving pleasure both to the process itself and to its result. In addition, the created things, which will certainly subsequently decorate the house, will serve to create overall home comfort and coziness.
The main benefit of cutting beautiful decorative elements from plywood is in the process of spiritual development of a person, his ennoblement. Mastery, skill, labor development, all this is inherent in these classes.
Work shapes personality. And working on what you love is doubly interesting. Time no longer has power over busyness here. They don't notice him. And this is one of the signs of true passion.
What do you need for work?
Photos of tools for making toys.
Tools
For this exciting activity you will need an initial set of tools, but their quality must be impeccable:
- a circular saw;
- jigsaw;
- sandpaper;
- Circular Saw.
Skimping on tools can result in insufficiently polished edges, which can cause injury.
After the drawings of plywood toys are transferred to the base, you can begin to work:
- For straight cuts, use a circular saw;
- for curved ones - disk.
- for excessively curved lines - a jigsaw.
Auxiliary elements
The photo shows the making of a monkey.
Having prepared all the parts, you can begin assembling the toy.
For this purpose you will need auxiliary materials:
- screws;
- nails;
- wood glue.
To ensure the strength and functionality of the toy, we use screws and nails; for small parts that should not move, we use glue. When assembling, you must remember that the metal fasteners must blend with the surface.
Advice. Before you start making the product, prepare a place where you can work unobstructed. Success largely depends on the ability to concentrate and move freely, without fear of knocking over or scratching something.
It is easiest to consider the entire work process using a specific example.
Rifles against transformers
The idea to start the production of wooden construction sets was given to Khadyev by a friend who found on the Internet photographs of foreign prefabricated models of toy weapons that shoot rubber bullets. “At first we wanted to make such wooden construction models together, but my friend lost interest in them after a couple of months. But I, on the contrary, was fired up by this idea,” recalls Marat Khadyev.
At the end of 2022, TARG’s turnover amounted to about 10 million rubles. What was left after the costs of purchasing raw materials, the salaries of nine employees and rent, Khadyev spent on the purchase of new machines.
According to Khadyev, TARG has practically no competitors on the Russian market. “Due to the complexity of manufacturing, no one has yet been able to follow our path,” says the entrepreneur. “We sell not just wooden toys, but the process of joint creativity between father and son or grandfather and grandson.”
My new hobby is mechanical models made of plywood; Hodor
The drawing on paper is cut along the contour, all internal details are highlighted, and the resulting picture is glued to a sheet of plywood. This is the 3rd way to transfer a design to a hard surface. After processing with a jigsaw, the workpiece is sanded to remove the remnants of the glued pattern.
Expert opinion
Strebizh Viktor Fedorovich, leading construction foreman
In order to avoid the tedious adjustment of two parts, it is better to immediately cut them in series, placing the blanks in a stack one on top of the other. If you want to clarify something, please contact me!
Making toys
Bee
Photo – bee toys.
When choosing a material, you should pay attention to the presence of obvious defects:
- knots;
- dents;
Before you start transferring the drawing onto plywood, it must be thoroughly cleaned with a coarse grater and polished with fine sandpaper. It is extremely easy to transfer an image onto a perfectly flat surface using a soft, simple pencil.
To make you feel comfortable during the polishing process, it is recommended to wrap the block in sandpaper. Translate the drawing slowly, after attaching it to the base with buttons.
Advice: Beginners should pay special attention to posture; the accuracy of your movements and, accordingly, the final result depend on this.
To cut, you need to be patient; straight or, on the contrary, curved lines are obtained after acquiring practical skills. Finished parts must be sanded again using fine-grained sandpaper.
As a rule, the first crafts are made using ready-made drawings, which sequentially indicate the assembly process.
Connect the parts in strict accordance with the instructions. The properties of the material allow you to adjust the shape of parts when deviations are identified during the assembly process; the main thing is not to rush.
Advice. It is necessary to sand plywood exclusively along the layers, the surface should be ideal, glossy-matte, and you will experience a pleasant sensation when touched.
Making dynamic toys
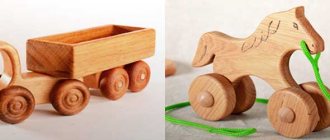
The photo shows a dynamic do-it-yourself toy made of plywood.
Children's dynamic toys are of genuine interest to representatives of different generations, the production of which you can safely move on to, having mastered the basic skills of working with materials and tools.
As an example, let's consider one of the most popular options: a duck that will tap its legs as it moves.
You will need:
- drawing and a simple pencil for transferring to the base;
- plywood sheet, optimal size A4;
- stick 80 cm long with a diameter of 7 mm, ball - 50 mm.
Manufacturing process:
The photo shows a drawing for a duck toy.
- You can print the template on a printer with resizing and apply it to a previously prepared surface. (see also Templates for cutting out plywood with a jigsaw)
- Use a jigsaw to cut out the wheels and duck. You should cut out carefully; the results of haste and sudden movements are quite difficult to correct.
- Using fine sandpaper, carefully sand the finished parts, especially the edges. Skillful use of sandpaper allows you to correct errors made during the sawing process, irregularities become invisible.
- To produce dynamic toys, in addition to the standard set of tools mentioned above, you need to prepare a drill.
- In this case, you need to drill a hole in the tail area to attach the wheels.
- The final stage is coloring the craft; when choosing colors, you can give free rein to your imagination.
In principle, if you act in accordance with the instructions and drawings that come with the model you are interested in, no problems will arise, but it is still recommended to start with the basics.
Christmas toy made of plywood
In the photo - Christmas tree decorations.
DIY Christmas tree decorations have been especially in demand lately; the demand for them is growing due to the return of fashion for handmade products.
To make them, you will need a sheet of plywood, a set of tools, bright colors and all kinds of decorative elements: lace, beads, pieces of fabric or leather, glue. A lot of templates are available on the Internet, but individuality is valued in handmade products; give free rein to your creative fantasies.
After transferring the image onto the plywood, carefully cut out the desired shape with a jigsaw; the work is quite painstaking, since in most cases the toys are quite compact.
After sanding the plywood with a drill, make a small hole for the tape or thread, now you can safely begin decorative finishing. Bright colors (acrylic, gouache) will give the craft a special festive look, patterns made by burning in combination with a varnish coating - an imitation of antiquity.
"Exhibition" of skill
The arrangement of a house or apartment involves making a personal contribution to feeling the aura of inner beauty. And sometimes even externally, since the placement of objects made of plywood can be located, for example, on the territory of a summer cottage.
Of course, the result of fruitful work will always find its rightful place. Be it a carved lampshade for a table lamp or light plywood crafts in the form of figures, located on bookshelves and acting as book dividers.
More complex elements are performed with a solid knowledge of working with wood material. To rush and immediately start cutting out such objects means wasting time and ruining the material.
Subtleties that need to be learned to create quality crafts
Coloring toys is an equally exciting process
- When attaching transfer paper to plywood, you should position the pins or nails so that you can easily lift the drawing to check the quality of the image.
- Lay the thinnest elements along the grain to increase their strength.
- When cutting plywood, the jigsaw should not move exactly along the lines, but should pass next to it, from the outside.
- The diameter of the hole should be slightly larger than the nails used to allow them to rotate freely.
- You should not drive the nails in completely; you may need to move certain parts to improve the model.
First steps on the path to perfection
It's worth starting with the simplest. And for the initial comprehension of the science of carving, choose certain educational literature to help you, presented as a guide to the manufacture of decorative wooden elements from plywood sheets. Take advantage of the advice of experts on thematic Internet sites. Be sure to look at the photos of crafts made from plywood. This in itself will attract interest in such work.
Nothing awakens zeal for something more than seeing its results. And products made from plywood sheets, sanded, treated with paints or varnish leave an indelible impression.
Separately, it is necessary to mention such a necessary element as drawings. They are necessary in any case. When making complex figures and when cutting out the simplest parts. It is much easier to work with a material when its future appearance is determined in advance.
Returning to the question of the initial steps, it is worth mentioning such important things as carefully studying the rules for using tools and materials. And of course about mastering technology. It is quite simple and will take a little time to master.
But in order to achieve a master class level, in addition to consolidating in memory the technological stages of the process of making wooden plywood crafts, additional knowledge is also required.
How startup Ugears creates wooden mechanisms - 3D puzzles
You can endlessly watch three things: how the fire burns, how the water flows and how the gears work in the amazing moving wooden mechanisms produced by the Ukrainian
startup Ugears . Many people make self-propelled toys, many assemble realistic models of rare cars or trams. But a construction set, where the mechanism is part of the design, where you can see how every gear rotates and every lever moves, is something new on the domestic market.
Here and below - photo by Olya Zakrevskaya
Technical designer Denis Okhrimenko, the ideologist and founder of the project, is offended when Ugears models are compared to children's toys, preferring to call them steampunk fantasies. The bulk of puzzle buyers are adults 25-35 years old who are passionate about construction. There were quite a lot of them in Ukraine and abroad: in a couple of years the company grew from one enthusiast who packed puzzles on his knee to a team of 50 people.
The editors of AIN.UA visited Ugears, asked about how puzzles are created and sold, and also took a peek at how the production workshop works.
Business
Now Denis remembers with a smile the times when sales of 4-5 models were pleasing, and he packed the puzzles himself, sitting in the kitchen with a hair dryer, while the online store courier was waiting at the door. The hairdryer often burned through the polyolefin wrapper and I had to repack the puzzle with all the small parts several times (this hairdryer still stands by my desk).
In the Ugears office, even tool stands are made from puzzle pieces
Denis had a lot of ideas for business projects and puzzles were not the focus. The entrepreneur planned to raise money from puzzles for the main project - a construction box with products.
Denis showed this project several times on Startup.ua, but investors were not interested. But I liked the idea of moving puzzles, especially since I already had one prototype of the box in my hands.
Until the puzzles got to exhibitions, there were no big sales. In the spring of 2014, Denis even tried to trade them on Andreevsky Spusk. “I went to dozens of sellers, showed samples, but no one took it for sale. It was a shock for me, because no matter what I showed it to anyone before, it always had a wow effect. I walked through the haul, upset, and decided to get up and try to sell it myself. Some foreigners, families with children, immediately came up. I sold everything and realized that there was demand,” he says.
At the Startup.ua conference, Denis met future investor Gennady Shestak, director of the Egmont Ukraine publishing house. In the summer of 2014, an LLC was created and the co-founders began purchasing equipment (previously they had to work on borrowed equipment). Now Gennady is developing the Ugears business.
Sales began to grow after the autumn Made In Ukraine. The partners launched an online store and were happy when they saw 20 sales a day. When they decided to launch a small campaign on Facebook, sales increased from 1,600 to 3,000 per month.
“Gena likes to say that we work in a blue ocean. I believe that our entire ocean is blue, and if there is a red ocean, it is “near the shore”, in those areas where there is a lot of competition and there is no room for innovation,” the project founder explains the sudden breakthrough of Ugears. Over the past year, the project has grown from 3,000 to 8,000 models sold per month.
Over the entire short period of its existence, the project had only one unprofitable month (-20,000 UAH), and even then - due to the relocation of production. And so the project’s profit is at least 100,000 UAH per month, but everything is reinvested in development.
Technologies and production
Ugears lives in an outwardly unremarkable three-story brick building. But already on the approach to the workshop you can notice parts on the asphalt and the specific smell of heated plywood.
A year ago, in the Ugears workshop there were three machines, a lonely tennis table and a wall bars - there was an echo in the room. Now there are 16 machines working simultaneously here. Work is in full swing, like in Santa's village before Christmas week.
The hum of the machines is neutralized by the deafening dubtronics - the assembly and quality assessment team works under it. “We were worried that the guys were working in a noisy environment, but they turn up the music at probably 90 decibels,” jokes Denis.
Ugears plans to grow very quickly. In mid-February, 2 more machines will be delivered here, and 8 more in March. They plan to maintain this pace until the end of the year, says production manager Viktor Shevchuk. But while increasing production, the team will have to solve many problems: where to get more energy, how to provide ventilation, etc. Already operating at full capacity, the workshop consumes 45 kW with the permitted limit of 50 kW.
On a day, the machines can cut approximately 66 products according to the most complex drawing; one model, depending on the complexity, takes from 20 minutes to an hour. The workshop can make up to 15,000 models per month when fully loaded.
The puzzle material, plywood, also poses many technological problems. Initially, Denis was going to make puzzles by stamping from cardboard, and tried to create models using someone else’s equipment. But cardboard wears out. I tried lamellas (wooden planks), but it turned out that about 40% of them were discarded; we tested foam board, expanded polystyrene, and acrylic. We settled on plywood, the parts are cut out on the sheet with a laser cutter.
Plywood is a rather capricious material, says the Ugears team. If you buy imported goods, you will have to raise prices. And the one produced in the CIS is not of very high quality. The sheets may vary in thickness; in three-layer plywood, the middle layer may be poorly glued, knots and voids may occur. Sometimes there are even “tractor” boot prints on the sheets.
All this is critical for puzzles with very small parts. “It’s important for us: the sheet thickness is 3.5 mm or 3.7 mm. Some 0.2 mm - and we already have problems. The model is no longer assembled that way,” says Denis. If there is emptiness in the sheet, the laser will become unfocused.
Not everything is always smooth with the equipment either. It happened that the edge of the product burned during cutting - this was solved by supplying air under pressure to remove combustion products that formed carbon deposits on the model. And somehow a whole colony of algae settled in the warm water of the cooling tubes of the machine.
The workshop employees, having fun, assemble models of their own design from parts
The problems were resolved. Now the cut on a plate is as thick as a hair, which allows you to create incredible openwork designs.
Clients
The main clients of Ugears are people aged 25-45 years. Therefore, some rigor is observed in the design. Denis is sure that if designers add at least a little flowers or patterns to their models, sales will drop significantly. Now the team is thinking about “more feminine” puzzles. One of the latest developments is an openwork lily with opening petals.
The main problem of Ugears now is that the business is growing quickly, and the team simply does not have time to complete many things: customer service, marketing, website. “For a long time we were like that car at the market: we pulled in, opened the side and let’s unload the bags, and there was a crowd around us, the goods were in great demand, we already needed a second car. Now is the period when we can breathe out a little and work on the quality of the business,” says Denis.
The founder of the project himself advises buyers over the phone who have difficulty assembling models, and maintains a Facebook page, says Denis.
The safe and its author - designer Mikhail Mishutin
According to him, models are an intellectual product that takes months to develop. “We write music on plywood,” says Denis. One of the latest models, a safe, took about 8 months to develop. But a significant part of the value in the product is brought by the user himself, because it is he who puts together the puzzle and sees how the model “comes to life.”
Ugears puzzles are now sold abroad: in Poland, Germany, Serbia, the Czech Republic, and recently several pallets with mechanisms went to English stores. During a very successful Kickstarter campaign, puzzles became known in Japan, Taiwan, China, and orders and proposals for implementation came from there. “The Japanese, for example, really like the fact that our puzzles are completely mechanical, not robotic, without servomotors,” says Denis.
The company is also gaining large clients: for example, Mercedes is interested in a corporate order of 50,000 wooden cars.
Plans
Denis came up with the idea for the puzzles while he was studying the process of creating ornate, complex skeleton watches (a device where the entire clock mechanism is visible). The team now has a list of about a hundred ideas for what else could be cut out of wood, stuffed with gears and levers, and made to move. Every connection, every detail has to be reinvented, because you can’t put an ordinary bearing in a wooden car.
Among the potential models are dozens of devices: from gramophones with wooden records to a half-meter telephone directory with 20 numbers.
“We plan to take over the world. So that the world knows that Ukraine is not only sunflower and metal, so that Ukrainian brands and products are recognized in the mass market. I don’t really like comparisons with Lego, but I would like to become famous like them,” says Denis.
Collection of educational toys for developing fine motor skills
1. DIY game for children made from boxes and straws
Very easy to make with your own hands in 10-20 minutes.
Materials: shoe box and a set of straws.
Make holes in the bottom of the box and color them with different colored markers to match the color of the tubes.
Ready! The educational toy for kids is ready! The child will be happy to play every day for 20-40 minutes a day, develop fine motor skills, remember colors and get acquainted with new objects.
2. Developmental game for children 3-4 years old
Easy to do with your own hands.
Materials: colorful bottle caps and cards.
Make cards with circles of certain colors. Now on each card you need to arrange the lids by color. If you have 2 children, play for a while and be sure to reward the winner and support the losing child.
3. Do-it-yourself educational toy for kids 2-4 years old
Manufacturing time: 10-15 minutes.
Materials: colored paper, album sheets, glue, stationery.
Draw or stick circles of different colors on a piece of paper. Make strips of paper in different colors. Ready! Children must glue the ends of the strips into circles that match the color.
4. Labyrinth toy for motor skills development
On A4 sheet or cardboard, draw or stick a labyrinth. Color it. Now the child must use his fingers to reach the end of the maze. Children love this game very much!
5. Tube game for kids
Materials: tubes and toilet paper roll base.
At the base of the toilet paper roll, make circles the size of the tubes. Ready! It turns out in 7-10 minutes! Now the baby must insert the tubes from the hole of the roller. We develop fine motor skills and learn colors.
5. DIY game made from clothespins and a box
Today we are building a house out of clothespins. Each wall should be a certain color. The child must attach clothespins to the sides of boxes of certain colors. We develop attentiveness, logic, fine motor skills and have a good time!
6. Puzzles with sticks, repeat the pattern
Draw on paper examples of what the child should build from sticks. The game develops not only finger mobility, but also logical thinking.
6. DIY board game “Labyrinth”
Make a labyrinth out of material or paper as shown in the picture. By the way, you can draw the labyrinth yourself with bright colors or felt-tip pens. And now the child must guide a ball, a small toy, or a button through this maze. A very exciting development for motor skills, logic, and the thought process.
8. Homemade educational game from pasta tubes
A simple game when you don’t know what to do with your child. Glue large pasta onto a sheet and thread a string through it. The child must thread the string through the pasta to create a beautiful design. You can draw a diagram in advance for your baby to follow to thread the lace. This game is fun and will keep your child busy for more than 20 minutes. Develops logic, fine motor skills, and grasping skills.
9. Finger motor skills development for kids
Make a ladybug or apple applique as shown in the picture. Glue the corks to the image as in the photo. Now the child must decorate the photo by threading a string through these curlicue plugs.
10. Developmental game for children 3, 4, 5 years old to learn letters.
Mark the letters on the clothespin and box, as shown in the photo. And now the child will look for the correspondence of the letters on the box among the clothespins. When he finds the right letter, have him name it. You can also use this development tool to study syllables. Write the syllables on the box and the baby will look for the necessary letters and read the syllables.
Wood carving tools
Sawing with a jigsaw is a creative process, but it requires preparation and additional equipment. What you will need for work:
Preparing the stencil
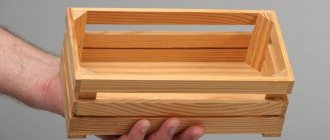
Drawings for cutting with a jigsaw can be of different sizes, depending on the scale of the product being manufactured. To create a diagram of a shelf, a piece of furniture or a composite three-dimensional toy, you can take a large sheet of whatman paper A1 or A0; wallpaper left over after renovation will also work; for small figures, use regular A4 paper or another suitable format.
Using a bright pencil or marker, draw the outline of the future product on the surface, following the dimensions. This could be an element for assembling furniture, a shelf or another large product.
There are such a wide variety of templates for cutting with a jigsaw that it can be difficult to choose the right one. It is much easier to come up with your own cutting patterns and transfer them to paper.
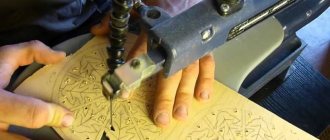
Transferring an image to the surface of plywood or boards
Before you start cutting with a jigsaw, you need to transfer the image from the stencil to a piece of wood or plywood. To do this, cut out a shape from a sheet, apply it to the surface of the plywood and carefully trace it. It is desirable that the line be smooth and accurate. We use a simple pencil so that, if necessary, we can correct the line by erasing it with an eraser.
We apply the outline from the back side so that no remaining lines are visible on the finished product. The internal area can be shaded so as not to cut off excess and to mark untouchable areas.
It is important to transfer the design in such a way as to minimize cutting along the grain with a jigsaw - it is so difficult to get an even line.
Sawing process technology
Many people have probably heard how to use a jigsaw. Working with the tool will not cause difficulties if you prepare for it correctly.
Plywood carving begins with the inner contours of the design
. To do this, you need to make slots for inserting the tool blade:
- The plywood is often taken thin, and when cutting a large contour there will be no problems, but tension may arise in a small remainder. Sawing with a jigsaw inside can damage the product - chips, burrs, cuts;
- It’s easier to work this way: you always have something to hold the workpiece by. A large sheet is much easier to handle than trying to hold a small sawn piece while shaping its interior.
How to saw with a jigsaw
:
Working with a jigsaw is much easier than using a hand tool; there is no need for physical effort and the process goes faster.
How to saw with a jigsaw
:
As you can see, there is nothing complicated in this process.
Defects in work
If you did not follow the technology or hold the tool incorrectly, the saw may simply move off the line. Why does a jigsaw cut crookedly:
- tilted the tool while working;
- the tension of the file has weakened;
- With an electric saw, the fastening of the saw may become loose.
To avoid such problems, before starting sawing, be sure to check the tension of the saw and the fastening of all working elements. If the blade is beveled and stuck, it is better to start over and make a line parallel to the defective one.
A little about safety
Safety precautions when working with a jigsaw for cutting plywood and wood are simple:
- Use protective equipment - glasses, gloves, gown. These things will protect you from dust and small chips.
- Sawing with a hand jigsaw should be done carefully so as not to damage your fingers with the saw. Maintain a distance between your body and the tool.
- If you are a beginner, carefully read the instructions on how to use a jigsaw and the main characteristics of the tool. This information will help avoid accidental injury and unit breakdown.
Wood carving with a jigsaw requires care and attention. Both your health and the integrity of the finished product depend on these qualities.
Wooden mechanisms from the creative group Wood-Mechanics
The works of the creative group Wood-Mechanics present fantastic mechanisms made mainly of wood and similar structural materials. Complex handwork and modern processing result in things that attract attention and capture the imagination.
Table lamp from the creative group Wood-Mechanics, under the working name Araneae (Latin: Spider). It uses a new two-stage gearbox.
The rise and fall of the structure occurs along two different trajectories. A similar gearbox is used in aircraft manufacturing in aircraft wing liners.
Another mechanograph lamp is a mechanical table lamp that can be controlled by changing its position using a handle.
The mechanical part consists of a two-stage gearbox with a total gear ratio of 10.5. Rotation of the control handle causes rotation of the gear wheels of the gearbox and is then converted into reciprocating movement of the drive arms. The mechanical cycle is closed and can be carried out in both directions relative to the control handle. Handle on both sides. The structure can be rotated 360 degrees around its axis - the only reasonable limitation is the electrical wire. The lampshade can be fixed in a selected position and maintains this position during design evolutions.
Steampunk clock. With internal lighting. A meter in diameter, if you turn off the light, it will be like a window into another world. Or a night light for a small bedroom.
Partial decoration of a room in steampunk style.
Workplace for painting small items.
Wooden clock.
dosoaftor.ru
Signs of a true master
A true master will immediately determine:
- what type of plywood sheet is best suited for sawing and processing. Wood varies in quality and properties. Some types are easier to work with, but some types are more difficult due to delamination, sudden appearance of cracks and other negative aspects.
- what thickness of material to choose for a specific design of a future craft;
- what jigsaw files to buy in order to use them for a long time.
This experience develops over a longer period. But the more interesting it becomes to advance along the path of self-improvement.
Hand-made plywood crafts, at first simple and unprepossessing, but over time acquiring real features that confirm the high class of a home craftsman, can become an objective reflection of the formation and development of artistic wooden decorating skills. Sometimes this is expressed in a very original way.
Over a certain period of time, plywood crafts are displayed in a row one after another, and then a picture of the gradual passage of the entire path from a student to a real specialist begins to emerge.
New Year's snowflakes on the Christmas tree
For any child, the most memorable moments of the holiday are making toys for the Christmas tree with your own hands. It's very easy to make wooden Christmas snowflakes for your Christmas tree from old clothespins. For this:
- remove the two halves from the spring. Unfold the reverse side and glue 8 pairs with even “backs”.
- Fold the 4 glued halves into a cross and glue it in the center.
- attach 4 more turned out clothespins, gluing them at the base.
- New Year's snowflakes on the Christmas tree should be beautiful. Glue circles of colored paper or cardboard on both sides, sprinkle with tinsel;
- Don’t forget to tie a string to the New Year’s toys to make it easier to hang them on the tree.
From time to time, hobbies that were forgotten for a while return to our lives. For example, making toys with your own hands is now at the peak of popularity.
Movable toys made of plywood are of particular interest, especially since the price of the finished toy will pleasantly please you, inspiring you to create new masterpieces.