Every girl has a favorite doll. Any girl wants her pet to have a separate place to live. The housing is unique, unique housing. A house for your baby’s dolls is now, of course, easy to purchase and ready-made, now the market is full of offers, but making such a toy for a child with your own hands is a special pleasure!
Imagine her joy, and the children rejoice sincerely, from the heart! And the cost of a finished house is usually not small. Let's think together how to make a dollhouse with our own hands?
House for dolls photo
Features of interior decoration
A plywood dollhouse will require finishing. There are several ways to decorate a product.
- It is not difficult to paint a house if you choose safe paint.
- It's easy to cover the walls with wallpaper. It is more convenient to do this before the main assembly.
- For gluing it is easy to use textiles or decorative film with an adhesive base.
It's easy to use the decoupage method.
Windows and doors need high-quality treatment after cutting through.
It’s easy to complement the interior decoration with lighting fixtures and furniture if desired.
Large house for dolls made from boxes with your own hands, step by step with photos
The most affordable way to make a dollhouse is to make it from cardboard boxes, which can be found in every home. In addition, the house itself can later be covered with remnants of wallpaper, any other paper, painted or sheathed with fabric. Also, over time, you will have the opportunity to add new rooms and floors.
To create a cardboard house, prepare:
- large cardboard box;
- stationery knife;
- scissors;
- pencil;
- scotch;
- materials for decoration.
Start by cutting the box in half. The larger the box you choose, the larger your home will be. For Barbie dolls, a box, for example from a microwave, is suitable, and for baby dolls or small toys you can use small boxes.
Cut off the flap tops of the box from each half.
From one of the cut pieces we cut out the front part of the roof. On one side of the second piece, we make a rectangular cutout with a stationery knife, which will serve as an exit to the stairs. Using tape we glue the parts together.
From the remains of the box we cut out 2 parts for the roof and the floor for the attic floor. We make exactly the same rectangular hole in the floor for the stairs. Glue the parts with tape.
Let's draw a drawing of the windows and doors on the front side of the house, and then use a utility knife to cut out all the details. From the remains of the box we cut out 2 ladders and glue them with tape.
Next, we decorate the house with paints, markers or wallpaper at our discretion.
What must be considered when creating a design?
When building a house for Barbie with your own hands, you need to take into account several important criteria. They include the following items:
Decide on the size and shape of the future structure. Experts first recommend preparing a detailed plan for creating a future doll house with your own hands.
Drawings allow you to navigate when preparing parts and have a clear idea of the finished result. When choosing sizes, it is necessary to take into account the height of children's toys with which the child will play.
It is important to take care of the safety and stability of the doll's home. To do this, wide legs are made in the lower part, which will be able to support the entire structure and prevent trauma to the child’s body.
Experts recommend making the distance from floor to ceiling twice as large as the size of the doll. This way, the child will be able to freely visit different areas of the structure without making any effort.
The depth of the room should be at least 50 cm and the width up to 30 cm.
When choosing a form, it is necessary to take into account the number of floors and future rooms. For example, when creating a house for dolls with your own hands, it is best to choose a rectangle shape. It can accommodate three spacious floors and six rooms.
Most specialists prefer to work in special 3D designers. These programs help model consumables and templates for future parts.
How to make a house for paper dolls
Girls who are interested in paper dolls will definitely like houses for them. Making paper houses is easy, and most importantly, their appearance depends entirely on the child’s imagination. Grown-up girls will be able to make such houses on their own, but very little girls cannot do without the help of adults.
The very principle of creating houses for paper dolls is somewhat different from creating houses from cardboard or plywood. The most advantageous material for such houses in terms of durability is cardboard. Furniture drawings are applied to it, and slots are made for doors, windows, cabinets and beds so that the dolls can rest and have a snack. The creation of each of the rooms must be approached with special attention and the rooms must be arranged in a logical order, so that from each room there is an exit to the next.
House book.
With the help of a book house, lovers of paper dolls develop not only their imagination, but also fine motor skills. The pages of such a house can be made of thick cardboard, and each of them can be pasted over with office paper or wallpaper and drawings can be applied to them.
On each spread of the book, a room is drawn in a certain theme: kitchen, hallway, bedroom, bathroom and children's room. A child can sit his puppet characters at the table, bathe them in the bathroom, put them to bed, and brush their teeth by inserting them into the slots in the appropriate places. Such a house can be placed on a corner, or you can simply flip through it.
House in a notebook.
Houses in notebooks are also convenient for playing with paper dolls. Each spread is also designed in a specific theme. Household items are cut out of colored paper and glued to a place previously drawn for them. Each door opens, on each shelf you can put everyday items: clothes, shoes, towel, comb, toothbrush, dishes, books, toys, etc.
House 3D.
Creating 3D houses for paper dolls is very simple. A4 sheets are folded in half and drawings are drawn on each half. For example, on the lower part there is a floor and a bed, and on the upper part there is a window and a closet. Placing the sheet of paper on the table with the bottom part will create the impression of a full-fledged room. To ensure that the structure holds up better and the sheets do not wrinkle, it is recommended to glue each of them onto thick cardboard. Each of the rooms is designed so that there is a transition from it to the second or a door to the street.
Materials for a dollhouse
To create such a toy, you can use a number of materials.
- Boxes and thick cardboard.
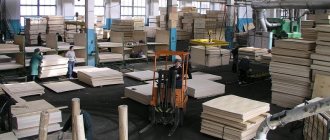
- Plywood, laminate, chipboard.
- Drywall.
- Wood.
Having decided on the main material, it is necessary to think about the decor of the product.
It’s easy to cover the inside walls with remnants of real wallpaper or cover them with acrylic paint.
Additional details such as stairs and balconies must be properly fixed.
Construction and finishing materials used for do-it-yourself dollhouses must meet sanitary standards and safety requirements.
The choice of base material determines the dimensions of the planned structure. It depends on the planned costs of its creation and the professional skills of the master.
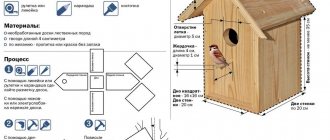
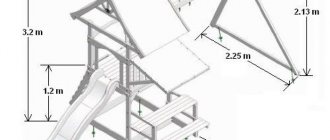
DIY plywood doll house, drawing, master class
Houses made of plywood, as a rule, last much longer than those made of paper or cardboard. First you need to make a drawing of the future house. We suggest using our drawing. All sizes are indicated in centimeters.
To create a house you will need:
- plywood sheet 8 mm;
- pen or pencil;
- ruler;
- jigsaw;
- construction nails 1.2x20 mm;
- super-strong glue “Montazh”;
- white paint for facades;
- paint brush;
- sandpaper of different grain sizes;
- drill.
First of all, we transfer our drawings to plywood and cut out each detail with a jigsaw. To quickly assemble the house in the future, we recommend signing every detail.
On those parts where you decided to place windows, we mark them.
Since the parts are in the middle of the sheet, we first drill several holes and then cut them out with a jigsaw.
We carefully sand every detail.
We assemble the house according to the drawing. First we glue the parts, and then, for greater fixation, we drive in a pair of nails at each joint.
After the house is completely assembled, we paint it white. You can choose any other one.
Get closer to your child
On the Internet you can easily find many ideas for making a dollhouse from a variety of available materials. It’s easier to buy a ready-made house, and such a house will look better than a homemade one. But remember, psychologists agree that such joint work brings you closer to your child. Such work is useful for both you and the child.
How to make a house for dolls without glue, diagrams
This is the house we got from the drawing above.
A simple one-story house template.
Features of work
To create a playhouse, it is recommended to use so-called furniture plywood. When preparing parts, it is necessary to process all cuts.
Fastening is done using self-tapping screws.
Difficulties always arise when installing interfloor ceilings. Experts advise attaching them to a narrow glazing bead fixed around the perimeter inside the house.
How to make a house for a barbie doll
How to make a house for monster high dolls
House made of paper for dolls, step by step with photos
In order for the house to hold up, and for furniture and the dolls themselves to be placed on its floors, we would recommend using cardboard as a base.
To create a house you will need:
- cardboard;
- stationery knife;
- ruler;
- pencil;
- glue Moment Crystal;
- pieces of wallpaper or other paper for wall decoration.
First of all, you will need to draw a drawing of your future home on a piece of cardboard. We used a cardboard blank measuring 110x74 cm.
We bend 2 side walls of the house. To make it more convenient to bend them, before the process itself, walk the blunt end of the scissors along the future bend lines. From a piece of cardboard, cut out 2 rectangles measuring 50x30 cm and 25x27 cm. This will be the floor between the first and second floors and the partition between the rooms on the first floor. Glue it.
We cut out another blank for the floor and for the partition on the second floor, as well as blanks for the attic. Then we cut out the windows with a utility knife and cover the house from the middle with wallpaper or paper.
We wallpaper the outside of the house. The roof can also be covered with wallpaper, or you can, for example, cut cardboard into 3x31 cm strips and glue them overlapping. Window frames are also made from cardboard or ordinary colored paper according to the measurements of the cut window.
By making your own dollhouse for your daughter, you will give her a whole play world in which she can develop her imagination.
§ 6. The most pleasant part is the landscaping of the layout.
Trees, spruces and bushes for dioramas.
First of all, we determine the height of the trees and fir trees, depending on the scale of the layout.
a) Vegetation can be made independently using special various powders, lumpy foliage or deciduous and coniferous mats. Steel or copper wire is most often used to make barrels. Take several pieces of wire of the required length, twist them together into a bundle approximately to the middle, and spread the rest into branches. To make the barrel more realistic, you can cover the barrel with napkins and PVA glue. This will help hide the twisted wire and imitate the structure of tree bark. Then paint the trunk brown with acrylic paints or gouache. Another way to decorate the trunk and make it more realistic is to apply quick-drying Morrison-N glue to it and sprinkle it with imitation earth that we have left after making the landscape.
• The fastest way to make a crown is with clumping foliage. Just glue the ready-made crown pieces to the tree branches with super glue and you're done!
Tip: you can make this easy-to-use material yourself by mixing loose foliage of your favorite color with an emulsion to prepare the foliage in a container. Add approximately 100 ml to one bag of such crumbly leaves. (half a bottle) of Morrison foliage glue and mix thoroughly. After mixing, let the mixture dry for about one hour. This way you will get quite elastic and at the same time fluffy lumps. You can start crowning the tree.
• There are many more ways to use loose foliage. For example, glue pieces of cotton wool to the trunk (it is better to first paint it brown), dividing it into thin transparent fibers - it will look like thin twigs. Then carefully apply Morrison-E glue to the cotton wool with a brush and sprinkle the foliage through a sieve.
b) If you value time, ready-made Morrison trees will always come to your aid when landscaping your layout. We have developed about fifty different types of trees and spruces for you and continue to expand our range.
• The “Classic” series is a favorite line of trees from two to forty-five centimeters in height, loved by both beginners and professionals.
• The Pro Series is an excellent choice for any layout. These trees are handcrafted by our highly experienced craftsmen. “Pros” look great on any layouts of various themes, be it a railway layout, dollhouse landscaping, a miniature garden, a military diorama or an architectural layout.
• Trees and spruces from the “ArchiFORM” series amazingly enliven layouts and create a sunny mood! Excellent value for money and quality. Suitable for all types of dioramas, miniatures and architectural models.
• Textile trees and Christmas trees of the Micro series are an excellent help for architectural models. With such trees you can easily plant an entire forest or improve the territory of a residential complex. These trees are definitely not afraid of anything - no moving of the layout around exhibitions and your customer’s offices. They will never crumble or leave dirt under the glass cover. Trees, by the way, can be used as shrubs. And the various shades of the Micro series combine picturesquely with each other. But their main advantage is that absolutely everyone likes these “fluffies” and the process of landscaping the layout takes just a few minutes.
• Entourage and foam balls are a real salvation for urban planning conventional layouts on small scales (1:500, 1:800, 1:1000, 1:2000). Also, landscaping on such layouts can be made from clod foliage or leaf reticulum.
• Bushes – where would we be without them? Green, red, yellow, lilac and white! Just a godsend for the layout of a blooming garden and more! These bushes will definitely become a real decoration for any miniature or diorama and will not leave anyone indifferent.
• Of course, we haven’t forgotten about coniferous trees for your masterpieces. Here you will find fluffy Realistic Spruces and Pines for your models and dioramas. They have already been appreciated by both professionals and novice modelers and modelers.
Flowers on the model and diorama.
Flower beds, flower plantings in a park or garden, as well as flowering meadows always delight the eye and create a wonderful mood.
• You can use clumping foliage to imitate flowering vegetation and shrubs. This is the easiest and most convenient way to create flowering flower beds, plant a flower hedge or plant flowers next to a fence.
• Imitation flowers in powders - a versatile fluffy material that can be used to decorate hedges, create flowering trees and bushes, or make any other flowers.
• Flower ribbons are a quick way to create flowers in the garden by planting them in rows or forming a flower bed.
• Colored powders are a “lifesaver” in cases where you need to create flowering meadows or meadows. Apply some flowers to the finished green landscape and secure with glue.