According to the technology, any wood surface must be mechanically cleaned and smoothed before further treatment with paints and varnishes. Let's look at how to sand wood manually or using various power tools. Let's get acquainted with the features of the work, the criteria for choosing certain devices. Read to the end and you will learn how you can achieve this or that result.
The difference between the sanded and untreated area on a wall made of timber Source pokraskadomov-vergiz.ru
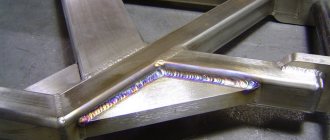
How to sand oak correctly?
Grinding
We start with 80 grit. We work with it carefully, removing only large irregularities. Then we repeat the treatment with sandpaper at 120, then at 180 and 240. During the work, we must periodically remove dust and inspect the surface to identify unevenness and other defects.
Interesting materials:
Can the speaker be used as a microphone? Can quartz sand be used for an aquarium? Is it possible to use mineral water in a Nebulizer? Can mineral water be used in a Nebulizer? Can mineral water be used in a humidifier? Can mineral water be used instead of tonic? Is it possible to use regular rinse aid in the Irrigator? Can grinding be used to lubricate a chainsaw chain? Is it possible to use a vacuum cleaner without filters? Is it possible to use an iron with a steam generator without water?
Why do you need surface smoothing?
Sanding a beam, board or wooden object is ultimately done to improve the appearance of the object. Additionally, the goal is to protect people from injury during operation of structures or products. In addition, the event allows you to solve other problems:
- removal of fungal and mold formations, blue stains;
- cleaning the surface from dirt and old decorative finishes;
- elimination of burrs, which quickly darken under the influence of the sun;
- ensuring good adhesion of the surface layer with decorative paints and varnishes.
Many people believe that wood, as an excellent moisture-absorbing substrate, can be painted and impregnated with protective agents in any condition. However, if you process unsmoothed workpieces, the coating will be unevenly distributed. As a result, stains, peelings, and all defects will soon appear on the surface. That is, stripping the wood before painting is a prerequisite in order to obtain a durable and visually attractive result.
Impregnation of the treated surface Source 1c-bitrix-cdn.ru
Several features
Wood is fibrous in structure. Moreover, the fibers are located in a certain order - along the trunk with smooth bends in the area of knots. So, if you grind in the longitudinal direction, then the abrasive marks will be almost invisible. On the contrary, transverse movements will not cut, but tear thin threads, so minor damage will be more pronounced.
In addition to following the direction, there is one more note on how to sand wood. It is better to work with dry workpieces than with wet ones. This is justified by the efficiency, simplicity and reliability of the fibrous structure. In the second case, the threads peel off, which complicates the task and forces the removal of a thicker surface layer.
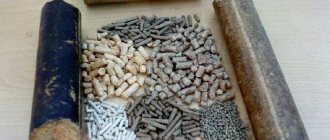
When considering the procedure for properly sanding wood, you need to observe the grain size of the abrasive device. First, coarse material is used, then the grain size is gradually reduced. For example, you can start working with sandpaper with 40-80 grains per square inch, then take it with 120 and 180 units. If you need a decision on how to polish wood, then you should consider samples with numbers over 250.
Sanding wheels with different grits Source amazon.com
What is sandpaper
Sanding paper is a combined material that consists of:
- The basis of sandpaper is most often paper or fabric.
- Abrasive is a grain that is applied to a substrate using glue or resin.
Manufacturing
Sandpaper production was first started in China in the 13th century. Craftsmen glued river sand of various sizes, crushed shell rock, and plant seeds to parchment using agar-agar or starch glue. Later they came up with the idea of using crushed glass as an abrasive, hence the appearance of “glass paper.”
Serial production of sandpaper began in London in 1833, then began to spread throughout the world, technology improved, and today we see a variety of types of this product.
Production stages:
- The paper base or fabric is impregnated with polymers, most often rubber latex.
- Glue heated to 30...500C is applied to the prepared base.
- The abrasive of the required fraction is applied using the bulk method.
- The semi-finished product is sent to the oven for drying. The temperature depends on the type of glue, grain fraction and other factors.
In this way, you can make low-quality sandpaper at home using thick cardboard, crumbs from an abrasive wheel or crushed glass, sand.
Release form
Finished products are stored by stacking sheets or rolling them into rolls. Sheet fabrics have sufficient rigidity, so they are difficult to bend. Sandpaper in rolls is more compact to store, its fraction and grain size are smaller than that of sheet sandpaper.
Other release forms:
- The abrasive mesh is a sparse sheet with fixed grain. When sanding, even the smallest dust particles pass through the material and do not become clogged in the pores. This working method is called “dust-free sanding”.
- Abrasive wheels are fine-grained sandpaper cut to the shape of attachments for mechanical devices. Its purpose is to clean the metal surface from rust and remove old coating.
- Sandpaper of different grits, cut to the shape of the attachment for power tools with Velcro fastening or to the holes made.
- Sanding belts intended for threading into sanding machines and machines.
Marking
Sandpaper markings indicate the fraction and concentration of the abrasive. Domestic GOST 3647-80 determines the number of grains of different sizes per 1 square unit, but this classification is considered outdated. Today, sanding paper complies with international ISO standards; this designation can be found on the back of the product . It should be noted that the data of the old GOST and the values of international standards overlap with each other. Their correspondence can be seen in the table.
The main difference between the old and new standards is the different movement of numbers in the markings:
- In GOST 3647-80, the values of grain size and density are reduced, which is quite logical;
- In the new ISO 6344 standard (GOST 52318-2005), the product number increases with decreasing value in the marking.
Decoding grain size
The letter "P" in the designation indicates the grain size. The larger the value behind the letter, the finer the skin fraction. P400 is a known zero. P600...P2500 have small fractions and an almost smooth surface; their grain size is not so noticeable to the touch. This type of sandpaper is used for final polishing in industry.
In the old GOST, things were different. Using 10-N as an example: the first number means that an abrasive of a size corresponding to a sieve with a mesh of 100 microns is applied to the surface of the product. The lower the indicator, the smaller the screening size.
Other designations
Types of sandpaper differ in the composition of the base and the properties of the grains. This information is also reflected in the product labeling.
- The letter “L” indicates the sheet form of the product. Rolled is not indicated in any way.
- The letter "M" stands for waterproof sandpaper.
- The product marked “P” is intended for grinding dry products without contact with moisture.
- “1” is an abrasive for soft surfaces, “2” is for hard surfaces.
To select emery for a certain type of work, you should take into account not only the main classification, but also the information provided, which is contained on the back of the sheet.
Technology
The sanding job is not that easy. This is a rather complex and labor-intensive complex, including six main stages.
Coating preparation
The new flooring must be checked for defects, such as fallen knots, un-glued dies, protruding nails, chips, and excessively wide gaps. The old parquet is checked for integrity, damage and strength of fixation. To eliminate defects, they most often use parquet glue and putty compounds (special liquids or PVA glue mixed with fine sawdust). It is better not to use elastic grouts and sealants, as they do not gain sufficient strength and “clog” the abrasive nozzle.
In order not to damage the drum or disk of the machine, all steel elements must be “sunk” into the floor by at least 3 mm. Damaged planks must be replaced with new ones, not glued ones - fixed with glue and hardware. Dust and debris are removed with a damp cloth or a construction vacuum cleaner.
Primary grinding
Rough grinding.
First of all, a drum or belt type machine is used as the most productive and efficient. This stage is most often called scraping or rough grinding of the surface, since an abrasive material with a grain size of 40 or 60 units is used. Uneven surfaces, scratches, old paintwork, dirt, etc. are removed.
Professional devices allow you to adjust the clamping force of the abrasive. This is very convenient, because it ensures a uniform fit of the nozzle to the surface, which means better quality work. A tape or glued strip is installed on the base, carefully fixed and deep processing is carried out:
- For decking - along the grain from wall to wall. Transverse movement during such laying is allowed only when the machine is turning around vertical enclosing structures;
- On herringbone parquet - diagonally, with uniform advancement over the entire surface;
- When laying wicker, shield or palace parquet (multi-directional installation) - crosswise without highlighting individual sections;
- On artistic parquet – circular movement, twisted in a spiral
The grinding process is quite dusty, therefore drafts are an undesirable phenomenon. Therefore, be sure to close the windows and entrance doors in the work area.
The technician must periodically check the condition of the abrasive attachment and, if necessary, replace the worn part with a new one. This is a kind of preventive measure against stripes and individual untreated areas.
After completing the main work, it is necessary to process corners and other hard-to-reach places. For rough grinding of the floor with a grinder, orbital machine or “boot”, you will need circular nozzles of the same grain size - 40 or 60 units.
Fine grinding
The final leveling stage is carried out using single- or three-disc surface grinders. In this case, all minor irregularities, dents, cracks and other defects on the floor boards are finally eliminated. For effective work, wheels of different grain sizes are used - 60, 80, 100 and 120. In some cases, even abrasive discs with a grain size of 180 or 240 are used.
The work is again carried out along the fibers. Nozzles should be replaced with new ones as they wear out. Corners, steps and other difficult areas are processed with an angle grinder or a “boot” with circles of the same grain size. At the end of the work, the surface must be vacuumed again or wiped with a damp soft cloth. Fine wood particles and dust must be completely removed.
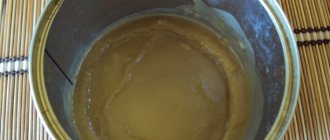
Filling gaps and small defects
After leveling the surface, you can begin to putty. For this, paste-like ready-made compositions for wood or special putty liquids are used. Professionals prefer the latter, since when mixed with sawdust from the treated plank floor, a mass of identical shade is obtained that perfectly fills all the voids, while being quite elastic and not cracking over time. The mixture is applied with a stainless spatula, which allows you to fill the pores while cutting off the “rising” small wood fibers.
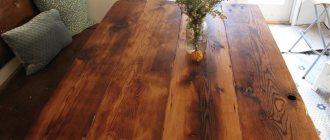
Final sanding
Before applying varnish, oil or wax, the surface must be polished again. The work is carried out after the putty has dried and polymerized. It is implemented using a surface grinder and an angle grinder with abrasive attachments with a grain size of 120-160 units. The direction of movement is the same - along the fibers. After treatment, the floor must be thoroughly vacuumed again.
As a result, everything unnecessary is completely removed from the surface and the floor becomes perfectly smooth.
About grinding pads and making them yourself
The simplest tool can be called sanding pads. They can be used to work with a wide variety of workpieces. Among the features of common pads, the following points can be highlighted:
- Most versions consist of three main parts: the shoe and the locking mechanism and the handle. The body is used as a base; the fixing element does not allow the sandpaper to move during operation.
- Branded pads are made in a variety of shapes and types. In most cases, plastic is used in the manufacture of the case, which is characterized by low weight, but also low strength.
Homemade sanding block
If desired, you can make such a tool yourself. For this, an ordinary wooden block is used, to which the skin is attached using nails or screws. The handle can be attached to a block to simplify the grinding and polishing process.
When making a homemade structure, it is worth considering what size the workpiece will be processed. If the size is too large, the working area should be larger, but problems may arise with selecting the most suitable skin.
What are the advantages of hand sanding?
If you don’t have special tools to sand the wood, you can do this by hand. To work, it is enough to have only a piece of sandpaper and a special block, which you can make with your own hands. The advantages include the following points:
- Low cash costs.
- You can sand any surface and hard-to-reach places.
- Grinding can also be carried out in the absence of an energy source.
However, there are several significant disadvantages, including low performance.
Methods and devices
There are only two methods for sanding a board or other wood product: manual and mechanized cleaning. The second method allows you to complete the work faster, cover a larger volume in a unit of time, and smooth out areas with high density. On trading platforms there is a group of specialized tools for sanding wood. This includes the following machines:
- tape;
- surface grinding;
- oscillatory;
- orbital;
- angle grinders (grinder).
Let's look at how to properly sand wood with a sander, depending on the model:
- Tape. Here, a woven-backed abrasive material is manufactured in the form of a closed strip that fits over a roller pad. The surface treatment process occurs with rotating movements in the longitudinal direction. A tool is used for rough cleaning of the plane. The main advantage of the model is high performance. Disadvantages include the likelihood of the formation of stepped marks, the inability to work with shaped workpieces, relatively large weight and high noise level. It is also worth paying attention to the fact that grinding is carried out mostly in the central part of the site.
Example of a tape machine Source comfy.ua
See also: Catalog of companies that specialize in finishing materials and related work
- Surface grinding. Here the working platform is represented by a flat sole (plate) with clamps for sandpaper. The replaceable attachment is a flap with abrasive on a paper or fabric base - this is a relatively inexpensive solution for sanding boards. The second option lasts longer. The convenience of this model lies in its relatively thin platform, the edges of which can be used to process hard-to-reach places and corners. Craftsmen choose this tool because of its affordable price and inexpensive equipment. The operating principle of the machine is in reciprocating movements along the longitudinal axis of the sole. Therefore, when choosing equipment, you need to pay attention to power (as a rule, this ranges from 150 to 300 Watts), frequency and amplitude of vibrations, and weight.
Surface grinding model Source magazinsosklada.ru
- Orbital. Also known as eccentric models. Here the working platform has the shape of a circle. The mechanism is designed so that the plate rotates and makes reciprocating movements. The optimal speed is 12,000 per minute, the vibration amplitude is 2-7 mm, the diameter of the pads is from 75 to 150 mm, the power is up to 950 W. Due to the light weight and protruding edges of the circle, it is possible to process hard-to-reach places and curved lines. The purpose of the tool is rough cleaning and finishing polishing.
Sample of an orbital sander Source ozone.ru
- Oscillatory. Another name for devices is a multi-tool. Here, the replacement equipment is presented in various designs depending on the purpose. So you can choose knives for neatly cutting large protrusions or a triangular platform with rounded corners for abrasive sheets with Velcro. Using this technique, you can perform rough cleaning, sanding and polishing of large and compact wood products. The principle of operation is to move the platform with low amplitude (1-3 mm) and high speed, which can be adjusted. There are holes in the sole to remove dust. The advantages also include relatively quiet operation and the ability to work with shaped workpieces.
Multi-tool with a set of various attachments Source shuriki.ru