There are now more than enough tips on how to cut a baseboard at 45 degrees on the Internet, the only bad thing is that most of them are given by people who have never done this. Next, from a practical point of view, I will tell you how to cut skirting boards at the corners with your own hands in 3 options, and you will learn about both traditional methods and folk universal recipes.
The science of how to properly trim ceiling moldings in corners is not as complicated as it may seem.
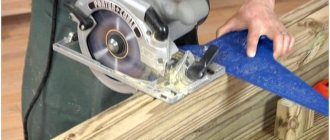
Video: How to Cut with a Circular Saw at 45 Degrees
When purchasing, be sure to pay attention to such an indicator as the depth of the saw
Note. The cutting depth of the saw blade ranges from 30 to 130 mm.
You need to know what thick boards you need to work with. The choice of saw is also very important. For a neat cut, a disc with a large number of teeth is suitable. If the disc has sparse teeth, the cut will be faster, but the cut will be rougher.
Sections with such a saw are usually smooth and practically free of chips
How to make a 45 degree cut?
This angle is found in the manufacture of various products. Let's start cutting. First, the saw blade moves ninety degrees. Depending on the model, there is a red bolt on the side that needs to be unscrewed.
The soleplate is then rotated to a 45 degree angle and secures the bolt back. Take a piece of chipboard as a blank. We secure it with clamps to the table top so that the part is cut out of the table.
After setting the line. It is usually included with the circular saw. The saws have 2 marks zero and 45. We will cut 30 millimeters, for which we combine three on a line with a mark of forty-five on the sole. Then tighten the screw that secures the ruler.
Next, the sole should be positioned so that the ruler rests on the edge of the workpiece. The saw starts and, after it is completely unwound, presses the ruler firmly against the edge of the workpiece and moves forward.
Seeing advice
If you cut the edges with a chip, you should do the following:
- Take a small sheet of 6 mm fiberboard.
- Glue this sheet to the base using adhesive tape.
- With the saw running, we plunge the blade into the rigid board to create a recess with zero clearance.
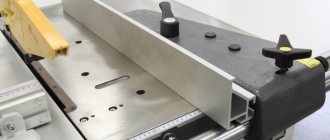
Accurate cutting pattern
How to make a cut? The device was made with a slight fit, after pressing the circular stop we sawed off the edge of the base to the desired length. The saw blade defines the cutting line for the circular saw.
The board is marked instead of a saw. Pressed with a lower accent to match the board, the edge is aligned. By having the saw go through the device first, cutting boards are more precise.
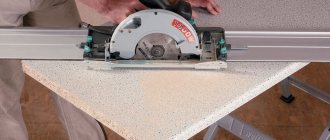
Make a straight cut using a circular saw
To create a guide, we take a piece of plywood from twenty-five to thirty centimeters wide. It must be secured along the intended cutting line.
If you need to cut long materials, it will take a lot of time to measure and set the straight guide on the marking. To simplify this process, you can make a template yourself, for example, from fiberboard. The edge of the template is aligned with a mark on the workpiece and there is a straight guide attached to the back that needs to be secured with a clamp.
You can even use a similar pattern to use a jigsaw or router bit.
Which disc to cut ceramic tiles with a grinder?
There are at least 6 types of discs suitable for use with an angle grinder. The quality of work and the achievement of various results at the request of the master will depend on the choice of nozzle.
Stone discs
Sharpening bits are most often made from stone. They provide a solid base with a minimum thickness of 6 mm. Thanks to their solid base, stone discs are ideal for sharpening tools that conventional thin blades cannot handle.
As a rule, stone discs are not suitable for cutting tiles due to their large thickness. But they can make the tools at hand sharper without much effort. A stone wheel with sandpaper petals glued on is suitable for sanding work. It is recommended to clean the tiles with a soft abrasive marked No. 120, 150, 180.
Steel wheels
Steel is a complex alloy of iron with carbon and impurities in the form of silicon, sulfur, manganese and phosphorus. The carbon component, the content of which does not exceed 2.14%, gives the steel high strength and hardness. This allows the use of metal as a base material for the production of cutting discs for grinders.
Another option for coating steel nozzles is electrocorundum. This is an abrasive made from crystalline alumina or synthetic corundum, which increases the sawing properties of the disc. Such nozzles are marked blue and are used for cutting a variety of metal elements - profiles, sheets, angles, fittings and pipes.
Even more so, such attachments can handle cutting tiles without difficulty, even if you have to work with very thick floor tiles and porcelain stoneware.
Segmented dry cutters
The disk of this modification is also made of steel, but differs from the standard attachment in the presence of slots. They are located along the edge of the product towards the central part and divide it into equal segments.
Segmented dry-cutting discs are used for processing very durable porcelain stoneware tiles and natural stone materials. Thanks to the presence of segmented slots, the nozzle lasts longer than other models. Increases service life and air cooling during cutting.
The only drawback of dry cutters is the high probability of chipping.
Solid dry cutters
The solid type attachment, despite the name, is used for wet cutting. It does not have cuts responsible for thermal relief, and therefore requires the use of a coolant - water supply to the cutting zone. Due to the tendency to overheat, a continuous dry cutter operates continuously for no longer than 15 seconds. At idle, leave it for another half a minute to cool down.
Failure to do so will cause the silver solder to weaken, the diamond coating to wear off, and the wheel to lose its original shape.
A continuous dry cutter provides a better quality cut. The most important thing is not to forget about the water supply. Its supply can be ensured by connecting a hose or attaching a specialized device.
Combined disc models
Discs for cutting tiles with a grinder received this name due to their ability to work both dry and wet. This is an intermediate option between segmented circles and dry cutters:
- cuts better than segmented, but worse than solid;
- continuously works more than solid cutting, but less than dry cutting.
Diamond wheel
A tool for cutting ceramic tiles for an angle grinder with diamond coating is the most expensive, but at the same time the highest quality option for attachments for an angle grinder. What can a diamond wheel cut?
- tile;
- stone;
- plastic;
- tree;
- ferrous and non-ferrous metals;
- concrete;
- marble.
The carbon coating on the nozzles has different hardness and composition.
Cutting tiles with a grinder using a diamond wheel is permitted only with diamond discs whose coating is compatible with tiles.
Diamond attachments for grinders are also solid and segmented. There is another variety - turbo circles. They are used where you need to cut tiles at an angle at high speed.
Important features when choosing the right blade.
If you are a beginner and don't have the services of a circular saw expert, choosing the right blade can be a little daunting. There are different types of saw blades designed for different materials, types of cutting, and for different power saws. Then one of the most important characteristics when choosing is the diameter and type of blade. You just have to make sure that it is compatible with your circular saw model.
Here's a quick guide to help you find the right sheet:
- Hand saws accept smaller diameter blades, typically 4 to 7 inches;
- the saw will require a diamond blade with a diameter of 7-10 inches;
- table saws require 10 or 12 inches, and table saw blades must have a carbide tip;
- For cutting metal, 14-inch blades are typically used.
Another important feature is the RPM (or revolutions per minute). For example, smaller sheets have higher rotations and larger sheets have lower rotations. The recommended saw speed should be lower than the recommended blade speed
Please note that a saw's RPM does not directly indicate its cutting speed, so higher RPM does not mean it will cut faster
The diameter of the blade will affect the speed because the edge of the larger blade will move faster compared to the edge of the smaller blade as it covers more distance at the same time. On the other hand, don't rush to select a larger blade, as you also have to consider the desired cutting quality. So when looking for a suitable RPM indicator, consider the material you will be working on.
To do this, you must calculate the SFM, which is equal to Surface Foot Per Minute. The formula is as follows:
SFM = (diameter / 12) * O * RPM
Typically, you will need an SFM of 5,000 to 8,000 for wood materials, and less than 1,000 for metals.
Also pay attention to the cut line indicator when selecting a tool. This is so you can see where your sheet is going as you cut.
Without this, you will have a harder time cutting a straight line. The cut indicator is usually located on the motherboard and looks like two small notches. However, in some cases you may not be able to see the crop indicator. For such cases, a small window that shows you where the leaf is is helpful, so look for it. Feel free to grab the tool and see if it feels comfortable.
Next, take a look at the motherboard. What material is it made of? Magnesium base plates are more stable, but can break if you drop the saw. On the other hand, an aluminum base plate can flex when you need it most, while plastic base plates are stable and impact-resistant.
Regardless of the material, the base plate must be flat in length and width and have a straight edge. At the end, take a look at the guard. Guards with sharp or rough edges can get stuck on wood surfaces during cutting and make lifting difficult.
When it comes to what you are going to cut, you should also pay attention to the type of blade. Different types of materials work better with different types of blades
For example, there are blades designed for cutting wood, plastic and acrylic, metal and several materials. Here are some types you may need:
- Rip Cut is wood cutting; Consequently, cutting blades are designed to cut along the grain: these blades have fewer teeth, specifically designed for aggressive cutting;
- The cross-cut blade is designed for cutting grain and has 40 to 80 teeth designed to provide a clean cut;
- Combination blades are used to make both crossed and ripped cuts as they have groups of teeth separated by a throat.
Since the teeth make a cut larger than the disc itself, its shape and quantity must be taken into account. This is another aspect of the blade that will affect your cutting performance. The more teeth, the more accurate the cut will be. Additionally, the shape of your teeth determines the quality of your cut. For example, the alternative top bevel type is suitable for quick cuts in rough wood that are along the grain. Multi-material blades are good for cross-section, and radial arm blades have a negative angle to avoid automatic feed.
Making a miter box at home
If you decide to make a miter box with your own hands, then there is nothing complicated about it. At the first stage, the base material is selected. It is advisable to take a board made of coniferous wood up to 20 mm thick. Oak blanks are taken with a thickness of 10-15 mm. It is recommended to prepare a board for the base with a smooth surface and even corners.
Then it is necessary to make a box with a width of no more than 150 mm for more ergonomic work. The sidewalls are secured to the bottom plane with self-tapping screws. Edges are installed on the base.
When answering the question of how to make a miter box with high quality, you need to pay attention to the technology for making the slots. First, you should make precise markings with lines located parallel to each other and at equal distances.
To make cuts, use a hacksaw with a sharp blade. Sandpaper will help you widen the grooves.
To work with a miter box, you need to choose the right hacksaw. The fabric should be thin but durable. Fine teeth are preferred.
The miter box is used not only in the field of construction and repairs, but also wherever neat and precise cutting is required. The scrap rate is reduced, and the speed of manipulations increases significantly.
Tools used
There are several ways to cut a pipe; for this, construction and industrial tools for metal processing are used. Of all the types, only the grinder allows you to obtain curved surfaces without further processing with the closest arrangement of edges.
For individual use
The following tool is used for cutting steel pipes at home:
Manual pipe cutters. Allows you to cut round parts with an even, right angle of cut due to the cutting edges of the rollers. There are several varieties of products of this type, consisting of single rollers or a series of rollers attached to a chain. In everyday life, such devices are quite rare and are more suitable for professional work.
Bulgarian. It is a universal tool for cutting any metal parts with different angles; special metal discs are used for the work, which are ground down quite quickly during operation. This allows you to accurately cut a curved line with a small diameter disc.
Rice. 7 Customized pipe cutting tool
Gas-burner. A quick and effective method of cutting metal surfaces with a hot jet of flame; the disadvantages include melted edges, which complicate further welding. It is difficult to use a gas torch to cut a product according to a paper template, which will burn, and if a line is drawn, then it will practically not be visible in the stream of flame.
Electric pipe cutters. To work with pipelines of small diameters, you can use compact electric pipe cutters, whose operating principle is similar to a grinder. The device is called a roller machine; during operation, the part is mounted on a bed and rotated on roller guides; its surface is cut from above by an electrical device. The main difference between a pipe cutter is the metal disc, which has a special durable coating for cutting metal.
For industrial use
In industry, large-diameter pipelines are used to transport liquids and gases, so pipe cutting units are heavy and have large dimensions. There are also manual pipe cutters of the rotary and clamp operating principle. In the first case, the cutting rollers rotate along a round surface using an adjustable handle; in the second version, cutting is carried out by arcuate plates, which gradually move during rotation.
Rice. 8 Industrial pipe cutting equipment
Oblique cut
When changing the direction of the pipeline at an angle greater than 90 degrees, manual methods for making templates become too complex. Using a special program for calculating and creating patterns on a computer for any angles can come to the rescue. The good thing about this method is that it has high accuracy in creating paper templates and is easy to implement if you have a printer.
To obtain a paper pattern, the necessary data on bending angles and pipe diameter is entered into the program, after which a template is obtained, which is printed on a printer in full size. All that remains is to cut it out, stick it on the element to be cut and mark its outline.
Further cutting is done using a grinder in the standard way. An important advantage of machine templates is the ability to cut them in unlimited quantities with the same accuracy.
Rice. 10 Example of a calculation program
For high-quality connection of cylindrical pipeline elements, their precise cutting at angles of 45 and 90 degrees is required. To perform these works, special patterns are used, the shape of the bends of which is calculated manually or constructed by computer. They are cut out on paper and glued to the pipe surface, then the element is cut along the paper contour with a grinder with a small disk. Thus, it is possible to obtain a high-precision corner connection with the edges as close as possible.
Technology for cutting pipes at right angles
If we exclude the options used in industry - dies with mandrels, devices for radial cutting - then there are not many solutions available to the home craftsman. In any case, you will need either a hacksaw or a hand grinder. The adjustment is facilitated by the fact that the tubular product always has only linear contact with the cutting plane.
How to saw off a metal pipe smoothly? It is enough to firmly clamp the metal workpiece with parallel clamps, mark the cutting area with a marker and cut it to size. Of course, within the gaps between the hacksaw blade and the mounting bases of the hacksaw, play is always possible, resulting in a burr on the joint surface. If subsequently the inclined section of such a joint is joined to another element of the pipeline using manual arc welding, then this is not a problem: everything can be corrected (within reasonable limits) by changing the thickness of the weld. Otherwise, you should simply select a new tool and constantly monitor the marker markings during the cutting process.
It’s even easier to cut the end using a pipe cutter (it’s inexpensive, in extreme cases you can borrow it from a more skilled neighbor). This tool is equipped with a special screw-type feeding device. The sequence of actions using a single-roller pipe cutter is as follows:
- The surface of the workpiece is thoroughly cleaned of traces of dirt, grease or scale.
- The divided area is tightly compressed with jaws (if the pipe is made of soft metal, for example, aluminum, it is better to place a rubber corrugated plate between the jaws: the clamping friction will increase).
- By rotating the feed screw, the cutting roller is gradually inserted into the wall until the roller cuts through it.
- Change the position of the round pipe, rotating it 1200 so that the cutting roller comes into contact with the new cut section, and repeat the transition.
- We perform one more reinstallation - and the straight section of pipe is ready. All that remains is to clean the areas of the overlap.
There are three- and four-roller pipe cutters, where the cutting process is quite simple, since the number of reinstallations is correspondingly reduced.
How to cut steel pipe at 45 or 90 degree angle? First, you should check whether the pipe cutter you already have is suitable for sawing a particular part. The following are taken into account:
- Strength limit of the material;
- Diameter or wall thickness;
- The condition of the cutting edges of the roller/rollers and the gaps in their axes.
Note: In especially critical cases, you should first practice on an unnecessary piece of pipe.
How and with what to cut plastic skirting boards
All of the above applies to MDF and wood skirting boards. Cutting them with a regular hacksaw is not a problem. It is advisable to use a blade for metal, since it has a smaller tooth and the cut is smoother; you will have to work less with sandpaper. With plastic the situation is different - when you try to cut a piece, some thin-walled skirting boards crumble and break.
Cutting plastic is not very convenient due to the thin walls
To cut normal quality plastic skirting boards you can use:
- A hacksaw for metal.
- Grinder (angle grinder) with a diamond blade.
- Turned with a miter saw. Before cutting, accelerate the blade and only then start cutting.
- A jigsaw and a fine-tooth file. Here you have to try - select the speed and blade.
- Sharp knife.
- Metal scissors. In any case, it is not difficult to make straight cuts with them.
Only personal experience will help you decide which is more convenient for you to cut plastic floor plinths. If you have a miter saw, try using it. It’s not a problem to try a couple of times with a grinder with a diamond blade. If all this does not give a normal result, try a hacksaw, jigsaw or knife. There are, of course, special scissors for plastic, but for one-time use they are too expensive to buy.
Accessories for decorating corners and joints of PVC skirting boards
In plastic skirting boards, you can design corners and joints using special fittings. There are external and internal corners, plugs and connectors. In principle, they allow you to assemble the desired configuration. Each manufacturer makes its own fittings - according to its own profile, colors. But the principle of their use is the same.
How to decorate the corners of a plastic plinth
The first rule is that all cuts are made straight. Strictly perpendicular. Marks in the corners are placed 1-1.5 mm away from the corner. The fact is that the fittings for rigidity have their own jumpers. So for them you need to retreat a couple of millimeters, but no more. Otherwise, a gap will appear or the baseboards will pop out of these corners.
This is what comes out of the assembly:
I must say that not everyone likes the look of plastic corners. You can make a corner on a PVC plinth in the same way as described for wooden or MDF. The only difficulty is that you have to be careful with plastic - it breaks from excessive force. There is one trick - before cutting the plastic baseboard, add a little polyurethane foam on the back side and wait for polymerization to begin. It will be tougher, easier to cut, less deformation. If the foam subsequently gets in the way, it’s not a problem to remove it, but it’s actually easier to cut it.
Advantages of tile end sharpening technology
The development of sharpening the ends at 45 degrees eliminates the need to use decorative corners when finishing external corners. Thanks to this, it will be possible to make the wall look neat. Such corners have a more discreet and elegant appearance than those trimmed with corners. Agree, this is much more exciting than tiles laid on tiles or plastic inserted.
Electric tile cutter
A tile cutter is a machine for cutting tiles at 45 degrees, also for cutting them longitudinally and transversely. This device has a water cooling system. In addition, water helps to remove virtually all the dust that occurs during the cutting of porcelain stoneware or clay tiles. The main advantage of a tile cutter is its accuracy. He cuts one at a time, following a previously given line of movement. This allows you to eliminate the influence of reasons such as trembling of the master’s hands. In the end, the cut comes out very even and careful.
Tile cutters can cut at almost any angle. True, craftsmen often cut tiles at an angle of 90 degrees or 45 degrees.
Special equipment
The process of cutting porcelain stoneware is considered complex. Special equipment is used for cutting granite tiles. These are machines that can handle any hard and durable material (granite, concrete stones, marble). The equipment is quite lightweight, so if necessary, it can be purchased for personal use.
Modern machines for processing granite tiles are compact and reliable. With their help, you can perform voluminous work. For example, custom-made porcelain tiles are cut on hydraulic cutting machines. Staircases and baseboards are made from durable material.
When cutting your own home, it can be difficult to decide what to cut porcelain tiles with. The optimal, inexpensive and simple option is cutting with hand tools without special professional skills.
The main thing when cutting is to follow the following rules:
- apply significant effort when working;
- to avoid chipping, try to complete the first scratched layer in one go;
- before breaking off the sawn part, place the material so that it protrudes slightly beyond the line of the working surface;
- you need to break the tiles with a quick, sharp movement;
- if the first cut is made correctly (deep), then there will be no problems with breaking.
Regardless of the tool chosen, cutting porcelain tiles is carried out almost according to the same pattern. First, the cut line is marked with a marker. Then, using pressure, it is carried out with the cutting part of the selected tool. And at the final stage, the tile is broken along the drawn and processed line.
If you use an electric cutting tool, be careful and careful. Place a sheet of plywood under the work surface to avoid damage. Fix the tile securely and hold the tool firmly in your hands.
Take your time - make a light first cut. Use protective equipment. During the work, pieces of granite tiles may break off. Therefore, do not remove protective covers from electrical tools, cover your eyes with goggles, and cover your hands with gloves.
Mark the cut line on the front side. The tiles in the tools are also installed from the face.
The cut is always made away from you. If electric cutters are used, the cut lines should be periodically sprayed with water. This will reduce the amount of dust. In any case, it is recommended to wear a respirator.
90 degree cutting
To cut a round pipeline or metal profile of rectangular cross-section evenly across, use a sheet of plain paper. They wrap the workpiece so that the edges of the paper sheet coincide, after which it is fixed to the part using tape or glue. Using a grinder, a thin line is drawn near the edge of the paper sheet, after which it is gradually deepened until it is completely cut out.
Collar insert
To obtain branches of metal pipeline lines in the form of tees, a collar insert is used, for which it is necessary to cut the edge of a round pipe adjacent to the walls of another at a right angle. To implement the method proceed as follows:
- cut the edges of the workpiece at right angles using the previously described method.
- On the round end surface, a marker marks four equidistant points located at angles of 90 and 180 degrees to each other.
- The size of the circle is measured, the resulting diameter is divided by 3. The resulting distance is plotted from two diametrically located points, after which these points are connected to two others by a smooth arc, drawing a line with a marker.
Fig.5 Example of a collar section of a pipe
According to the markings, a cut is made with a grinder and semicircular segments are separated, after which the part is ready for welding. If there are minor inaccuracies in the mating, it can be compacted with a sledgehammer, placing it against the round surface of another element.
Some tips for cutting pipes
Sometimes households need to cut to connect a pipeline at different angles or along an axis. The main tool for performing these works is a universal grinder and metal discs.
Rice. 9 Pipeline slitting
Making a longitudinal cut
To make a high-quality, even longitudinal cut, you can use a simple device in the form of a metal corner. It is securely fixed to a flat wooden surface with screws and the pipe is pressed against it with a heavy weight. Using an angle grinder, make a longitudinal cut in the pipe top, lightly resting the disc on the surface of the angle.
The corner can be attached to the pipe with clamps and a slot can be made along the upper wall of the corner in a similar way.
Composition and features of the material
To understand how to properly cut a plinth, you need to understand its composition. This will help you choose the right tool and cutting technology.
- Styrofoam. The price and strength of this material are the lowest. But since we are creating a decorative decoration for the ceiling, strength is not particularly required.
- Ceiling plinth made of polystyrene foam is more dense. than regular foam. To cut such material, the most ordinary knife is used.
Tip: sharpen the knife well before use. This will eliminate the presence of torn edges at the incision sites.
How to cut a skirting board straight
Tree. Here you will have to put more effort into processing. For wood, use only a hacksaw.
Where should you not use a turned 45° angle?
This type of corner becomes quite fragile due to the thinned (narrowed) edge of the tile, so it is undesirable to use it when facing steps. In the place of the greatest traffic, the tile will definitely come off, the corner will be chipped - it’s only a matter of time.
The steps are laid with the top tile overlapping the end tile (on the riser) or using aluminum corners/profiles.
And in general, before making such angles, think carefully about everything. If there is a big threat of hitting and knocking down a given corner, then most likely this is not your option. In this case, you can try using an aluminum corner (but not a plastic one).
What is a miter box for?
A miter box is a hand-held carpentry tool for precise cutting of boards and other lumber at the required angle. When making a wooden frame, installing platbands and baseboards, or performing any other work related to cutting boards, you will definitely be faced with the need to create a perfect corner cut - the so-called miter joint. In order for the joints of the parts to fit tightly and have no gaps, the cutting angle must be as accurate as possible. Here a miter box becomes an ideal assistant.
There are several design options for this device. In our article we will dwell in detail on the main types of miter boxes, tell you how to choose and correctly use this hand tool to create a flawless burr.
Magnetic modification
A device with wooden or plastic guides with built-in magnets. Thanks to their presence, the canvas is attracted and fixed in the slots.
This is a compact device that provides cutting at a given angle with a minimum step. Compared to rotary designs, productivity and quality of work are still lower.
Methods for cutting metal products at an angle
Conventional perpendicular cutting at 90°, using a grinder, is carried out quickly and efficiently, if you do not neglect the advice of specialists.
Many people believe that if a large tool with a large powerful disk is used for sawing, then there is no need to apply markings. Experts do not recommend sawing without marking, because after cutting the parts may not align.
Features of cutting a cylindrical pipe at 45
Most often, making a cut at an angle of 45 degrees is required when installing heating or plumbing systems. The main difficulty in carrying out the work is that after combining the cut parts of the pipe, a right angle of 90 degrees should be obtained. A simple way to prepare a homemade pattern will help you achieve the quality of the cutting process:
- Prepare a plain white sheet of paper.
- Fold it diagonally.
- The protruding part of the sheet must be cut off with scissors so that when unfolded you get a square.
- The resulting triangle must be wrapped around the pipe so that the long side runs parallel to the section.
A paper template is great for cutting metal products in the middle.
Paper template
The resulting triangle, folded in half, must be divided into two parts. Then the templates need to be wrapped around the pipe and secured with tape or tape. The templates should be positioned so that one edge of the base coincides with the second.
Use scissors to round the top corners of both templates. The resulting two blanks of the required diameter should be placed on the pipe, and the cut location should be marked with chalk or a pencil. The prepared marked part can be safely sawed off.
For small diameter tubes that need to be cut close to the edge, the marking method using a container of water is suitable. The desired angle of inclination of the cut is marked on a deep container, then the end of the tube is placed in the water and tilted towards the marking. The line of contact with the liquid will become a cutting mark.
How to mark a 45mm cut on a profile pipe
Not everyone knows how to cut a profile pipe at 45 degrees with a grinder correctly and efficiently. Experts advise using an ordinary triangular ruler to mark a profile pipe with a square cross-section.
First, a straight strip should be drawn on one of the faces, located perpendicular to the side of the pipe. Then the workpiece must be rotated and an oblique mark applied to the adjacent face. It should go from the edge of the first strip at an angle of 45 degrees.
After this, the product is turned again and a perpendicular line is drawn. On the fourth side, all that remains is to connect the previously drawn stripes diagonally. Now you can start cutting.
Measuring and Creating Angles - Dummies
On the map, you trace your route and come to a fork in the road. Two diverging roads diverge from a common point and form a corner. The point where the roads diverge is the top
. An angle divides the area around it, known in geometry as a plane. into two areas. Points inside an angle lie in the interior region of the angle, and points outside the angle lie in the exterior region of the angle.
Once you become familiar with the types of angles and learn how to measure them and create your own, you will gain valuable geometry skills that will help you solve even the most difficult geometry puzzles.
To accomplish both tasks, you use a protractor, a very useful tool (see Figure 1).
When choosing a protractor, try to find one made of transparent plastic. Determining the angle is easier because you can see the angle line through the protractor.
The design and principle of operation of a circular saw
The main parts of a hand-held circular saw include:
- Electric motor. With its help, rotational energy is created, which is needed for cutting the material.
- Frame. For its manufacture, plastic is used that is resistant to temperatures and shocks. It has holes for ventilation.
- Handle with start button. The latter is equipped with a lock designed to prevent accidental pressing.
- A platform with a guide (it is also called a sole or base plate). Thanks to this element, the tool is moved along the workpiece being cut.
- Spindle for fixing replaceable disks.
- Gearbox. It is designed to reduce the speed, load on the rotor and bearings of the electric motor.
- Main and additional handles.
The principle of operation of the equipment is to transmit torque from the motor shaft to the cutting disc. The latter rotates around its axis at high speed, this makes it easy to saw the prepared surface.
Circular saw device
Cutting porcelain floor tiles
Cutting ceramic tiles intended for floors differs from the technology for cutting wall tiles due to the different technical characteristics of these finishing materials. Floor ceramics are typically thicker and harder and the cutting tool must be suited to the task at hand. The most suitable devices for this are an electric tile cutter and a grinder.
Electric tile cutter
Electric tile cutter? Probably the best tool for cutting ceramic tiles.
It is able to replace the entire range of cutting devices, since it performs almost all necessary manipulations:
- cutting parts of different thicknesses;
- separation of fragments is already 5 mm;
- making recesses and holes;
- cut at an angle of 45°;
- figure cutting.
The electric tile cutter is easy to use, significantly reduces the concentration of ceramic chips and dust in the air, and also creates smooth, rounded edges along the cut line.
A significant disadvantage of the device is its high price, so purchasing it is advisable only in case of regular and long-term use.
The tile cutter device includes a motor and a base with a built-in cutting disk. By the way, the disk is equipped with a small reservoir of water in which it is partially immersed. Thanks to this, dust does not scatter throughout the room and does not settle in the lungs of those present.
The procedure for performing work on an electric tile cutter:
- Fill the bath with water up to the indicated mark.
- Before cutting a ceramic tile, you need to put marks on it along which the disc will move.
- Press and fix the workpiece to the machine.
- Direct the tile towards the cutting element with a force depending on the thickness of the product (but the main thing here is not to overdo it, because excessive pressure can affect the quality of the cut).
What can you do with electric circular saws?
Electric circular saws allow you to process wood and wood-based products in different ways, which depend on the type of tool chosen.
Types of work with a hand-held circular saw
The following types of work can be performed with a hand-held circular saw:
trim multiple workpieces laid in one plane;
trim wide boards using a rip fence that cannot be cut on a pendulum saw;
trim boards when laying floors;
trim the workpiece at an angle, without a guide and with its use;
perform longitudinal sawing of the workpiece at an angle;
align the unedged board along a pre-drawn line;
choose a quarter in a board or timber;
cut sheet materials using a guide rail;
By changing the equipment, you can use a circular saw to cut metal profiled sheets;
cut plexiglass and various types of plastic;
Place the hand saw in the table and use it as a stationary circular saw.
Working on a circular saw
Working with a circular saw (stationary) is slightly different from working with a hand-held unit. Using a circular saw you can do the following:
cut and trim wide workpieces, both with a straight cut and at an angle;
perform longitudinal and transverse sawing of wooden panels;
cutting wood-based sheet materials;
open the board at an angle;
sawing an unedged board.
Types of work with a miter saw
You can do the following with a miter saw:
trim wood blanks at any angle relative to the edge;
trim the workpiece at an angle to its face;
a miter saw with a broach allows you to cut wider workpieces;
Where will corners be needed?
Trimming tiles is inevitable when decorating walls with this facing material for a number of reasons:
- the most aesthetic option for laying out tiles is “from the middle”, the tiles are cut in both corners; On the boxes, all tiles are cut to obtain a beautiful layout without narrow and asymmetrical pieces.
- the edge of the cut is very rarely perfectly smooth, the glaze may chip;
- If the finisher is not sufficiently qualified, the tiles may turn out shorter than the required size.
Therefore, you have to seal the joint with grout or initially use a special profile that allows you to hide minor defects. A corner seam occurs at the junctions of the following surfaces:
- wall/wall – internal vertical;
- wall/ceiling – internal horizontal;
- wall/floor – horizontal internal;
- wall/bath – internal horizontal;
- wall/wall – vertical external;
- wall/slope – external vertical and horizontal.
The joint between the bathtub and the wall needs not only finishing, but also sealing against leaks.
JBTS-10 Table Saw Manufacturer Details
The supplier of the JBTS-10 table saw is JPW Tools AG Switzerland, which is a subsidiary of Walter Meier (Tool) AG. Website address: www.jettools.com
In Russia, Jet products are exclusively represented by ITA-SPb, St. Petersburg, founded in 2004, as a subsidiary endowed with all rights for sales, promotion and technical service.
Machines manufactured by JPW Tools AG, Switzerland, China
- JBTS-10
– circular table saw - JKM-300
– combined woodworking machine - JPS-10ts
– stationary circular saw - JPT-10B
— tabletop jointing-thicknessing machine - JPT-310
– stationary planer-thicknesser machine - JRT-2
– milling table - JTS-315sp
– construction circular saw - JWP-12
- table thickness planer - PKM-300
– combined woodworking machine - BD-3
- table lathe Ø 100 - BD-7
– table-top screw-cutting lathe Ø 180 - BD-8
– table-top screw-cutting lathe Ø 210 - BD-920w
– table lathe Ø 220
Tsulaga
When processing small workpieces, the tsulaga shown in the pictures below can be of great help.
To make it, you will need a piece of wood slab approximately 20 x 30 cm in size and 2 mm thick, as well as two planed strips, which must be fixed to the slab as shown in the figure. To prevent the slab from bending and breaking, the planks must be positioned transverse to the direction of its core layer.
How to work with a circular saw
The lower bar of the tsulaga rests against the edge of the tabletop and thus sets the correct direction for the cut; the shortened upper bar ensures good centering of the saw.
If you have to saw long boards or planks, then a second tsulaga will not hurt, which will serve as a stop for the other end of the workpiece.
A piece of wood slab and two pieces of plank are enough to make a practical tsulagi.
Before starting sawing, the saw placed at an angle must be pulled towards you several times.
Steep teeth for rip sawing
This is how the teeth are positioned on almost all hand saws, including hacksaws and back saws.
The cutting edge of the teeth is located vertically. Suitable for longitudinal cuts.
Trimming the shield at 45 degrees without a festool It's possible and simple!
When cutting longitudinally, the workpiece should protrude sufficiently beyond the workbench - this makes sawing easier.
The marking below the gap indicates where the saw deviates.
How to use a miter box correctly
Using a miter box greatly simplifies the work of the master. Next, let's look at what a miter box is used for using specific examples. Before work, carefully read the instructions from the manufacturer.
How to cut material
To properly cut an element, you need to carefully prepare the material by taking a miter box with a saw. The presence of grooves allows you to make accurate and even workpieces since the saw will take the set position. The first step is to secure the tool with screws or a clamp on a flat surface. Next, use a pencil or laser to make a mini-drawing. The workpiece is placed in the tray. In this case, the marking should be opposite the corresponding slot. Then a hacksaw is inserted and the cut is made.
How to correctly form an acute angle?
The next step after the process of cutting the tiles to a certain degree is its proper use, as well as the organization of a right angle. To do this, the following points must be observed:
- Using a special building level, you need to glue the first part of the tile evenly. Its trimmed edge should protrude slightly beyond the base of the right angle;
- the second tile should be glued in the same way opposite, the period of fixation of the glue allows you to move and adjust the touching tiles to achieve tight contact.
Before you start facing the corner, you should check the consistency of the vertical wall. Even with the lowest elevation changes, the angle at the top may not converge and may not turn out smooth. It will be impossible to disguise or repair this flaw in the future.
The scope of use of tiles cut at an angle of forty-five degrees has certain limitations. As a result of the clay being cut from the back, the narrowed edges of the tiles become thin and fragile, so they can easily break off.
How to cut correctly?
Let's consider step by step how to correctly and evenly cut an aluminum profile.
- First you need to apply markings to the metal workpiece. To do this, you can use a ruler or tape measure. Markers should be placed with a marker.
- A perpendicular mark must be applied to the product. It is along this that the side planes will be trimmed.
- Then folds are made along the marking line. Lastly, cut along the fold.
- If we are talking about cutting a rack profile, then the master needs to remember that it has auxiliary stiffeners. Sometimes they come out slightly uneven. You can trim them with scissors. Slats with a length of up to 1 m can be cut by weight, but longer parts will require fixation in supports or a vice.
- To prepare lintels or small structures, the profile should be cut at an angle of 45 degrees. First you need to saw off the slats to the required length, after which you should mark the angle of the cut and complete the procedure by cutting it.
Profile cutting must be carried out strictly according to technology
When working with any tool, it is very important not to forget about compliance with safety regulations. It is better to stock up on all the necessary personal protective equipment, and carry out the work itself carefully, without rushing
You can see how to properly cut an aluminum profile in the video below.
Method of joining platbands without trimming
Today, platbands are often not cut at an angle and then joined together, but the joints are made at right angles. This method of connecting platbands does not require any special trimming, which is very convenient. In addition, this method looks more modern and attractive.
Cutting at an angle using a miter box
If you still need to cut this or that part at an angle, then you should stock up on a miter box - a simple device that looks like a small box. The miter box has slots that are designed for a saw or a long sharp knife. Of course, these slots are made to form a smooth and precise 45 degree angle.
However, a miter box can have many slots at once, at different angles. This is convenient because with the help of one device you can trim any parts at different angles.
There are adjustable miter boxes on sale. The slots in such a miter box can be adjusted, which allows the master to set exactly the angle that is required at the moment. In particular, it is quite simple to move the slits of such a miter box to a position of 45 degrees.
Now you can trim the workpiece simply. A baguette, platband or plinth is placed in the miter box, after which a saw is inserted into the slots and the excess is simply cut off. The angle ends up being perfect, exactly 45 degrees.
What to do if there is no miter box? Very simple. You need to make a template according to which it will not be difficult to transfer the necessary markings to the workpieces. As a template, you can choose thick cardboard or anything else that will be appropriate in this case.
How to properly cut a ceiling plinth at an angle of 45
Corner elements for ceiling plinths can be easily trimmed using a miter box or by hand. In the first case, you will need a miter box and a hacksaw, and in the second, a pencil and a hacksaw/cardboard knife. The hacksaw blade should be well sharpened so that you don’t have to think about how to cover up chips and roughness on the cut.
Cutting a corner using a miter box
We take a polyurethane ceiling plinth. designed for the left or right side of a corner. We lean it against the future installation location so that the end of the segment opposite from the corner is against the edge of the already glued molding. In the place where the bottom edge of the ceiling plinth touches the top of the wall corner, make a dot with a pencil or stick a piece of insulating tape. We repeat these steps with the second segment.
How to cut an external corner of a ceiling plinth:
- We place the left blank in the miter box from left to right, pressing it to the edge closest to us. The corner vertex mark should coincide with the leftmost slot in the same edge
- We place the right blank from right to left, pressing it to the near edge. The mark for the top of the corner is to the far right slot.
How to saw down a ceiling plinth at an internal corner? Everything is very simple, the actions will be exactly the same, only the location of the corner vertex mark changes. Here it’s the other way around: for the left segment – the far right slot, and for the right – the far left. The finished ceiling fillets must be aligned, and then the joints should be held up to the light - there should be no gaps. If they are very small, then editing is not necessary; you can get by with sealing with putty material after installation.
How to make a corner of a ceiling plinth: positioning the workpiece in a miter box
Important: sometimes the angles deviate too much from the standard 45 degrees, and a simple miter box for the ceiling plinth becomes useless - you can cut off the excess. The solution would be to purchase a rotary tool, but it is not cheap and this “one-time” purchase will be irrational. In this case, you can use the intersecting point method.
In this case, you can use the intersecting point method.
How to cut the corners of a ceiling plinth without a miter box
If you are wondering how to properly cut down a ceiling plinth without a miter box, then the following information will be useful to you. We take the right section of the ceiling plinth made of foam plastic, apply it to the installation site and draw a line on the ceiling along its upper edge. It should extend beyond the vertices of the corners by about 5 cm. We do the same with the left segment and put points at the intersections of the lines. We put the ceiling plinths in place one by one and transfer the resulting marks to them.
We've dealt with the upper part of the ceiling moldings, now let's move on to the lower part. Everything is simple here, the marks we need are the vertices of the corners. We mark their location with dots on the lower edges of the left and right ceiling plinth. Next, you need to connect the dots on the moldings - this will be the cutting line. This method will help you cope with even the crooked corners. Adjustment will most likely not be needed, and if it is, it will be minimal.
How to cut a ceiling plinth without a special tool: the photo shows marks for the intersecting point method
Important: the work described here requires marking the surfaces. Therefore, first you need to start cutting and fitting the ceiling plinth, and only then think about how to glue the wallpaper. Or, if you want to mount the plinth on top of the wallpaper, we do the marking and trimming before finishing, and gluing after it
Or, if you want to mount the plinth on top of the wallpaper, we do the marking and trimming before the final finishing, and the gluing after it.
How to make an angle on a plinth more or less than 90°
Not all angles are exactly 90 degrees. If the deviation is small, the cracks can be removed using sandpaper. In other cases, you will have to mark and cut taking into account the real degree. The main task in this case is to find the point on the floor where the two skirting boards will join.
Let's start by explaining how to properly cut an outside corner if it is not 90 degrees. We take the plank, place it against the corner on one of the sides, press it tightly against the wall - as it should stand. Draw a line on the floor along the bottom edge of the baseboard with a pencil. We apply the bar to the other side of the corner and do the same. The intersection of the two lines will be the joining point of the two baseboards.
How to join a plinth if the angle is less or more than 90 degrees
Narrowing the gap
It's not often that a DIYer has to cut very narrow strips of wood, as shown, for example, in the photo above. But if such a need arises, then care should be taken to ensure that thin cuttings do not fall into the gap between the work table and the saw blade, get stuck there, and then fly out at great speed, crossing the entire workshop.
The main thing in work is safety. For this, you can sacrifice a piece of plywood or hard fiber board. Saw the selected piece lengthwise, but not the entire length, place it on the table and attach it to the rear side edge of the table with clamps or using strips of adhesive tape on both sides.
How the corners of plasterboard structures are formed
External corners
Sticker of aluminum outer corner on fugenfüller mixture.
Drywall corners are finished using the following auxiliary corners:
- aluminum, it is quite rigid, not subject to rust, it can be used if you need to seal drywall corners at right angles;
- galvanized, it is more rigid, it is difficult to break, but it can rust over time, also used for right angles;
- made of plastic, this element is less rigid, does not rust and is not brittle, can be used for any angles, for sharp, straight and turned ones.
Processing drywall corners by sticking a plastic corner onto the unfolded corner.
The question arises, how to seal the corners of drywall using corners? You can watch a video about this process on our website.
The principle of working with all types of corners is the same:
- we remove the chamfer from the end edges with a special plane for working with plasterboard so that there are no protrusions;
- We apply a layer of gypsum putty on both planes; the Knauf fugenfüller is best suited for this;
- glue the corners, pressing them with a rule or an even strip so that the excess mixture comes out through the perforation;
- We give the corners a chance to set with a thin layer of fugenfüller.
Internal corners
Internal corners at the joints of Knauf sheets are sealed using paper reinforcing tape and leveling putty.
Cut line
Anyone who brings the part to the saw blade with the casing lowered cannot see whether the cut line coincides with the marking line. In this case, you should not give in to the desire to lift the guard and work with an open saw, without protection.
It is better to put a mark on the workbench that will clearly indicate the cutting line and help process the parts in accordance with the markings. To do this, stick a self-adhesive label on the table, use the miter gauge to slightly move the bar towards the rotating disk, and immediately pull the miter gauge back along with the bar. After this, it will no longer be difficult to transfer the cutting line from the plank to the label.
It is recommended that the mark be made in the form of a clear stroke exactly the same width as the gap in the table. This makes it possible to control the position of the part during the sawing process, and will also make it easier to install the rip fence at the required distance from the cutting disc with millimeter precision.
How to cut a gas pipe correctly
The work of cutting gas pipes is dangerous and quite difficult, so it is best left to the professionals. Before starting work, be sure to turn off the gas supply.
The next step involves freeing the pipe cavity from residual gas. To do this, you need to light the gas burners on the stove and wait for them to go out. Only after carrying out the above manipulations should you begin marking and subsequently cutting the metal.
High-quality cutting of metal pipes is a complex process. However, if you take precautions and listen to the advice of professionals, you can cut metal of any density and thickness using a grinder. A grinder with a cutting round disc is rightfully considered a universal tool in everyday life. The main rule is not to forget about safety precautions when working with dangerous cutting tools.