If the wood has darkened over time, you can return it to its original color by removing the top layer of wood using a plane or sander. The situation is much more complicated with dark and colored stains that appear as a result of the activity of wood-staining fungi. They penetrate deep inside, spoil the appearance of structures and, over time, are colonized by microorganisms that destroy the wood. There is only one way to get rid of such stains - chemical bleaching of wood.
Sanding a darkened log house Source ua-bud.com.ua
Traditional methods
There are also folk tips on how to remove soot from lining in a bathhouse and steam room.
You can use a soap solution for this. However, this event will require a lot of time and effort. Additionally, improvised abrasive materials such as river sand or crushed brick are sometimes used. The surface must first be vacuumed. Then everything is thoroughly rubbed with soapy water. But in this case, you also cannot count on an ideal result if the surface is seriously contaminated. Therefore, sometimes you have to combine different methods and look for how to wash soot and soot from the lining in a bathhouse and steam room in more reliable ways.
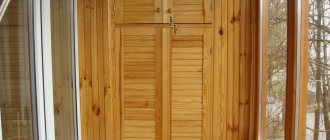
Impregnations and coatings for lining on the balcony
In pursuit of cheap, practical building materials, we forgot about wood, which half a century ago occupied a leading position in construction. Now wood in a house is partly the roof, sometimes the floor, doors, furniture, and decoration.
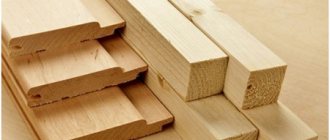
For finishing residential premises, lining is used - lumber in the form of edged planed boards. Once upon a time, freight cars were sheathed with similar boards, which is where the name “lining” came from.
Due to massive deforestation and destruction of forests, the price of wood has risen. Not everyone can afford it. In addition, it is believed that wood requires special care and handling. But paneling on a balcony is not such an expensive solution: the area of the walls and ceiling for the cladding is small, and installation is easy to do with your own hands.
It is more difficult to process the lining on the balcony. But a balcony decorated with such material will look expensive and stylish! Every time you go out onto it, you will be able to inhale an indescribable woody smell.
Reasons for darkening of cladding boards
Unfortunately, residents encounter this problem quite often, in particular if they installed the boards themselves.
In this case, painting work is carried out with significant violations, which leads to deformation of the wood and the colonization of fungal and mold microorganisms.
Thus, the lining begins to gradually lose its original beauty, fills with moisture and begins to warp.
Therefore, very often owners, when sheathing a loggia, choose harmful and toxic plastic boards as an alternative to lining.
Know that any tree will begin to lose its color and along with it its attractiveness over time. This cannot even be affected by the product that was originally used to treat the darkened finishing material.
The following types of wood that have not yet darkened are used as cladding:
- Cedar shalevka (poorly tolerates temperature fluctuations and moisture).
- Linden (has good stability, but will lose color over time).
- Pine or larch (susceptible to atmospheric phenomena).
How to process lining
When covering a balcony with clapboards, it is necessary to treat not only the finishing with antiseptics, but also all the sheathing strips. The most popular protective impregnations and primers are listed below. Some of them can immediately give the wood a shade, not by painting, but by emphasizing the texture.
- Senezh Aquadecor is a tinting antiseptic. If you coat wood with this composition, it immediately protects against mold, fungi, and insects, while simultaneously imparting one of 16 shades. No finishing coat is required.
- Aquatex “Grunt antiseptic” is a high-quality protection for lining under subsequent finishing coatings (for example, varnish).
- TIKKURILA VALTTI-POHJUSTE (TIKKURILA VALTTI-POHJUSTE) primer antiseptic for wood, protects against biological damage, but does not protect against ultraviolet radiation. Therefore, prompt staining is recommended.
- Impregnation of the U-409 Estate. It creates a thin polymer film on the wood through which steam penetrates, but this film prevents dirt from penetrating into the wood, preserving the appearance of the finish. The composition includes additives that protect against fungi, mold and insects.
The packaging of each product contains instructions for use and application. It describes the rules of application and consumption to ensure protection. Only by following these rules can you be sure that the lining and the frame underneath will serve for a long time.
If we talk about stains, most modern compositions, while changing the color of wood, also have protective properties. For example, Aquatex stain (analogous to Senezh Aquadecor). It has a wide range of colors and contains a hard-to-wash antiseptic that protects the wood from damage by fungi or insects.
Processing the lining on the balcony can be done in different ways. It is most convenient to use tinting antiseptics for finishing the balcony. A single treatment will immediately protect and add color. But they only add tint, leaving the pores open. Dirt can accumulate in these pores. And cleaning it out is not an easy task. If you also need a protective film that will prevent the penetration of dirt, you can cover the lining (tinted or not) with varnish or dirt-repellent impregnation such as Usadba U-409. Impregnation creates a polymer film on the surface that closes the pores, but does not provide shine.
Problems often arise on the sunny side: how to cover the lining on the balcony so that it does not fade. A light tint that slightly whitens the wood is best. A light wall heats up less and is not afraid of fading. This clapboard cladding looks great.
If you want to have a shiny surface, you can use any varnish for interior work. Watch the video about the types and types of varnishes. It will be easier for you to understand what varnish to coat the lining on the balcony with.
Painting the lining on the balcony with ordinary paint is no longer relevant today. Why spend money on wood and then paint over its texture? Then you can immediately install PVC. So choose: tinting, varnishing, or both.
What to do if the lining turns yellow and how to avoid the problem?
One of the popular finishing materials is lining. This is a board made of selected wood. The material is used by builders for both internal and external cladding work.
The main characteristics are that the material is environmentally friendly, has soundproofing properties, is durable, condensation does not stagnate on it, retains heat well, and looks original in a renovated room.
When using the material, there are nuances - it turns yellow and you need to be aware of this.
Why is this happening?
The question of changing the color of the finishing material is often asked by owners of wooden buildings (you can find out why the lining darkens and how to treat it to get rid of the problem here). When choosing light colors for the lining, there is a possibility that yellow spots and stains will appear on the surface and spoil the appearance of the finish.
- Yellowness appears as a result of the fact that wood contains resin. This component, consisting of yellow substances, interacts with paint particles, dissolves and appears on the surface as rusty spots. This process is especially noticeable in the place of knots.
- Another reason for the appearance of yellow stains is associated with an incorrect technological process for drying the material - this is relevant for finishing materials made from coniferous wood.
What to do?
Craftsmen involved in finishing surfaces with lining must tell the customer about the advantages and disadvantages of choosing a particular color, and warn about the likelihood of rust stains appearing after the finishing work is accepted. This is necessary so that yellowness does not become an unpleasant surprise in the future.
Is it possible to bleach it?
Any rusty stains that appear can be bleached . Bleaching will not cause significant inconvenience, since the products used are odorless. Impregnations and aqualacs are fireproof and dry quickly (how to properly coat lining with varnish for a long time?).
How to whiten at home?
The construction industry offers impregnations, decorative glazes, and transparent coatings that highlight the beauty of wood.
These products come with special additives (pigments). The choice of means for whitening lining is large. Most often, aqualac or alkyd varnishes are used. Before applying aqualak to the floor, the surface must be coated with anti-slip or water-repellent oil, and then begin painting.
What can I do to prevent the coating from turning yellow?
Proper care of the material helps to significantly extend the service life and protect against the influence of negative factors. Proper care will maintain the attractiveness of the coating .
Rules of care
- The material should not be heavily wetted, nor should aggressive chemicals be used for care.
Some advice from experts
- To increase the service life of the finishing board, you can coat it with special wax. It should be noted that this cheap composition is sold in any hardware store.
- If during finishing work you leave an area of several square centimeters unlined, fresh air will circulate normally and preserve the surface for a long time (how to beautifully cover a room with clapboard?).
By following all the rules for caring for the skin, you can maintain its beautiful appearance for a long time.
It is hardly possible to compare wood with any other building material. It was, is and will be the best that can only be used in construction. By using lining as finishing, you can make your home comfortable, cozy, and pleasant. And well-known rules for caring for it will extend its service life and preserve the attractiveness of the finish for a long time.
What to do if the lining darkens
There is no need to disassemble wooden panels that have lost their natural appearance and install new ones. Craftsmen have come up with many ways to lighten wood. They use:
- oxalic acid,
- hydrogen peroxide,
- bleach.
There are special ways and means to correct the situation and preserve the natural structure of the tree. To this end:
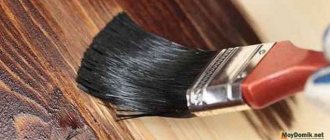
- treat the surface with a brightening compound,
- cover it with varnish of a lighter tone,
- sanded
- paint.
Whitening agents:
- do not spoil the structure of the tree,
- non-toxic,
- harmless
- fireproof,
- give the material wear resistance.
All these whitening methods have not only advantages, but also disadvantages. When using brightening compounds based on active substances (chlorine, hydrochloric acid), in order to preserve their effect, the lining is coated with a light-colored protective varnish on top.
The greatest effect is achieved if the product is applied in several layers. The original appearance will not be achieved, but the exterior will improve significantly. Painting allows you to completely change the appearance of the surface, but the effect of the wood structure disappears.
The method of processing with sandpaper and further coating with acrylic makes it possible to return the lining to its former beauty and increase its resistance to weather changes. When processing the front surface, do not forget about the back side.
The use of an antiseptic will protect the wood from the development of fungus and mold, which cause darkening of the coating.
Why bleach wood
Among the fungi that attack wood, there are both very dangerous ones that destroy it, and quite harmless ones that cannot affect the structure of the tree. But they spoil its appearance, causing the appearance of black, green, blue or brown spots. During their life activity, wood-staining fungi increase the permeability of wood to moisture, and in a humid environment, harmful wood-destroying microorganisms can already develop. Therefore, it is necessary to combat this phenomenon not only to restore the marketable appearance of lumber, but also to protect it from more dangerous fungi.
Blackness and blueness can appear not only on fresh boards and logs, it also affects finished wooden structures, especially those that are not protected or are used in damp conditions. Not only does bleached wood look better, it is more resistant to infestation by dangerous mold organisms.
Logs damaged by blue fungus Source winterhouse.ru
The cause of wood discoloration is not always caused by fungi. It gradually darkens and turns gray from contact with air, under the influence of sunlight. Unsightly dark spots often appear around the installation sites of metal fasteners and fittings. This happens as a result of a chemical reaction between iron particles and phenols contained in wood.
In such cases, bleaching the wood with bleach or special means also helps restore the original color of the surface.
Finally, bleaching is used when it is necessary to lighten the natural shade of wood. The active components of the bleach discolor not only fungal cells, but also the pigment bonds of lignin - a natural polymer compound that holds the cells and fibers of wood together and determines its color.
Old grayed boards before and after bleaching Source kraski-net.ru
How to update darkened lining
Reasons for lost attractiveness
Blackening of wood is more common when finishing it yourself. Here, technological errors are made when working with wood, which leads to a change in the external attractive appearance and even the appearance of fungus and mold. And this is caused by the unfavorable influence of the environment. Sometimes darkening is caused by poor quality building materials.
However, even under all favorable conditions, any tree loses its attractiveness and freshness over time. Therefore, protection is necessary when using it as a finish.
You can restore the attractiveness of the lining in several ways: lighten it with bleach, cover it with brightening varnish, cover it with acrylic paint, having previously sanded the surface, or paint it.
The lining has darkened, how to lighten it
Don’t be upset about this, immediately dismantle the darkened lining and run to the construction center for a new finish.
Craftsmen from among the people have long invented and put into practice a lot of methods for lightening wood. The ingredients used are oxalic acid, bleach and water (ratio 1:10), and hydrogen peroxide. And manufacturers have not ignored this situation and have developed special bleaching agents that do not harm the structure of the wood. Moreover, these products are harmless, non-toxic, and increase the material’s resistance to fire and mechanical damage.
After bleaching the lining, a protective coating should be applied and preferably several layers of it to reliably preserve the new light surface. Of course, you won’t get the original appearance, but the surface will be significantly improved.
Here, for example, is one of the methods for bleaching a darkened surface with the ready-made product “Iney Prof”, “Neomid-500-T” or “Senezh”. The packaging of each product contains detailed instructions on how to bleach wood. Give it a try.
The workflow looks something like this:
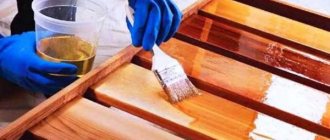
Apply the product to the wooden surface with a brush for 10-15 minutes, and then rinse with warm water. The brightening effect is immediately visible. However, now the lightened surface must be primed and then varnished in 1-2 layers.
When working, you should take precautions: wear rubber gloves and a ventilated area. Information about types of lining
Information about types of lining.
Painting the lining
It will allow you to radically change the surface, however, the effect of the natural structure of the wood disappears.
First, you need to prepare the surface before painting. To remove all dirt, treat the finish with an alkaline solution. Now you should treat it with pumice, sandpaper or a grinding wheel. This removes the old protective layer from the material. By using classic varnish, you manage to preserve the unique structure of the wood and that’s where your finishing ends.
If you decide to use an opaque finish, you will lose the interesting texture of the wood. To improve the decor of the room, you will need to change the design of windows, doors and flooring.
lighten and varnish
How to cover the lining so as not to darken
To protect the wooden surface you need to use varnish. Which one to choose?
Polyurethane varnish protects wood from yellowing and fading in the sun.
Water-based coating is environmentally friendly.
Alkyd varnishes are suitable for floors, walls, and also for exterior surfaces. They are abrasion resistant.
Acrylic-polyurethane varnishes do not fade and repel moisture and therefore are successfully used in saunas, baths, baths.
Acrylic varnish, produced on the basis of water, can be glossy or matte, is safe for health, and is recommended for allergy sufferers.
Aqualak is colorless with a long service life; it is used for floors, walls, and ceilings.
The article “Types of varnishes and their properties” will help you in choosing a varnish.
how to update darkened lining
Preparing for painting
Before covering the lining with varnish or acrylic, it should be cleaned of dirt and degreased with an alkali-based solution, and then sanded with a flat pumice stone or a grinding wheel. This will require the following tools:
- sponge and brush to remove dirt from the surface;
- roller, brush or spray for applying restoring and brightening agents.
This operation leads to the loss of all the protective characteristics of the wood. To restore them, treatment with a disinfectant composition is necessary. It will not only protect the wood, but also improve the quality of the varnish coating.
How to paint lining correctly
Using regular oil paint to renew the surface gives it an artificial shine and hides the natural grain of the wood. In addition, such coating is short-lived and will soon require modernization. When using acrylic varnish on wood panels:
- the original pattern is preserved;
- ensures attractive appearance;
- creates lasting protection from moisture and weather changes;
- the service life of the cladding is extended (up to 8-10 years).
Depending on the degree of darkening, you can use the concentration of the solution as prepared or dilute it with water in a 1:1 ratio. To avoid differences in the tone of the coating, it is necessary to apply a test stroke in an inconspicuous place. After this, the paint color is selected.
The recovery procedure consists of step-by-step operations:
- surface cleaning;
- drying wood;
- antiseptic treatment;
- testing and selection of shade;
- applying acrylic paint.
The final finishing with clapboard is quite often used in the repair of balconies and cottages. In order for the cladding to maintain a beautiful natural appearance for a long time, you need to follow the rules for using wood material and know how to lighten it. To ensure high-quality restoration of darkened panels, you should choose the right bleaching method. For this purpose, it is advisable to consult with specialists or read the instructions.
Impregnations
These compositions are distinguished by the fact that they penetrate deep into the structure of the material and do not create a film on the surface. Some of the solutions discussed below can be used as a full-fledged protective layer, others can only be used as preparation for finishing.
The most popular options are:
Stains give the surface a certain shade, but do not protect it from water and other influences. The compositions can be water-based, alcohol-based or oil-based. They differ in properties, but perform the same function. The choice depends on the specific conditions, but the most popular are water-based solutions; they are distinguished by their low price and safety;
Before covering the lining with stain, you should choose the desired color
Acrylic-based impregnations are often called glazes. They differ from stains in that they tightly close the pores of the wood, so they can also be used as a finishing finish. If you are thinking about how to cover the lining to prevent it from darkening, then this option will come in handy. Acrylic emulsion reliably protects against ultraviolet radiation, and the surface retains its original color for a long time;
If you are thinking about how to cover the lining outside the house, then choose acrylic compounds with wax, they are especially reliable
How to cover the lining outside the house or inside the premises to protect them from mold? Antiseptic compounds provide excellent protection against fungus and extend the life of wood significantly. Such solutions are used exclusively as a preparatory layer; the surface is always covered with something again;
Antiseptic impregnations can tint wood to the desired color
If you are thinking about the best way to coat eurolining in order to increase its resistance to fire, then the best option would be special fire retardant compounds. They also serve as a preparatory layer before the main coat. A universal fire-bioprotective solution can be an excellent solution; it makes the material resistant to both fire and mold.
Universal formulations are very popular
Lining painting techniques
- Brushing. Painting option for soft wood. First, remove their top layer with a coarse brush, then the surface is sanded and covered with stain.
- Patination. Two colors similar in tone are used. First, a thick layer of the first shade is applied to the wood and dried. Then a second lighter one is applied and also dried. The surface is sanded.
- Paraffin coating. Gives the surface abrasion. Paraffin is applied unevenly, then the lining is patinated. After drying, the paraffin is removed with a spatula. The surface is opened with stain.
- Bleaching. The base is covered with acrylic pigment or stain, and a layer of oil is applied on top. For a beautiful design, excess dye is removed and the surface is rubbed. The technique is used for painting white while maintaining the texture of the lining. When applying stain, do not pour too much mixture. To get the desired shade, it is better to paint in several very thin layers, each of which is given time to dry completely.
- Furniture painting. First, the stain is applied, then the surface is primed twice. When the soil dries, the lining is sanded several times. To obtain a matte finish, the lamellas are first sanded with 280 and then 320 grit sandpaper. After removing the sanding dust, the wood is varnished.
Painting wood while maintaining texture
A pronounced wood pattern can be achieved using glaze, pigmented oil or wax. These compounds apply quite tightly, almost painting over the structure of the wood fibers. Any of the compositions described above can be applied with a brush or roller.
When applying paintwork materials, take very little, first applying them in fragments along the entire length of the lining. Then, using a brush or roller, the applied strokes are shaded over the entire surface. After leaving them to soak for 5-10 minutes, to reveal the texture, take a soft, lint-free cloth and remove most of the oil. As a result, the pattern appears much brighter than in its original state: a larger amount of pigmented product is retained in the grooves, and almost none remains on the protruding parts. The result is a pronounced texture. This technique is also called brushing or texturing the lining. In interiors, wood processed in this way looks very decorative: both on the walls and on the ceiling.
The process can be observed in the video. Three samples were painted: two with the same oil with pigment, one with colorless. 5 minutes after painting, one of the pigmented blanks is wiped to reveal the design. To preserve the wood after the pigment has dried (24 hours or more, read on the packaging), the lining is coated with two layers of colorless oil (glaze, wax). In areas of intensive use, you can also coat it with matte varnish.
How to choose a dye color
- In the living room, it is better to use materials for painting that emphasize the wood texture and give it a golden-honey hue. Additionally, you can use bright, saturated colors in the design.
- In the kitchen, the best paint colors are orange, peach, pink or yellow.
- The office is usually decorated in cool colors or the wood is kept in natural color. The room is sheathed with slats, which are then opened with varnish or wax.
- For children, soft, calm, soothing tones are chosen. You should not choose flashy tones that excite the child’s psyche.
- To paint the bedroom, neutral, light shades or clear varnish are used.
Selection of protective composition
Various processing materials that are applied to wood not only protect it, but also improve its appearance. After all, when using various paints and varnishes, you can make works of art from lining with your own twist.
Before treating the lining on the balcony, experts pay close attention to the appearance of the object. Depending on whether it is glazed or unglazed, the choice of composition is made
If the balcony is glazed and protected from external factors such as rain, snow and sunlight, then you can use solutions for interior wood finishing. Well, if it is open, then it is treated with solutions for external treatment
It is also important to treat the wood with both a fire-retardant material and an agent that prevents rotting.
Can I use home remedies?
Products such as bleach, acetic acid and hydrogen peroxide are found in every home, so the temptation to use them instead of special expensive compounds is very great. But you shouldn’t do this, even though they work well. Not only can they leave streaks or change the color of the wood unpredictably, but they also act at a slower speed and require repeated application. And a long period of exposure without rinsing is fraught with the risk that the alkaline salts will penetrate too deeply, will not be washed out and will remain inside, having a destructive effect on the wood.
Why does the lining darken?
Blackening of the cladding boards occurs quite often, especially in the case of carrying out construction work on one’s own. In this case, the wood processing technology is usually violated, leading to damage to the material by mold and mildew. As a result, the presentation of the wood becomes worse: it turns black, becomes saturated with moisture, and warps.
You can use different types of lining:
- cedar shalevka is very sensitive to sudden temperature changes and the effects of water;
- linden material is more stable, but also darkens over time;
- pine and larch respond equally to weather conditions.
A competent approach to solving the problem guarantees the strength and reliability of wooden cladding.
Why does the coating change color in a steam room with a stove?
Material from different types of wood changes its color as a result of constant contact of an unprotected surface with water or due to poor thermal insulation, which creates temperature differences at the border of this internal wall covering.
- If a stove is installed, then we can say that there are large temperature fluctuations that the wall panels have to withstand.
- If an area of darkening is noticed in the corners or at the junctions of walls with the floor, ceiling or other walls, then the reason is the accumulation of moisture in these places (how to make corners from lining?).
- If darkening is observed around the vent, the cause of the dark spots is poor pipe insulation where it contacts the wood.
Such defects can be easily eliminated by painting or constructing a fence to cover the defects.
If the pipe and walls do not receive reliable thermal insulation, then removing the blackness and improving the appearance of the lining is only a temporary solution.
Read about how to update old lining panels here, and learn about how to remove old lining or remove varnish and blackness from it here.
How much lining is needed to cover a balcony?
It is better to consider the algorithm for calculating the area of a room using the example of a 5x8 house, where we will cover the walls and ceiling with clapboard.
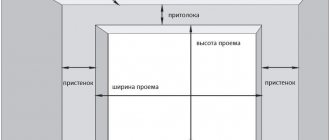
Next you need to calculate the square footage of one of the rooms. Let its length (a) be 5m, width (b) 4m, and height (c) 2.5m. And then everything was as we were taught in the school geometry course.
- Let's start with a long wall: multiply its height by length (ac) = 5x2.5 = 12.5 m2.
- The opposite wall will be the same size, so we simply multiply the result by two. 12.5x2=25 sq. m.
- Now, using the same principle, we find the size of the smaller wall (bc) = 4x2.5 = 10 square meters. Multiply by two. 10x2=20 sq. m.
- We multiply the length of the room by its width and get the ceiling area (ab) = 5x4 = 20 square meters.
- Let's summarize the data obtained from points 2, 3 and 4. And in addition, the square footage for finishing one room is 25 + 20 + 20 = 65 square meters.
We are trying to correctly calculate the area of the balcony
The calculation of the square of the balcony follows the same principle, only in this case, for convenience, it is better to divide each side into its constituent figures.
Take the appropriate measurements and calculate the area of the resulting figures using the formula.
Add it up and you get the balcony data.
Calculation of the required amount of material
How to calculate the amount of lining? First we need to know the size of the cladding material.
According to GOST, the thickness of a standard board should be 1.2-2.5 cm, length - 600 cm, and width up to 15 cm.
Panels up to 1.6 cm thick are used for interior decoration, and panels with a thickness of 1.8 cm are used for exterior work.
Knowing the width and height of the boards, we can also find out their square footage. For example, if their height is 600 cm and width is 9.5 cm, then the total area of the board will be 0.52 square meters.
To find out how many units of material will be needed to cover a room, divide its total area (walls and ceiling) by the area of one board.
You can also contact a consultant at any building materials store for help or calculate using a special calculator on the manufacturer’s website.
It is recommended to take the material with a reserve in case of defects or breakage during installation.
Mechanical dismantling of lining
There is nothing complicated in the question of how to remove the lining, the main thing is to work carefully without damaging the planks. The tools you will need are a hammer, a thin, sharp, hard spatula and a well-sharpened nail puller. Dismantling begins with the lamella that was attached last, and most often it is not possible to maintain its integrity. From the wall, into the gap between it and the lining, you need to place a thin spatula and carefully pry off the lamella. It is necessary to pull it out from the mount slowly so as not to break the tenon and groove, because this will significantly complicate the re-installation process.
When the first lamella is no longer in place, the most crucial stage begins. In the area of fastening with a nail, the tip of a spatula is placed under the lining, and the lamella is moved back just a few millimeters with careful movements. Next, use a hammer, preferably a rubber one, so as not to damage the surface of the wood. With light movements near the nail head, the strip is pressed back to the wall, while the head remains sticking out 1-2 mm. This distance is quite enough to hook the nail with pliers or a nail puller. So, step by step, each nail in each plank is dismantled, freeing the wall from the lining.
If during installation the lamellas were secured with screws or clamps, the answer to the question of how to remove the lining becomes as simple as possible. In this case, the first plank is also torn off, and all subsequent ones are not moved away with a spatula, but are simply unscrewed using a screwdriver or screwdriver.
Features of coating formation
Before treating the lining with any preparation or dye, its surface is carefully prepared for this procedure. Taking this into account, the surface treatment (decoration) process includes the following steps:
- surface preparation;
- priming followed by application of special compounds (antiseptics and fire retardants);
- decoration (painting lining);
- varnishing and waxing.
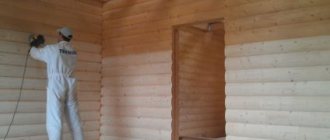
Preparatory measures boil down to cleaning the surface of the lining from unevenness, dirt and fungal formations, carried out using fine-grained sandpaper.
In some cases, a steel or hair brush can be used for these purposes.
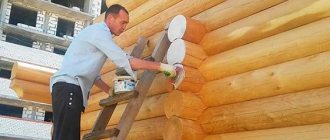
At the stages of priming the surface of the lining and applying protective coatings to it, you will need a special roller or sprayer of liquid compounds. With their help, a soil layer is first formed, and after it dries, antiseptics and fire retardants are applied (with the exception of soil mixtures containing antiseptic and fire retardant additives).
You can start painting the lining only after the previously applied layers of primer, antiseptic and fire retardant have completely dried. When carrying out painting procedures, it is necessary to follow the instructions for using one or another type of composition (such coatings are formed from several layers, the number of which is determined by the specific type of dye).
At the final stage of work, you need to worry about reliably preserving the decorative layer from wear, which is achieved by covering it with special varnishes and subsequent waxing.
From a short video you will learn how to apply an oil wax coating to a wooden surface.
Processing lining in a bath to prevent blackening
In order not to wonder why the lining turns black in the bathhouse, what to do, you can prevent the process of damage to the board
The first thing people pay attention to when choosing a product is safety. Use indoors, especially in a bathhouse, implies the absence of toxic substances, the release of which increases with heat exposure
Among the natural remedies that are suitable for treating the inside of a bath, the most common are:
Treatment with compounds forms a thin, invisible film on the surface of the board, so the lining does not turn black even after years of active use and not very good ventilation. Before the finishing coat, it is recommended to treat the wood with an antiseptic solution based on boron salt. These compounds are harmless, suitable for use in damp and residential areas, and protect the lining from the formation of mold, mildew and blackening.
Step-by-step instruction
The quality of painting depends on proper surface preparation.
Cleaning the panels
First, the panels are cleaned of dirt with a soda solution. To prepare, you need 5 liters of warm water and 0.15 kg of soda. The ingredients are mixed, the resulting solution needs to be treated with the lining. In order for the paint to be better applied to the surface, it is better to first remove the old coating from it, especially in places where there are chips, peelings and cracks. To speed up cleaning, the old layer is first heated with a hair dryer and then removed with a spatula.
Solvents can be used for cleaning. They are applied to the lining, which after a while is rubbed with a stiff brush, and then washed.
Old oil paint can be removed with foil and an iron. The foil is applied to the painted surface, ironed for 20 minutes, and the exfoliated pieces are removed with a spatula. Traces of mold are removed from the cleaned lining, and darkened areas are bleached. Cleaning is completed by wiping the boards with a clean rag. Damaged panels are replaced if necessary.
Grinding
Clean lining is sanded with pumice or fine sandpaper. For convenience, the cladding is visually divided into several small squares, which are processed sequentially. This method will allow you to sand the entire surface without missing a single area.
Sand with even pressure on the panels.
You should not rub the same area for a long time.
Priming the lining
Sanded boards are wiped clean from dust. Primer is applied to them with a brush or spray. The joints are especially carefully primed. Prime in one layer. Often priming is done with the same mixture that will be used to paint.
Painting
Paint with a brush or spray gun. The main surface is treated with a medium brush, hard-to-reach places - with a narrow one. For the strength and durability of the coating, the paint layer should be of minimal thickness, but it must be applied 2-3 times according to the instructions:
- the paint is thoroughly mixed and poured into a small plastic container;
- the brush is dipped to the middle of the pile;
- the tool is applied to the lining, drawn along with even strokes;
- all strokes are made in the same direction, without touching the already treated areas;
- in openings and corners they are coated with a narrow brush.
Painting begins from the upper areas so that drips do not spoil the painted lining. After the first layer has completely dried, the next one is applied. If the lining is dry, only the front side is painted; the back side can remain untreated.
Surface priming
Regardless of how you decide to treat the wooden lining, it must be primed.
For different types of wood, it is best to use special soil solutions. Today the most popular types are:
- Acrylic primer. It can be called universal, it is suitable not only for lining, but also for other materials, however, it is recommended to use it for processing indoors. On the street or open balcony, acrylic primer will not protect against exposure to an aggressive environment. Precipitation and high humidity can cause mold or darkening of the wood.
- Alkyd primer. This is a solution for treating wooden surfaces. The wide range of primers offered on the market will allow you to choose the ideal composition specifically for your lining.
- Polystyrene primer. This type of soil mixture is also designed for processing wood, but due to the toxic substances included in the composition, it is recommended to be used only in open areas.
Decor ideas – different photos of interiors
For interior decor in the loft style, the patination technique for lining is somewhat modified. Materials of various colors are used for painting. One is quite dark, and the second, on the contrary, is light or brighter. After sanding, the surface looks original.
For the effect of a slatted wall, the outer side of the lining and the joints are painted in different colors. The main part can be slightly toned, and the gaps are covered with a rich color. To create an original interior inside the house, you can decorate not all walls with wooden slats, but only one of them. The wall, made using the brushing technique, looks impressive against the background of a perfectly white ceiling and interior items.
The wall can be sheathed with boards of different thicknesses, and alternate thick and thin elements and the color of their painting. The combination of different shades of the same color will make the interior fresh and interesting. To give the walls a relief, you can use eurolining with specially made waves and depressions on it. The coloring matter applied to such a surface focuses attention on the relief.
To brighten a room decorated with clapboards, you can install long translucent lamps between the boards. You can draw attention to this area if the lining near it is painted in lighter colors.
When decorating children's rooms, wooden trim is often painted with interesting pictures. This design is coated with colorless oil or child-safe, odorless varnish. Additional varnishing increases the service life of the pattern applied to the lamellas.
The “rustic” style is characterized by specially imperfectly processed wood. The brushing technique is used with darker colors. The beams on the ceiling can be painted dark, and the boards between them whitened.
In bathrooms, the combination of lining and marble looks original, but in conditions of high humidity, high-quality ventilation and treatment of the lining with waterproof impregnation are important.
To visually expand a balcony or any other small room, it can be lined with horizontal clapboard, painting the inside with light paint with a dark edging.
Choosing material for cladding the balcony
Lining made from coniferous trees (cedar, larch, pine) is used for both internal and external cladding.
Pine wood is very durable, although its color may darken over time. In addition, thanks to resins, pine lining is not subject to rotting. Cedar boards are recognized as one of the most wear-resistant. However, its main drawback is its high cost.
The temperature on glazed loggias and balconies in hot weather sometimes rises to 50-60 C°. Therefore, if the balcony is located on the sunny side, pine and cedar lining cannot be used for external and internal cladding under any circumstances, because resin may be released on the surface of the boards when heated.
Eurolining made of hardwood (aspen, linden, oak, alder) is used in most cases for interior decoration of balconies.
The most budget options are alder and aspen. However, they do have minor drawbacks. Firstly, eurolining made from these types of wood may darken over time. Secondly, alder has relatively high thermal conductivity.
Linden lining is the most popular and, perhaps, ideal option for interior lining of a balcony. Linden wood has a pleasant light golden color that does not change over time.
In addition, you do not have to treat it with impregnations and varnishes. Linden lining does not overheat, does not swell and practically does not contain knots. In addition, it has high sound insulation properties. And this is especially true when it comes to a balcony.
What type of eurolining is suitable for a balcony?
There are three classes of eurolining:
- Grade A – these are boards with virtually no knots or core on the surface. The surface of class A eurolining has a uniform shade and is ideally smooth.
- Grade B means that a small number of knots are allowed on the surface, the size of which should not exceed 15-20 mm. These are high quality boards with good performance properties.
- Grade C – boards with knots up to 25 mm in size, blind holes, stripes and recesses.
If your budget allows, then it is better to use high-quality class A eurolining as upholstery, since it is most resistant to damage and harmful environmental factors.
Grade B is slightly inferior in performance characteristics to class A; it can be given a solid four plus. This type of eurolining is cheaper. In popularity it is not inferior to class A.
Class C boards, which are the most budget option, are used least often as a facing material for balconies.
It is definitely impossible to answer the question which eurolining is best for a balcony. After all, everything depends not only on the wood and type of material, but also on the climate zone, as well as on whether the balcony is located on the sunny side or not. Be sure to consider these factors.
Description of materials
Primers
Primers serve as a base for painting and also have antiseptic properties.
Primers are presented in special mixtures that combine two functions at once. They serve as a basis for subsequent painting with oils or varnishes, and also have pronounced antiseptic properties, i.e., they provide reliable biological protection.
These compounds can be used both when processing finished coatings indoors and when finishing building facades.
Recommendations for the use of such products allow their use even on surfaces with partially damaged wood. Their combination with special texture additives allows you to extend the service life of coatings and give them a noble and well-groomed appearance.
Antiseptics
Wood antiseptics belong to the category of products intended to protect lining from harmful insects, fungus and mold. This composition is absorbed into the top layer of wood to a depth sufficient to provide reliable protection of the finishing material from destructive influences. All antiseptics are divided into translucent and opaque formulations.
Antiseptic compositions for wood processing
A transparent coating for lining allows you to preserve the natural grain of the wood and imbues it with natural colors, while at the same time imparting shine to it. When using an opaque antiseptic, it is possible to preserve only the woody texture of the natural material (while its color is hidden under the applied layer).
Paint and varnish decorative coatings
Before covering the lining with one or another type of paint and varnish composition, pay attention to the possibility of decorating it with special dyes. When decorative compositions are used, the surface of the lining acquires the appropriate color or shade while maintaining the natural texture of the wood. When using these products, there is no need for preliminary priming, since they already contain components with antiseptic properties. The most commonly used such compositions are:
Oil paint that penetrates deeply into the top layer of wood, ensuring its preservation for a long time (up to 8 years or more). After this period, the surface of the lining loses its original shine and color saturation and needs to be repainted. A significant disadvantage of oil coatings is long drying times and a strong unpleasant odor. It is best to coat the lining with oil paint in the summer or in the off-season, i.e. in conditions that allow the room to be ventilated.
Acrylate paint is odorless, dries quickly, and is safe for health.
Acrylate-based dyes, which are practically odorless, are applied to the surface easily and without bleeding, and also dry fairly quickly, without posing a health hazard. That is why treating lining with acrylate dyes is one of the most acceptable options for decorating it. The only drawback of this material is its relatively high price.
To finish the lining surface, it is best to use an acrylic scuba coat. Thanks to the use of this environmentally friendly product, the wood structure acquires increased strength and durability. Aqualak is applied to the surface of the lining in several layers and dries very quickly. It is optimally suited for preserving the surface of decorated lining coverings, which must be thoroughly dried before processing.
How to clean the lining
Before you wash the wooden paneling, you need to select the means for this. To achieve the desired result and not damage the material, experts advise using special chemical cleaners or highly concentrated soot and soot removers.
When choosing special cleaning products, take liquid formulations and neutral degreasing gels. You can also use chemical sponges. They are impregnated with components of deep penetration action. Such substances immediately penetrate the wood structure and safely remove even the smallest particles of soot and soot. But such sponges become dirty and unusable in a short time, so do not forget to change the product in a timely manner.
- To clean the lining in the steam room and in the bath, take a sponge and a dry cloth, a container with clean water, a special product, a broom or vacuum cleaner, and plastic film. To clean ceilings and walls, you can use a mop with a soft cloth or sponge. Which mop is best to choose for your home, see here;
- First, clean the surface to be treated with a vacuum cleaner or broom;
- Prepare cleaning solution according to instructions;
- Apply the prepared composition to the darkened surface and thoroughly wipe the product with a sponge;
- After cleaning, rinse off the applied composition and any remaining product with plenty of water. During the process, cover the floor with film to prevent further contamination of the surface. After all, all the dirt drains down. Wash the floor last;
- Finally, be sure to wipe the paneling with a dry cloth. Otherwise, the raw wood will begin to rot.
Required Tools
Depending on the paint application technology, the list of tools may vary, but the standard set is as follows:
- paint tray;
- plastic or galvanized bucket;
- pumice;
- clean rags;
- painting tools (roller, brush, spray gun);
- primer;
- skins of different grain sizes, sanders, scraps of leather for rubbing;
- brush;
- protective equipment (goggles, mask, gloves).
If the room is high or the ceiling is lined with clapboard, you need a stepladder.
The better way to apply paintwork
The ideal tool for application is a brush that has smooth, thick and dense bristles.
The flute brush easily applies any paint and varnish materials and makes smooth finishing strokes.
- Due to its large size, wooden bases can only be primed with the Macklova.
- Varnish is easily applied with a brush with soft bristles; to apply oil, on the contrary, you need a tool with stiff bristles to evenly apply the dense mass.
- The shape of the brush should be rectangular with rounded edges to make painting easier. If you bought a low-quality brush with frayed bristles, cut them off with scissors.
- Apply the liquid composition with a brush to a small area. For larger ones, a roller is used.
Rollers are available in different sizes and minimally absorb paint material. Usually the walls are primed with a roller, but with enough experience you can apply tinted oil.
It is convenient to paint the linings with pipes at the junction of boards with a chain-link mitt or a foam sponge.
When choosing a tool, the size of the surface, the type of paint and varnish material and experience with it are taken into account.
Reasons why lining processing is required
If there is excess moisture, the wooden lining will rot. Untreated thin wood easily catches fire and is damaged by insects.
Its correct use will reduce risks. First of all, reliable waterproofing of the walls and insulation of the balcony with non-flammable insulating materials are necessary. The balcony should be well ventilated, to prevent the appearance of condensation, cold bridges, and sudden temperature changes.
Wood in any condition requires mechanical and chemical protection to ensure its safety. Wooden lining on a residential balcony requires particularly careful environmentally friendly processing.
Necessity of processing and painting
Without additional treatment, lining quickly deteriorates for a number of reasons.
- Fire. When the temperature rises to a critical point, the wood first chars and then ignites. It supports the flame well and burns out quickly.
- Microorganisms. With high dampness and poor ventilation, mold and fungi quickly grow on untreated wood. The surface first becomes bluish, then black, and eventually rots.
- Pests. Some insects settle in wooden materials, destroying them.
- UV radiation. Direct sunlight changes the shade of the finish, making it darker. With uneven burnout, lightened spots appear on the lining.
- Mechanical damage. The paintwork takes on impacts, scratches, and abrasions.
How to lighten treated wood?
If the coated lining has darkened over time, it is not so easy to lighten and repaint it; this is a long-term and complex process, therefore it is important from the very beginning to follow all the rules for performing painting and painting work when working with wood, so that you can then enjoy its beauty for a long time . But it's still possible
What should be done?
First of all, remove the old layer of varnish using all possible means. You can treat the paint layer with a heat gun, this is a good method, but there is a big drawback - the presence of a strong odor. You will definitely need a gas mask or powerful ventilation. It is less labor intensive. Restorator bleach in combination with a textured coating will help solve this problem. However, even in this case you will have to remove the varnish. If the varnish is water based, this will be easier to do.
Types of decorative and protective coatings
How to cover the lining in a country house? - this is a question that comes up quite often in Internet searches. And, indeed, even before the finishing work begins, it is necessary to decide on the choice of paint and varnish products that are best suited for each specific conditions.
The latter are presented on the domestic market with a wide range of materials that preserve the surface of wood under various operating conditions and improve its appearance. When assessing and choosing them, not only the ability to resist the destruction of the material should be taken into account, but also the possibility of preserving the overall style of the room. Before processing the lining inside the house, we advise you to carefully read the list of special products used for these purposes and represented by the following names:
- primers;
- fire-resistant impregnations (fire retardants) and antiseptics;
- decorative coatings (oil, acrylate and other dyes);
- wax compounds and varnishes used for finishing surfaces.
Additional information: To this list you can add special compounds used when it is necessary to remove old coating, etc.
Impregnations, primers and decorative coatings for wood processing
In order to decide how to treat the lining in the interiors of the room, we will consider each of the listed items in more detail.