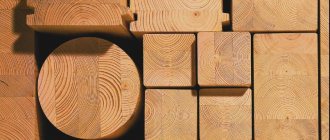
How to dry pine
In industry, pine is dried in two ways: in a special chamber and in the fresh air in the shade. In the second case, the main disadvantage is the rather long drying time.
However, you still have to dry lumber at home, so this process is carried out in a natural way.
To do this, you first need to prepare a flat surface and always under a canopy or in the shade under thick tree branches through which the sun's rays do not pass.
Interesting video: DIY pine drying chamber
This area must be covered with any waterproofing material. A garage or other room with insufficient fresh air will not be suitable.
Modern production rejects this drying method and chooses special chambers.
Here the wood is first well heated, then dried, and then subjected to final heat treatment. The pine is dried to standard humidity, which is 12%.
If the humidity in the environment increases, the wood begins to absorb it.
How to dry spruce
Drying spruce in a chamber is the main method of drying lumber of this type of wood, although the owners do it in a natural way.
Fast and high-quality drying requires the availability of the necessary equipment. Only in the chamber can you regulate humidity, air circulation and temperature.
Drying on the street can only serve as a preliminary drying of boards, logs and other lumber that are stacked.
Interesting! How much wood will there be in a cubic meter? HERE!
In this case, dry wooden spacers must be placed between the rows. The formation of stacks is carried out from lumber of the same species. In addition, the size of the boards should be the same.
The correctness of their installation is checked using the template method.
The boards are laid out depending on the direction of the air flow. Pre-stacks are formed on a pre-prepared site. This happens next to the drying chamber.
If the boards are laid manually, it means that vertical lifts are used, which significantly increases productivity.
How to dry cedar
When drying cedar wood, be sure to follow a gentle regime. This is due to the fact that cedar can crack. If you dry this type of wood under a canopy, the percentage of defects will be reduced to a minimum.
Before drying cedar, the ends of the boards or logs are coated with paint or lime. This reduces the likelihood of cracks occurring. And although this lumber is quite strong, it still remains soft and flexible.
Due to its high resistance to moisture, cedar is successfully used in the production of external carved elements.
Drying of cedar boards is carried out at a given temperature (25ºC) and the required humidity concentration (18%).
This concept includes the alternation of temperature and humidity processes that act on lumber. The temperature rises gradually, and the humidity, on the contrary, decreases.
The drying modes are set by the master, taking into account not only the type of wood, but also the thickness of the boards, their quality category, the required final humidity and the type of chamber.
How to dry larch
Coniferous wood is dried at a temperature of 25ºC. This regime can only be maintained in a chamber, but under a canopy, drying the larch can continue for quite a long time.
At woodworking plants, the drying process is automated, so everything takes place in the same time interval. Today there are highly specialized enterprises that work with a specific type of wood, for example larch.
Previously, such mills sent lumber to customers without preliminary drying, but this brought in less income than the sale of dry wood.
The fact is that green lumber is too heavy, so approximately 20 m³ of wood could be loaded onto the truck, and more than 30 m³ of dried lumber.
In addition, dry lumber is sold at higher prices.
Transport costs have also decreased several times.
The most popular are Italian drying chambers with a loading volume of 200 m³. They produce a small percentage of defects - a maximum of 3%.
It takes only 6 days to completely dry thin boards.
How to dry fir
Before the fir drying process begins, it is heated with steam to a certain temperature.
Steam is supplied through special pipes. At this time, powerful fans and heating devices are operating in the chamber, but at the same time, the supply and exhaust ducts are blocked.
The duration of the initial warm-up is directly related to the type of wood. The fir is heated for a maximum of two hours.
Then the drying process itself begins. To do this, all parameters (temperature, humidity and air flow) are adjusted to the required values. All this happens automatically with open supply and exhaust channels.
And since residual internal stress is formed during drying, it is eliminated by intermediate moisture-heat treatment.
The boards are dried to operating humidity, that is, when they become suitable for mechanical processing with carpentry tools.
Lumber from fir and other coniferous species, the minimum thickness of which is 60 mm, undergoes moisture-heat treatment.
At the end of drying, all modes in the chamber are reduced to certain parameters, and the lumber is kept for another three hours, after which the chambers are turned off.
How to dry plums in an electric dryer
Furniture made from wood without pre-drying will warp and dry out.
Therefore, any tree species is pre-dried to a certain humidity, which will correspond to the operating conditions of future products.
Most often, wood is supplied to furniture factories with a high degree of humidity.
The main drying modes for plum boards in the electric dryer include two processes, one of which is high-temperature and the other is low-temperature. At low temperature conditions, the air in the chamber warms up to 100°C.
True, a lot depends on the purpose of the lumber. And since increased demands are placed on them, drying modes are divided into the following categories: normal, soft and forced.
In the first option, after the wood leaves the electric drying chamber, no defects are detected. Slight color variation may occur.
If the soft drying mode is turned on in the chamber, then the color of the wood does not change and the physical and mechanical properties are preserved. After the forced mode, wooden parts sometimes darken, but its strength is maintained.
How to dry an apple tree
Every craftsman who works with wood is interested in the issue of accelerated but high-quality drying.
The importance of properly dried apple trees cannot be overestimated. For example, furniture made from damp wood may become unusable while still in the store.
The same fate awaits over-dried lumber. For example, the front door or cabinet door will not close because it will be saturated with moisture from the air and swell.
For this purpose, a technology has been developed for drying each type of wood separately.
In modern chambers it is easier to achieve the required humidity (18°C), because everything here is automated. And drying apple tree boards in the fresh air requires certain knowledge and experience.
After all, you need to be able to determine when to stop the drying process.
But in any case, raw wood cannot be used, especially in construction.
Drying lumber is a rather lengthy process.
And if you do this on your own personal plot, where there are no modern automated drying chambers, then this procedure will become unpredictable. Therefore, it is better not to save money, but to immediately buy dried wood.
How to dry a whole pear in an electric dryer
Pears, like other types of wood, are best dried in an electric dryer.
You can put them in the unit as a whole or cut them into boards and other parts.
Some people think that it is better to buy already dried lumber, but the majority of owners prefer to save a significant portion of their money and purchase raw wood.
In this case, they do the drying themselves.
In production, boards are dried in steam chambers and electric dryers.
In both cases, they are spacious rooms with a large number of powerful fans. And the very fact of drying lumber in closed chambers eliminates the possibility of damage.
The process of removing moisture from a pear is not as simple as it might seem, because this type of wood contains two types of moisture. It is present in the walls of plant cells, as well as in their cavities.
If the humidity is 30%, then the wood has a lot of free intercellular moisture. Therefore, different types of wood are dried differently and the percentage of moisture left is different.
8% moisture is left in pear trunks and boards. When the moisture content of lumber exceeds 22%, their transportation becomes unprofitable. After all, even the largest truck has a loading weight limit.
How to dry quince
Wood moisture can vary and is divided into several categories.
For example, quince moldings are dried until 15% moisture remains. Fluctuation in any direction up to 2% is allowed.
In products made from laminated and solid wood, moisture fluctuations from 7% to 15% are allowed. As for the production of furniture, the best characteristics are demonstrated by lumber with a moisture content of 8%.
They glue securely and are easy to process. This also increases the service life of the finished product. Today you simply cannot do without drying chambers.
They rid the wood of excess moisture. One of the economical and popular technologies for artificial dehydration of quince building materials is drying.
A modern drying chamber is a spacious room equipped with the necessary equipment operating in automatic mode.
Loading of lumber from quince and other fruit trees into the chamber is carried out using forklifts, lifting devices, carts moving on rails, etc.
Well-dried quince boards are durable and high-quality material.
How to dry cherries
The main equipment intended for drying chambers is a heat supply system, numerous fans and supply and exhaust ventilation.
The most popular is the automated control of the drying process. If you load cherry trunks or lumber into such a chamber and turn on the automatic mode, then you don’t have to monitor the drying process, since everything will be done by electronics and automation.
Temperature and humidity will be maintained at the specified level and, if necessary, increased or decreased.
Temperature is regulated by supplying hot air or steam, and humidity is controlled by supply and exhaust ventilation. The entire drying process can be controlled remotely.
Now, to measure the percentage of moisture in wood, it is not necessary to enter the chamber. This can be done using a remote moisture meter.
Moreover, humidity is checked at any points. When drying cherry lumber, a mild temperature regime is used: up to 75°C. This is done due to the high density of this tree species.
The air humidity in the chamber does not exceed the permissible norm - 80%.
Anyone who has started building their own house must remember that saving on drying lumber will lead to disastrous consequences. And correcting them will require additional financial costs.
Drying end-cut wood at home
My notes on drying various types of wood at home. I will be constantly adding photos over time. Drying is performed after various procedures. Let's see what happens in the end.
Pear
Cut down in April 2016. Thickness 30-40 mm, diameter 220-250 mm. Raw saw cuts with the bark removed just before coating. After 3 weeks, the saw cuts were covered with PVA glue and then with garden varnish on top. There are no cracks. After a week, the cuts became clearly easier. Under the layer of such coating, light mold (millimeter dots) appeared on all samples ( group1 , group2 , group3 ).
group1. Photo 2 weeks after coating.
gr2 (left), and gru3 (right). Photo 2 weeks after coating.
Samples gr2 and gr3 after 2 months. They are in excellent condition. Didn't bend or crack. The color remains the same, maybe even a little richer.
Cut down in April 2016. After 5 weeks, cuts were made (3 pieces) with a thickness of 30-40 mm and a diameter of about 230 mm. It didn't work; there wasn't a large container. It was decided to simply soak the saw cuts for a day in selenium water in a ratio of 5 tbsp. salt per 1 liter of water. After 24 hours, the tree drained for about two hours and was covered in three versions: 1 – PVA, 2 – garden varnish, 3 – PVA + garden varnish. Samples gr4 , gr5 and gr6 (below they will be numbered according to the coating, but for now these are just cuts under the future numbers 4, 5 and 6, since they went through the same conditions):
Photo after salt water, before coating.
Photo after salt water, before coating.
Photo after salt water, before coating.
Below is a photo of the same three cuts numbered gru4 , gru5 and gru6 . Sample group 4 is covered with PVA glue, group 5 with garden varnish, group 6 with PVA glue and garden varnish.
group4. Covered 2 hours after soaking in salt water with PVA glue.
gru5. Covered 2 hours after soaking in salt water with garden varnish.
gru6. Covered 2 hours after soaking in salt water with PVA glue and garden varnish.
A week later, the saw cuts were heavily covered with mold and moss. After another 3 weeks, the saw cuts were very heavily covered with moss.
After 2 months, the bark was removed gr4 , gr5 and gr6 After this, these saw cuts lost significant weight and the fungus no longer grew. Those. the presence of bark gave a negative result. Below are photos of the same samples:
gr4, before “revision”
Sample gru5 or gru6 (their conditions are almost identical), also before “refinement”, i.e. also with bark and fungus.
Samples gru4, gru5 and gru6. The bark has been removed and the fungus has been cleaned off.
In May, one of the end cuts ( gro7 ) was boiled in salt water (1 tablespoon of salt per 1 liter of water). But before that, the cut was done on a planing machine. As a result, its thickness decreased to 20 mm, while the diameter was about 230 mm. After cooking for 15 minutes, cracks appeared on the cut. The cooking was stopped. The cut is dried without coating.
gru7. Photo before cooking in salt water.
Apricot
Cut down in April 2016. About 20 mm thick and 120 mm in diameter. After 3 weeks, the saw cuts were boiled in salt water in a ratio of 5 tbsp. salt per 1 liter of water. The saw cuts were cooked each separately for 1 hour. On one sample the bark was left ( abr1 ), on the other it was removed ( abr2 ). After cooking, the saw cuts were slightly dried and covered with PVA glue and garden varnish. Unlike pears, mold did not appear on these saw cuts; cooking in salt gave its results.
Left – abr1, right – abr2. Photo after cooking.
Apple tree
Cut down in May 2016. The cuts were made immediately after sawing the tree ( app1 , apple2 , apple3 , apple4 ). After that, they simply lay indoors for 2 weeks.
apple1, photo 3 weeks after cutting.
apple1 is closer, photo 3 weeks after cutting.
apple2, photo 3 weeks after cutting.
apple3, photo 3 weeks after cutting.
apple4, photo 3 weeks after cutting.
After 2 weeks, the wood was boiled in salt water in the same ratio of 5 tbsp. salt 1 liter of water. During cooking, after 15 minutes cracks appeared on one of the samples. Therefore, the rest were boiled for about 10 minutes to avoid this. After cooking, the saw cuts were not covered with anything.
The result after 2 months (samples apple2 and apple4 ), a couple of saw cuts are very badly cracked, the experiment on them is stopped, leaving apple1 and apple3 :
apple2 in 2 months, experiment completed
apple4 after 2 months, experiment completed
: Drying end-cut wood at home
A lot of scientific work, I would say, but acoustics cannot be made from saw cuts and diffusers are not made. Useful for general development.
The best solution is to dry the trunk in bark for about a year. Then you can cut it and dry it in a not very dry room. But it’s even better to dry it in bark for 3-5 years.
When preparing firewood
There are two larch trunks of 3 m each. from the root, the diameter is 60 cm. Above, of course, it is thinner, I really wanted to use it for some crafts to make diagonal end cuts and maybe sawing it lengthwise will work out, how to cut it and how to dry it, tell me, I read that larch is a capricious material. Thank you
With such a diameter and such thickness it will most likely burst. For 60 cm, I would take a thickness of about 10 cm. Leave the bark and dry it gradually, i.e. There is no need to immediately bring the sawn wood into a warm room. You can also try drying it in film at first, but placing it under paper so that it absorbs the moisture.
Personally, I never use larch, like many wood species that are dead for sound. I only use solid walnut. And in very rare cases, ash. From many years of personal experience, I learned a long time ago which wood is melodious and which, so to speak, means nothing. I dry it in logs without removing the bark in an upright position in a fairly well-ventilated area and without natural light. First, just in case, I treat the logs with lime. And I forget about them for ten years. That is, drying occurs under natural conditions. After 10 years, when the wood has suffered, I cut the logs into boards from which I make acoustic enclosures. Don’t believe anyone that she will start singing if she goes into the dryer…. Lies. But if you do it my way, then even with a light tap with your finger, you will hear her sing. And the varnish with which I cover ready-made speaker cabinets, I also cover only with my own, personally prepared varnish based on plant juices. Believe me, it's worth it. Because varnish also affects the sound. Solid wood of heavy species is suitable only for the manufacture of panel acoustics. (oak, hornbeam, beech, birch,…..)