Why dry wood?
When drying, the strength of lumber increases and the risk of rotting and fungal damage is seriously reduced. Moisture is a comfortable environment for the formation of fungus and the proliferation of microorganisms; during the drying process, the moisture content in wood decreases significantly, therefore, the conditions for the development of fungus inside the fibers become partially unsuitable. And in combination with treatment with antiseptic solutions, the tree becomes completely invulnerable to the effects of microorganisms.
Moreover, working with dry lumber is a pleasure and a minimum of problems.
Dried timber: positive factors and necessary equipment
The durability of the structure depends on the quality of drying of the wood, otherwise the timber may bend over time, rot, and insects and fungus will certainly grow in it. So how to dry timber without cracks and residual harmful moisture? After all, only proper drying will improve the mechanical qualities of wood and prevent its warping, rotting and cracking.
Drying the timber, of course, will increase the strength and durability of the entire building.
Note that the instructions state: the moisture content indicates the amount of water in the wood. By the way, this moisture can be both free and bound. But free moisture evaporates well, lightening the wood, while bound moisture leaves very slowly.
Drying wood in theory
Moisture in wood exists in two states:
- free , contained in large quantities in the capillaries of wood, is given first and does not significantly affect the shape and volume of the fibers;
- bound , contained in the cell walls themselves, released only under the influence of temperature and directly supports the structure of the fibers.
Due to the characteristics of this structure, there are 2 types of wood drying:
- Natural drying . It is produced outdoors under a canopy that protects the boards from rain and direct sunlight. With this drying, you can achieve 18-23% humidity. Drying can also take place indoors so that the material takes on a “room-dry” state with 8-12% humidity. Free moisture and excess bound moisture are evaporated. The natural drying process can last for several weeks or even months.
- Artificial drying . This process is carried out in special chambers - dryers. takes from several hours to several days. It is in this way that our company produces dry edged boards and other dry lumber. But there is also a way to dry wood in a liquid medium, in baths with petrolatum at a temperature of 130-1400C.
Drying chamber design diagram
The arrows indicate the air circulation flows in the chamber.
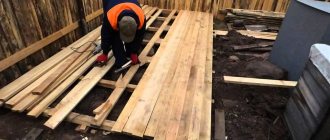
Drying boards inside the garage
You can dry the boards by laying them on the floor and placing a fan; for this you need a concrete floor. It absorbs moisture well, laying out the boards, they need to be turned over periodically, and the fan should be running constantly.
Article on the topic: Is ouzo necessary in the garage
Drying boards with infrared radiation. Thanks to this method, the boards can be dried for several days. To do this, you will need an infrared dryer or separate small heaters. Infrared cassettes are placed into a stack of boards, through three boards folded together. The last layer is covered with a board, and polystyrene insulation is reinforced at the bottom and top of the stack.
How to dry wood at home
We often have to observe how summer residents handle freshly purchased lumber. It seems that a person spends a lot of money on a purchase with the goal of turning the wood into waste. If you want to dry wet boards, timber and other lumber using natural means such as sun and air, you need to approach this issue wisely.
The drying process takes a fairly long period - from several weeks to months, so construction must be planned in advance. For your convenience, we have prepared step-by-step instructions:
- We choose a place. It is better to choose an open area; the middle of the garden or the flat roof of a low building will do just fine. The working area must be covered with some kind of moisture-proof covering, for example, old roofing felt. It is necessary to lay it with a large overlap, and to prevent the material from sticking together, it can be thickly sprinkled with sawdust.
- We assemble the stack supports. Their purpose is to raise the lowest pads (on which the bottom row of boards will be laid) off the ground. The most simple and reliable design of supports in our case is a well, which is laid out from bars having a length of 0.5 meters and a cross-section of 50x50 mm. Having laid out 2 wells 0.7 meters high, we place on them a lower support pad with a cross-section of at least 60x80 mm. One support is ready. The distance between supports is 1.5 meters along the length of the stack. The last step in preparing the supports will be fitting. It is necessary to ensure that the surfaces of the upper support pads are in the same horizontal plane. You can achieve a better result by using wood chips or wedges. Spacers under the boards must be at least 2 cm thick and have the same cross-section.
- We stack the lumber. It is necessary to take into account the direction of the wind and lay the stack across, and not along the prevailing direction. The stack must be kept narrow, maximum 1-1.2 meters. The optimal option is 0.8 meters; with a larger latitude, the middle boards will take longer to dry. The height of the stack itself can be any, depending on the convenience of stacking. However, the distance from the ground to the bottom layer of boards (the support of the stack) should be at least 0.5 meters, optimally 0.7 meters.
- We pull together the stack. We place more spacers on the last top layer of boards, and tighten the ends of the upper and lower support spacers with a rubber band. The stack is pulled together vertically. The easiest way to cut a rubber band is from an old car inner tube. A tape 30-40 mm wide will be enough. You can also knock down a tension frame from planed boards.
- We protect the wood from precipitation. It is better not to close the stack at all than to close it so that the moisture cannot escape. We place several dry poles along the length of the stack on the top pads. We overlap sheets of rigid waterproof material, such as roofing iron, on the poles to form a canopy with an overlap of 15-25 mm at the edges. We put a couple more dry poles on top, which we tie to the top linings so that the sheets do not blow away during strong winds. Or you can use weights, such as several bricks or cinder blocks. If everything is done correctly, an air gap of about 8 cm will form between the top layer of boards and the sheets.
Layout of a stack with fixation by boards
Homemade drying stack
Important! During natural drying, the moisture content of wood is reduced to a certain limit due to the continuous exchange of moisture with the environment. Thanks to this, the bound moisture does not completely leave and does not evaporate quickly, which reduces the risk of warping, cracking and other deformation of the wood during drying.
As an example, let's look at the lining that is taken out of plastic bags. From being isolated from air and surrounding moisture, it enters an environment where continuous moisture exchange begins. In an excessively humid environment, wood warping may begin. But after several cycles of shrinkage-swelling of wood under natural conditions, it will practically not change in size in the future.
By the way! Coniferous wood is dried in a chamber much easier and with fewer consequences than deciduous wood.
Technology
Not every person can use high-quality, expensive equipment for drying wood for their own needs. When drying a large volume of wood at home, you should remember several important points:
- choice of location;
- method of laying the material;
- installation of supports, fasteners;
- protection from precipitation.
Logs for drying or other lumber should be placed in open areas, for example on a personal plot or the flat roof of a small building, that is, in places with good lighting. You need to spread roofing material on the surface where materials are stored, then fill it with sawdust.
The correct placement of raw materials for drying should be based on the direction of air flow. The stack must be laid across, and not along, the movement of the wind (meaning its main direction). The optimal width of the stack is 80 cm. A distance of at least 30 cm must be maintained from the soil surface to the bottom board. This gap is necessary for good ventilation of the lumber.
The main purpose of installing support structures is considered to be the need to raise the lowest workpieces.
Article on the topic: How to properly insulate a garage door
It is best to make the base in the form of square wells. Two such wells are laid out on the sides of the stack. They are connected to each other by a support gasket. A distance of 1.5 m is left between the side supports, while the upper part of the spacers should be in the same horizontal plane. The stack is tightened using a rubber band, which can be made from a car inner tube.
When drying in natural conditions, wood may suffer from precipitation, but there is no need to completely cover the boards.
To protect the wood, several wooden guides are laid on the top pads and roofing material (iron, corrugated sheeting) is spread to form a slope to drain moisture. The roof is additionally secured with rope to prevent the wind from blowing it away. An air gap of 8 cm is left between the metal and wood.
When drying lumber in air, the moisture content of the workpiece is reduced to 20%. Immediately after finishing the work, the ends of the workpiece with cracks must be cut off and the product brought to the required size. The material that will be used for interior decoration of residential buildings is placed in a heated room for drying.
The old way
There are many types of drying wood in industrial conditions, but evaporation technology was developed in ancient times. Our ancestors boiled the wood for several hours in salt water with the addition of small pine sawdust, then took it out and dried it in a cool place for three weeks.
As a result of such processing, the workpiece retained its original structure, did not crack, and became flexible and elastic. During the evaporation process, excess moisture is released from the wood structure, the surface of the product acquires a beautiful chocolate color and a clear fiber pattern.
Modern users can lower the moisture level of a piece of wood by placing it in the oven, but in the old days, waxing was a popular method. In this case, the raw materials were placed in a paraffin solution, the temperature of which was at 40°, and left in the liquid for several hours.
Article on the topic: Where is the cranberry garage sold?
As a result of this treatment, the surface of the wood acquired a beautiful texture and did not warp during use. After removal from the paraffin solution, the wood was kept for several more days in a dry, ventilated room.
The waxing method was used to process the dishes. After removing the wooden cups or other household items from the solution, all that remained was to varnish or cover them with patterns. The finished products acquired additional strength and did not crack.
To improve water resistance, the dishes were dried in a solution of linseed oil. In this case, the workpiece was placed in liquid and steamed over low heat for 5 hours. Despite its age, this method is also popular among modern tableware makers.
Shrinkage problems
The dimensions of the material during drying can change in different ways. After improper drying, an edged board can turn into a completely unusable material. For example, if you dry it too quickly, the natural shrinkage process is disrupted and the board becomes deformed.
Such defects can often be eliminated with a plane, or in difficult cases by exposing the material to steam and repeated drying. Here are the most common cases of curvature:
- warping of the board in the transverse direction;
- bending the board in the lateral direction;
- arcuate bend;
- torsion.
Typical shrinkage deformations
Shrinkage promotes the formation of cracks. In small materials (boards, timber) there are fewer cracks, but such lumber is more susceptible to warping. To reduce the likelihood of cracks forming in logs and beams, longitudinal cuts are made along the entire length of the material. This allows you to reduce the internal tension of the wood.