The completeness of the landscape design at the dacha is given not only by the built residential building or barbecue area. True individuality and originality can only be created with the help of various accessories and small details. And what could be better than crafts for a dacha made of wood - handmade gizmos will add an indescribable flavor and will undoubtedly attract the attention of guests.
Wooden crafts are a wonderful accessory for decorating a summer cottage
Using wood in a summer cottage
Currently, hardware stores offer a choice of a huge number of different ready-made sculptures and other elements for the garden, made from various materials.
But it’s better not to be lazy and make country crafts with your own hands - making them from wood, unlike stone or metal, is not so difficult, and the resulting result will exceed your wildest expectations.
Craft ideas
Let's focus on interesting and easy-to-implement designs:
- The most common option is wood sculptures. This can be a figure made from a single log or made up of several parts connected to each other in one way or another.
- Crafts made from branches and stumps that resemble animals, birds or fairy-tale characters look good. In this case, you practically do not need to make changes to their natural shape; just clean the material from the bark and varnish it.
Flowerbed from a stump - beauty without much effort
- Plywood is good for creativity. Draw a stork, a windmill or a frog princess on a sheet of paper, cut off the excess parts and paint the product.
Photo of plywood sculpture
- You can also make excellent containers for plants and birdhouses from plywood. Another beautiful and useful thing is a feeder.
Logs as a material for creativity
Very often, when designing a summer cottage, it is necessary to cut down one or more trees. Of course, they are perfect as firewood, but it’s better to show your imagination and use them for crafts made from logs for your dacha: you can easily make a flowerbed, bench or decorative well with your own hands.
Let's look at these options in more detail.
- Flower bed. For most summer residents, garden flower beds made from various available materials are not new: plaster, empty glass bottles, old car tires, and so on. But it is the old log that is suitable for this purpose like nothing else.
Log flowerbed
For manufacturing you need a hammer with a chisel or a chainsaw. By making a recess of the appropriate size and placing the log on supports, you can learn an unusual and attractive product absolutely free of charge. All that remains is to fill the hole with soil and plant flowers.
- Garden furniture. An excellent solution, but not so easy to implement. First of all, you need to select a log of sufficiently large diameter. Then carefully process it with various tools:
- the first stage is an ax or chainsaw;
- second stage – chisel and hammer;
- the third stage is grinding and applying a protective coating.
Garden furniture made of logs
- Decorative well. A very beautiful accessory for a summer cottage. The downside is that old wood is not suitable for manufacturing. You need to purchase high-quality round timber and build a log house from it.
Decorative well made of logs
Alternative options
A good alternative to varnish for a kitchen countertop is to impregnate the wood with vegetable oils. Typically, mixtures of tung, linseed, and citrus oils are used.
A good alternative to varnish for a kitchen countertop is to impregnate the wood with vegetable oils.
The main advantages of oil impregnation compared to varnishing:
Environmentally friendly. Oils do not contain harmful substances that are necessary for film formation.
Oils do not contain harmful substances that are necessary for film formation.
Ease of use. Small scratches here are practically not noticeable and do not spoil the appearance. In case of serious damage to the surface, the damaged part can be sanded and then coated with oil again. Moreover, you can do this yourself. When restoring a varnish coating, it is necessary to treat the entire surface completely.
Small scratches here are practically not noticeable and do not spoil the appearance. In case of serious damage to the surface, the damaged part can be sanded and then re-coated with oil.
Oil impregnation does not change color and does not look noticeable, preserving the natural appearance of the wood. Oils can dry completely or partially. In the first case, they form a durable film; in the second, they can be erased from the surface of the wood over time.
Oil impregnation does not change color and does not look noticeable, maintaining the natural appearance of the wood.
Self-production
Simple options
Even a novice summer resident who does not have too much experience in working with carpentry tools can make wooden crafts for the dacha with his own hands. Naturally, you need to start with simpler options, and then you can move on to monumental products that will become the central element of the landscape design of your dacha.
The manufacturing instructions below give only general direction. Otherwise, you should rely only on your own taste and sense of style. Don't be afraid to experiment.
Perhaps in the future your wooden sculpture will be a role model.
- The simplest option is plywood garden crafts. On a sheet of suitable size, you can draw out individual parts of a pony, donkey or goblin, cut them out and tie them together using strong twine.
Using a jigsaw and plywood you can create real masterpieces
- Another idea is small branches of fruit trees. They are suitable for making wall or floor planters. In this way you can make pots for house plants with your own hands. In this case, it is advisable to cover the interior space with plastic film to avoid soil spillage or insert plastic containers there.
Twigs - material for beginners
- Having gained experience in working with a manual or electric jigsaw, you can begin making more complex crafts. Carefully transfer your chosen design onto the plywood and carefully cut it out. The finished wooden sculpture is sanded with sandpaper, cleared of sawdust and coated with varnish or paint to protect it from adverse environmental conditions.
- There are other DIY plywood crafts: for your dacha you can make not only garden sculptures, but also figurines that look natural in the garden. For example, plywood bunnies will be an unexpected detail decorating a carrot bed. The procedure for making them is simple: draw an outline and cut out the shape using a jigsaw.
Chickens are an interesting solution for decorating a vegetable garden
Advice! On suburban land plots, power outages or power supply breaks sometimes occur. In this case, only renting a diesel generator for a summer house can help out. This device will provide power to all power tools and other equipment.
Complex designs
For those for whom making country wood crafts with their own hands has already become a kind of hobby, you can offer more complex options - making a mill or a wooden well. Here, in addition to your desire, an accurate mathematical calculation is necessary, otherwise the cut out parts will be impossible to fit together.
You can also offer a simpler option:
- We saw planks of the same length, which will be the basis for the mill (you can use small blocks of suitable cross-section).
- We take two sticks and place them parallel to each other at a distance slightly less than the length of the element itself.
- The next two elements are placed on the laid planks (perpendicularly) (the whole process is somewhat reminiscent of building a log house only on a smaller scale). You can fasten the parts to each other using nails or glue.
- Having constructed a structure of the required height, we begin to build the roof. To do this, take four small blocks and connect them in pairs to form a ridge. Pieces of ondulin left over from the construction of the house can be used on the roof. Then the design will fit best into the landscape design of the site.
- The material for the blades will be two or three planks, fixed at an angle like an aircraft propeller.
- You can decorate the structure with a decorative climbing plant that will entwine one of the walls.
Conclusion
The information above will help you create your own, unique wood crafts that will become the highlight of your summer cottage. You can learn more about this from the video in this article.
The bunny is a participant in many cartoons, so children really love this simpleton character. It is easily recognizable by its long ears, so it is easy to make from a variety of materials. To find out what you can make a hare from, let’s look at several simple ways to make children’s crafts.
Material properties
For work, elements obtained as a result of end sawing of tree trunks are used. Tree stumps, trunks, branches and branches can be used as raw materials.
For blanks, you can take fresh wood. Drying parts at high temperatures promotes the formation of textured cracks on them.
The type of wood is selected depending on the type of product:
- Coniferous wood is excellent for making children's crafts, toys, trim, home interior parts,
- wooden elements of garden decor require hard wood species (birch, oak, beech) as raw materials.
Hare made of felt (fleece)
This is the easiest way to make a little bunny quickly, without needles or glue. For the figurine you need felt, or fleece or other soft fabric. Scissors and a hair tie (bills) or thin ribbon.
This is a master class on how to make a hare craft for beginners (for the little ones):
- Cut a square out of fabric.
- Start rolling a thin rope from one corner to the other.
- Release the resulting tourniquet a little so that it becomes 2 times thicker.
- We fold the tourniquet in half, take about ½ of the half in our left hand and lift it up - these are the future long bunny ears.
- Using an elastic band for hair (bills) or a colored thin ribbon, grab it several times from the side of the ears. We straighten the ears, they should look up and to the sides.
The toy is ready, but you can sew or glue small black buttons-eyes and a red nose.
A pair of cardboard bunnies
For this bunny craft we will need:
- a roll of cardboard from foil (can be from toilet paper or cling film);
- scissors;
- A4 paper (pink and black or brown);
- pencil;
- ready-made “eyes” (beads);
- multi-colored pom-poms;
- brush;
- paints (can be acrylic or gouache);
- ribbon (yellow, blue-green);
- glue gun (stationery glue);
- paper or artificial flower (for decoration);
- You can use small pompoms (optional for tails).
For 2 bunnies, one roll of foil is enough for us.
Detailed instructions for making crafts:
First, you need to outline the contours of the future ears of our hares with a simple pencil. To do this, divide the roll into approximately 3 parts; long ears with rounded ends (not touching) will be located in the center. Then, where the ears are, cut with scissors to make 2 hares.
If the roll is from toilet paper, then the bunnies can be cut out with scissors after marking. Paint two bunny rolls: 1 white, 2 gray. Then set aside and let them dry.
Take pink paper and cut out 2 small hearts with scissors - these will be the noses of the hares and 2 inner ears, as shown in the picture. Cut black (brown) paper into thin strips, 3 pieces for each hare (6 strips in total).
Glue 3 strips just above the center of the roll, cover them with a heart-nose on top. Glue ready-made eyes over them or draw them yourself with black paint (felt-tip pen). You can glue dark beads instead of eyes.
Glue pink ears onto the ears of the roll (they should be smaller in size). Draw a mouth for 2 hares with paints or a felt-tip pen.
The white hare is a girl, you can decorate her with an artificial flower near her ear, and attach a pompom tail to the back. The gray hare is a boy, he can have a dark pompom tail, and a bow made of a bright ribbon (yellow, blue or green) on his chest.
The crafts are ready, a couple of mischievous bunnies will perfectly decorate the table for Easter, if there are toilet paper rolls, they will fit colored eggs. Creative and fun.
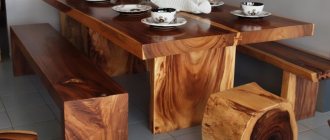
Armchair
In the case of slatted structures, it is better to immediately consider a hybrid option in the form of a chaise lounge - a beach lounger. Other design options in the interior will look too rough.
Portable, lightweight design with a fabric back is easy to assemble and convenient to transport. It is recommended to make the load-bearing elements from maple wood, and the lintels on the seat from cherry, beech, and pine.
To make a chair, you need to prepare the legs: 2 parts 20x40x800 mm and 2 parts 20x40x560 mm each. The lower crossbars are also paired, 10x50x380 mm each. Top 1, size 20x40x380 mm. The crossbar for sitting is also needed in a single copy, 20x40x300 mm. You will also need 5 slats 20x40x400 mm and a piece of fabric for the back 600x500 mm.
The assembly order will be as follows:
- jumpers are attached to a long pair of legs at the top and bottom;
- fabric for the back is stretched over the resulting part;
- The seat is assembled: a jumper is attached to the short legs at the top, then 5 prepared slats;
- chair assembly: the second pair of legs is passed between the lower jumpers of the long part and secured with a movable connection.
- You can first paint or coat the chaise lounge frame with impregnation.
Bunny made from a wooden stick (stool legs)
An unusual hare can be made from the leg of a broken, unnecessary round stool (small chair).
To do this you need:
- paints (red, green and black);
- brush;
- a piece of twine or light thin rope (mustache);
- two white pom-poms for the face;
- a small piece of white soft cloth;
- colored ribbon (green, yellow, etc.) for a tie.
Let's look at how to make a hare craft with your own hands step by step:
First, let's paint the blank (round leg). You need to paint in several layers for a smooth color:
- the upper quarter of the stick is white;
- the second quarter is pink (red);
- the lower half of the workpiece is green.
After drying, decorate the hare on top. There are white polka dots on the red shirt, and on the top of the green pants we draw white stripes, highlighting the transition from red to green with stripes (waves) for beauty.
The white part will be the bunny's head. Here we draw pink (red) cheeks for blush. We make the mustache from twine or thin rope (we tie 2 pieces of twine into a knot in the center). We close the antennae with 2 white pom-poms on top, so that the cheeks are above them. Even higher we draw the eyes and eyebrows of the hare.
You need to cut out long ears from a piece of white soft fabric and attach the crafts to the top of your head. We tie a beautiful tie (yellow, green) from a colored ribbon and glue it to a red shirt. If you have white yarn, you can make a strand of hair for your eared friend.
Our bunny groom is ready! This is a great souvenir that will look beautiful on a shelf, or you can even give it to your child's friend.
If you want to somehow diversify your leisure time, then we advise you, dear friends, to take up carpentry. This exciting activity will captivate you so much that time will simply slip away unnoticed, and in this case you will learn how to make all sorts of decorations for your home, cottage, garden and, of course, the yard with your own hands. In addition to all this, you will not be tormented by the eternal question of what to give to relatives, friends and work colleagues on their name days and other holidays. Moreover, there are a dime a dozen available materials for creativity; all the old trees located on your plot are at your disposal. Even from ordinary-looking stumps and driftwood, if you use your imagination, you can create incredible masterpieces of art that will be admired by everyone without exception. So, we strongly recommend that you visit our article, which will provide you with 10 photos of ideas for beautiful and interesting DIY wood crafts for prepared beginners. They will serve as a shining example for you and an impetus for your own unusually cool works. Videos with step-by-step master classes will complement and consolidate your acquired knowledge in the field of carpentry.
Frame made of tree branches
A photograph is a preserved piece of happiness captured at different periods of life. By making an unusual wooden photo frame with your own hands, you will add zest to the interior and surprise your guests. This frame will be especially relevant as a gift to loved ones. Even a novice carpenter can easily and quickly cope with such a simple task. The result will be an amazing craft for everyone to enjoy!
You will need:
- Branches of various thicknesses,
- Frame,
- glue gun,
- Jigsaw.
Progress:
- Cut the branches into wheels, about 5 mm thick. The more varied the thickness of the branches, the more interesting the finished frame will look.
- Now cover the frame with the resulting rings using glue, placing them in a chaotic order.
- The edges may be jagged, but this will add a special charm to your DIY wood craft.
Swedish candle
This candle will be indispensable on any hike. You can cook food or heat water on it; it burns for a very long time. This useful craft, made with your own hands, will save you on any hike, travel, fishing, and even in the country. It's incredibly easy to make. Let's look at the step-by-step description and principle of its implementation.
You will need:
- A piece of log
- Chainsaw,
- Lighter fluid.
Progress:
- In order to make this interesting craft from wood with your own hands for beginners at home, you will need to use a chainsaw to make 4 cuts intersecting in the center along the log. We do not make the cuts all the way to the end so that the structure does not fall apart, but slightly more than half the length.
- Now pour lighter fluid into the middle.
- Once you're on your hike, simply light the log in the center. The flame will be strong.
- To ensure that oxygen reaches the fire site, take 2 branches, preferably raw ones, and place them parallel to each other. Now you can place dishes with food or water on them.
Video: master class on making a Swedish candle with your own hands
Crafts and toys for children
You can make many different crafts from saw cuts for a school exhibition or kindergarten.
Toys made from this material look original: stylized animal figures, play furniture.
Many ideas for New Year's crafts from saw cuts can be found on the Internet: snowmen, snowflakes, flowers, decorations with a pattern applied to them.
From coniferous wood cuts you can make unusual Christmas trees that will not only decorate the room for the holiday, but also fill the house with the aroma of pine needles.
To make a classic triangular-shaped Christmas tree, you will need a frame of thin slats. Round blanks should be placed inside the frame, the voids should be filled with transparent glue or epoxy resin.
Owl made of wood
To decorate the garden or as an interesting craft for school, an owl made of wood will look good. It is quite simple to do with your own hands, so with your help, even a novice carpenter or schoolchild can easily cope with such an owl. Before we begin, let's see how to make an owl with your own hands in step-by-step instructions.
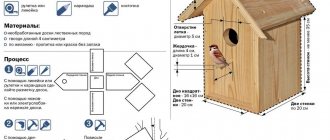
You will need:
- Round cuts from trees of different diameters (1 large, 2 small and 1 medium),
- Saw,
- Self-tapping screws,
- Cap from a plastic bottle - 2 pcs.,
- Felt pen,
- Sackcloth,
- Scissors,
- Glue.
Progress:
- A large saw cut will serve as the body of the owl.
- On the flat side on top we fasten two small saw cuts with self-tapping screws. These will be the eyes.
- We cut a medium-sized piece in half and attach it to the sides of the large cut. Sawed sides in different directions.
- Make your own beak from a small piece of log, cut it out. Place from below between the eyes, attaching with a self-tapping screw.
- We need to make ears from burlap, placing them above the eyes. Take a small piece and roll it into a tube, making one end sharp. Flatten it and use glue to glue it above one eye with the sharp part to the side. We make the second ear in the same way.
- We make eyes from lids. We attach the lids to the logs for the eyes with a self-tapping screw, and fill in the pupils with a black felt-tip pen.
- The owl is ready. It can be hung on the wall, since it has a flat side, or mounted on a tree branch in the garden, decorating it with another interesting DIY craft.
Which slats are best to choose?
When choosing slats, the following criteria are used:
- Exposure to moisture. In conditions of high humidity, pine and beech slats require impregnation with special compounds. It is enough to subject the oak elements to surface treatment.
- Environmental friendliness. All wooden slats are safe for humans. The exception is veneered MDF, which can emit harmful substances, which limits its use in residential premises, especially in bedrooms and children's rooms.
In terms of strength characteristics, preference is given to oak and some rare wood species.
- Appearance. Any decor made from slats on the wall is natural and attractive. However, exotic wood species stand out especially for their beauty of structure and color shades.
In the price segment, inexpensive, budget options and luxury materials are distinguished. The first category includes pine and beech. Oak is somewhat more expensive. You will have to pay a significant amount for the chic look of valuable wood.
Buffels can be created from flat or three-dimensional elements. Sizes also vary. The cross-section of the slats can vary from 10x10 mm to 20x50 mm (veneered slats - up to 50x50 mm). The length ranges from 1 to 3 m.
Interesting stool
This interesting wooden stool will be an excellent decoration for a summer cottage, bathhouse or garden. You won’t spend a lot of effort and energy making it yourself. This stool is distinguished by its originality in manufacturing, since, by and large, it turns out by itself. You will need several steps at the beginning and end of the job. For beginning craftsmen, this is just a great way to hone their skills.
You will need:
- Log,
- Ignition fluid,
- Saw,
- Round seat blank,
- Metal brush,
- Grinder,
- Nails,
- Hammer.
Progress:
- We take a log and make 2 cuts, perpendicular to each other, along the log.
- Pour lighter fluid into the middle and light it.
- We wait until the fire itself makes legs for the stool and extinguishes it.
- Using a metal brush, remove remaining coals and soot.
- Then sand the surface of the stool with your own hands.
- Nail the seat to the top of the stool.
- The stool is ready! An excellent and useful wood craft for the whole family.
Video: master class on making a stool with your own hands
What do they look like in the interior?
By choosing the right design option, design style and installation method, you can provide an original and attractive look to the interior in any room. You just need to consider its size and purpose.
In the hall
A decorative panel made of slats can be combined with a hanger.
In the interior of the living room
In the living room, wooden slats are used to decorate the walls and zone the room.
- One of the common options is a slatted surface behind the sofa. You can place a picture, shelves, indoor plants on it, or simply leave a slatted element in the form of a panel.
- Another common option is the wall opposite the sofa. A TV just begs to be seen here. In this case, all supply wires will be disguised under the cladding.
Using a slatted partition, you can provide zoning for the living room. It is quite popular to move the kitchen here. You can select a dining area or a small office.
Reiki in the kitchen interior
A slatted wall looks good in a large kitchen, highlighting the dining area.
The naturalness of the interior increases appetite, and its appearance attracts the eye. It is advisable to reinforce the impression with a beautiful dining table. Sometimes in the kitchen the ceiling is finished with slats. This makes it possible to create a special lighting system.
In the bedroom interior
Wooden designs are quite popular for bedrooms. The classic option is to decorate the wall behind the head of the bed with a slatt.
This way you can decorate the entire wall or cover only the width of the bed, but up to the ceiling. There is a belief that wood improves sleep. In modern styles, preference is given to asymmetry.
In this case, you can cover the wall only on one side of the bed.
Wooden slats in a children's room
In a children's room, the possibilities of slatted decor expand. Here you can veneer a wall or ceiling, make a transition from floor to wall or from wall to ceiling.
Separate the recreation area (bedroom) from the play or study area with a partition.
It is better to make partitions airy, decorative, with large gaps between the slats. As in the bedroom, a wooden wall behind the head of the bed looks good in the nursery. You can hang shelves on a wooden surface near the table.
DIY swing for a child
If you want to make your child happy with a swing, you don’t have to buy one. You can make a very beautiful and safe swing for small children from wooden planks with your own hands. They are safe because there is protection from falling out on all sides in the form of crossbars. So, let's start the process of making our homemade interesting craft at home.
You will need:
- Bar 3 × 4 × 37 cm - 11 pieces,
- Board 4.5 ×1.5 ×37 cm,
- Self-tapping screws,
- Rope,
- Hacksaw,
- Pencil,
- Ruler,
- Drill,
- Screwdriver.
Progress:
- To make our wonderful craft from wood, we place two bars parallel to each other. We lay 6 boards on top with the same distance between them and fasten them with self-tapping screws.
- We drill holes for attaching the rope on four sides in the corners.
- Next, take a hacksaw and cut two pieces of 15 centimeters each from the block.
- Then we drill holes in the center of the resulting blocks, so we will get the front pillars of our homemade craft.
- We cut the seven-centimeter piece in half and drill it vertically.
- We take a new block and place small blocks with holes along the edges. We drill holes in the block.
- We repeat the same action with two more bars and three planks.
- From the new block, we cut off two blocks, each 7.5 cm long, and drill vertical holes in them.
- We take the rope and begin to assemble our swing. We pass two different ends along the sides of the seat so that the middle of the rope is under it. We do this on both sides of the swing.
- We put 15 cm posts on the rope on the front part of the swing.
- We put 3.5 cm posts on the back ropes. Then we put a block with holes on the back posts, so we will make the back wall of our swing with our own hands.
- We put bars 7.5 cm long on the rear racks.
- We install armrests. We put planks on the side ropes.
- We put the two remaining drilled bars on the back ropes.
- We put a board on the front ropes, which will serve as a side for the child.
- Now you can hang the swing in any doorway or in the corridor.
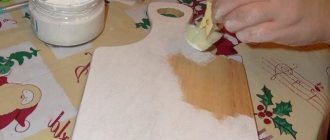
Wood cutting board
Each of us uses cutting boards in the kitchen, so I want to talk about how to make a board with your own hands for novice craftsmen. This interesting craft can be used in your kitchen, given to friends and relatives, or used as a basis for wood burning or other works.
You will need:
- Board 20 × 70 × 40 mm,
- Glue,
- Clamp - 2 pcs.,
- Plane,
- Jigsaw,
- Drill with drill,
- Sandpaper,
- Creosote.
Progress:
- In order for the craft to turn out as required, the boards need to be glued together so that you get one wide board. To do this, we coat the sides of the boards with glue and, using two clamps, tightly tighten them together.
- After the glue has dried, remove the clamps and process the board with a plane so that it becomes smooth and even.
- Now draw the desired shape of the board and use a jigsaw to cut it out.
- Drill a hole in the top of the board so that our craft can be hung in the future.
- We sand all sides of our board so that it becomes perfectly smooth and without burrs.
- After sanding, treat your board with creosote. Wait for it to dry.
- The board, made from wood with your own hands in a short period of time, is ready for use!
Main advantages of varnish
Due to the wide variety of varnish coatings, this method of protecting wood is the most popular compared to oil impregnation. Despite some of the disadvantages mentioned above, this method has many positive aspects:
- Strength and durability, does not require restoration during its service life
- Possibility to choose the desired shade and adjust the color of the wood
- Protects wood from fire and combustion
- Protects wood from moisture
- Gives a perfectly smooth surface
Tic-tac-toe game made of wood
You can make not only decorative and useful crafts from wood, but you can also make a tic-tac-toe game with your own hands. This interesting work will delight both adults and children with its unusual design. This game can occupy time at home and in the country.
You will need:
- Sawed circle, diameter 20 - 25 cm,
- Branch, 3 cm in diameter,
- Cautery on wood,
- Hacksaw,
- Sandpaper.
Progress:
- In order to make an interesting wooden craft with your own hands for beginners without any problems, you first need to cut the branch into circles up to 1 cm thick. We need 12 of these blanks.
- Using sandpaper, sand all sides of the circles, as well as our playing field.
- Now burn out a playing field of 3 × 3 cells on a large circle.
- We need to burn 6 zeros and 6 crosses on small circles.
- The craft is ready for play!
Snowman made of wood
Such an interesting and cute children's craft will become a real decoration for your room interior for the New Year 2022 or a gift for friends - schoolchildren. Children can easily make such a creation with their own hands, they just need to devote a little time and effort to creativity, and also prepare several cuts of wood. Parental help and support, of course, will also not be superfluous for beginners. So let's get to work.
To create you will need:
- a piece of wood, size 5 X 10 cm;
- sandpaper;
- white acrylic paint;
- materials for decorating the Snowman: buttons, fabric and other things you like;
- drill;
- black marker;
- pink paints;
- paper;
- compass;
- orange polymer clay;
- brush and sponge for applying paint.
Work process:
- To make this craft, you will need to separate the work for children and adults. To begin with, a child of 11-12 years old will be able to freely draw a Snowman template on a piece of paper, and then cut it out in front of an adult.
- Dad or grandfather, in turn, transfers these sketches onto the tree, tracing the lines with a black marker.
- Using a carpenter's tool you will need to cut out the fairy-tale character, and then sand all the unevenness and roughness.
- After this, it is necessary to bring the Snowman closer to its natural color. To do this you will need snow-white acrylic paint. We cover the entire product with it and set aside time for drying.
- We create the cheeks using pink paint. With a simple touch of a finger we apply blush to our craft.
- We draw the eyes and mouth with a black marker.
- We make our own carrot nose from polymer clay. Entrust this part of the work to your child. After drying, attach it to the product with universal glue. In the same way, attach the buttons to the Snowman’s body.
- We make handles from tree branches, a hat from gray or brown colored cardboard, and a scarf from any piece of fabric. So our fun New Year's craft is ready, created with your own hands quickly and easily. For schoolchildren, you can come up with many similar products that they can create on their own at home. Perhaps this creativity will develop into your child’s real hobby, and subsequently into something more serious.
Vase for fresh flowers made of wood
Another creative work for beginning carpenters, which will be mastered by schoolchildren aged 11-12, is a vase made from wooden saw cuts and a metal can. You can give this handmade craft to your mother, grandmother or friend. Look carefully at the photo and start making this interesting product.
To work you will need:
- metal can;
- universal glue;
- small cuts of wood.
Manufacturing process:
- Adults need to prepare small wooden cuts in advance.
- Clean the metal jar from dust and dirt.
- In a chaotic manner, we glue the wood cuts onto the prepared container, starting from the bottom to the top. In principle, there should be no gaps. They need to be masked with small circles of natural material. That's all! Our interesting craft can become a gift, and a very valuable one, since it is made with your own hands.
Finally
Our article has now come to an end, providing you with some of the simplest and most interesting DIY wood crafts for beginning carpentry masters. The photo ideas and videos we offer are quite diverse and colorful, informative and meaningful. This material is quite sufficient for beginners who want to develop their skills in the field of this carved art. Give this information some time, study and put your knowledge into practice at home to create the best work for beauty and benefit. By the way, if your children are also partial to this type of needlework, then feel free to include them in your creative company. Together, as they say, work is more fun. For the kids, you can find some simple crafts that they can easily create with their own hands. Fantasize, make your dreams come true, decorate everything around with your creations, delight yourself and your loved ones.
Coating process
Proper treatment of a wooden surface is the key to its long service life. This rule especially applies to kitchen countertops. In addition to the fact that you need to choose the right treatment product, it is also important to properly prepare the surface, apply protection and dry. The following describes the process of how to coat surfaces using oil compositions as an example.
The coating process follows certain rules.
Preparation of the product
The main thing you need to pay attention to when choosing a coating is its quality. A good protective agent will protect the wooden surface from mechanical damage and moisture and give it a shiny, renewed look.
The coating must be of high quality to provide the furniture with protection and a well-groomed appearance.
The product must also be prepared. Before treating a wooden countertop in the kitchen, the composition must be thoroughly mixed for 5 minutes.
The product must be mixed well.
Preparing the wooden surface
The first step will be to clean the countertop from all kinds of dirt and greasy marks. Next it is dried.
Before coating, the surface must be cleaned of dirt.
On a note! The wood moisture content should be no more than 12% according to DIN EN 13183-2.
To ensure that the oil adheres well and is absorbed, the wood is sanded, starting with coarser abrasives, gradually moving to finer ones. Also, after each abrasive, the coating is cleaned. You may need to putty it to remove deeper scratches. A special restoration kit based on wax is ideal.
The wood should be sanded so that the coating lays more evenly.
Application
The composition is applied with a brush or cloth, and the latter should not leave lint on the surface. It will take about 12 hours for the first layer to dry. Then you can apply the next one, and so on. The number of layers will directly depend on how the product is applied. Using a brush, two treatments are enough; a fabric coating will require up to 4 layers.
Use a brush or cloth for application.
When the product is well absorbed, the entire treated area is thoroughly wiped with a soft and clean cloth.
After the product has been absorbed, wipe the surface with a cloth.
Drying
Drying time varies from several hours to several days. Naturally based oils or mixtures containing acrylic require a longer drying period. They can also increase strength gradually. It is important not to use a freshly treated countertop for a while.
After applying the coating, it is important to let the furniture dry.