Wood processing
An open lesson on technology in the 6th grade on the topic: “Wood processing technology on a lathe.”
Lesson topic:
Wood processing technology on a lathe.
Lesson objectives:
- To consolidate knowledge on the construction of a lathe for wood processing STD-120 M.
- Introduce the types and purposes of chisels for woodworking.
- To consolidate knowledge on the use of devices for securing workpieces.
- Create conditions for the development of general educational and special skills. 5. To develop polytechnic, general education, and production skills in schoolchildren. 6. Foster a respectful attitude towards work.
Lesson type:
combined with the use of ICT.
Object of labor
:
1. Lathe for wood processing STD-120M. 2. Chisels for woodworking. 3. Devices for securing workpieces.
Equipment:
machine STD-120M, model of a lathe, chisels, textbook “Technology” - 6th grade, parts made on machines, test cards, multi-media projector, screen.
Form of training organization:
individual, group, frontal.
Teaching methods:
- verbal; 2. research; 3. demonstrative; 4. partially search;
DURING THE CLASSES:
I. Organizational stage.
1.1. Greeting students and checking attendance
- Checking work clothes and readiness for class.
1.3. Appointment of duty officers. 1.4. Induction training.
Lesson topic message.
Formulate the purpose of the lesson based on its topic. ( Write down the topic of the lesson in your notebooks).
2. Motivation.
Conversation to review theoretical information:
What tools did we use when processing wood on a wood lathe? (Maisel, Reyer). What devices are used when processing wood on a wood lathe? (cartridge, trident, faceplate).
3. Updating knowledge
Today you must learn to distinguish between the types and purposes of wood turning tools, the types of work they perform, and learn how to correctly use devices for securing workpieces. Turning simple parts on a wood lathe.
4
.
Checking homework.
Testing.
Students are offered test cards. Peer review
5. Questions for students:
1. Purpose of the STD-120M machine? 2. Name the main parts of the STD-120M machine on the screen and what do they serve?
3.What movement in the machine is called the main one? 4.What is the auxiliary movement called? 5. What is the purpose of the headstock and tailstock of a lathe?
6. What types of wood are best used for turning?
6. Explanation of new material.
Working methods and workpiece preparation.
Anyone who knows the structure of the machine and the rules of safe operation can learn to work on a lathe, since this process does not have complex operations and involves removing the surface layer in the form of chips from the workpiece being processed. In this case, the workpiece being processed rotates, and the chisel is moved relative to the workpiece, resting on the tool rest. Preparation of the workpiece for turning is of great importance. If the end of the workpiece has the shape of a square, then diagonals are drawn at the ends to find the center. Then, using a plane, the ribs are cut off, giving the workpiece an octagonal shape. At one end of the workpiece, a cut is made with a depth of 2-3 mm for a trident. After this, the workpiece is fixed on the machine, taking into account that the distance between the workpiece and the tool rest should be minimal (2-3 mm)
Types and purpose of chisels Turning the workpiece is done using special chisels. Semicircular chisels (a, c) are used for rough profile processing of wood, and chisels with oblique (angular) cutting edges (b) are used for finishing surfaces, as well as for turning cones and trimming ends. Chisels must be sharp and have intact handles. Only the teacher can sharpen chisels!
On the screen we demonstrate the types of chisels.
Routing.
Before starting turning, study the technological map for processing the product. The technological map can be made in the form of a table and contains the sequence of work, images in the form of a drawing or picture, and the types of equipment and tools can also be indicated.
7
.
An example of a technological map
| № | Sequence of work | Image | Equipment and tools |
| Prepare the workpiece. | Pencil, ruler, square, hacksaw. | ||
| Mark the workpiece and sharpen the edges. | Pencil, ruler, surface planer, plane, workbench, awl. |
8. Rules for working on the machine (preferably near the machine with a practical demonstration of the process)
Work on a lathe is carried out wearing safety glasses. After turning on the machine, take the chisel in your right hand, place it on the tool rest without touching the workpiece, and press it onto the tool rest with your left hand from above. First, rough turning is performed with a semicircular chisel. At the same time, slowly bring the blade to the rotating workpiece and smoothly move the chisel to the left and right to remove the chips. Finish turning is performed with an oblique chisel. In this case, the chisel is rested with its edge on the tool rest from the side of the obtuse angle. Do not allow the sharp corner of the chisel to cut into the workpiece - this can lead to the ejection of the chisel and cause injury! The workpiece dimensions are controlled after the machine is turned off and the spindle is completely stopped. If necessary, the part is processed using a grinding block. After stopping the machine, the workpiece is removed, the excess ends are cut off with a saw and cleaned with sandpaper or a file.
9. Safety rules.
1. Do not turn on the machine without the teacher’s permission. 2. Check the workpiece, it should be free of knots and cracks. 3. Securely fasten the workpiece. 4. There should be nothing superfluous in the workplace. 5.Check the working tool. The handles of chisels should be free of cracks and firmly seated. 6. Tuck in clothes. Fasten all buttons. Tuck long hair under the beret. 7.Before starting the machine, put on safety glasses. 8. Monitor the distance between the tool rest and the workpiece. When it increases, move the tool rest, stopping the operation of the machine. 9. During work, do not be distracted, do not leave the machine. 10. All adjustment operations should be carried out only when the machine is turned off. 11. Do not stop the rotation of the workpiece with your hands. 12. If any malfunctions are detected, immediately turn off the machine and inform the teacher.
10. Practical activities
Under the supervision of the teacher, students perform training work.
11. Repetition and generalization of material.
Solving test card tasks
Assessment of students' practical work; analysis of typical errors.
12. Homework assignment.
Select an object to be turned on the machine and complete a technological map for its production. Review the rules for safe operation of the machine.
13. Lesson summary.
Now let's summarize the lesson.
Topic 1. Technologies for manual processing of wood and wood materials
5th grade
Theoretical information.
Wood as a natural structural material, its structure, properties and applications. Lumber, their types, areas of application, types of wood materials, properties, areas of application.
The concepts of “product” and “part”. Graphic representation of parts and products. Graphic documentation: technical drawing, sketch, drawing. Lines and symbols. Rectangular projections on one, two and three planes (types of drawing).
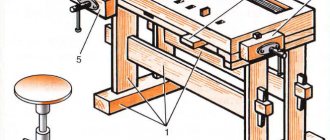
Carpentry workbench, its structure. Hand tools and accessories for processing wood and wood materials.
Sequence of manufacturing wood parts. Technological process, technological map.
Marking wood blanks. Types of control, measuring and marking tools used in the manufacture of wood products.
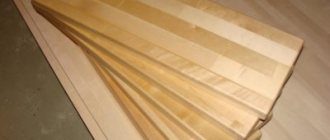
Basic technological operations of manual wood processing: sawing, planing, drilling, cleaning parts and products; quality control. Devices for manual wood processing. Manufacturing of parts of various geometric shapes using hand tools.
Assembling parts of a wood product using nails, screws, self-tapping screws and glue. Finishing of parts and products by tinting and varnishing.
Safety rules when working with hand carpentry tools.
Laboratory and practical work
Recognition of wood and wood materials.
Reading the drawing. Making a sketch or technical drawing of a wood part.
Organization of a workplace for carpentry work.
Development of a sequence for manufacturing wood parts. Marking wood blanks; methods of using control, measuring and marking tools.
Familiarization with the types and rational methods of working with hand tools when sawing, planing, drilling, and cleaning parts and products. Protective and decorative finishing of products.
Manufacturing of parts and products according to technical drawings, sketches, drawings and technological maps. Connecting wood parts using nails, screws (screws), and glue. Identification of defects and parts and their elimination. Compliance with safe work rules when using hand tools, devices and equipment. Cleaning the workplace.
6th grade
Theoretical information.
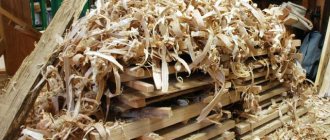
Wood harvesting, wood defects. Wood waste and its rational use. Professions related to the production of wood, wood-based materials and reforestation.
Properties of wood: physical (density, humidity), mechanical (hardness, strength, elasticity). Wood drying: natural, artificial.
General information about assembly drawings. Graphic representation of connections in drawings. Specification of product components. Rules for reading assembly drawings.
Technological map and its purpose. Using a personal computer (PC) to prepare graphic documentation.
Connecting wood blocks: overlay, using dowels.
Manufacturing of cylindrical and conical parts using hand tools. Product quality control.
Manufacturing of parts and products according to technical drawings, sketches, drawings and technological maps.
Finishing of parts and products by painting. Identifying defects in a part (product) and eliminating them.
Safety rules when working with hand carpentry tools.
Laboratory and practical work.
Recognition of natural wood defects in materials and workpieces.
Study of wood density.
Reading an assembly drawing. Determining the sequence of product assembly according to technological documentation.
Development of a technological map for the manufacture of wood parts.
Manufacturing a wood product with overlay joining of bars.
Manufacturing of parts with cylindrical and conical shapes.
Assembling the product according to technological documentation.
Painting wood products with paints and enamels.
7th grade
Theoretical information.
Design and technological documentation. Using a PC to prepare design and technological documentation.
Sharpening and tuning of wood-cutting tools.
Measurement accuracy and processing tolerances. Deviations and tolerances on part dimensions.
Joinery tenon joints. Technology of finger jointing of parts. Gouging out lugs and sockets.
Technology of connecting parts with dowels and screws into dowels. Rational techniques for working with hand tools when preparing parts and assembling products.
Manufacturing of parts and products of various geometric shapes according to technical drawings, sketches, drawings and technological maps.
Safety rules when working with hand carpentry tools.
Laboratory and practical work
Development of drawings of parts and products. Development of technological maps for the production of wood parts.
Setting up the plane. Finishing the blade of a plane knife.
Calculation of deviations and tolerances for the dimensions of parts.
Calculation of tenon joints of a wooden frame.
Manufacturing of wood products with tenon joints between bars. Familiarization with rational techniques for working with hand tools when sawing, chiseling and stripping tenons and eyes.
Connecting wood parts with dowels and screws into a dowel.
5th grade
Theoretical information.
Wood as a natural structural material, its structure, properties and applications. Lumber, their types, areas of application, types of wood materials, properties, areas of application.
The concepts of “product” and “part”. Graphic representation of parts and products. Graphic documentation: technical drawing, sketch, drawing. Lines and symbols. Rectangular projections on one, two and three planes (types of drawing).
Carpentry workbench, its structure. Hand tools and accessories for processing wood and wood materials.
Sequence of manufacturing wood parts. Technological process, technological map.
Marking wood blanks. Types of control, measuring and marking tools used in the manufacture of wood products.
Basic technological operations of manual wood processing: sawing, planing, drilling, cleaning parts and products; quality control. Devices for manual wood processing. Manufacturing of parts of various geometric shapes using hand tools.
Assembling parts of a wood product using nails, screws, self-tapping screws and glue. Finishing of parts and products by tinting and varnishing.
Safety rules when working with hand carpentry tools.
Laboratory and practical work
Recognition of wood and wood materials.
Reading the drawing. Making a sketch or technical drawing of a wood part.
Organization of a workplace for carpentry work.
Development of a sequence for manufacturing wood parts. Marking wood blanks; methods of using control, measuring and marking tools.
Familiarization with the types and rational methods of working with hand tools when sawing, planing, drilling, and cleaning parts and products. Protective and decorative finishing of products.
Manufacturing of parts and products according to technical drawings, sketches, drawings and technological maps. Connecting wood parts using nails, screws (screws), and glue. Identification of defects and parts and their elimination. Compliance with safe work rules when using hand tools, devices and equipment. Cleaning the workplace.
6th grade
Theoretical information.
Wood harvesting, wood defects. Wood waste and its rational use. Professions related to the production of wood, wood-based materials and reforestation.
Properties of wood: physical (density, humidity), mechanical (hardness, strength, elasticity). Wood drying: natural, artificial.
General information about assembly drawings. Graphic representation of connections in drawings. Specification of product components. Rules for reading assembly drawings.
Technological map and its purpose. Using a personal computer (PC) to prepare graphic documentation.
Connecting wood blocks: overlay, using dowels.
Manufacturing of cylindrical and conical parts using hand tools. Product quality control.
Manufacturing of parts and products according to technical drawings, sketches, drawings and technological maps.
Finishing of parts and products by painting. Identifying defects in a part (product) and eliminating them.
Safety rules when working with hand carpentry tools.
Laboratory and practical work.
Recognition of natural wood defects in materials and workpieces.
Study of wood density.
Reading an assembly drawing. Determining the sequence of product assembly according to technological documentation.
Development of a technological map for the manufacture of wood parts.
Manufacturing a wood product with overlay joining of bars.
Manufacturing of parts with cylindrical and conical shapes.
Assembling the product according to technological documentation.
Painting wood products with paints and enamels.
7th grade
Theoretical information.
Design and technological documentation. Using a PC to prepare design and technological documentation.
Sharpening and tuning of wood-cutting tools.
Measurement accuracy and processing tolerances. Deviations and tolerances on part dimensions.
Joinery tenon joints. Technology of finger jointing of parts. Gouging out lugs and sockets.
Technology of connecting parts with dowels and screws into dowels. Rational techniques for working with hand tools when preparing parts and assembling products.
Manufacturing of parts and products of various geometric shapes according to technical drawings, sketches, drawings and technological maps.
Safety rules when working with hand carpentry tools.
Laboratory and practical work
Development of drawings of parts and products. Development of technological maps for the production of wood parts.
Setting up the plane. Finishing the blade of a plane knife.
Calculation of deviations and tolerances for the dimensions of parts.
Calculation of tenon joints of a wooden frame.
Manufacturing of wood products with tenon joints between bars. Familiarization with rational techniques for working with hand tools when sawing, chiseling and stripping tenons and eyes.
Connecting wood parts with dowels and screws into a dowel.