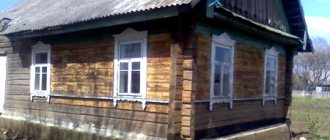
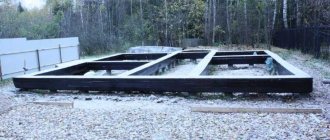
For every building, one of the most important elements is a strong and durable foundation at the base. And the foundation itself begins with its markings, on the basis of which excavation work is carried out. Let's figure out how to mark the foundation and the best way to draw a diagonal. You will learn about the features and all stages of marking, the correct execution of which greatly affects the quality and durability of your home.
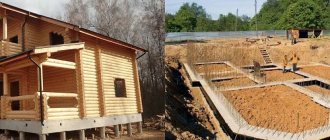
Finding points using the Pythagorean theorem - school formulas, without which you cannot lay out the foundation Source doma125.ru
How to mark the foundation for a house with your own hands.
Marking the foundation for a house is an important stage of construction, since the building box must have strict geometric dimensions in accordance with the project and evenly distribute the load on the underground foundation.
How to correctly mark a strip foundation.
Please note: before starting construction work, you must have the appropriate permit and documents indicating the minimum setbacks of the building area from the boundaries of your site.
Before you begin marking, you need to identify a building site and prepare it - clear it of debris, remove interfering bushes and trees, remove the fertile soil layer, and eliminate relatively minor unevenness. If the building site is located on an area with a large difference in elevation, the project must provide a foundation of a suitable type.
Having understood the principles of marking the foundation, the work can be done on your own, without the involvement of professionals. This will allow you to build your house, optimizing the budget for preparing the foundation. To mark a columnar, pile or strip foundation with your own hands, you will need an ordinary tape measure, pegs and a cord.
General rules
Without preparation and following the sequence of rules, it will not be possible to mark the site correctly. The following so-called reference point must be taken into account. The location of one of the corners of the foundation must be tied to any object located on the site. This is done to make it easier to correct yourself if you accidentally make a mistake. An example of such an object would be a fence.
Many people try to position the house so that it is parallel to the fence structure. To do this, equal segments are laid off from the fence at several points, perpendicular to the plane of the fence. You can use twine for this. After this, you need to build a right angle from the starting point. Now you can begin the remaining stages of marking.
Marking the base for a building with right angles.
Marking the foundation with your own hands is primarily relevant when building a house of a simple shape - with right angles. The principle used in this case is suitable for structures with a layout of any complexity, provided that all the corners in the rooms are right.
How to properly mark the foundation.
If there are no specialized tools available that allow you to mark a building spot on a designated area, strictly focusing on the cardinal directions, the easiest way is to determine the location of the future house relative to the existing boundaries of the site. Wherein:
- two nearby boundaries are selected;
- the optimal indentation from each of them is determined (taking into account the regulated minimum values);
- two pairs of pegs are driven in so that the cords stretched between each pair are located parallel to these two boundaries and at the intersection form a corner of the future house;
- then a second pair of cords is pulled between pegs installed relative to the first pair at distances corresponding to the length of the walls of the house;
- of the rectangle formed by the intersections of the cords, it is necessary to measure the sides (they must correspond to the design lengths of the walls) and check the diagonals (they must coincide), if necessary, adjustments are made.
How to properly mark the foundation.
If the boundaries of the site are not located at right angles, markings for the foundation are carried out relative to one selected side. The first cord is pulled parallel to it, the rest are pulled “by eye”, checking the sides and diagonals.
Since the foundation foundation is laid not only along the perimeter of the structure, but also under the load-bearing walls inside it, after marking the outer perimeter, the location of all other foundation elements should be determined. At the same time, the lengths of the sides and diagonals of all rooms are checked.
After marking the outer contour, it is necessary to pull the cords parallel to them with an indentation to the width of the foundation tape, the parameters of which are indicated in the project. The “double lines” system will allow you to mark a strip-type foundation or determine the location of elements of a pile or columnar foundation at all internal and external corners. In the second case, you will need to take measurements and additionally mark the locations of the supports along the length of the walls.
How to correctly mark a columnar foundation with your own hands.
Recommendations from experts
Thanks to the experience of professionals, the process of marking the site can be simplified and done using the following tips:
- the thread should be tightly stretched, without sagging or tearing out pegs; a damaged thread will not give the exact dimensions of the base;
- pegs can be made independently from remnants of reinforcement; they are perfectly installed in the soil and firmly fixed;
- always focus on the external boundaries of the land plot and the design of the house or extension;
- do not remove the threads until all work is completed;
- If possible, use professional equipment;
- If you are not confident in your abilities, seek help from professionals.
Checking and correcting errors.
If the marking of a rectangular strip foundation is carried out without errors, then the diagonals of rectangle ABCD will be equal to AD and BC (the permissible difference is 1 cm).
Usually the error is more than 1 cm, since correct marking for the foundation with your own hands is hampered by uneven soil, the presence of tall plants on the site through which the stretched cords pass, and measurement inaccuracies.
How to correct the marking of the foundation for a house with your own hands? Let's imagine that the diagonal BC of the resulting quadrilateral is 18 cm longer than the diagonal AD, that is, the quadrilateral is a parallelogram with an obtuse angle A and an acute angle B in the upper part. To correct the marked perimeter, you must:
- move angles B and A to the left by half the difference between the lengths of the diagonals (in our case - by 18/2 = 9 cm);
- re-measure all sides and diagonals;
- if the discrepancy between the diagonals is more than 1 cm, perform an operation to shift the corners to the left by half of the new difference;
- take all measurements again.
If the last shift to the left was too large, the corners are shifted to the right according to the same principle. As a result, the perimeter should be a rectangle with equal diagonals.
How to correctly mark the foundation for a house step by step.
From the author
In this article, we looked at how to make markings for the foundation with your own hands by building a rectangle with angles of 90⁰. In general, there is nothing complicated about the markup. The price of the issue is the cost of twine, boards for casting (an economical option is pegs) and the ability to use a tape measure.
Similar articles:
- DIY columnar foundation
- Columnar foundation made of plastic pipes (PVC)
- Columnar foundation made of asbestos-cement pipes
- Wooden column foundation
- Brick columnar foundation
- Video on marking the foundation
After all the preparatory work for building the foundation has been done, you can begin practice. Where does the construction of the foundation begin? If we are talking about a monolithic or strip foundation, then the first thing to do is to design the markings according to the plan. Thanks to the markings, you can quickly and correctly dig a trench for the base.
But the question arises, how to properly mark the foundation with your own hands? What will you need for the job? How to do everything right so that the foundation lasts a long time. We will learn the answers to these and other questions from this article. In addition, we will look at several methods for constructing markings.
How to mark a foundation of complex shape.
If a house with right angles has a complex shape, that is, its foundation in plan is not a rectangle, but a figure with protrusions, the marking task becomes more complicated, but you can still solve it on your own.
Marking the base of a complex-shaped house without bay windows will have to be done in several stages:
- a general contour is performed - marking a rectangle into which a complex-shaped foundation will be inscribed; for this, the cords must run along the outer contour of the protruding parts of the future building;
- the lengths of the sides and diagonals are checked and, if necessary, adjustments are made;
- then parallel cords are stretched inside the resulting perimeter, which will mark the boundaries of the protruding parts of the building, and the intersections of these lines will form the internal corners of the future foundation strip;
- the resulting complex figure consists of several rectangles; it is recommended to check the sides and diagonals of each of them.
Method No. 2 - two arcs
Also a simple option, without the use of high-tech tools. Marking the foundation involves using a simple rope. Drive one peg into the ground in advance. From it, measure two equal distances in a straight line and make notes there. You can just drive in the pegs. Next, you need to tie a rope to each of the outer pegs in turn. Let's start from one side. There should be a nail at the end of the rope. Now pull the rope tight and draw an arc opposite the peg in the middle. Do the same on the other side. You have an intersection of two arcs opposite the central peg. If you connect the point of intersection of the arcs with the central peg, a right angle of 90˚ is formed.
In the end, all that remains is to tie a rope to the pegs at the height of the future foundation, and check the horizontalness of all four sides using a building level. But one square is not enough for us. If we talk about a strip foundation, then you need to make an internal contour corresponding to the width of the strip.
Advice! If you plan to dig a trench not with shovels, but with the help of special equipment, then it is better to use sand rather than rope for marking. The fact is that the rope can be torn when digging with a bucket, and it is difficult to see. But the sand will clearly highlight the boundaries.
Thanks to these simple methods, you can achieve even markings without a laser level, etc.
Foundation for a house with a bay window.
It is somewhat more difficult to mark the foundation for a building with protruding parts that are not rectangular in shape. When building a house with a bay window, the marking is initially carried out according to the basic principles indicated above, and only at the last stage is the bay window itself marked.
Marking the foundation bay window.
- parallel to the wall with the future bay window, a cord is pulled with an indentation equal to the depth of the bay window;
- on the cord that marks the wall of the building, on both sides (or on one side, if the bay window is planned at the edge of the structure), a distance is set aside according to the design values to indicate the base of the bay window, and marks are placed;
- on a cord stretched parallel to the wall, the location of the outer wall of the bay window is marked;
- lines (additional cords) connecting the base marks and the marks of the outer wall of the bay window will complement the contour of the protruding structure;
- check the length of the indicated lines - they should match, if necessary, adjust the markings.
If the bay window in plan is a segment of a circle, it is necessary to transfer the wall markings to the ground (draw a projection on it from a stretched cord), mark the base points of the bay window. A straight line is drawn parallel to the resulting line where the farthest point of the semicircular bay window will be located, equidistant from the base marks.
To draw the part of the circle that will pass through the three indicated marks, use a compass, two pegs and a cord. It is important to correctly determine the center of the circle.
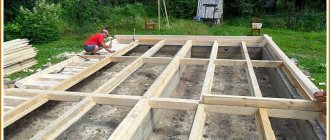
Cast-off device
A cast-off fence is a wooden fence that is installed at the site of future construction. The cord is attached to it when broken using nails. And on it are marked marks that determine the position of the axes. The classic cast-off fence is a fence made of a row of pegs that stand 60-70 cm apart along the entire perimeter of a leveled area. An edged board is nailed to them on top. The pegs are also tied together with a board at the bottom.
The cast-off may not be complete. For example, if your future house has only four axes, then you can put cast-offs only in the corners. At the same time, the thickness of the walls of the future house must be guaranteed to fall into disrepair. In principle, the cast-off is placed perpendicular to each axis and must grasp it in both directions at a distance of at least a meter, that is, a piece of cast-off made of three pegs is placed. In this case, it is necessary to take into account the distance to the trench - if it is an angle, extend it approximately beyond the edge of the trench by a meter, so that during excavation work it does not slide into the trench along with the ground.
It is advisable to install cast-off pegs at a regular building level or plumb line. The top cast-off board is attached from the outside from the middle of the construction to the pegs on the side, using self-tapping screws and a screwdriver. The top board should be installed at the same level along the entire perimeter.
If the cast-off is solid, make passages in it where possible. You will need to remove the earth and transport concrete in a wheelbarrow to the construction site, and perform other work - it will be inconvenient to step over cast-offs.
How to make markings based on the “Egyptian triangle” principle.
Egyptian is a triangle with sides of 3,4 and 5 units. A triangle with this aspect ratio is rectangular.
How to correctly mark the diagonal of the foundation.
Taking straight and rigid wooden or metal slats, you can assemble a right triangle with sides of 3.4 and 5 meters. It is used to mark the location of the external and internal walls of the house with right angles.
However, it is difficult to use such a large structure, and if you make the tool much smaller in size, the error in the results will increase and you will have to adjust the markings after checking the diagonals.
List of tools
Marking the foundation of a bathhouse or house is quite simple if you prepare the following tools in advance:
- rope, fishing line or cord - the main element limiting the work space;
- measuring device - an ordinary tape measure;
- To place the corners on the ground, you will need wooden or metal pegs. Some builders recommend using the so-called. “benches” - 2 pegs knocked together with a board. The cord moves well over such cast-offs, which facilitates the adjustment process.
A simple set of devices is all that is required to ensure that the markings for the foundation of a private house or bathhouse are done correctly.
Marking by stages
Useful tips.
The following tips will help you mark out the foundation for your house with your own hands:
- before starting marking, check whether the setbacks from the red line and the boundaries of the site prescribed in the development permits are observed;
- To ensure that the lines of the cords run as accurately as possible, it is recommended to use pegs of small diameter - cuttings of reinforcing bars with a diameter of 10-12 mm are ideal, they easily enter the ground and hold firmly in it;
- the cord needs to be tightened so that it does not deviate due to tall grass getting in the way, etc.;
- you should not remove the cords until the trench has been dug, so as not to lose the accuracy of the markings;
- at the stage of installing the formwork and after pouring concrete, or when erecting supports for the grillage, check the diagonals so that the constructed house has right angles and stands firmly on the foundation.
A foundation made by yourself will evenly distribute the load on the ground, provided that the markings are correct and the installation technology is followed.
Material used
The material used to construct the formwork structure directly affects compliance with the above requirements. Let's look at the main advantages and disadvantages of popular foundation materials.
Wood
Usually they use boards or sheet laminated plywood, fiberboard, chipboard with a thickness of at least 5 cm.
Advantages of wood:
- low cost;
- availability;
- ease of installation.
The disadvantages include the fact that the wood form is not rigid enough, so in some cases combined materials are used to give greater strength.
Metal
In such cases, steel sheets 1–2 cm thick are usually used.
Advantages:
- ease of installation and processing;
- good rigidity;
- possibility of welding reinforcement directly into the structure.
But formwork for a metal strip foundation is highly expensive.
Reinforced concrete
Installation of formwork for strip foundations is made from ready-made reinforced concrete slabs. They provide good strength not only to the formwork, but also to the foundation itself. The disadvantages include:
- the use of special equipment (this is due to the large weight of the slabs);
- high cost, even if you purchase already used products.
Expanded polystyrene
There are ready-made prefabricated elements made of polystyrene foam, and ordinary blocks are also used. This variation of the foundation structure has undeniable advantages:
- ease of installation;
- easy workability;
- additional insulation of the finished foundation.
But there are also disadvantages:
- high price;
- difficult to select rounded corners;
- rapid destruction under the influence of precipitation without additional treatment.
Fibrolite
Fiberboard slabs with a thickness of at least 5 cm are very popular in the construction of formwork for foundations. They are used when installing a permanent structure. Fibrolite is a fairly ergonomic material with a number of advantages:
- chemical resistance;
- ease of installation;
- high heat and sound insulation.
The only negative quality that can be highlighted is the significant cost of such products.
Recycled raw materials
You can use anything to form the foundation: slate, old doors, corrugated sheets, etc.
Advantages:
- cheap price;
- a good option for constructing a foundation for a small building, for example, a barn or outbuilding. the buildings.
Flaws:
- certain difficulties during assembly and installation;
- use of reinforcing elements;
- low load-bearing capacity;
- high probability of depressurization.
Having familiarized yourself with the characteristics of the materials, you can make a simple conclusion that for the construction of a residential building, it is most advisable to use formwork for a strip foundation made of wood
Beginners should especially pay attention to this material, since wood processing is accessible even to an inexperienced craftsman.
Marking the foundation with your own hands.
How to properly mark the foundation for a garage.
In order to make a right angle between segments A and B, you need to add the squares of their lengths and calculate the root of their sum. The resulting number will be the length of the diagonal connecting these two segments. This can be easily calculated using a calculator.
As a rule, to mark the foundation, take such a length of sides that when calculating the root, an integer is obtained. For example: 3 x 4 x 5; 6 x 8x 10.
Now let's try to do this practically.
First option: Golden triangle rule.
For example, let's look at how to mark a rectangular foundation with dimensions of 6 x 8 m.
- When marking the first side of the foundation, you need to remember that if you want, for example, the foundation to be parallel to any side of the fence, then its first line should be made equidistant from the selected side. For the purpose of placing the first twine, you can use a castaway. Make the distance between the cast-offs for this side 14 m (add 3 m between the cast-offs and future corners). The first cord was pulled.
- Now you need to pull the second cord perpendicular to this. To do this, we fasten them with tape or a staple at the point of their intersection.
- We begin to form a right angle using the Pythagorean theorem. To do this, we will construct a right triangle with legs 3 m and 4 m and a hypotenuse of 5 meters. To do this, we measure 4 m from the place of their intersection on the first string, and 3 m on the second. We put marks in these places in any way. We connect the marks and measure the resulting hypotenuse with a tape measure.
- If the triangle is truly rectangular, then the marks will converge at a distance of 5 m.
- Next we will complete the rectangle. Let's mark the lengths of the sides of the future foundation as 6 m and 8 m on the cords, and put notes.
- Now you need to try to pull the third cord perpendicular to the first and fasten them at the 8 m mark.
- We will also pull the fourth cord perpendicular to the second. Let's fasten them at the 6 m mark.
- Let's make marks on the third cord 6 m and on the fourth cord 8 m.
- To obtain a rectangle, the marks on the third and fourth cords must match. To do this, we will move them until they match.
- We check our rectangle by measuring its diagonals. If they are equal, then we have the desired rectangle.
Second option. Web.
- First you need to cut pieces of twine along the length of the sides of the foundation. Let me remind you that we decided to mark the foundation with sides of 6 m by 8 m. We also need two diagonals, which in our case are equal to 10 m. Leave a margin of length on the strings to secure them.
- Connect your “web” by fastening the sides and diagonals at the corners. It is not necessary to fasten the diagonals at the intersection point.
- Pull the first string and create the first and second corner. Secure it with pegs.
- We stretch the diagonal twine to the third corner. Try to ensure that the strings do not sag and are as tight as possible. We fix the third corner with a peg, and the first corner becomes right
- By analogy, we pull the fourth corner and fix it with a peg.
Methods of marking for various foundations
For strip foundation
When marking for a strip foundation, it is necessary to make a reserve of about 1 m from the length of the walls. Since laying the foundation involves digging a pit, and when installing stakes according to exact dimensions, they will fall during digging.
How to mark the foundation.
For pile and columnar foundations.
When marking this foundation, the above length reserve is not needed, and its installation is much more difficult.
The marking is done using a two-tier cast-off, where the lower tier is the level of the pillars, and the upper tier is the level of the grillage.
How to correctly mark a columnar foundation with your own hands.
For slab foundation.
This is done in the simplest way - we build a rectangle according to the size of the foundation according to the above theorem
In general, there is nothing difficult about marking a slab foundation with your own hands. The price of the issue is the cost of the cord, the cutting board, or the pegs.
Installation of cast-offs
This part of the work should be placed in a separate section, since cast-offs are installed depending on the type of foundation. They are necessary to ensure that the markings are not disturbed when preparing the pit. Cast-offs are pegs with parts of a board about 60-80 centimeters long nailed to them. Nails are driven into their ends so that the string can be secured for marking.
From the corners, cast-offs are dug in at a distance of half a meter. The ropes are stretched so that their intersections are exactly at the corners. All lines laid by cords must intersect each other at an angle of 90 degrees.
A strip foundation requires the installation of additional cast-offs, with the help of which it will be possible to lay out the internal boundaries. They are parallel to the main ones, and the distance between the perimeter lines and the additional ones is equal to the thickness of the future walls. If the foundation is columnar, then using ropes and cast-offs it is necessary to mark squares for future piles. The intersection points of the cords should indicate the locations of future supports.
https://youtube.com/watch?v=66CDCNNuep8
Technology for marking the area for the foundation.
How to properly mark under the foundation.
Any house must have a reliable and stable foundation. When building a country house, you need to know how to mark the foundation, because the service life of the building and the level of comfort when living in it depend on the quality of the support.
Markings for the house will allow you to navigate the exact location of the object on the site. There should be no mistakes in this work. This affects the stability and strength of the foundation. The marking process involves the distribution of all values from the drawn up plan to the site . That is, division is carried out on the ground taking into account the shape of the house and its size.
Basic calculation parameters
When creating a drawing of the foundation of a house, it is necessary to use the results of calculations made when designing the foundations. In particular, it is necessary to take into account:
- total weight of the house under construction;
- an increase in the load on the house during its operation, for example, the construction of a second floor;
- groundwater level;
- type of soil on the land plot.
These data take into account not only the geometric dimensions of the foundation, but the materials that will be used in its construction (grade of concrete, size of reinforcement, etc.). In addition, the designer will determine the type of hydraulic and thermal insulation. When building a foundation on land with high groundwater, it is necessary to design a drainage system that will drain excess water from the foundation structure, thereby extending its service life.
Ideally, the design of foundations for buildings and structures should be carried out by a company that has experience in such foundation design work. When designing building foundations yourself, it is advisable to use current guidelines and instructions for foundation design.
Preparation for marking the foundation.
How to properly mark the foundation for a bathhouse.
Before marking the foundation with your own hands, a draft of the future building is drawn up . At the same time, the area of the object, the appearance of the building and the layout of individual rooms are determined. The project is tied to the site where construction will take place. First, soil research is carried out, and then the foundation is marked.
To carry out marking you will need the following tools:
- Pegs made of metal or wood.
- Construction levels.
Tape measure for marking the foundation.
- Roulette and plumb line.
- Level and laser range finder.
- Cord.
- Boards and scraps of reinforcement.
Before making markings for the foundation, it is necessary to carry out preparatory work:
- Old buildings are being dismantled . Garbage and excess plantings are removed from the site.
How to properly mark the foundation.
- The platform is leveled in the horizontal plane . all depressions and hills are eliminated.
- A passage is being prepared for vehicles that will transport construction materials and remove unnecessary waste. After cleaning the road, it is recommended to sprinkle it with gravel for easy passage during rain.
- Separately, a place is prepared for storing various materials.
- Before construction work, it is worth erecting a fence to protect the building materials.
- Consider the supply of electricity . water, installation of a bathroom, as well as temporary housing.
After this, the foundation for the house is marked. The installation technology assumes the presence of rectangular shapes. General rules and regulations for marking are suitable for all types of bases; they are not affected by the material of manufacture or the presence of a basement.
How to properly mark the foundation.
Marking begins on any side of the building . This may be the facade or side of the building. When using a tape measure, you should give preference to metal products that have a length of more than 10 m. Fabric models do not guarantee the accuracy of measurements and sag during measurements.
To carry out the casting, it is recommended to use bars (at least 10 pieces), stakes (about 19 pieces), as well as cords, boards and ropes. Sometimes pieces of reinforcement are used that are driven into the ground. They should be U-shaped.
How to properly mark the foundation.
The site is selected taking into account the following factors:
- The prospect of all communications.
- Condition of the roads.
- Geographic reference to cardinal directions .
The most important purpose of the marking is to ensure the correct orientation of the future structure relative to the terrain. This will allow the building to be built taking into account standard technological rules.
We achieve results
In order to obtain a completed foundation, the work must be carried out in strict sequence:
The starting point is determined, for which a mark is applied in one of the foundation corners, the purpose of which is to indicate the surface level. Subsequently, using a hydraulic level, the remaining points are located at the remaining corners. In the absence of a hydraulic level, in order to determine points, it is possible to use a hose that has the property of bending. It stretches from corner to corner, after which it is filled with water.
It is important to ensure that there are no air bubbles inside the hose. One end of the hose is brought to the marked point, and the location of the other is changed until the water reaches the edge level
After this, the hose is fixed and a mark is made on the formwork structure, which is the second starting point. Marks in the remaining corners are found and marked in the same way. The formwork is sawn vertically. The cuts are made in the amount of a couple of pieces in each corner and are located in the center of the foundation walls, and their direction should be made downwards until the fill is reached. The taken cord is pulled through the sawn places. This is how the fundamental zero is designated. The pre-prepared solution is poured to a height marked by cords pulled through the sawn holes.
All inaccuracies and small deviations when pouring the foundation are leveled out when laying the base
Stages of taking measurements.
Correct marking for the foundation consists of several stages. First of all, the main point is determined . which is the right corner of the building. It is installed taking into account the design specifications. The first peg is mounted at this point.
Start of marking.
How to properly mark the foundation.
A distance is set aside from the peg that is equal to the size of the foundation. The drawn segment must be parallel to the front line . A perpendicular guide is measured inside. In this case, the resulting angle should be 90 degrees. The angle is verified with a level.
The designation of external boundaries is carried out as follows:
Lace for marking the foundation.
- From the beginning of the cord, marks are made at 4 m, and then at 3 m. The mark is fixed with a beam.
- The beginning of the cord is attached to one line, and the 4 m mark is set perpendicular to it.
- The rest of the cord is connected to the beginning. In this case, the angle between the smallest parts of the rope is straight.
Other elements are marked in the same way . If the diagonals of the resulting rectangle are the same, then the angles are right.
Internal boundaries.
How to properly mark the foundation for a house.
When deciding how to mark the foundation on your own, you should pay attention to correct measurements of the internal contour . The thickness of the foundation should not be less than 45-50 cm. This distance is measured inward from the outer boundaries and is marked with pegs. If internal load-bearing walls are planned, then additional markings are also performed. In each element of a rectangular or square shape, the equality of the diagonal lines is checked.
When it is planned to construct a complex base shape, the entire area is divided into separate rectangles and each element is checked separately.
How to properly mark the foundation with your own hands.
After marking is completed, all values are checked again and pegs are installed in the right places. This work must be carried out responsibly, and measurements must be carefully verified. Even a small error in calculations will affect the quality of the support . Proper marking of corners helps to further minimize pressure on the ground.
Performing cast-offs.
How to properly mark the foundation for a house.
After marking work is completed, wear-out is carried out. This stage of the process is considered necessary for control measurements. All contours of the future structure are brought to the surface of the earth . The top layer is removed and a recess is made to the size of a shovel bayonet.
Casting is the installation of wooden posts, which are driven in pairs into the soil at a distance of 1.5-2 meters from the corner of the base. Casting allows you to create the correct contour of vertical planes . In this case, the planes have a pair of columns. The horizontal parts of the pillars must be located at the same level.
The height of the cast-off is equal to the height of the base of the building. Marking the depth of the trench is done from cast-offs. In this case, the perimeter, regardless of the nature of the relief, must be the same.
Beginning of work
As a general method, marking the strip foundation can be cited. Removal of tape or individual supports (pillars, piles) to the area. The difference is insignificant. The easiest way is to mark the ground for a slab foundation. Here it is enough to indicate the corners and sides of the slab.
Scheme of step-by-step foundation contour marking
They begin preparing the site for construction by finding the first point. It can serve as any corner of the house. For strip and other types of foundations, you will need to find the outer side of the corner. When making drawings or sketches, it is recommended to link the object under construction to existing ones or to the boundaries of the site.
Having determined the first point, you need to construct a right angle. The easiest way to do this is using the “Egyptian Triangle” method. First you need to mark a corner with a short side length using a construction square. Next, a value divisible by 3 is set aside in one direction (it is convenient to set aside 3 or 6 meters, such a large length will reduce the measurement error), and in the other direction, divisible by 4 (if in the previous case 3 meters were set aside, then the side length should be taken as 4 meters, and if 6 meters, then – 8).
Then check that the angle corresponds to 90 degrees. To do this, you need to measure the distance between the ends of the postponed segments along the shortest path. If segments of 3 and 4 meters were used, then the length of the diagonal should be 5 meters. If the segments were 6 and 8 meters, then the diagonal, if the angle is even, will be 10 meters. If the values do not match, it is necessary to align the angle until it meets the condition.
To perform the work correctly, it is also necessary to clearly understand the design of the markings.
The internal boundaries of the outer tape and the internal walls are marked with a cord, which is nailed to the cast-off. External castings made of wood can be made either continuous or with breaks.
After finding the first corner, work on marking a strip foundation of a simple rectangular section is carried out in the following order:
The process of applying markings under the base
- Finding the second and third points by plotting the lengths of the walls. Constructing 90ᵒ angles from these points and checking them. At every point, milestones are forgotten.
- Finding the last fourth point and completing the building outline. Checking the angle.
- Checking diagonals. They must correspond to the drawing. If the house, as in the case under consideration, is rectangular in plan, the diagonals should be equal. The same rule applies to a square.
- Driving pegs around the outer perimeter, pulling the cord.
- Nailing horizontal slats to pegs. This should be done approximately at the middle of the height of the vertical post or along its upper edge.
- Next, mark the internal contour. To do this, step back from the outside by the width of the foundation and also mark it using pegs and a cord (slat).
- Checking internal angles and diagonals.
- Marking internal walls and checking the angles of their connection with external ones.
After marking is completed, the top layer of fertile soil is removed from the area under the house and a trench is dug. When installing a strip foundation for a building with a basement, instead of a trench, it is necessary to make a foundation pit. In this case, the construction of the internal part of the marking is not required before the start of soil development. The cord for marking the internal boundary is pulled out after excavation work, attaching it to the external slats at the required distance.
Exactly finding points using the Pythagorean theorem
Marking the foundation with your own hands does not require complex equipment. But if a fairly large construction project is planned, a level (laser level) will be required to reduce labor costs. With its help, all necessary geometric measurements, including checking angles, can be carried out in the shortest possible time. For private housing construction, the simplest devices are sufficient.
To ensure that strip foundation demolition does not interfere with excavation work, it would be correct to perform it with an indentation of 50 cm outward from the design values.
For free-standing foundations, as well as for strip foundations, the external casting is first performed, and then a cord is pulled to indicate the supports.
If the marking work is carried out correctly, during the construction of the building there will be no significant deviations from the design values (provided that the technology for installing the walls and their evenness are followed). Casting and marking for the foundation will allow you to build a house without additional measures to adjust the elements of the house to the existing dimensions.
Source
Using a level.
Level for marking the foundation.
The laser level is a level for making markings . The internal bubble level allows you to check whether the level is level. Modern models have automatic mechanisms that adjust the position level. When deciding how to mark the foundation on your own, you can use this device.
The following actions are performed:
- From the mark of the corner of the building, using a level, a line is calculated and drawn, which should coincide with one of the walls of the future building.
- All measurements are taken from the same starting point. This will improve the accuracy of the measurements taken.
- The zero mark is made on any visible element.
Level for marking the foundation.
Project documents
Before starting marking work, you must settle the issue with the design documents in order to:
- there were no difficulties during the construction of the walls;
- construction materials were cheaper;
- do not encounter not very pleasant surprises.
When drawing up documentation and a house project, not only the texture of materials for construction is important, but also compliance with the parameters. If there is the slightest inaccuracy when marking the foundation, the likelihood of erecting a structure different from the design increases.
Preliminary activities:
- To begin, determine the planned location for the structure, if possible on a level area.
- Decide on the type of foundation and its dimensions. The choice depends on the climatic conditions and the massiveness of the future home.
How to mark corners?
Next, proceed to marking the first wall. To do this, you will need twine or cord, pegs, a tape measure and, ideally, a laser level (you can do without it).
There are several ways to construct a right angle. We will look at two main ones.
Features of strip foundation markings.
How to properly mark the foundation.
Creating a strip foundation with your own hands begins with the correct markings. Such a base is made of continuous reinforced concrete strips . which are placed in the trench. The width of the support depends on the quality of the soil. The foundation should not be thinner than the walls. Its thickness should be more than 50 cm if the building will be erected from bricks or blocks.
The depth of foundation depends on the level of soil freezing . Such structures are erected on solid soils and are easy to install, and also allow you to equip the ground floor and basement.
How to properly mark the foundation.
When marking, it should be taken into account that the building from the fence and neighboring territory should be located at the following distances:
- According to fire safety rules, the distance from windows to the walls of another building must be at least 6 meters. At least 3 meters from the building to the neighboring property.
- According to sanitary standards, at least 3 meters.
Marking for a strip foundation is carried out according to the general rules for marking a site for construction. The same is true for cast-off.
How to properly mark the foundation.
On the upper part of the cast-off, nails are driven in for marks :
- In the central part there is a mark for the axis of the foundation walls.
- To the left and right of the axial line there is a mark for the width of the base;
- Next, the width of the pillow under the base is indicated.
How to mark a columnar foundation?
How to correctly mark a columnar foundation with your own hands.
A columnar foundation is a simpler version of a pile foundation. Under the columnar foundation, rectangular or round supports are mounted in a vertical position along the axes of the building . They must be installed in the most loaded areas of the building: in future corners of the building, as well as at the intersection of load-bearing structures.
In most cases, the pillars are placed at intervals of 1.5-2 meters. The supports are connected using beams. The space between them is filled with crushed stone and sand.
Pegs for marking the foundation.
Marking such a foundation requires the construction of cast-offs. The size of the elements depends on the height of the future base . The casting is done using boards. Each pair should be located opposite each other. Each of them is limited by a cord. This produces a rectangle or square. All angles must be right.
The pillars must be placed at the same level. Control ropes are made according to marks made using a hydraulic level. At the intersections of the cord, pegs are mounted, which indicate places for drilling recesses for supports.
How to properly mark the foundation.
Then the cords are removed. Recesses are dug at the peg locations. Piles are installed in the recesses and filled with cement mortar. After this, the main part of the foundation is marked. It is carried out in accordance with the general rules for marking work.
What is breakdown
Before starting to build a house or even go for materials, it is necessary to determine the type of future construction and develop an action plan. It includes a detailed layout of the building on the site, foundation features and all dimensions. After this, you can begin to lay out the foundation of the house. It’s worth mentioning right away that this work is quite specific, and if you are not confident in your capabilities, the best solution would be to seek help from surveyors. This is especially true for uneven areas with strong differences in height and slopes located near ponds or ravines. Otherwise, problems may arise in the future involving significant shrinkage of the foundation of the house. The price of laying out the foundation axes depends on the complexity and volume of work.
The breakdown consists of transferring the overall axes of the future building, as well as marking the lines of its foundation directly on the ground. Such work precedes the digging of a trench or pit to fill the foundation. The dimensional axis is a conditional guide that marks the center or boundaries of the placement of structural floors and functional elements (formwork). The guides must correspond to the dimensions of all load-bearing elements and the foundation as a whole.
To lay out the foundation with your own hands, you will need the following materials:
- hammer;
- bright paint (red);
- bright colored rags (red);
- boards;
- wooden pegs or metal bars (you can use pieces of reinforcement) with a length of 100 cm or more;
- twine or wire;
- roulette;
- nails.
To properly lay out the foundation, it is necessary to constantly check all the corners of the casting - they must be perfectly level. Otherwise, the walls will stand at an angle, and there can be no question of any strength of the structure.
If you are making a floor with standard elements, it is important to accurately transfer all the dimensions of the axes to the base. Don’t be lazy to take all measurements and check the results 2-3 times
In this case, the saying that recommends measuring 7 times is very useful.