Articles
All photos from the article
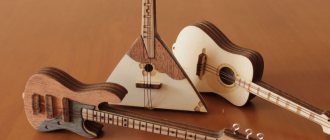
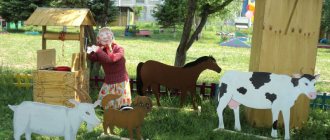
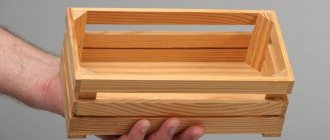
Making toys with your own hands is an entertaining and fun process, especially if you make these toys for children or as decorations, for example, for a New Year tree. You can use various materials, especially when constructing movable models, but plywood is considered the easiest to work with.
It has the necessary strength and is not heavy. This material makes a lot of useful and fun homemade products for children from a very early age. Today we are making toys!
Photo of the implementation of the dollhouse idea.
Doll furniture made of plywood is a fun activity for parents and joy for the baby
Any child should always have a lot of toys. Toys give him the opportunity to create his own world, in which he himself determines the rules. For a boy, these are soldiers, cars and children's weapons, but for any girl, regardless of age, dolls are always the main toy. But to create an exact copy of the world that the child involuntarily reproduces, all the required elements must be present. Playing with dolls is impossible without furniture. The most popular is still plywood doll furniture, which you can buy or make yourself.
Assorted plywood doll furniture
Types of doll furniture
Toy furniture belongs to a special category of children's toys. Reduced in proportions, it accurately reproduces interior items used by both adults and children. Doll furniture has its own distinctive features:
- Similarity to the original. The children's version of furniture should almost completely copy real objects. It is very difficult to deceive a child. Children want toy replicas to be exactly like the regular furniture they themselves use with their parents at home or in kindergarten.
Photo of finished furniture from the book
- Careful manufacturing. Production often involves only manual assembly. Small parts from which furniture is assembled for children must be carefully processed, do not contain sharp edges and are always subject to strict control during acceptance of the finished product.
- Safety. Doll furniture always remains, first and foremost, a toy that a child can put in his mouth or leave with him in bed all night. Therefore, only materials and processing agents that are harmless to health should be used for production.
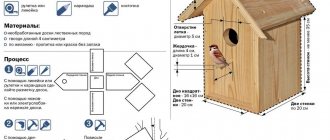
Photo of a template for making furniture from plywood
Plywood has been used for the production of furniture for dolls for quite a long time. This was due to several reasons:
- Strength of the material. Products can serve more than one generation without losing their original properties.
- Ease of processing. A hand jigsaw is enough to give the desired shape.
- Harmlessness. Certain brands are absolutely harmless to humans.
Another indisputable advantage of using plywood is the ability to independently make any items at home.
Photo of finished doll chairs
Making furniture yourself
Everything you can do for a child or with him can confidently be called the best moments of any person’s life. In most cases, furniture for a doll can be purchased. The range of stores for children offers a wide range of different materials. But do-it-yourself doll furniture made from plywood for a child will be the best childhood memory for parents and baby.
Photo of finished toy stools
When starting work, you should decide on the list of elements that need to be manufactured. The easiest way to do this is with a child. Usually girls always know exactly what they need to make their favorite dolls happy. Agree on the list, sizes and quantities of required items. After this, you need to prepare a drawing.
Preparation of the drawing
Making doll furniture from plywood, the drawings of which are to be made, is different from making the usual production process, but the principle remains the same. Furniture is assembled from pre-prepared elements using different fasteners.
Photo of a drawing of a chair back
To prepare the drawing you can use:
- Ready template. Plywood furniture for dolls has been made for several decades since the times of the Soviet Union. In books or on the Internet you can find ready-made templates for doll furniture made of plywood. As an example, below is a photograph of finished furniture and templates for its manufacture.
Important! A distinctive feature of all ready-made templates are the provided fasteners, which allow you to connect the parts together.
- Hand made drawing. Do-it-yourself plywood doll furniture, drawings of which must be made, will take into account the personal wishes of the child and parent.
Even without minimal practical experience, it will not take much time. To visualize what this looks like, below are several examples of preparing a drawing for toy chairs and stools.
Photo of chair seat drawing
A template for making stool legs is also provided.
Manufacturing and assembly
The technological stages of assembly are simple and will not cause difficulties:
- Preparing parts. After preparing the drawing and template, the process of preparing the details of future furniture begins. To do this, you need to take plywood with a thickness of no more than 6 mm. Typically, a four-millimeter plate is used for the frame, and a six-millimeter plate for auxiliary parts.
For cutting, it is better to use a manual jigsaw, which even a woman can operate. The finished parts are first tried on, after which they must be cleaned with sandpaper.
Photo of a template for stool legs
Important! It is better to carry out cleaning by machine, for example, using special attachments on a screwdriver. This improves quality and speeds up the process.
Preparation of individual furniture elements
- Assembly. Finished parts are assembled using self-tapping screws, glue or connections provided in the parts, usually tongue-and-groove. The assembled furniture must dry.
The cracks or technological holes in the finished product are sealed. To do this, you can use acrylic putty, which after drying is almost invisible and completely harmless.
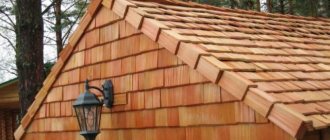
Finished plywood stool.
- Finishing doll furniture made of plywood. Depending on the mood or wishes of the child, the furniture can be coated with any acrylic paint. Often furniture is completely covered with white paint as a base, which is then painted in different colors or a design is applied.
An example of finishing plywood furniture
The result obtained, no matter how it turns out, will bring joy to all participants in the process. If over time, toy tables, chairs or cabinets seem not so beautiful, you can add variety by making soft pillows, or upholstering the furniture with fabric. You can simply make covers of different colors and change them periodically. In any case, everyone will be happy.
profanera.ru
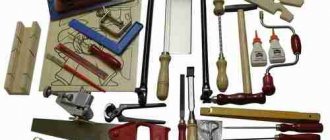
Tools and materials
So, if you decide to make toys, doll furniture or other crafts from plywood for kindergarten, then you should start by selecting tools.
We will need:
Photo of a jigsaw for artistic cutting
- wood saw or jigsaw for rough cutting;
- jigsaw (manual or electric) for finishing cutting;
- drill with a set of drills of different diameters;
- sandpaper;
- wood files (several pieces of different shapes).
The principle of using a sawing stand
In addition, a workbench with a special stand for cutting would not be amiss: its presence, of course, is not mandatory, but working with it is much more convenient.
Note! Brushes and other tools may also be needed for finishing, but we will mention them in the appropriate section.
Next are the materials:
- plywood - best of all, birch, smooth and durable, without large defects, chips and separation of veneer layers (i.e. sheets of the first - second grade). Do-it-yourself children's toys from plywood are usually made using fairly thick blanks, so we purchase parts from 5 to 10 mm;
For work we use sheets of plywood of different thicknesses
Advice! Laminated (melamine) plywood should only be purchased if you plan to make children's furniture. The price of this material is higher than that of standard glued sheets, and its strength and moisture resistance will be excessive in most cases.
- wood glue - PVA is good because it is non-toxic and has good adhesion. Polyurethane adhesives with good fixation can be used;
- varnish for external treatment - glossy, matte or semi-matte water-based composition. It is best to choose products with minimal toxin content, since sooner or later the toy will end up in the child’s mouth;
- materials for decoration - paints, stickers, etc. Here the choice directly depends on your imagination.
Plywood drawings for artistic cutting with a jigsaw
Plywood is a very accessible, relatively inexpensive material for various crafts. Things made from it can have not only decorative value, but also be useful in our everyday life.
Plywood is an easily processed building material, which is produced by gluing together several layers of veneer and specially treated wood chips.
Photo: Having drawings of animals made of plywood, you can use a jigsaw to create a special atmosphere in your home, including a cheerful one, for example, this cat made of thin plywood makes you smile. Is not it!
Introduction
These sheets, which can be used for making crafts and structures, may differ:
- number of layers of veneer - three-layer, five-layer and multi-layer;
- the type of wood from which the multilayer sheet is made (deciduous or coniferous);
- according to the degree of processing of the surfaces of the plywood sheet (sanded on one or both sides, not sanded).
Building codes and standards
To learn more about the building material in question (about the classification of the entire plywood nomenclature, grades, standard sizes produced), which can be purchased for the manufacture of many products and crafts, it is recommended that you familiarize yourself with the following documents:
- GOST 3916.1-96 “General purpose plywood with outer layers of hardwood veneer.”
- GOST 3916.2-96 “General purpose plywood with outer layers of softwood veneer.”
Schemes, drawings and patterns for products made from plywood sheets
A pattern of a cat, according to which, using drawing programs, you can easily make a plywood blank of any size with your own hands for further processing (for example, cover it with polyurethane foam and paint it black).
Computer drawing programs
Today you can easily find a diagram, a pattern for a plywood structure, so that you can then prepare any drawing using computer-aided design systems (including the above cat pattern). Next, use a plotter to print it onto a paper sheet of the required format.
Popular drawing programs are the easiest to learn and can be used in 2D and 3D modeling, including for plywood structures:
- "KOMPAS" is a complex of automated systems with the ability to prepare drawings in accordance with the standards of the ESKDI and SPDS series;
- AutoCAD is a two- and three-dimensional computer-aided design and drawing system.
So, if you cannot find a detailed drawing of the plywood product you need, then the application capabilities of the given software will help you make a full-fledged drawing using any diagrams and patterns posted on the Internet.
Kayak
The price of the construction plywood from which the kayak is made is simply incommensurate with the pleasure that the person who made it with his own hands and who loves rowing boats will receive.
Appearance of a single-seater boat, drawings of which are given below in the article
The Eskimo kayak is the same kayak among the Aleuts - a traditional rowing boat of the Arctic peoples. This boat can be single, double or triple. Let's post drawings of a plywood kayak for one person.
For this kayak, plywood sheets were purchased - 1525 x 1525 (mm), thickness 4 (mm).
The algorithm for building a rowing boat from plywood sheets is, in principle, general, with the exception of some nuances. A step-by-step procedure for cutting, processing and assembling a kayak can be seen in the video in this article.
Plywood table - simple and functional
Plywood table: 1 – cover; 2 – inner wall; 3 – side (end) walls.
Clear drawings of a plywood table with your own hands, which will be easy to implement even for a person without special carpentry skills and experience.
Table cover (1 sheet) - 1300 x 600 x 16 (mm)
Inner wall (1 sheet) - 1170 x 400 x 16 (mm)
End wall (2 sheets) – 450 x 740 x 16 (mm)
Plywood constructor
Various plywood construction kit drawings are now gaining more and more popularity. Assembling such models from safe material is a very useful activity for children and teenagers. Such crafts will become good examples of collections and will decorate the modellers' corner.
Tank
The photo shows drawings of a plywood tank: top of the hull
Tank bottom
Tower details
Other tank elements
The stages of work on installing a tank model are as follows:
- The plywood is sanded (first with medium-grain sandpaper and then with fine-grain sandpaper);
- The drawings are carefully transferred through carbon paper onto sheet plywood material sanded with fine-grained abrasive.
- In the corners of the contour transfer, through holes are drilled with a drill (drill 3 mm or more);
- Attach the file to the jigsaw and start cutting out the elements of the tank;
Sawing can be done even by a child
Note! Cutting out parts must begin inside the contours of the tank blanks, and only then around the office itself.
- After cutting out all the parts, sand them again with sandpaper, removing the burrs left from the file;
We polish every detail - Start assembling the parts.
Advice! When assembling the model's plywood assemblies, have different types of needle files on hand so that you can fit the elements together at any time.
- After adjusting all the parts, you can start gluing them (for example, with PVA glue, “Titan”);
Advice! In order for the components and elements of the tank to grip each other more firmly and reliably, you can tie them with thread or rope for a while after gluing them.
- The cannon can be made by cutting the wooden handle of a watercolor brush or from other auxiliary material;
- If desired, you can apply a side number or other inscriptions and patterns to a tank, or any other model, using an electric burner;
- For greater preservation and decoration of the model, they can be coated with varnishes and paints.
The model of the tank is made of plywood with a thickness of (3 – 5 mm), the plywood elements were sanded, joined with “Titan” glue, primed and coated with acrylic varnish and paint. The photo shows the result of the actions described above.
Car – retro (old Mercedes)
Model of a retro Mercedes car
Note! When you transfer these drawings of a plywood machine with your own hands onto the plywood sheets themselves, do not forget to transfer the numbers.
Mercedes parts (1)
Mercedes parts (2)
When assembling the model itself, look carefully at the numbers.
In this case, the process is carried out according to the following algorithm, in accordance with digital notations:
- the part or assembly numbered 1 must be connected to another number 1;
- and part number 2 is attached accordingly to the next number 2 and so on until the machine is assembled.
Gun
Model of a pistol such as "Bulldog" M19
Drawings of a pistol made of plywood model "Bulldog". When assembling, we follow the same rules as when assembling a machine: the same numbers must be mounted with each other.
Pistol parts(1)
Pistol parts(2)
Advice! This model of pistol is best coated from a bottle of spray paint; for a better resemblance to the original, layers of black paint can be applied.
Dinosaur
It’s not difficult to make a model of such a dinosaur; it’s just a matter of patience when cutting out the parts with a jigsaw.
When designing, drawings of plywood dinosaurs, for example, those presented below, can be made in any scale you need according to the presented pattern in a drawing program for a computer.
Preparing the material, model elements and the assembly itself is not difficult, but you will have to have some patience when working with a jigsaw and adjusting the model components to each other.
Parts for assembling a dinosaur
Napkin holder – “Grape leaves”
Very light + simple + necessary part in everyday life
This item in the shape of grape leaves is always useful in the household for its intended purpose - for napkins, and for storing, for example, sheets of paper of the selected format:
Drawings of a plywood napkin holder: before varnishing, staining or painting a plywood blank, you need to burn out the pattern
Napkin holder base with technological slots for attaching vertical parts, in the shape of grape leaves
Vase, stand for pencils, pens, brushes
A vase that can be used for sweets, for writing objects, for storing other small household items
Drawings of a plywood vase, from which you can easily cut out a craft of the size you need:
Stand, with holes for fastening the side walls of the vase
Side, prefabricated walls of the vase with holes for attaching to each other
Plywood panel
It is the ease and simplicity of cutting out plywood sheets of various configurations with different sizes with a jigsaw, and installing various structures from them, that allows us to create a variety of decorative panels for the walls of our homes. Any panel made carefully is an excellent gift for family and friends.
Panel – “butterfly shelf”
Drawings of a plywood panel, which also serves as a shelf in the household:
A panel in the shape of a butterfly with a hole for a shelf (the shelf can be made shaped, rectangular, or semicircular).
Tips for preparing and assembling plywood crafts
To avoid such defects in the workpieces when sawing with a jigsaw, prepare a plywood sheet by coating its surface with a solution of glue and water
Some useful tips and warnings:
- When transferring patterns and drawings onto plywood, use the thinnest and sharpest pencil lead. It's even better to use a used ballpoint pen, then the lines will always be the same and the copy paper won't be torn by the ballpoint. It is convenient to transfer drawings to plywood using a laser printer.
- For better fastening of parts, where possible, it is recommended that the width of the grooves correspond to the thickness of the plywood sheet.
- There are two types of files with large and small teeth. It is more convenient for beginners to learn how to use a thick file, and cut out small parts with a thin file, already having some experience and skills in using a jigsaw.
- The files must cut from top to bottom, so pay special attention to the correct fastening of the file in the jigsaw.
- Files can easily break, so cut carefully and do not allow parts to hang on the saw blade.
- When purchasing a file, make sure that the teeth are sharp, and that the file itself should not bend easily, but rather be firm. It’s not the flat ones that are easy to use, but the so-called “twisted” files – they can be used to make cuts in any direction.
- For those who enjoy cutting out structures from plywood sheets as a hobby, there is no need to purchase a band saw; it is enough to purchase a jigsaw. Although everyone is an amateur, some craftsmen still often resort to a hand jigsaw when they “need to get a feel for the material.”
conclusions
- Before choosing, purchasing and directly working with the material from which you will cut models, panels, construction kits and structures, familiarize yourself with its types and classification according to construction documents (GOST).
- For sawing, purchase high-quality tools, equipment and accessories for it.
- Take a responsible approach to choosing high-quality plywood. Do not limit yourself to a visual inspection, tap it for internal voids and delaminations due to poor gluing of the veneer layers.
- Before working with a jigsaw, optimally equip your workplace. Pay special attention to good lighting so that the cut and markings are clearly visible and your eyes don’t get tired. It’s not a bad idea to use a strobe light to illuminate the area where you’re working with a jigsaw. Convenient and comfortable sawing!
fanera-info.ru
Preparing for work
What can be done
So, we have the materials and tools, now let's think about what kind of structure we will cut and assemble? In principle, the possibilities of plywood are practically unlimited, but a novice craftsman should focus on simple forms, for which you can find many diagrams and manufacturing tips on our portal.
Photos of carved parts for metrics
A brief overview is given in the table below:
| Category | Peculiarities |
| Metrics | Baby birth certificates made of plywood are souvenirs dedicated to the birth of a child. Typically, the metric includes the following details:
|
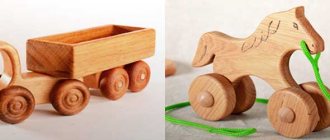
| Toys for little ones | The simplest drawings for cutting out plywood with a jigsaw for children allow you to literally make several simple toys for your baby in just a few hours: sorters, pyramids, mobiles over the crib, etc. All these products are characterized by a small number of parts, their simple shape and fairly large size. At the same time, a mobile or pendant above a crib is usually made of thin plywood, while for sorters and pyramids it is better to take sheets of 10 mm or more. |
| Transport models | All kinds of cars, planes, tanks, etc. represent the lion's share of all products made from this material. Today, detailed drawings of plywood toys for children are widely available, so a product of any complexity can be made. |
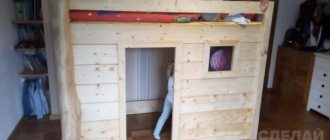
| Doll furniture | Miniature pieces of furniture intended for playing with dolls or installing in a dollhouse do not necessarily need to be purchased in specialized stores. If you have, for example, drawings of a children's kitchen on hand, you can make a real masterpiece out of plywood with your own hands, which cannot be compared with any factory crafts. |
| Puzzles | For older children and teenagers, it is worth making several puzzles. As a rule, in addition to plywood parts of various shapes, they include metal rods, laces and various latches that allow the structure to be assembled and disassembled in different ways. |
A do-it-yourself children's kitchen is made from plywood in the same way as ordinary furniture - naturally, adjusted for miniature sizes
Note! Their future owners can also be involved in the production of toys (subject to compliance with safety regulations). Of course, children's works made from plywood are not distinguished by the perfection of their forms, but a child will be much more willing to play with a car or an airplane made independently.
Constructing and transferring a drawing
When we have decided what exactly we will do, we move on to preparation:
Drawing for a dinosaur skeleton
- On graph paper we draw a drawing of all the details of the future structure.
Note! If we use a ready-made diagram, we print it on a printer in compliance with the required scale.
- We place the sheet with the image on the plywood and transfer the drawing through carbon paper.
- As an alternative method, you can prick the key points of the design with an awl, and then connect them with straight lines on the workpiece.
- We cut the plywood with the printed images in such a way that we can cut out one part from one fragment. This is done to make it more convenient for us to work in the future.
Doll chair diagram
Primary School
In elementary school, classes in fine arts appear, briefly. Where students are required to express their creativity and imagination. The elementary school teacher gives them templates in the same way so that they can create their own paper crafts.
But this time, next they need to show originality and add an interesting ornament to the product. For beautiful crafts, the children receive high marks, encouraging their efforts and efforts.In an educational institution, it is important to maintain good academic performance, so even in such lessons you should give your best.
Safety precautions
Basic safety precautions are required for all types of physical work.
- The workplace must be properly prepared. It should not be cluttered with unnecessary objects or tools.
- The work table or workbench must be well secured and set to the individually required height.
- The workplace should be well lit.
- When working, you should use personal protective equipment, such as gloves, safety glasses, etc.
- When using a power tool, make sure it is in good working order. For beginners, study the technical documentation of the tool they use.
Paper crafts on the theme “Summer”
Summer masterpieces are distinguished by bright colors and an abundance of flowers. Kids perform such work with enthusiasm, joy and pleasure. Let's try to make some of them together.
Sunflower
A bright yellow flower is a real symbol of summer for us, very similar to a warm and gentle sun. To make it you will need scissors, glue, sunflower seeds, and colored paper. From it immediately cut out the yellow petals and core, green leaves and stem of the plant. Connect the parts using glue.
Pour as much glue as possible onto the core. Before it dries, distribute the seeds so that they are firmly attached. The glue should not be visible: excess can be removed with a cloth or scraps. If desired, attach the flower to colored cardboard or stick it on a large Whatman paper. It will turn out great!
Funny caterpillars
Multi-colored caterpillars also symbolize a bright summer. Therefore, be sure to take scissors, glue, colored paper and try to make them in one of the following ways (according to the samples in the photo):
- connected by paper rings;
- accordion;
- paper mugs;
- spiral.
Then glue the head, horns, eyes and paws to the caterpillar. Some details are easier to cut out of cardboard, others are easier to draw with felt-tip pens or paints. Attach the caterpillar to the base, which you have previously painted with bright colors. Also depict grass, stems, daisies and forget-me-nots on it. The result will be a truly colorful and summery picture!
Funny turtles
For creativity, prepare multi-colored plasticine, glass, sea or river shells. Sculpt a reptile's body, head, tail and four legs from plasticine. Make eyes, nose, smile. Assemble all the parts and attach the shell shell on top.
Color whatman paper with felt-tip pens or pencils, designing the base as the seabed or shore where the turtle came out to get some air. Attach the resulting reptile to it. Ready!
Volumetric pendants in an openwork frame
The main feature of these New Year's decorations is a beautiful openwork frame with a slight three-dimensional effect. This simple effect is achieved in a simple way. The oval center of the pendant is carefully cut out according to the template, moved back and fixed with glue. Thus, the openwork frame protruding to the foreground gives additional volume and makes the ornament more interesting.
The rest of the project assumes a standard cutting algorithm. Separately, we note that if you work on a machine, it is better to use #2 or #3 spiral files for this project; they will be easy to cut out not only the openwork frame, but also the main ornament of the decoration. As for the finish, the frame and middle look more beautiful in a contrasting design, painted in different colors. For such decorations, it is best to use alkyd or oil paints, which provide good coverage and color saturation.
Ornamental decorations with geometric patterns
A series of sketches for making simple, but at the same time very expressive New Year's decorations. The through openwork pattern gives these toys a characteristic visual lightness and endows them with grace; at the same time, this feature puts forward a number of requirements for manufacturing. The wooden blank must be thin, but at the same time strong enough so that the fragile pattern does not break.
For a series of these projects, it's best to use hardwood (under a clear finish), or even better, thin plywood if you plan to do an all-over stain that will hide unsightly plywood edges. To make such jewelry, it is most convenient to use spiral saws, which allow cutting in any direction without the need to rotate the workpiece.
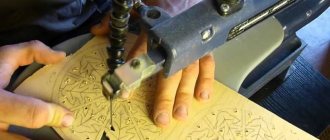
Manufacturing technology
Sawing and assembling parts
If you have picked up a jigsaw at least once, then you can almost guarantee learning how to cut out crafts for children from plywood with your own hands:
- To begin, we take a piece of plywood with markings applied and place it on a workbench or on a special lining for sawing.
- We cut out the part along the contour, leaving a reserve of material of approximately 0.5 - 1 mm.
Cutting out parts with a jigsaw
- To make through holes, use a drill to drill starting grooves.
- We insert the jigsaw blade into the starting groove and cut out the unnecessary fragment.
Advice! When making a mounting hole, make sure that its size does not exceed the size of the corresponding protrusion. It is better to make a smaller groove and fit the part to it using a file.
- Using this algorithm, we cut out all the details we need.
- We perform rough grinding, removing burrs, broken chips and other irregularities.
- Using sandpaper and files, we remove sharp chamfers, rounding the edges of the parts to avoid injuring the child.
Workpiece after filing
- We assemble a toy or other structure by connecting the parts together using recesses and protrusions. If necessary, we use glue and other fasteners.
Advice! If finishing is planned, then final assembly should be carried out only after painting. At this stage, only preliminary adjustment of parts is performed.
Plywood stencils for children: a set for the little ones, made using cutting with nichrome wire
Finishing
So, everything is almost ready, but if we want the toy to be bright and colorful, then we start decorating the plywood blanks with our own hands:
- First, sand the wood using fine-grained sandpaper.
- We remove wood dust and sawdust, then degrease the surfaces using a swab dipped in solvent.
Acrylic paints in cans
- Using a brush or spray gun, apply acrylic paint.
Advice! When painting in several colors, a clear transition line can be ensured using masking tape.
- We apply the paint in several layers, each time pausing to dry.
- We lay several layers of varnish on top of the paint, which not only improves the appearance of the product, but also protects it from moisture, which means it makes it more hygienic. This, as you understand, is extremely important in the case of children's toys.
Assembled motorcycle model after varnishing
Christmas decorations in stained glass style
You can add a little variety to the standard cutting technology and make one of the proposed options for New Year's decor that imitates stained glass style.
The decorations in the foreground are made using pseudo-stained glass technique.
The essence of this technique is quite simple: you need to cut out two stained glass frames and place a sheet of cardboard between them, painted on both sides. In order to avoid the tedious adjustment of two parts, it is better to immediately cut them in series, placing the blanks in a stack one on top of the other. Of course, it is much more convenient to do such work on a jigsaw.
Cutting templates
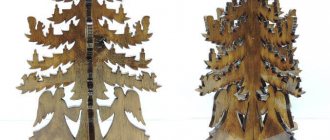
Set of decorations in Christmas style
A set of three ornaments inspired by traditional Christmas motifs. The set includes a pair of stylized angels and an openwork Christmas tree assembled from two halves. The latter can be used as a pendant or as a free-standing decoration.
Such toys look good in their natural form, with an open wooden texture. Therefore, linseed, mineral or any other non-tinted oil is best suited for finishing.
Stencils for cutting
The width of the central slot should correspond to the thickness of the workpiece used. To ensure a good fit between the two halves of the plywood Christmas tree, cut the groove a little smaller, then carefully file it with a file or sandpaper until it fits snugly.
New Year's gnomes
Make a series of these easy Christmas gnome ornaments and use them individually or as a makeshift garland.
DIY New Year's gnomes. Material: plywood. Finish: oil paints