A lamp made from timber can decorate almost any interior. Also, materials for the chandelier can be thin boards, wooden beads and even branches. And you can do it yourself. It is important to study the popular options available and carry out the work strictly according to the instructions.
Wood is commonly used in furniture, flooring, and small interior elements. But more and more often they began to use it for lamps. All because of environmental friendliness. Wood is a completely natural material that does not emit harmful substances.
Additionally, the psychological aspect is highlighted. It is believed that the more wood there is in the interior of a house, the better its owner will feel, he will be able to relax after work and relax.
Another feature is that you can make a chandelier out of wood with your own hands. From the material you can plan figures of almost any shape. Sometimes special tools may be required to work with wood, and sometimes you can do it with just a standard set.
Expert opinion
It-Technology, Electrical power and electronics specialist
Ask questions to the “Specialist for modernization of energy generation systems”
Do-it-yourself wooden lamps (chandelier, sconce, lamp, floor lamp, lampshade): diagrams, drawings To make the furnishings of the room look decent and original, you can either splurge on a designer decoration or make it yourself. Ask, I'm in touch!
Features of the material
Natural wood, in addition to its aesthetic properties, has a number of significant advantages. Products made from it are easy to use and environmentally friendly. When heated, wood does not emit toxic substances, but on the contrary, it has a beneficial effect on people with chronic respiratory diseases, having healing properties. This effect is especially typical for coniferous species.
Wood is a material sufficiently pliable that in the skillful hands of a master it can acquire exactly the forms that he intended. Therefore, any creative design ideas come to life. Luxurious photos of exclusive wooden lamps easily convince of this.
The material is quite versatile, due to which it can be used widely, in almost any type of interior. Interesting configurations and a variety of shapes allow the item to organically fit into any style.
Lamps made of wood in the interior look solid and noble, and besides, they go well with objects made from a wide variety of materials: plastic, glass, metal.
Along with the listed advantages, wood also has disadvantages. It is highly flammable, for this reason the products should not be placed in rooms containing fireplaces, gas stoves and other sources of possible ignition.
The material is very sensitive to temperature changes and high humidity, so placing wooden lamps in the bathroom or kitchen is extremely undesirable. In addition, wood attracts small pests - termites and other insects. It is advisable to coat the products with special protective compounds that will prevent their appearance and protect the material from deformation.
When using an electrical appliance, observe a number of simple precautions:
- place the light source at a sufficiently large distance from open fire (fireplace, stove);
- remember that the optimal location for the device is considered to be rooms with normal humidity levels and room temperature;
- wooden lamps do not allow the installation of ordinary incandescent lamps in them: their heating temperature is too high, it is unsafe; use LED, halogen, fluorescent lamps.
Plastic chandeliers and lamps
Plastic has become one of the most popular materials in modern interiors. This also applies to lamps - a wide variety of models are sold. You can make a chandelier with your own hands, which will be in no way inferior to finished products. The lampshade of a lighting fixture can be constructed from anything. These can be disposable cups, various sticks, painted plastic bottles. They are sometimes decorated with decorative devices: figurines, luminous details. Various metal frames can be used as supporting material. The easiest way to make a table lamp. You can use cut-out parts and shapes with holes. Instead of throwing away unnecessary plastic items (used disposable tableware, etc.), it is better to try making a small lamp out of them that can decorate the room.
Master class: making a lampshade from plastic spoons
You need to find a large number of identical plastic spoons, up to 200 pieces. It will be more difficult to construct a product from entire devices, but if you cut them, everything will work out quite quickly and simply. The handles of the spoons need to be cut off and removed, leaving only the scoop. Next, you can use the finished lampshade to cover the elements or cut it out of the eggplant. The lower part is made from it and a hole is made for the light bulb, or the top of the neck is cut off, leaving a fairly wide hole. Next you need to decide on the design. The upper surfaces of the cups will create a shell-like pattern, and the lower surfaces will create a “scaly” surface. If you choose the second option, then you need to glue jumpers to the eggplant. First, the top part is finished, laying out rows of spoons one after another. When the process reaches the open part, you need to calculate everything so that the last row hides the cut edge of the eggplant.
The following can be used as fastening:
- glue;
- office plasticine;
- scotch.
Chandelier made of plastic bottles in the form of leaves
You will need steel wire for the frame, thin wire, a soldering iron, scissors, ten plastic bottles of various shades of green. You need to cut leaves of different sizes and shapes from the bottles. Fragments in the form of birch leaves and other leaves with a more or less compact shape are ideal. This will result in a larger number of elements. It is better to process sections simulating plates with a soldering iron to make them slightly bent. You also need to make veins with the edge of the sting: the leaves will take on a more natural appearance. Since the bottles are cylindrical in shape, the blanks will have a curvature. Holes for thin wires are pierced with a hot needle. You need at least two on each leaf, but four is even better to thread the wire through the figure eight. As many sheets as possible are put on each one. Then the flexible wires are securely twisted into a frame made of steel wires.
You need to handle the soldering iron as carefully as possible so as not to burn your fingers or burn the leaves.
Lamps made from laser discs
You can make several types of such lamps. Materials needed: rubber feet, silicone sticks, fluorescent lamp, fiberboard circle, CDs. You will need tools such as a triangle ruler, pencil, compass, glue gun, screwdriver, pliers, pliers, drill. In a round form made of fiberboard, a hole is made in the very center, and twelve sectors are drawn on it. On the lines that separate them, one small hole is drilled. Steel wires will be stretched through them, each of which will house a stack of disks. The design will be quite heavy, so metal wires are needed. A wire with a socket is inserted into the hole in the fiberboard circle, and a light bulb is inserted into it. From the disks you can also make a polyhedron lamp, a lampshade in the form of a ball, petals, or a ring lamp.
Application in various interiors
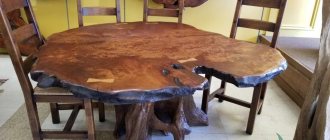
The versatility of wooden lamps allows them to be used in the design of a wide variety of rooms, regardless of style. They are most appropriate in the setting of a country house, decorated in country, Provence, and oriental styles. The combination of natural simplicity with sophistication is the most valuable quality of wood.
Original “antique” lamps made of wood are widely in demand in retro styles. They are often made in the shape of cart wheels, with candle-shaped lamps located around the circumference. This design is usually used in restaurants, bars, and hotels.
Ceiling models look great in large rooms and living rooms, bringing luxury and elegance to the interior. Spot lighting options are relevant for small rooms, especially if they have low ceilings.
Lamps of simple shapes, without any frills, are suitable for country style. They may look a little rough, but they will create a feeling of unity with nature and fit organically into the space without conflicting with other objects.
Oriental style requires the use of solid wood, welcomes clear shapes and lines, complemented by oriental motifs.
Retro is characterized by classic options or more original models, stylized as antiques.
Classic makes it possible to use stained glass; a lampshade for a lamp can be made from it; wooden structures have smooth, streamlined shapes.
High-tech allows you to create original designs by combining wood with metal, frosted glass and other materials.
Using glass to create lamps
You can hang a composition of several empty liquor bottles on the ceiling. Three-liter jars can be hung by metal chains. Glassware is also suitable as a lampshade. A lamp made from many glass fragments can imitate a crystal chandelier. Broken glass objects find a new purpose in the form of an original lighting fixture. Glasses and wine glasses make beautiful table lamps. Various glass boxes, glass from old wall sconces, headlights, and interior doors may come in handy. A homemade glass chandelier can be painted with watercolor or stained glass paints. You will get beautiful stained glass windows. To create pendant lamps, craftsmen use a variety of decorative containers from oils and perfumes. Unlike wood and paper, glass has high fire safety.
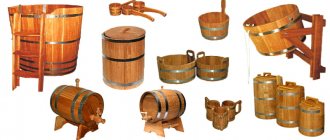
Lighting fixtures made from wine bottles and wood
The list of necessary equipment includes wire cutters, screwdrivers, screws, a glass cutter, silicone, a rag or brush, stain, pine boards, hooks, a chain, ten light bulbs, wiring, and wine bottles. The first step is to process the containers. Labels and remaining glue are removed from the bottles. Using a glass cutter, you need to remove the bottom of each bottle: it rests at a height of 1-2 cm, and the bottle rotates around its axis. The cracks must be tapped with a hammer until the bottom falls off. After this, the electrical wires are placed in bottles and connected to the cartridges. Light bulbs are screwed into them. Now you need to prepare the boards. In the lower, larger one, holes are drilled for necks and wires. The top one will collect them in one bun. Hooks for chains are screwed into the bottom board, which will hold the structure. For the kitchen, you can make a table lamp with a bottle base and a wooden shade.
Wooden boards can be stained to give an antique effect.
Using old cans to create lamps
Old jars can find a new purpose. Lamps can be created using threads, electrical wires, and handles for cans. Containers must be equipped with handles. They will need to be tied with threads attached to a pre-prepared iron frame. Electrical wires with sockets and light bulbs are lowered into the jars - the chandelier is ready. You can make an option for the dacha - threads are tied around tree branches, and candles or small lanterns are placed inside the jars. Containers wrapped in multi-colored threads or decorated with patterned napkins look beautiful. The inside of the cans can be painted white, and while it is still wet, apply a pattern in the form of chaotic lines. Some people paint the outside of the container with different paints, and paint an image on top using glitter shadows. Banks can also be lined with small broken glass.
How to make a lamp from wood with your own hands
Of course, by ordering a product in special workshops, you will receive a perfectly made, polished product. However, if you have experience working with wood, you can try to create an exclusive item yourself from the material that is available to you.
Recessed lamps: typesChandeliers: how to choose a product and which manufacturer to choose
Ceiling chandelier - stylish design options, features of installation, connection and placement (100 photos of ideas and new products)
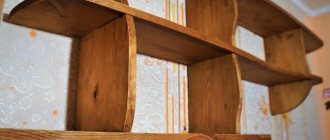
DIY wooden lamps are made from:
- branches;
- boards;
- bark;
- cuts;
- logs;
- veneer
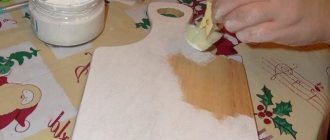
If you have an idea that you can’t wait to implement, you can safely get started. First, the wood must be prepared by treating it with protective solutions and impregnations, and wait until it dries completely.
This stage is mandatory: an untreated product will not last you long. The structure is then assembled and fastened together. We invite you to try several original options.
Lampshade made of linen threads or fringe
For your bedroom or kitchen, you can make your own cute lampshade that emits soft light. To make it you will need:
- Linen yarn of any shade.
- Scissors.
- Small photo frame.
- Hoops in several different sizes.
- Pliers.
- Special chain for fixing the chandelier.
Manufacturing process:
- Take a photo frame. Place it in a horizontal orientation.
- Secure the thread lengthwise along the upper long side.
- Wind the thread evenly around the frame so that the longitudinal thread lies under the wound layer.
- Carefully tie the thread so that it connects the bundle. The ends of the thread should be long enough so that you can then tie the tassels to the hoop.
- Carefully cut the wound layer from below with scissors.
- This results in a strand from which you need to make a brush. To do this, stepping back from the thread fixed at the top, you need to tie a bun with another thread, thus forming a tassel.
- The remaining tassels are made. Their number should correspond to the diameter of the hoop.
- Take the outer rim of the hoop and tie the tassels along the entire diameter quite tightly to each other.
- Repeat with a smaller diameter hoop. Most often, they take either two or three rims of different diameters in order to form several stages of the chandelier.
- It is necessary to tie the hoops to each other in such a way that the steps of the chandelier are formed. This is done with threads in several places.
- Take 3 chains of the same length and fix them on the largest diameter rim. It is important to maintain the same distance between the fixation points.
- At the top, connect the chains together using a link, securing with pliers.
- The pendant is fixed to the ceiling, the light bulb is left on a wire of such length that it is in the center of the lampshade.
This DIY lampshade for a chandelier is extremely easy to make and does not require any special skills. Therefore, it can always be taken as a basis for those who do not have experience making any designer items with their own hands. In this case, you can change the color of the thread in layers, achieving one or another effect.
This option is suitable for boho, rustic or ethno style.
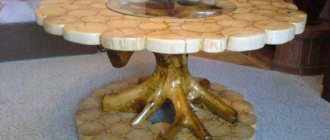
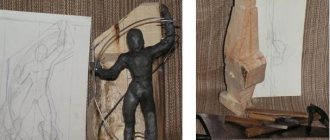
Driftwood lamp
This creative idea will not require much effort or expense to implement - use driftwood found in the forest under your feet. They are exclusive in themselves: every bend of the branch is unique. All you need to do is find a suitable specimen, clean it of bark and excess wood, then dry it thoroughly. For drying, a ventilated place away from direct sunlight is suitable.
After complete drying, you need to sand the driftwood well using sandpaper. Determine the side that will be attached to the ceiling. Using a blade, make grooves on it into which you will lay the wires. After finishing work with the wires, the holes must be carefully filled with putty, and then treated with stain and putty to match the color of the wood.
Chucks are attached to the ends of the driftwood, you can come up with different ways to attach them. When finished, treat the wood with varnish. It is necessary to lay several layers and dry each one. Choose acrylic or waterproof varnish.
- Ceiling lamps - the best manufacturers, installation and connection features (125 photos)
LED lamps: detailed description, application features and review of the best manufacturers
- Pendant lamps - examples of installation, placement and design of light sources with your own hands (110 photos)
You can also construct a table lamp or sconce in a similar way - driftwood will serve as an excellent base. This idea is easy to implement even if you do not have carpentry skills.
General rules
There are a huge number of ideas for all kinds of lampshades, chandeliers made from branches, driftwood, and boards. In general, the process of making a chandelier comes down to making a frame, providing wire connections for sockets and elements for fixing the product to the ceiling.
To make the wires invisible, you can make grooves in the wood. Secure the wiring with special plastic ties or staples. If it is invisible from the outside, then there is no need to make grooves. Sometimes the wires are left completely visible - this is a design decision.
Wood must be used without rot or wormholes. If you find some branch or snag in the forest, then inspect it; perhaps it has begun to rot and collapse. This type of wood is completely unsuitable for a chandelier, unless it can be trimmed.
Some people are interested in how to make a beautiful chandelier from driftwood. One idea is this. The driftwood must first be cleaned, peel off the bark if there is any, cut off all excess, and sand the surface. It is best to use such a figured tree for a lamp stand. If you want to make a chandelier, you can hang a piece of driftwood on chains from the ceiling and run a wire to it, threading it through the links. In this design, hollow cylinders can be cut out of wood for cartridges.
You should not pile up a lot of branches, as this will make the chandelier heavier. In addition, such a product does not always look harmonious. A large volume chandelier is better suited for spacious rooms, while in a regular kitchen small lampshades will look more impressive.
Branch chandelier
Gather carefully selected small branches together so that some of them are perpendicular to the ceiling. Next, you need to attach the lampshades to the ends of the branches, and carefully wrap the wires around them. Instead of branches, you can use real rhizomes if you are lucky enough to find one in the forest.
Find and implement your own ideas - wood gives you a lot of opportunities to experiment using your imagination. You will be rewarded for your creative impulses by receiving a designer product that will become an interior decoration.
Chandelier / lamp in shabby chic style
Beautiful decorative items are created from beads and fabric, including lamps characteristic of this style. Decorating in the shabby chic style means that the room is designed to accommodate a girl or woman. You will need beads, beads, threads, chains, a socket with a lamp, a finished wooden or metal frame. The first step is to paint the base in one of the soft shades. After this, it can be wrapped with decorative elements or fabric. The top of the lampshade is wrapped with smaller beads, but in larger quantities - up to 40 beads need to be strung on one thread, while on the lower threads - about 20. This is an approximate proportion, it, like the tension of the threads, can be changed depending on the size of the structure. The lamp is usually covered with pink fabric. All decorations are hung so that they flow down.
Paper butterflies
A chandelier made in this version is perfect for a child’s room or bedroom. Making such a lamp will not require financial investments, and children can be involved in the creative process.
What will you need?
- Sheets of paper. It can be either colored paper or just white.
- Sharp scissors.
- A piece of wire, about forty cm in length.
- One or more butterfly patterns.
- Wire for needlework.
- Glue.
Operating procedure:
Roll a piece of wire into a ring and secure it. It can be decorated with large beads and decorative ribbon.
- Transfer the template onto paper and cut out the desired number of butterflies.
- Secure the paper blanks to several pieces of thin wire.
- Connect these elements to the rim and straighten them with your hands, creating the shape of a lampshade.
- Hang the finished product.
Leaf fall
The lampshade, made in the form of various branches with leaves, looks very original. A chandelier made from scrap materials transmits light well, and its creation does not require any special skill or expense.
To work you will need:
- Plastic bottles, preferably green.
- Scissors.
- Lighter.
- Thin and thick wire.
- Frame from an old lamp.
Stages of work:
- You need to cut out leaves of different sizes from the middle part of the bottles.
- Smooth out sharp edges and nicks using a lighter.
- Then, from wire segments, build something like branches.
- On which to fasten the leaves. The plastic elements are attached by heating the plastic and pressing it tightly with a wire.
- All that remains is to place the branches on the frame at your discretion and hang the lampshade in its place.
- Leaves can be made from foil, thick fabric, colored cardboard.
The photo of homemade chandeliers shows how they differ from purchased ones in their uniqueness, beauty and diversity. Things made with your own hands will give warmth and joyful emotions.