Who among us did not dream as a child of our own house in which to hide, play with friends or just sleep? Children's desire to have their own little “hole” is often so great that they try to build a home on their own from any available materials. Bedspreads, old curtains, cardboard boxes, boards, pieces of plywood and even polystyrene foam are used. There are no limits to the imagination of young builders. The process of creating a children's house with your own hands is so exciting that children like it even more than playing in a ready-made building.
Children's house: purpose and benefits
A small house is a place for a child to retire, store things dear to his heart, and play with friends. The baby takes care of his home - he arranges furniture in it, decorates it, and wipes off the dust. Thanks to this, moral qualities are formed, a caring attitude towards things and responsibility are brought up, and the first work skills appear. Games with friends help socialization, development of imagination, thinking, memory, and speech.
How are business boards useful?
High-quality and properly made bodyboards can develop a child almost from infancy. They develop fine motor skills , which are necessary for proper brain function. In addition, they help improve:
- concentration;
- memory;
- perseverance and patience;
- logical thinking;
- imagination. For this purpose, boards with images of heroes and fairy-tale characters are specially created. The child independently comes up with a story and embodies it on his board;
- understanding what certain actions lead to. For example, the child opened the zipper and found in his pocket the key to the lock that opens the door, etc.;
- safe introduction to household items.
Some boards are designed to prepare a child for school, teach him to count and read.
Buy or build yourself
There are a huge number of ready-made structures on sale. Bright and elegant plastic houses will be a wonderful decoration for any nursery. They will look no less colorful in the courtyard of a country house. Their advantages are easy assembly, low weight, and mobility. But such structures are not particularly solid and durable. Under the influence of precipitation and direct sunlight, products quickly lose their brightness and attractiveness and become unusable. Therefore, it is better to use them indoors on an ongoing basis. The main advantage of ready-made models is the minimum amount of time and effort spent.
At the same time, it is difficult to overestimate the importance of creating a house with your own hands. The joint process of creation brings children and parents together as much as possible, teaches mutual understanding and mutual assistance. The child receives basic construction knowledge, becomes familiar with the principles of operation of various tools, and learns to use some of them.
If you decide to give your children such a useful toy, it is better to choose a product made by yourself.
Let's sum it up
As you can see, mastering the construction of children's houses is not difficult. In this case, it is important to make preliminary measurements and follow the instructions exactly, then you are more likely to not have any difficulties. But the good thing about building from plywood is that each parent can come up with instructions and drawings for assembly on their own, and not only give the child a place for exciting games, but also allow themselves to show their imagination and reveal the talents of an architect.
Plywood is often used in the furniture industry and for the manufacture of a large number of boxes of various sizes and other very beautiful and functional crafts. What plywood products can you make with your own hands? Read in the special article.
What materials to use for construction
There are plenty of options for what you can use to build a playhouse. The choice depends on:
- the place where it will be located - on the street or in the apartment;
- the age of the child - a cardboard house will be enough for kids, but older children need a stronger and more substantial home;
- financial capabilities of parents;
- their level of construction skills.
The most common materials:
- wooden beam;
- plywood, OSB, chipboard, fiberboard;
- polycarbonate;
- construction pallets;
- cardboard;
- textile.
Creation of toys with extended functionality
A large dollhouse made of plywood can become a full-fledged piece of furniture if you attach drawers to it on the side, bottom, and equip shelves. In this case, from an adult’s point of view, it will be a convenient storage system for the child’s toys, and the child will enjoy cleaning.
Wooden dollhouse with shelves and drawers Source oozor.ru
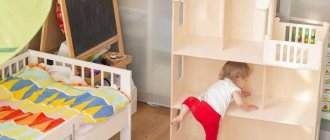
If you attach a house to your baby's bed when he goes to bed, he will be able to continue playing. This option will be of interest to those parents whose children have difficulty switching, have difficulty falling asleep and are capricious.
House dimensions
If the material has already been selected, it's time to decide on the dimensions. It should be comfortable for the child to enter the house and play in it. It is desirable that he can stand up to his full height. The more freedom there is indoors, the safer it is to play in it. Of course, in an apartment our options are limited. But on a personal plot, a spacious house of 2x2.5 m can easily be accommodated, in which several people can comfortably stay. In such a space you can freely arrange furniture and place large toys.
Preparatory stage
First of all, you need to determine what size the structure will be. To do this, take into account the size of the dolls themselves that the child plays with: the toy must fit completely into the house in height (with some margin). In addition, sufficient space must be provided for the arrangement of toy furniture: kitchen, bedroom, etc. The number of floors in the structure is determined by the height of the child, as well as the size of the toys. If the height of the figures is no more than 20 cm, then the house can be made three-story. For a standard Barbie doll, two floors will be enough. When the general sketches have been made, you can move on to the details, for which you make a drawing to a certain scale on a sheet of paper.
Drawing
To make a plywood doll house, you need a drawing on which the exact dimensions of all elements will be marked. After determining the approximate dimensions, they think about the shape and style of the house. It is worth considering that when using a finished drawing and changing the dimensions of individual parts, other dimensions will also need to be adjusted.
When preparing a drawing yourself, it includes the following parameters:
- The back part of the structure should be made in the form of a five- or rectangle. The first option is considered more preferable, since this shape will make it possible to make a roof that will have beveled edges.
- The size of the base should be slightly wider than the internal space. This makes the assembly process easier.
- Interfloor ceilings should have the same dimensions, slightly smaller than the bases.
- The data of partitions, side and roof elements are taken into account.
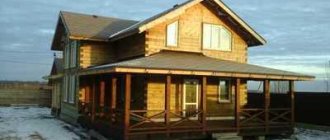
We are building a house on a summer cottage
Your own house, just like a real one, will certainly make your child happy. Moreover, on a summer cottage you can build a durable building that will last for more than one year. Construction will be an exciting adventure and will remain in your child’s memory for a lifetime. Let him decide for himself what it will be like - his first “own” home.
Architecture and design can be completely different. From a simple one-story building to a real palace, a pirate ship, a hut on chicken legs or a tree house. On your summer cottage you can build whatever your heart desires.
If you need temporary shelter, put up a tent or hut. For durable buildings, it is better to choose resistant materials - wooden beams, logs, panel structures, polycarbonate. It is the material that influences the choice of construction technology. To avoid possible mistakes, it is recommended to make a layout first.
From wooden beams
A house made of timber is an excellent choice for a durable capital construction. This design will last for many years and will delight more than one generation of children. But it is worth considering that wood is a flammable material. In addition, it is not very friendly with moisture. Bark beetles can settle in it and destroy the timber from the inside. However, all this can be easily avoided. It is enough to treat it with fire-resistant and antiseptic compounds and the house will be reliably protected from such threats. This procedure must be completed before construction work begins. Building a house from timber is a labor-intensive and long-term project. Construction of this kind requires strict adherence to technology.
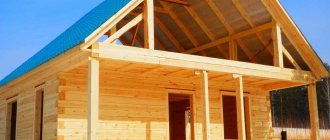
Frame house made of OSB or plywood
The process can be significantly accelerated if you choose sheets of plywood or OSB as the main material. The house will not be as solid as the previous option, but its construction will not take much time.
At the first stage, a timber frame is constructed. First, the base is assembled - a shield, which is sheathed with OSB on the bottom and clapboard on top. Children often play on the floor, so care must be taken to ensure that they do not sit on a cold surface. A layer of insulation can be laid between the outer layer and the boards. Thick polystyrene foam 10 cm wide is suitable for this purpose. To prevent it from falling through, provide additional protection - pad the bottom with a board base. Next, a supporting structure is constructed for the walls and roof. The finished frame is sheathed with sheet material on the outside and inside. From the street side, both OSB and plywood will look great. Insulation and windproof material are attached from the inside, and then the walls and ceiling are covered with plywood.
Another version of a plywood house is a constructor made from panels with special fastenings - grippers. They are also called paws. The long walls of the house are equipped with them, and there are grooves on the front and back. The “feet” must be directed downward so that, when inserted into the holes, they can be lowered and securely fastened. Disassembly is carried out in the reverse order - the long wall is raised slightly and the fastening easily comes out of the groove. Such houses are good for a summer residence - in winter they can be stored indoors, wrapped in plastic wrap or in special bags.
Panel house
This construction option is optimal for a playhouse. It is assembled from pre-prepared shields. First of all, construct a shield for the base. The supporting frame is made of timber 75 and 100 mm long. Then the floor is laid on this structure. The next step is to assemble the porch frame. After this, the frames of the front and rear walls are made, and then the side walls. A box is mounted on the base. After this, the roof sheathing and ridge are done. Next, the walls of the house are sheathed with sheets of chipboard or plywood, leaving openings for windows and doors. If you do this from the inside and attach decorative strips to the outside, you can get a house in the German half-timbered style. The next stage is roofing. Roofing materials such as flexible tiles, corrugated sheets, colored slate, and waterproof plywood are ideal.
Polycarbonate house
A house with transparent walls and ceiling - what could be more unusual? A polycarbonate building will always be light, warm and cozy. This material has many advantages:
- is characterized by low cost;
- transmits light well;
- easy to install;
- protects from direct sunlight;
- plastic – allows you to create original compositions of rounded shapes.
- variety of colors;
- not afraid of moisture;
- does not support combustion;
- It retains heat well due to its structure - air-filled cells are located inside the sheet.
To create a transparent house, you need to make a frame from metal pipes, cover it with polycarbonate sheets, cut out windows and doors. It is better to do them on one side so that there are no drafts in the future.
Children's house made of pallets
Shipping pallets are often used to create designer furniture for loft or country style interiors. They can be used with exactly the same success when building a playhouse. What is useful at a construction site?
- pallets - at least 8 pieces;
- metal connecting plates – 8 pcs;
- metal corners;
- roofing materials – flexible tiles, euro slate;
- quick-drying paint;
- self-tapping screws;
- grinding attachment;
- sandpaper;
- drill or screwdriver.
It is better to grind, paint pallets and form window and door openings before starting work.
Description of building a house from pallets
- We make the base - we connect two pallets using mounting plates.
- We install walls - structures with removed central lintels and previously formed openings. We attach them to the base using metal corners.
- We form the roof slopes from two pallets. We fasten them together and fasten them to the walls using metal plates.
- We are laying the roof.
- We lay the floor from pallet boards or other suitable material.
- We form window and door frames and paint them.
- We decorate the house from the inside and invite a little tenant.
Log playhouses
Any child will love his own log house. After all, it is so similar to fairy-tale houses and huts. They can be supplemented with a composition of a log well, a bench, or a sandbox. True, to create such a building you need to have special knowledge and skills. It is unlikely that an inexperienced builder will be able to correctly install a log house. This requires a real master.
But don’t despair - if you can’t install a real log house, you can always buy a plastic imitation. There are plenty of offers of various ready-made designs.
House on stilts with additional play areas
An alternative to a log structure can be a house on stilts. This is an intermediate stage between the baby doll version and the tree house. Children love to climb the steps into their “nest,” and for a “jet” descent, you can attach a real slide, install a fireman’s pole, or attach a rope. You can build a spacious two-story play complex with horizontal bars, swings and a sandbox. To erect such a structure, a flat area is not required. The main thing is to align the pillars well vertically and install the base for the floor and roof exactly horizontally.
The piles are installed to a depth of 20 cm and concreted. In regions with harsh winters, to the depth to which the soil freezes. It will not be possible to do without concrete. The pillars will very quickly become unusable.
Next, the piles are tied with timber, boards - logs - are laid on them, and plywood is laid on top. The walls are made of wooden frames covered with plywood sheets. They immediately leave openings for windows and doors. The finished panels are lifted onto the base and the frame is assembled.
If you work alone, it is better to sheathe the frames only on the outside, and do the interior finishing after the frames are brought to the site. This will make it easier to lift them.
The next stages are the formation of a ridge from beams, installation of transverse gables and laying of the roof.
The house on stilts is very reminiscent of a hut on chicken legs. By building it for your baby, you will give him a piece of a fairy tale.
Features of building a tree house
The tree house is an indispensable attribute of most American children's films. The guys love their shelters and are ready to be real good boys, as long as they are not banned from playing there. Can you think of a better place to listen to birdsong, watch the stars or just read in the fresh air? To build such a house, you need to choose the right tree. It should not be old, eaten away by parasites. Ideally, this is a tall plant with an even, strong trunk and spreading branches. Alternatively, the trunk can be forked. In order to avoid problems later, you need to find out whether the tree in your garden is a plant protected by the state, and whether it is necessary to obtain permission to carry out such work.
First of all, a platform is fixed to the tree - the base of the house. This process can be carried out in three different ways:
- The beams supporting the platform are attached directly to the tree.
- The base is suspended using ropes.
- The platform is supported by support pillars dug into the ground.
Don't forget to consider your lifting options. It should be easy for children to climb into the house. In addition, the lift should be as safe as possible. There are the following options for staircase structures:
- rope;
- wooden extension;
- stationary marching.
The platform must be equipped with railings, and sawdust must be placed under the tree - they will soften the blow in case of a fall. The design of such a house can be anything - with walls and a roof, or simply in the form of an A-shaped tent.
General provisions
First, let's look at the motivation why it's worth taking on making a dollhouse with your own hands:
Advantages of making it yourself
- Saving. The price of factory-made models is quite high, while homemade wood products will significantly save the family budget;
- Uniqueness. The project you implement will be one of a kind; your daughter will definitely not find the same toy among her friends;
Unique toy castle made of plywood
- Compliance with desires. In your dollhouse there will be exactly the kind of rooms, the kind of colors and the kind of decorations that the child wants to see;
You can even put a dinosaur in the attic, because this is original handmade work
Advice: involve your child in the work, this will allow you both to have more fun and make the homemade toy even more loved.
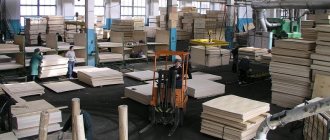
Advantages of choosing plywood
So, we figured out why you should get to work with your own hands and not run to the store. Now let's decide on the material.
Wood-laminated board consists of several sheets of wood veneer glued together, which determines the following advantages:
- High strength characteristics. Durable children's toys always last much longer than their flimsy counterparts;
- Ease of processing. Plywood is easy to saw, paint, drill, mill and fix with nails or self-tapping screws;
It is easy to cut a plywood sheet into pieces of the required size
- Aesthetic appearance. The top veneer has a beautiful original textured pattern and a warm shade that is pleasant to the eye;
Wood-laminated board looks attractive even without additional decorative processing
- Low thermal conductivity, due to which wooden plywood is always warm to the touch. This is an important factor for a child;
- Relatively low cost. Wood-laminated board is not expensive, and you will need very little material to complete the task in question.
But, speaking about the advantages of plywood, it is necessary to mention its possible disadvantage, which is of no small importance. The adhesive used in the production process of wood-laminated board may contain formaldehyde, which is highly toxic.
Therefore, be sure to pay attention to the appropriate labeling and choose an environmentally friendly product, because your child will come into contact with it, and the following labeling will help you with this:
| Symbol | Formaldehyde content, mg/100 g |
| E0 | No more than 6 – environmentally friendly product |
| E1 | 7-9 – permissible standard for use in residential premises |
| E2 | 10-20 is a rather dangerous type of plywood, the use of which is best limited to external work |
Playhouses in the apartment: materials and solutions
A house in the garden of a private house is wonderful. But unfortunately, he will be able to please the children only in the warm season. In winter it will be cold, and climbing the icy steps is dangerous. This is only justified if the house is part of a slide. But not everyone has their own territory for equipping a children's playground. Therefore, the optimal solution would be to build it right in the apartment from lightweight materials at hand - fabric, cardboard, plastic. This structure is easy to install, disassemble, store and transport. Therefore, you can take it with you when you move.
Compact cardboard house
The easiest way to make a home out of cardboard is to cut out windows and a door in a large box from a refrigerator, washing machine or other large household appliances. The product is decorated, after which you can start playing. The other option is more complicated. The house diagram is drawn on sheets of corrugated cardboard, cut out and assembled using a construction stapler or glue. The surface of the cardboard building can be left in its original form, or it can be painted or covered with wallpaper. For interior walls, both monochromatic designs and options with patterns are suitable. When choosing a color and print, you need to take into account the gender of the child. External walls can be covered with wallpaper that imitates wood or brick, but this is not necessary. It all depends on the preferences of the little owner - perhaps he wants his house to resemble the castle of the snow queen, Nyusha's house or a palace from a candy country.
House made of fabric and PVC pipes
If you want to create a more substantial structure, assemble your house from ordinary water pipes. Using various adapters and splitters, they can be connected into a lightweight but durable structure. The advantage of this option is that the house can be easily disassembled. Just a few minutes and the structure is ready for transportation. Thanks to this, you can take it with you to nature, to the sea, to the country house and even on a visit. The pipes act as elements of the frame onto which the cover is stretched. It must be sewn to the size of the house, but with small increases to make it easier to stretch the fabric onto the structure. From the inside, fasteners should be provided to secure the fabric with Velcro or ties. Openings for windows and doors must be provided in the walls. It is desirable that, if necessary, the windows can be closed with thick film or fabric shutters with lacing, and the door can be closed with a zipper. This way you can protect your child from wind and cold.
Indian wigwam - an original structure
Wigwam is the home of a “real Indian”. But don’t think that it will only be appropriate in a boy’s bedroom. Girls will play in it with no less pleasure. This unusual and stylish solution will add a daring, exotic touch to the interior of any nursery. This is not just a refuge and a little corner of privacy. A wigwam can inspire you to play interesting games, read books about Indians, and watch movies. How exciting it is to jump around the apartment or shoot at a target, wearing a feather headdress and painting your face, and then relax in the shade of a tent on soft pillows.
There are quite a few ready-made wigwams on sale. But a “real” Indian must be able to build his own house. For this he will need:
- wooden sticks with a round or square cross-section – 6 pcs. The length of the beams is 2 m, thickness is 2-4 cm;
- rope or elastic band;
- drill;
- tent fabric;
- eyelets;
- lace.
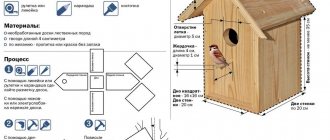
Step-by-step instruction
- Drill holes in the poles at a distance of 20-25 cm from the edge.
- Tie the sticks together.
- Place the frame on the floor and spread the supports so that there are even gaps. One of them is the future entrance, more needs to be done.
- We cut out a tent in the shape of a half-sun.
- We wrap the frame with fabric and mark places for sewing fasteners.
- We process the edges of the product, sew on ribbons to secure the tent on the poles.
- In the upper part along the edges we install eyelets and thread the lace.
- We fix the tent to the frame.
You can decorate an improvised wigwam in a variety of ways - whatever you have the patience and imagination to do. Special paints and markers, stickers, jewelry, buttons, and appliques can be used. Inside it is worth sewing pockets for various small things. We lay a blanket and a couple of pillows on the floor and invite the future tenant. Of course, you can surprise him, but it will be much more useful if he himself takes an active part in the creation and arrangement of his “shelter”.
House under the dining table
The easiest and most affordable way to build a playhouse in an apartment is to simply cover the dining table with a blanket or sheet. But such a structure is only suitable for playing hide and seek. The result is a semi-dark space in which you can’t get by without a flashlight. How to make sure that light penetrates into the house? An excellent way out of this situation is a special cover, the top edge of which will exactly match the size of the tabletop. The fabric structure stretches over the table and limits the entire space under it. In the “walls” of the cover, you can provide several openings - windows, a door, and thus provide access to light and air flow. The floor in such a house can be a rug or a small mattress. The walls inside and out can be decorated with various applications, depicting paintings, decor, furniture, and sew small pockets for storing children's treasures. The doors in such a house are closed with zippers, buttons or ties. A useful tool for developing fine motor skills.
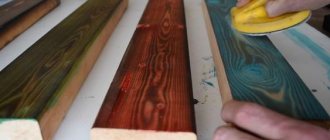
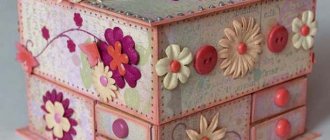
DIY bodyboard for girls
A girl's board can be decorated with pink ribbons, multi-colored laces, textile pockets with attached clothing accessories : buttons, snaps, zipper or Velcro. By adding decorations from artificial flowers and butterflies, you can easily make your princess’s favorite toy. At the very top of the board you can write the girl’s name, this will make the board unique, belonging to her.
DIY busy board for girls
How to furnish a house inside: finishing and furnishings
The interior decoration of the house is selected depending on:
- preferences of the little owner;
- dimensions of the building;
- type of construction.
It is best to paint the walls and floors in the house with waterproof paint or varnish, or you can leave them as is, simply treat them with an antiseptic.
The windows can be framed with small curtains, and a soft rug can be laid on the floor. Small pictures, posters, stickers will perfectly decorate the walls.
If in a small tent there is only room for a blanket and a couple of pillows, then in an outdoor wooden house you can install furniture - a dining set, a toy kitchen or a small crib. Miniature shelves and hooks will allow you to conveniently place outerwear and favorite crafts.
So that you can continue playing or reading in the evening, it is worth considering the lighting. Small LED sources or strip are best.
Features of product decoration
Paint the dollhouse with environmentally friendly paint, such as acrylic. You can get a bright, rich or soft, pastel shade by adding tinting paste to the base composition.
Material for painting plywood
Tinting paste
After the house is assembled, you can begin to decorate the interior walls, floors, and arrange plywood doll furniture.
Internal filling of the dollhouse
To make the structure more realistic, it is electrified using autonomous lamps powered by batteries, which are secured with double-sided tape.
Autonomous lamps
Decorative design of the facade
There are many options for facade design. You can simply cover it with clapboard or wooden tiles, or you can paint it with your child, stick on plastic or wooden figures and flowers. The lighting design looks wonderful when a lot of lights come on in the evening, and the house looks like a fairy-tale palace. You can design the façade in a specific theme. For example, attach climbing holds to it, turn one of the walls into a sports equipment, or hang a lifebuoy, compass, ropes and other attributes of the life of a real “sea wolf.” The choice of design depends on your imagination and preferences.
Building a playhouse is a fun and not too complicated process. And your child will certainly like the result.
Window assembly
If the structure is more solid, then windows can be inserted. Windows are also made from wood with your own hands. To do this, take a pallet board, saw a groove in the center, after which one of the parts is chopped off. You can make the workpiece in another way: grind off the excess wood with a plane.
For one window you will need 4 blanks. Each prepared board is sawn at both ends at an angle of 45 °, after which it is assembled together, coated with wood glue and tightened with self-tapping screws.
When windows and doors are installed, all wooden structural elements are first treated with protective impregnations, and when they dry, they are painted in the desired color.
Having familiarized yourself with the process of creating a children's house, you can begin to implement the project. Such an idea will require minimal financial investment, but the child will be happy and will be able to play in the fresh air.
Common types
Frame house covered with a house block
In order to make a children's house, you can use a variety of materials that were left over after construction or renovation; if there are none, purchase them at a hardware store. Undoubtedly, the most popular lumber is:
- bars;
- plywood;
- boards.
Let's look at common options.