Many professional carpenters make their own oils to save money. However, it is extremely important to follow the recipe, monitor the amount of ingredients and accurately carry out each stage of creating the impregnation. We'll tell you how to make oil for impregnating wood with your own hands and how practical it is in general.
Positive effects of wax oil
This product can highlight the original structure of the wood and provide protection from moisture, discrepancies, fire, fungal diseases or mold. Beeswax does not oxidize, so it stays on the treated surface for a long time. Wax has a strong viscosity, so it melts at high temperatures. This product has water-repellent properties. After applying the composition, the material has a smooth and shiny surface. This increases the wear resistance of the wooden material. Wax oil is usually made at home by adding various types of oil.
Features of the use of waxed products
With all the advantages of the method of treating wood with liquid wax, it should be remembered that wax is a material sensitive to high temperatures. Under their influence he “floats”. Therefore, you need to take into account the features of the room in which future furniture or wood products will be used. Although the heat resistance of some modern industrial samples of liquid wax reaches 100 0C. However, you should not wax your kitchen work surfaces. If you accidentally spill hot food or place heated dishes, traces will remain. Which can only be removed by repeated waxing.
Wax is not compatible with products containing alcohol. When choosing a care product for waxed furniture, you should carefully read the composition and instructions. In general, it is enough to simply wipe it with a dry soft cloth, and to remove dirt or remove fingerprints from time to time use special cleaners with the obligatory mark “for waxed surfaces.”
Subject to application technology and proper care, coating wood products with liquid wax will ensure a long service life and a noble appearance.
Preparation of wax
Method No. 1
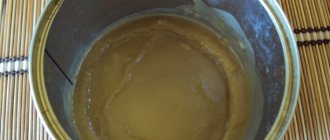
This mixture has the advantage that it can be used to treat children's furniture or wooden toys, as well as other items, while the composition does not contain harmful elements. To prepare the composition, prepare 50 grams of beeswax and 150 ml of jojoba oil; when using components in other quantities, their ratio should be 1 to 3. The wax is crushed, this can be done with a grater, then it is melted in a water bath and the oil is added . To prevent the wax from curling, it is constantly stirred until completely cooled. This composition can be stored in a warm, dark place for about two years.
Method number 2
Wax can be made from flax oil, for this the ratio with wax should be 2 to 8. That is, for tablespoons of wax, take 8 oils. When adding more wax, the product has increased viscosity. As in the first case, I grind the wax and melt it in a water bath, then add oil. It must be stirred constantly until it cools completely. This product can be colored using various additives. This composition takes a long time to dry; to speed up this action, it is necessary to add a drier. The wax should be stored in glass containers for about one year.
Method number 3
Beeswax can be mixed with linseed oil in a 1 to 1 ratio. Preparation is carried out in the same way as the previous methods. Sometimes the following recipe is used, two portions of wax, one of oil, and one of turpentine. In this case, the wax is melted in a water bath, then oil is added, stirred, and turpentine is also stirred thoroughly. After hardening, this composition is very dense, but has a pasty appearance and is easy to apply. After treatment, the wood has water-repellent properties.
Is it possible to make wood treatment oil yourself?
Yes, you can. For this, as a rule, natural ingredients are used: linseed oil and wax.
Flaxseed oil is a classic wood impregnation agent.
They are mixed in a ratio of 4 to 1, adding in the required quantities:
- turpentine - allows the oil composition to better penetrate the wood structure;
- rosin - makes the surface of the wood harder.
In addition, various pigments can be added to the oil.
Impregnation based on linseed oil
Pure flaxseed oil is the simplest and most affordable ingredient. It can be safely used to create kitchen utensils, such as cutting boards or hot pads. You should use the purest, fat-free, cold-pressed oil possible - a product with impurities can lead to the formation of mold.
Pure linseed oil can dry for almost 2 months
Craftsmen often use bleached oil - this is easier to mix with dyes. But you should understand that it will be quite expensive - about 1,500 rubles per liter. Whereas unbleached oil can be found at a price of about 700 rubles per liter.
Linseed oil based impregnations usually dry within 6-8 weeks. To speed up this process, tung oil can be added to linseed oil at the first or second stage of applying impregnation. In this case, the oil coating dries for about a week.
However, it must be used with extreme caution - preferably wearing rubber gloves, since tung oil is a very strong irritant. The most popular mixing ratios of linseed and tung oil are 1:3 or 1:5. Professional masters recommend experimenting and looking at the results in fact.
You can also use walnut oil instead of tung oil. But it also has its limitations. Professional carpenters recommend using it for crafts that are not often used in everyday life - the rancid smell of the oil takes quite a long time to evaporate.
Pigments are used to color the oil - preferably on a natural basis. Before mixing them with oil, the pigments must be dissolved in turpentine. The main thing with adding dye is not to overdo it. The optimal ratio of pigment and oil is 1:10.
As mentioned above, resinous rosin increases the hardness of wood after application of impregnation. Before adding rosin, it must be dissolved - to do this, the resin is heated to 130-150 °C. The difficulty in using rosin lies in the dosages. The more you add, the more viscous and sticky the oil becomes. Therefore, the required amount of rosin has to be measured after the fact, adding a little to the impregnation and monitoring its viscosity.
Another disadvantage of rosin is that it is a rather strong allergen.
Wax based impregnation
It is better to buy beeswax from reliable suppliers - this minimizes the risk that you will receive a dirty product
Most often, natural beeswax or carnauba wax is used in woodworking. Both of them dissolve well in turpentine or white spirit. Beeswax is soft and easier to work with than hard carnauba wax. However, the latter enhances the shine of the wood and makes it smoother.
In addition, the following can be used as wax additives to create oil:
- candelilla wax;
- ozokerite (earth wax);
- stearin;
- shellac.
We'll tell you how to make wood oil using a couple of simple examples.
Waxing of wooden elements
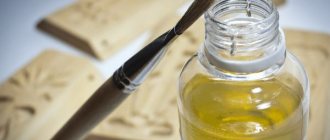
To process a wooden product, you first need to prepare a composition, for this you will need oil, wax, a container for kindling, a brush, a cloth for cleaning the brush, and, if necessary, use various additives to obtain different shades.
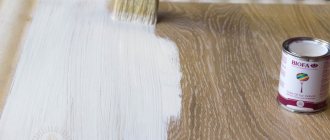
First, preparatory actions are carried out, the object is cleaned of dust or dirt, and, if necessary, grinding work is carried out. When the composition is prepared, it is applied to the object with a brush in a thin layer and left to soak thoroughly. In this case, the strokes are done very quickly, without stretching the work so that clear transitions do not form. Periodically remove wax clumps from the brush using a prepared cloth. This way the application will be even. After the wax has been absorbed, sanding is performed using a special machine or a cotton cloth, while the surface of the object remains smooth and shiny.
Method for stabilizing wood products
Wood is not the most resistant material to biological damage and changes in humidity. This feature is explained by the porosity of the structure. To improve the consumer properties of this material, various protective compounds are used.
Some of them form a surface film, but there are also those that penetrate deep into the structure.
Among vegetable oils there are non-drying ones (olive, almond and others) and drying ones (linseed, hemp, poppy seed, nut and a number of others). The latter polymerize over time, forming a dense film insoluble in organic solvents. Artists were the first to appreciate this property - oil paints and varnish in icon painting, for example, were made on the basis of linseed or nut oil (the composition has not changed today).
If wood is treated with linseed oil carefully enough, it penetrates deeply into the pores and dries, forming with the wood a polymer with interesting properties: resistant to decay, dense, does not absorb water, and very decorative. This process is called “stabilization”, since the wooden product stops responding to changes in humidity and does not change its properties over time. At the same time, the material continues to breathe and remains permeable to oxygen.
Technologically, stabilizing wood with linseed oil is quite simple, although it requires compliance with some technological nuances.
The main advantages of wax oil for wooden objects
The main advantage of the composition is that it is very easy to apply to a wooden object, which makes it possible to get the job done quickly. This product uses only natural ingredients, so the impregnation is considered safe for health and environmentally friendly.
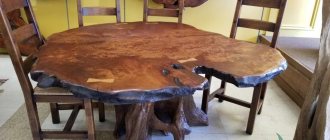
It is also easy to subsequently repair damaged or replaced areas; the mixture is reapplied to these areas. Caring for the item is easy; dirt is removed from the surface using special means, and then wax and oil are applied again. During the preparation of the composition, various additives are used to give the surface different shades. Using oil wax you can create an antique surface that will highlight any interior style. Wax is used to treat floors, wooden objects or surfaces in a bathhouse; this prevents moisture from penetrating into the material and causing its destruction. Preparing the composition yourself allows you to save money on purchasing various wood impregnations.
Recommendations for purchasing ready-made composition
Wood wax oil of the Sigma brand is in demand on the Russian market. This is the only manufacturer that produces oil material with wax and Sigma Color pigment . The composition is tinted at the factory. Tinted wax is available for sale in 27 variants. Material consumption: 0.8 l/m2. The manufacturer does not stop with the existing range of colors and new shades are added every year. The coating dries after a day, and after 10 days complete polymerization occurs. If the composition is used to finish wood indoors, then you can get by with applying one layer, without first priming the surface.
Finishing material with a natural color will emphasize the natural grain of the wood. The composition without pigment gives the surface a “wet wood” effect.
For outdoor and indoor work, Sigma Universal is recommended . You can purchase 0.8 kg or 1 liter of container for 810 rubles. The manufacturer declares material consumption: from 50 to 90 g/m2. A protective layer is formed that resists exposure to water and direct sunlight. The composition is available with factory tinting and the ability to add Sigma Color paste to obtain the desired color.
Wood is treated with oil and wax at positive temperatures. Service life of the oil composition for external use: from 8 to 10 years; for interior work – more than 10 years. The main advantage of oil wax is that it does not flake or flake off.
Rules for applying wax oil to wooden objects
- Before starting work, check the fasteners; all screws should be immersed in the material by approximately 3 millimeters. The caps are sealed with sealant or a special wood putty. When choosing a product, it is necessary to take into account that its color must match the wood.
- If the old surface is covered, then the previous treatment is removed; if there are large distortions or damaged areas, it is necessary to replace individual areas and apply wax to them.
- Before applying wax, sand the surface with sandpaper; it should have different grain sizes. Paper with a fine surface is not used, as dust particles clog the pores of the wooden material, and the work becomes ineffective.
- Then the wooden object is cleaned of dust that was formed during sanding.
- All cracks and fasteners must be covered with a special putty that matches the color of the wood, otherwise treatment can be performed using PVA glue mixed with wood sawdust remaining from polishing. Excess glue is removed immediately with a wet sponge or rag, so the surface acquires a smooth, uniform structure.
- After this, begin to apply the wax with a soft brush; lumps of frozen product are removed with a lint-free cloth.
- Then the item is left until completely dry, after which it is sanded using a cotton cloth or a special machine. As a result, excess wax is removed, and the surface acquires a smooth and shiny appearance.
- The wax coating is renewed about twice a year, while the wood refreshes its appearance. Dust and various contaminants collect on the old coating; they must be removed with a special product, and then wax and oil must be reapplied. After this, polish the surface with a cotton cloth.
Technology of waxing wood with hard wax
Hard wax color palette for wood.
Due to the fact that there are 3 types of wax: solid, liquid and water, there are different approaches when applying them to the surface of wood. Each waxing method should be considered separately.
The most common is impregnation with solid wax. Waxing wood with such impregnation is a holistic process consisting of several stages:
- Preparation of material.
- Surface preparation.
- Treating the wood surface with wax.
- Drying and getting rid of excess impregnation.
- Grinding.
Optimal tree protection scheme.
We begin waxing wood by preparing the necessary tools and materials. You need to prepare in advance:
- Grinding machine.
- Impregnation - vegetable linseed oil.
- Wax.
- A clean wool or cloth cloth.
- Brush.
- Tin container.
After this, the required wooden surface is prepared. Using a grinding machine, all irregularities and small knots are removed from it and it is thoroughly cleaned from dirt and dust. The result should be a smooth and clean wooden surface.
Using a brush or soft cloth, a vegetable impregnation - linseed oil - is applied to the entire area. Then the treated wood is left to dry for some time, and then sanded. It's best to do several of these approaches.
Hand movement patterns for waxing wood.
The wood surface is now ready for waxing. Hard wax must first be melted and placed in a tin container. Its application is done with soft, clean cloth or wool by rubbing in the direction of the wood grain.
The waxed wood is left alone for 2-3 hours to dry.
After this, to remove excess wax, the entire surface of the wood is wiped again with a rag. Otherwise, greasy stains may form in the future. It should be noted that wax can be applied to the surface repeatedly in this manner to ensure a more pronounced effect of depth of color and shine.
The final stage of waxing is sanding, which is done using a sanding machine.
There are times when it is necessary to give the wood the desired shade or repair some minor damage to the surface. Wax is also great for these purposes. To do this, you need to take wax containing the required shades.
To restore a wooden surface, it is pressed into cracks and rubbed over the surface. The damage becomes almost invisible. Proper waxing will last for many years.
Treatment of parquet floors
The floor surface is sanded using different sandpaper. The sanding agent should not have a fine grained surface, otherwise the dust particles will clog the pores of the wood. After this, the floor surface is puttied, that is, all fasteners and significant defects are covered, and then wax and oil are applied. This is done with a soft brush, the work is done very quickly to avoid clear boundaries between strokes.
When the application is complete, polish the wooden object using a special machine or cotton cloth. At the same time, all small scratches and defects become invisible, and the surface acquires gloss and shine. Thus, you can easily restore the old floor covering and it will have a beautiful appearance. When preparing oil wax with your own hands, you must follow the correct technology; after treating the surface with this product, the product takes on an original appearance. Thus, the coating can be given an antique look that suits any interior of the room.
Criteria for classification of oil compositions
To ensure that the wooden surface lasts a long time, it is treated with oil. An incorrectly selected composition can harm the tree. Therefore, you need to navigate the classification of finishing materials.
At the first stage, the choice is made according to the composition:
- Natural wood impregnation oil. It contains only natural ingredients, which makes it an environmentally friendly material.
- Synthetic composition. It is made from crude oil. There are harmful components, which significantly limits the scope of use of synthetic finishing materials. It is not considered as a useful protective layer. Under its influence, the wooden surface darkens. Refers to inexpensive wood coatings.
Wood oil is selected with an emphasis on its purpose:
- for covering wooden bases indoors and outdoors;
- the type of wood is taken into account;
- oil for protecting wood and its decoration.
Do you need to make your own oil to impregnate wood?
Processing wood with oil is one of the key stages in creating wooden products. Oil impregnation closes the small pores of the wood, making its surface more monolithic. In addition, the oil gives the wood hydrophobic properties and protects it from the formation of mold and mildew.
Many professional carpenters make their own oils to save money. However, it is extremely important to follow the recipe, monitor the amount of ingredients and accurately carry out each stage of creating the impregnation. We'll tell you how to make oil for impregnating wood with your own hands and how practical it is in general.
Content: