New Year decoration
A decorated Christmas tree in the house is always a symbol of the holiday, New Year's miracles, and the fulfillment of cherished desires. You can approach the solution of the problem creatively by making an original decoration with your own hands. We offer unusual variations on the theme of creating elegant Christmas trees.
A wonderful New Year tree - a symbol of celebration and fulfillment of desires
Cone trees
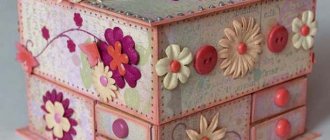
Even a child can make such crafts. Creating a whole forest of bright and cheerful Christmas trees will be real fun, an exciting creative process that you can do on a winter evening with the whole family. For work, we will take thick paper, a roll of colored corrugated paper, glue, pencil, scissors.
Materials for creating a Christmas tree
Everything is done simply:
- Let's roll a cone out of cardboard. The formula is this: the size of the cone, the height of the beautiful Christmas tree.
- We cut out two triangles from corrugated paper, the size of which is equal to the height and width of the base, and glue them.
- We cut out a circle from cardboard, its diameter is equal to the base of the cone, we paste it with corrugated paper on top, making an edge larger in diameter.
- We insert a stick-trunk inside the cone and glue the base. We wrap a small piece of flexible wire with paper of the same color and attach the element to the top.
- Let's get to the most creative part - decorating. We decorate our Christmas tree to our liking. You can use beads, appliqué, satin or packaging ribbons, New Year's tinsel and anything your imagination suggests.
- Let's bend the top in a whimsical way and hang an elegant Christmas tree decoration on it.
- We are preparing the stand. From the remaining cardboard we roll a ring, cut out a stand, fill it with plaster mortar and “plant” the Christmas tree.
After the solution has hardened, we wrap the stand with beautiful paper or burlap and place miniature gift boxes under the Christmas tree. Original holiday decor is ready to decorate the interior of your home.
Master class on creating a Christmas tree
Interior decor in the form of a Christmas tree
Today, many are trying to move away from the classic version - elegant natural pine or spruce, decorated with balls and sparkling tinsel. Do you want to decorate your room in a new way for the New Year holiday? We offer a very unconventional, but incredibly stylish wall decor made of wood.
An unusual Christmas tree will surprise your guests
For our installation we will need several branches of approximately the same thickness, which must first be cleared of bark. You will also need a garland, a star, which can be made in advance from a vine or willow branches with your own hands, as well as a strong rope. Assembling the installation:
- Let's prepare the sticks that will become the crown of the tree. They should be of different sizes, gradually decreasing from the longest to the shortest.
- We tie all the elements one by one with a rope, like a ladder, fastening the ends of the sticks together. The result should be a pyramid-shaped figure.
- We leave a loop on top of the structure, which is convenient for hanging the Christmas tree from a wall or door. We'll wrap it with a garland and attach a star on top.
A stylish installation in eco-style will appeal to everyone who looks at the world creatively. In addition, it does not “steal” precious meters in the room, but no less brightly complements the New Year’s interior.
Creative eco-Christmas tree
How to make a paper ax
To understand how to make an ax out of paper without errors, neatly and beautifully, you should first watch the video material, stencil options, ready-made crafts, and understand the assembly sequence.
Required materials and tools
To make a paper ax with your own hands, you should prepare the following materials:
- paper, cardboard;
- pencil, eraser, ruler;
- scissors or stationery knife;
- PVA glue, tape;
- paints, markers.
Depending on the chosen model, decor may be needed.
Step-by-step assembly of a Viking ax made of paper
The shape of the Viking ax is characterized by a special curved blade. Therefore, using a ready-made Viking ax template, it will be easier to create a craft with your own hands. The finished work will be recognizable. The work is carried out in stages:
- A handle is made from an A4 sheet - it is twisted into a tube (1.5-2 cm in size), the edge is fixed with glue.
- The blade is made - the same format is folded in half, twice.
- Each free side is bent at a slight angle.
- The workpiece is straightened, then the folded sides are folded to the fold in the middle. The upper protruding parts are bent inward. Everything is fixed with glue.
- Using a pencil, use a template to give the blade the desired curve, then cut it along the contour.
- The two elements are connected - they are marked with a pencil in the upper part of the handle, and slots are cut into which a paper blade is carefully inserted. They are fixed with a “clamp” twisted from a strip of paper and glue.
- To make the edge of the blade more durable, glue a strip folded in half.
The finished craft is perfect for games; it holds its shape perfectly.
Recommendations for design
By creating an ax from A4 paper, you can make it as similar as possible to the original. For example, the pattern of a taiga ax differs from a regular one. It has more compact dimensions. The upper “working” part of the blade has a straight line with the butt, the back of the blade is rounded, and in the inner part there is a semicircle.
For structural strength, thick cardboard is used, on which paper is glued. The paper folded in several layers also has excellent strength. Scotch tape or colored electrical tape increases wear resistance and adds original design. The same applies to the use of metallized paper or self-adhesive film to imitate metal in the manufacture of the blade, and the design of the handle to imitate wood.
Patterns made with paints and drawings that imitate the original ones will look impressive.
Video master class
Video instructions help you get the job done quickly and efficiently. The creative process will be interesting, and a neat craft will delight the author and others with its originality.
Origami hatchet
This spectacular origami ax craft is easy to make. A child can also master this assembly technique. Military weapons are created in stages:
- a sheet of A4 colored paper (silver or any color) is folded diagonally - the excess is cut off;
- the resulting square is folded diagonally on the other side and unfolded;
- each corner is folded towards the middle;
- the square is turned over, and again all the corners are bent towards the center;
- the workpiece is again turned upside down, and the folds to the center are repeated a third time;
- the paper square is turned over with the bottom side up and the resulting “windows” at the top and bottom are opened;
- the workpiece is folded in half - the “blade” of the ax is obtained;
- to create a handle, take a previously cut part of a paper sheet - fold the strip in half and unfold it;
- each side is bent to the center line, then again;
- For a narrow workpiece, the corners are bent inward at one edge, then it is folded in half and glued;
- The structure is assembled - the “blade” is coated with glue from the inside, placed in the handle and fixed.
The battle ax is ready - it is durable and wear-resistant.
Ninja ax
The ninja ax is distinguished by its compactness and perfectly “hits” the target when thrown. Any kid would agree to make such a “weapon” on his own. Using a ready-made ax template will allow you to create a paper “double” that is as similar as possible. The work is carried out in stages:
- A sheet of A4 paper is folded in half twice;
- on the bent side, mark points of 5 cm, 2 cm upward from it (draw a segment) and another 5 cm, then 9 cm;
- cut off half the contour of the blade;
- on the other half of the workpiece, a 10 cm segment is marked, the blade is completed, and cut;
- two elements are prepared from black paper;
- white paper templates are opened and glued onto a thick cardboard base (on both sides);
- then glue the black elements, and on them (in the middle) on each side there are 6 circles 1-1.5 cm;
- the handle is made by twisting a sheet of black paper into a thick tube and fixing it with glue;
- roll up another similar piece 15 cm long, cut 5 rings of 2 cm each from it;
- they are put on the handle with an interval of 0.5-08 mm and glued;
- add the next ring 3 cm thick with trimmed corners;
- the blade is inserted into the handle with a cardboard base and glued.
To make the blade more durable, you can cover it with transparent tape or foil.
Minecraft cardboard ax
A popular computer game sets the tone for creativity. Creating an ax out of cardboard with your own hands from Minecraft is just a hype of the present time. The craft is made step by step:
- The pre-printed template is placed on cardboard, the outline is outlined, and the workpiece is cut out. It is better to use thick, thick cardboard, such as from boxes.
- Three blanks are created, which are glued together, placing one on top of the other.
- All raised edges are glued with paper for strength.
- The blank is painted black, then a printed stencil of an ax is glued on both sides.
The minecraft ax is ready.
Ax templates for printing and cutting
What else you can do from the Minecraft universe is shown here.
Schemes of a simple ax with photo examples
For beginning craftsmen, there are simplified assembly options, but the finished paper ax looks very beautiful and “natural.” Assembly is carried out in stages:
- a colored or white sheet (A4 format) is rolled into a tube 1.5-2 cm thick, the ends are glued together - this is the handle;
- make a “blade” - fold a sheet of paper in half twice;
- straighten the workpiece into half a sheet and fold the upper corners towards the middle, then a second time;
- the resulting form is folded in half, the lower protrusions are put into pockets;
- the workpiece is glued together;
- on the handle (at the top) they retreat 3-5 cm and make slots for installing the blade;
- carefully insert the blade and fix it with glue.
The craft is ready, it is quite strong and looks aesthetically pleasing.
This beautiful paper axe, created according to the instructions, is suitable not only for boyish games, but will also perfectly complement the interior of a child’s room.
Templates and stencils for cutting
Using templates for handles and ax blade shapes, you can significantly reduce the time needed to make a craft. You just need to print the tested stencil and start assembling the product.
A hand-made ax made of cardboard looks original and impressive. Prop weapons will definitely be in demand and will find their use in children's games, or in staged mass reconstructions of historical events from antiquity.
How to make swords from paper is shown here.
Polygonal models: print and glue flat patterns
For papercraft beginners, these models will be difficult to assemble.
Source
Where to start assembling wood
Assembling a topiary must begin with planning the appearance of the future tree of happiness and finding the necessary parts. The appearance of topiary is determined by the style of the interior for which it is made. First, find the materials necessary to construct the base of the tree. In any case, you will need tape, glue, colored paper, polystyrene foam, polyurethane foam, etc. The list of parts is limited only by the imagination of the creator. After collecting the necessary things, you can start creating a topiary. First, the barrel is assembled, because it is the basis of topiary. Moreover, it must not only be strengthened, but also covered with varnish or paint. Then one end of the trunk is attached to a pot, stone or shell, and a ball is hung on the other, which will later become the crown of the tree of happiness. It is best to use glue to hold all the parts of the topiary together.
The basis
To construct the basis of the tree of happiness, whatever is at hand at that moment will do. To make a base from newspapers, you first need to crumple them thoroughly, and only then form a sphere according to the given parameters. Newspapers are crumpled and pressed tightly, after which they are wrapped with tape. The base can also be made from newspaper clippings, but in this case they should be placed in a plastic bag. If you need to make a small base from padding polyester, you first need to compact it into a sock or stocking, then give it the required shape and wind it tightly with sewing thread. It’s even better to make this base from polystyrene foam, using ordinary packaging from household appliances. But polystyrene foam crumbles and is inconvenient to roll into a ball, so this base is not very popular. In addition to those mentioned above, the following materials can become the basis of topiary:
- polyurethane foam;
- Knitting thread;
- papier-mâché, etc.
Trunk
The trunk of the tree of happiness connects the base with the crown, so it must be strong and stable. Its role can be ordinary wire, secured with artistic tape, twine or plastic. To make the product more realistic, this trunk can be made from a wooden branch or wood chips. But first this branch must be cleared of bark, covered with varnish and stain. If you are making a low topiary, then as a trunk you can take a popsicle stick, sushi sticks or wooden skewers fastened together. The color and type of trunk depends on the material of the base and crown. For topiary with coffee beans, white or brown colors are suitable. A curved trunk for a European tree can only be made from wire. You can also take any material that is approximately suitable for the trunk of a topiary, shape it and fill it with plaster.
Crown
To make a topiary crown, absolutely any materials that are currently at hand are suitable. To do this, you can take paper napkins, corrugated paper, folded origami, nylon tapes, etc. Then the crown needs to be decorated. To do this, take fir cones, real seashells, coffee beans, artificial flowers, etc. The crown is the main accent of the tree of happiness, so its design must be approached very seriously. The trunk and stand only emphasize the overall theme of the topiary, so it is advisable to first decide on the material for the crown, and only then design the remaining parts of the tree. But the topiary trunk may not be able to withstand a crown that is too large, so it should not be overloaded. Only the stand of the tree of happiness can be decorated with some elements.
Stand
As a stand for topiary, you can take an ordinary flower pot, a large flat stone or an iron bucket, decorate them beautifully and place them under the crown. The decor of the tree of happiness stand can be anything. It is decorated using the decoupage technique, decorated with lace or bright unusual shreds. You can stick stones, shells and artificial flowers on the stand. This topiary element is a semantic continuation of the crown, so its design must be based on the existing elements of the decorative product. If the tree is decorated in a marine style, then shells and multi-colored pebbles will be appropriate, and for a topiary in a romantic style you will need lace and hearts made of colored paper. The size of the tree's crown should be larger than its stand in order for the composition to look harmonious.
MDF production technology + Video on how to make it
On the way to the MDF board, the raw material, which is ordinary round timber, goes through several stages:
- Preparation . The bark is removed from the logs using a debarker, and then the wood is turned into chips using chippers. Next, the raw material is mechanically cleaned (washing, magnet) from foreign inclusions, steamed and fed into a refiner or defiberer for subsequent grinding to a fibrous state (the paper production process is similar). The preparatory stage ends with the introduction of paraffin and urea resins, which, when interacting with lignin released from wood, provide binding properties, and the removal of air from the mixture, after which the prepared raw material is sent for drying.
- Drying . The wood pulp is placed in a disperser, where its moisture content is reduced to 8-9%. Afterwards, the raw materials are fed into a cyclone, where the large wood fiber fraction, unsuitable for the production of high-quality slabs, is removed by air separation.
- Formation of the carpet . Primary molding is performed using a conventional press. This stage is necessary to remove air bubbles from the mass, which can negatively affect the characteristics of the finished slabs.
- Pressing . The pre-press obtained at the previous stage, in the form of a continuous belt, is supplied through a conveyor to a hot press, where, under the influence of a certain pressure and temperature, it acquires the desired characteristics. The parameters of the operating factors change several times, which is necessary for “setting” the outer and inner layers of the slabs.
- Calibration _ Its goal is to obtain slabs that are the same in thickness throughout. Performed with heating turned off and minimum pressure. From the assembly line, MDF is cut into slabs of the required size, which are sent to rest for 20-25 minutes to cool.
- Grinding . It is performed on a surface grinding machine to remove defects and residual thickness differences.
Next, the finished slabs are either packaged and sent to a warehouse, or subjected to decorative processing - lamination with PVC film, painting with enamels or paints, or veneering.
Finished MDF boards are stored in packs on disposable pallets. Fiberboard guards are placed on top and bottom, then the entire structure is tightened with a frame made of steel strips and corners. The marking of the packs contains the name of the manufacturer, trademark, type, grade and brand of products, emission class, dimensions, number of units, date of manufacture and shift number, quality control stamp and quality mark (for certified goods).
Covered trucks are used to transport MDF boards. Products should be transported and stored in a horizontal position.
How to do it:
Making a bonsai tree
Bonsai is the oriental art of growing decorated miniature copies of real trees. Hawthorn, pomegranate, calamondin, etc. are suitable for growing as bonsai. But to make, rather than grow, an ornamental tree, it is better to collect or buy hydrangea inflorescences. The collected inflorescences need to be dried well for 5-6 hours. Then the hydrangea flowers need to be fixed on individual branches and snags, which are crushed on the opposite side with a foam ball. These snags can be replaced with three-core wire. Then, carefully pour plaster into the container prepared for the tree (salad bowl, ashtray, pot). Then you need to place the bonsai base in the middle part of the pot and secure the resulting composition with a mixture of gypsum and PVA (the consistency of thick sour cream), while simultaneously securing the trunk and branches. After this, you need to dry the entire structure for 24 hours. After a day, you need to paint the tree trunk with acrylic paint or ocher.
After drying, you can decorate the bonsai with green decorative elements.
Where are artificial trees used?
In addition to home life and country house arrangement, artificial trees are an integral accessory of public buildings and public places.
The lobbies of hotels, restaurants, spacious administration and office premises cannot do without green trees that imitate real ones.
Large artificial trees are used to decorate exhibition halls, galleries, and conference rooms. They look great as decorations for performances.
Shopping and entertainment centers, the halls of water parks and concert halls, cafes with terrace tables, etc. are unthinkable without artificial trees.
LED tree
Making a tree from individual LEDs is considered a more labor-intensive process. However, this method does not have the disadvantages inherent in ready-made garlands, which makes it possible to produce structures of any shape and size.
The main material is 5 mm LEDs. To equalize the voltage you will need resistors.
Direct manufacturing begins with soldering resistors to the LEDs. The LED contacts have different lengths, so the resistor legs are pre-shortened on one side. You need to solder the contacts of both elements very quickly so as not to damage the LED.
- Heat shrink tubing is then cut into the wires to cover the solder joints and resistors. It is necessary to leave space for soldering the power wire. The tube is inserted onto the resistor leg and heated a little with a lighter to give the insulation the required shape. This operation is performed with each LED.
- After this, you can begin making the tree itself. Most often, the trunk is made of thin plumbing pipes, and the branches are made of wire, approximately 50 cm long. The main part of the branch takes 45 cm, and 5 cm is left for attaching it to the trunk.
- Small branches are cut into sizes up to 10 cm. The number of LEDs on one branch must be calculated in advance.
- At the next stage, small branches are tied with electrical tape to large branches. It is recommended to make the number of LEDs on each small branch equal to the number of LEDs on the large branch. Each LED is secured using electrical tape.
- The wires need to be stretched along the entire length of the main branches, after which they are cut taking into account the bends of the small branches.
- The ends are wound to the trunk, after which all the pros and cons on each branch are connected. Their number should match the total number of branches. The wire connections are insulated. All that remains is to hang the decorative ornaments evenly and connect the finished tree to the electrical network.
What is a faceplate for a wood lathe?
A faceplate for a wood lathe is a part in the shape of a steel disk with holes for attaching a dimensional workpiece. Typically, a faceplate for a wood lathe is used in cases with those parts that cannot be clamped into a chuck.
Examples include flat workpieces, large-sized ones, or simply irregularly shaped parts. Such a device is simply necessary when processing products with a displacement of the spindle circumference, as well as products that may suffer from the impact of the chuck.
The most popular tree species
Among artificial trees, the most expressive and most often used in the interior are imitations of such species as pine, sequoia, palm, bamboo, sakura, oak with acorns, hazel, etc. They have bright features and are recognizable in any setting.
Also, artificial ficus and orchids can pass for trees - they are tall and impressive in size, have clearly defined stems and large leaves.
Rowan and rose hips are also bright representatives of the flora, which are easy to realize in artificial form.
Production of artificial trees for the interior
Today, the production of artificial trees has been put on stream. The following trees are produced on an industrial scale:
- made of polyurethane foam,
- made of polymer concrete,
- made of fiberglass,
- artificial stone
- and other modern materials;
- from parts of natural origin - bark, roots, branches, vines, vines, etc.
The materials are strong enough, so trees can be created large without fear for their safety or risk of injury.
Collection and preparation of autumn material for topiary
You can start collecting material for seasonal crafts from mid-summer. During this period, most fruit trees produce a harvest, fruits appear on chestnuts, oaks and spruces. You can get a sufficient number of seeds, seeds, and shells by simply wandering through a forest plantation, a park, or in your own garden.
To create a topiary, only whole materials that are not affected by pests and rot are suitable. In order for the collected components to deteriorate as slowly as possible, they must be prepared before use. Each type of natural element has its own rules:
- Chestnuts. After collection, they should lie for at least 3 weeks in a cool place. Drying is necessary so that they do not puff up and lie flat on the base. During this time, their top layer will strengthen and the shape will become flattened.
- Fruit seeds. The material must be washed well and cleared of any remaining pulp. If necessary, boil cherry or plum pits for 5 minutes. Then they need to be fried in a frying pan, in the oven, or left in the sun for the whole day.
- Acorns. Single-seeded oak fruits must be washed and dirt, leaves, and larvae removed with a brush. Then they are thrown on a towel, allowed to absorb water and fried in the oven over low heat for 1 hour.
- Walnuts. Half shells are suitable for topiary. To split the nut into even pieces, you need to insert a knife between the halves and lightly hit it with a hammer. We remove the core, clean the inner sides of the shells from the veins, and leave to dry for several hours.
- Cones. To prevent unopened coniferous fruits from changing their appearance after drying and starting to open, they must be treated with wood glue. The material is dipped into the mixture several times, the glue is allowed to drain and laid out on oilcloth to dry.
Value comfort and save!
Inexpensive artificial wood allows you to simultaneously decorate your interior artistically without spending a ton of money. It will relieve tension and give your eyes rest if you work at your home computer for a long time. It is useful in combination with other indoor plants.
You can save not only your money, but also time. Artificial flowers do not require any maintenance.
The condition of natural ones must be constantly monitored; they require fertilizers and replantings. All this distracts from the main work, while labor productivity costs money.
A winter garden made of artificial trees does not need to be updated every season. It will transform the austere office environment and make the meeting room more comfortable.
You should not think that they are empty and dead - associative memory itself will take care of the positive perception of trees, even if they are not made of wood.
Decorative tree made from branches
To decorate the interior of your home, you can make large artificial trees with flowers.
Necessary materials:
- Hot glue gun;
- Twigs;
- Moss;
- Sea pebbles;
- Square flowerpot;
- Decorative flowers (can be paper);
- A piece of foam.
How to make a decorative tree yourself from ordinary branches:
- We fill the bottom of the flowerpot with sea pebbles and put polystyrene foam on them, and insert the prepared branch into it;
- Sprinkle it again with sea stones for good stability, insert moss on top;
- Now we decorate the branch. To do this, we glue decorative flowers randomly to a branch using a glue gun;
- After completing this procedure, such a decorative craft will rightfully serve as a decoration for your home or apartment.
On the Internet you can find many photos of trees made by yourself, choose the option that suits you and create your own masterpiece based on it.
Making an artificial tree with your own hands
Tiny artificial trees can be made from wire and beads. Such wicker things are called “trees of happiness.” They do not have strict manufacturing rules and are built on pure improvisation.
The leaves or paws, imitating conifers, are made of beads, the trunk is made of wire wrapped in plain threads.
For greater stability, a flat stone is attached below or the trunk is inserted into a miniature container. You can also make a “stump” from plasticine or clay. Even a child can make such a tree.
To make a larger artificial tree, you can use:
- paper,
- clay mold mass,
- metal wire,
- PVA glue,
- additional accessories.
Step-by-step master class on making topiary
To make a topiary with your own hands, first of all prepare the basic elements:
- The trunk, if it is not a natural branch, is wrapped with satin or other ribbons, twine, covered with fabric, and covered with materials selected for this composition. If the barrel consists of several elements, for example, several thin knitting needles or kebab skewers, you must first tighten them with electrical tape.
- You need to think about how to fix the tree in a pot and prepare all the necessary materials. When using a flower pot with drainage holes, it is important to seal them first. If the pot or bucket is heavy enough so that the crown does not outweigh the base, then foam plastic, pieces of polystyrene foam, or even polyurethane foam are sufficient for fixation.
The trunk in such a pot is placed in the center, sunk to the ground, burst with prepared materials and filled with polyurethane foam or alabaster in the consistency of sour cream.
To weight the pot, use cement mortar with sand: placing the trunk in the center and fixing it, pour cement into the pot and leave to harden. A tree on such a base will stand securely.
- The finished base is put on a firmly fixed trunk, or the trunk is fixed with the base already put on.
You may be interested in: Simple DIY home decor: interesting crafts for interior decoration
If the base for the tree crown is made in the form of any figure, for reliability it should be secured with glue.
The “skeleton” of the tree is ready – you can decorate it.
The near-trunk space of the pot can be decorated with pebbles, shells, and covered with floral mesh or fabric.
The pot itself can be covered with fabric to make a beautiful paper “wrapper”.
The crown can be attached to the base using glue, flowers can be pinned with wire, or placed on wooden skewers.
Other options
There are a huge number of materials for creating a tree of happiness. Felt topiary looks beautiful . You can cut beautiful flowers and petals from it. Felt goes well with beads and satin ribbons, so it looks gentle and attractive.
By the way, look at the previous article. There is a lot of useful information for you - How to make a bird feeder with your own hands?
Such a wedding topiary will not go unnoticed during the celebration. It will attract the attention of guests and catch the gaze of others.
It is difficult to make topiary from flowers . This requires a long time to prepare the material. Find suitable flowers, dry them correctly and only then use them to decorate the tree of happiness.
Please take a look at the following article. It contains more useful information - How to make a birdhouse with your own hands?
These flowers can be attached with regular glue. A special protective varnish will help them maintain their shape.
It is much easier to make topiary from organza . For this, squares of this material are usually prepared. Their length and width should not exceed 7 cm.
Difficulties will be encountered when processing the edges, so it is recommended to purchase floral organza, ideal for creating a tree.
We recommend placing organza topiary in an empty flower pot.
Volumetric tree on the wall
This unique 3D decoration can be made with your own hands on the wall (and even on part of the ceiling) without any problems. To create a real masterpiece, it is not necessary to have the knowledge of a sculptor or artist.
Important: This decor requires a lot of space.
You will need:
- Master OK;
- Bucket;
- Marker and scissors;
- Acrylic paints and brushes;
- Scotch;
- A bag of dry plaster;
- A large sheet of cellophane film.
Progress:
- Let's draw a contour mirror image on the cellophane film with a marker, and when we cut out the drawn middle, we should get a stencil;
- We stick it on the wall with tape;
- Pour water into a bucket and spread the plaster;
- Using a trowel, carefully fill the empty stencil space;
- Remove the film after the mixture has dried;
- We apply several more layers of gypsum, making the last one round;
- When the solution has dried thoroughly, paint the sculpture with acrylic-based paints.
You can choose a wide variety of palettes. A “natural” image would look great in the living room, or a fabulous tree, unusually painted, on the wall in a children’s room.
Care Tips
A few care tips:
- The appliance is not stored near other kitchen utensils. Can be hung on the wall using special loops on the handle;
- Wash after use with dish sponges and detergents. The use of abrasive cleaning agents is prohibited;
- A cutting board is used for work. Usually wooden or plastic. The cutting edge can easily be damaged on a stone, glass, or ceramic surface;
- the metal part is treated with kerosene, the blade is lubricated with vegetable oil.
Source
Topiary for beginners: tree of happiness made from decorative ribbons
We will need:
- polystyrene foam ball;
- wooden stick (a pencil will also work);
- ribbons;
- glue;
- decorative pot;
- invisible.
Cut the tape into small strips and form them into rings, wrapping the pieces around your finger. Then pin the rings one by one to the base. You need to make sure that there is no empty space left. You can lay decorative frost on top or sprinkle with small remnants from ribbons. The crown is ready. Now put the ball on a pencil and secure the finished topiary in the pot, having previously “weighted it down” with gravel.
Sharpening and operation
Small tips
Carpenter's axes require the most careful sharpening. It's okay if the sharpness of these tools allows you to sharpen a pencil or even make a toothpick.
Before sharpening the cutting edge of the ax, it is necessary to check the hardness of the metal and, if it turns out to be too soft, the ax will need to be additionally hardened by exposure to high temperatures. It is best to do this in a forge, trusting a professional specialist.
The tool blade is sharpened after connecting it to the wooden handle.
The figure below explains how to properly sharpen an ax.
Useful instructions
The correct use of an ax can be described by following some basic rules:
- Try not to cut metal products.
- Carefully check the wood being processed for the presence of foreign solid objects in its body.
- Do not use the tool in a capacity that is not inherent to it: as a lever, hoe or shovel.
- Do not throw the tool onto a hard surface, especially from a great height.
- Do not store it for a long time in an open place exposed to sunlight or in a very humid place.
If treated with care, the ax and its wooden handle will serve for a long time and please its owner.
Topiary made from coffee beans
This composition is an excellent addition to the design of the room, and also symbolizes well-being and happiness. A fantasy topiary made from coffee beans will be a pleasant surprise for a woman or man.
When creating a topiary from coffee beans with your own hands, you can use not only a ball, but also other shapes: a heart or a cone. Handicraft stores sell special foam plastic blanks, but you can make them yourself. Cinnamon sticks, dried orange slices, and cloves are perfect for decoration.
The photo shows a fragrant coffee topiary, the crown of which is decorated with beans. The trunks are two branches, and the pots are covered with moss and artificial plants.
Artificial tree combinations
Artificial trees for the interior are ideally combined with water cascades and fountains.
Handmade stones and rocks are a great complement to man-made trees. They look great as part of an alpine slide or as stand-alone accessories.
Corrugated paper trees
Add a little magic - make a forest with trees from corrugated paper with your own hands.
These paper trees are so fun and perfect for cute Christmas decorations. In addition to crepe paper, you will need wooden popsicle sticks and some thin wire.
You can use wine bottle caps for coasters, but if not, just make a base out of cardboard.
An amazing forest miracle awaits!
Paper axes: step-by-step instructions on how to make
Do-it-yourself paper weapons are always relevant and in demand, since for boys of any age this “prop” is necessary for games. These crafts are also popular among adults; they make it possible to create more realistic reconstructions of medieval battles. Fake edged weapons are also appropriate when staging performances and themed events. We will tell you in detail how to make an ax out of paper yourself. To do this, we offer you video materials, diagrams, assembly methods, templates for printing and cutting, and options for ready-made crafts as ideas for what to do.
Master class on making decorative poplar
Such a beautiful “poplar” is a great decoration for your home or street.
Required materials:
- Candle;
- Glue;
- Needle;
- Matches;
- Thin and thick wire;
- Pot;
- Gypsum or cement;
- Gray and green threads;
- Green plastic bottle;
- Scissors.
Step-by-step master class with photos:
- We use wire cutters to separate 3 identical pieces from the thick wire and connect them to each other by twisting them. We wrap the ends of the blanks on one side;
- We dilute the fixing mixture, pour the solution into the pot, and place a “poplar” trunk with curved ends there. We are waiting for the mass to harden, and at this time we are making artificial branches;
- We cut squares of different sizes from the bottle and cut out leaves from them. Heat a needle over the flame and make holes in the upper part;
- We insert a thin wire into them, fold it in half, and twist it. We connect three branches into one and make several identical blanks;
- Next, to make crafts for the home interior, we take several blanks, which consist of three branches, and connect them together;
- We close the wire part with gray threads and secure the ends with glue. We leave the lower part of the branch free, which we attach to the trunk;
- Using the same method, we make the entire “poplar”, wrapping its stem part with gray thread;
- To imitate grass, cut green threads of the same size and fold them in half. We lubricate the bend points with glue, and attach the workpieces to a cement or gypsum base.
Thus, we get beautiful artificial trees in pots that can easily stand both at home and on the street - they are not afraid of rain or bright sun rays.
What are the benefits of artificial trees?
Unlike natural ones, artificial ones do not require any care: they do not need to be watered, their roots will not rot, their leaves will not fall off, they do not need light, and they are not harmful to allergy sufferers.
Such “eternal companions” decorate the work environment and add ease to the atmosphere.
New Year's topiary made of cones and pine branches
We will need:
- pine cones;
- twigs (pine or spruce);
- small Christmas tree decorations in the shape of a ball;
- pot;
- alabaster (construction plaster);
- wire (thin floral);
- skewers (trunk of topiary);
- hot-melt gun (glue);
- decor for the pot (a little twine and burlap).
Tip: for such a topiary you will not need a foam ball, since for the tree of happiness we will use long cones.
There is only one thing: if the cones are small, then they need to be attached to a wire and a foam ball to give the topiary volume. By the way, a foam ball can be replaced with ordinary newspaper, tightly crumpled into a ball and wrapped with any thread. So, let's get to the topiary. Wrap the cones at the base with wire so that a tail 7-10 centimeters long remains. Start twisting the wire tails together, distributing the cones relative to each other. You should end up with a spherical crown. Secure the crown onto wooden skewers with hot glue. Now dilute the plaster to the consistency of thick sour cream and place it in a previously prepared container. Place the resulting structure of the trunk and crown evenly in plaster and wait a couple of minutes until it hardens completely. Decorate the tree trunk with ribbon or twine. The pot can be decorated with burlap. Make beautiful folds and give it the shape of a bag, and tie a satin ribbon on top. The crown of the topiary can be additionally decorated with small red Christmas tree balls and pine branches using glue.
Bonsai as art
Artificial house trees are popular in Japan. Bonsai - the art of growing trees - today takes such forms.
Imitation trees can also be “grown.” At the same time, the same canons are observed as in the real ones, and styles are observed (“broom”, “creeping forest”, “cascade”, etc.).
Such a miniature tree may include part of an ornate driftwood or twig. Coffee beans will imitate pebbles, snow is made from polystyrene foam or cotton wool, salt or white sequins.
Artificial bonsai has become a popular trade item today. It is convenient because it fits even in small rooms and is used to decorate open shelves or corners.
Advice and recommendations from experts
The faceplate is a widely used device in metalworking and woodworking. Due to the fact that it is intended for the production of non-standard parts, the tasks before them can be very diverse. Therefore, during production, it is necessary to take into account many nuances.
From this it is clear that specialized stores have a huge number of faceplates. Sometimes even this is not enough. In this case, turners make them themselves, focusing on their own needs and requirements for a given faceplate, which helps to tailor it to a specific production goal.
It is important to always have a whole set on hand, including faceplates for various purposes. However, some of the kits may be homemade. It happens that some variations may not be available on the market or in the assortment of a specialized store.
What are the varieties?
Due to the widespread use of faceplates for wood lathes, there are a huge number of modifications and mounting options, and from here the number of varieties is increasing. The faceplate for a wood lathe itself has a simple design and a wide range of uses, which has led to an increase in the methods of securing the elements being processed. Below we will consider in detail each of the types of faceplates for a wood lathe.
T-slot disc
This design is a surface with recesses on it. All fastenings are made using screws. You can find a huge number of types of products for installing this equipment. It is important that the quantitative factor of the grooves changes, namely, the larger the number of grooves themselves, the purpose increases.
During the manufacturing process, disk parameters can easily change and adapt to a specific situation. This type of faceplate for a wood lathe is the most common because it is convenient and versatile, and has many uses.
With through grooves
Faceplates with through grooves are especially suitable for processing metal, not just wood. Through grooves are their main difference. Their size and frequency depend on the task of use.
In most cases, the holes are located along the entire circumference at a certain distance. There are models where the groove is solid and continuous. Installed with screws. Often the part is placed on the disk with the reverse side if a particular product has corresponding holes.
As a rule, other mechanisms are installed on the surface of the adapter. They make it possible to make the range of clamps more diverse, necessary for working with the disk and increasing its adhesive capabilities.
With holes
The entire line of varieties has a common feature - a central recess. Thanks to this, the disc fits easily onto the chuck, which is why threads are used. All other holes are located according to specific regulations. The number of grooves directly depends on the product line. They can be round, oval, or even elongated.
There is also more than one option for fastening the workpiece in the faceplate; in addition to screws, clamps can also be used, which significantly increase the number of options.
Drive faceplates
Such discs have a special recess along their entire circumference, which holds the clamp. Due to this type of disk, the parts are placed between centers, and the torque is transmitted from the shaft to the product.
The clamp, in turn, encircles the product itself, thereby being similar to a coupling. In addition, on the disk itself there are holes of different sizes, having a T-shaped format; their number can be any. A faceplate of this type is not limited to clear parameters; they completely depend on the purpose of use.
With a square
This type of faceplate for a wood lathe has a so-called additional adapter with an angle shape. It is attached to part of the disk, while releasing the other side with an empty flat surface. The workpiece is located on this adapter.
The essence of this additional part is to reduce the mechanical factor for the part. Therefore, it is better to use it if the product is vulnerable or has soft areas and thin parts.
In order for the stability to have the maximum indicator, it is necessary to install fixation at one point on the surface, and also select at least three. You can choose more, but it all depends on the characteristics of the material that is used. It is important to use additional fasteners.
For example, if the shape is quite thin, but at the same time elongated, then a special adapter is quite suitable. The trident cartridge is used when working with long wooden structures with a flat base.
Basic rules for installing glass block partitions
Basic rules for all glass block structures:
- The surface under the lower tier must be perfectly flat.
- The use of glass block structures as load-bearing structures is excluded. Only fencing function, zoning and design. The point here is not the strength of the blocks themselves; it is enough with a reserve, because the thickness of the glass walls is about a centimeter (7-9mm). Significant weight and small thickness of the blocks require perfectly level and stable support, strong bracing, and strict verticality. Complex curved structures, including arched ones, are also made from glass blocks, but in these cases there is a supporting frame.
- The largest possible partition area is 15 m2. More is not possible for reasons of stability, since glass blocks are very heavy and collapse may occur.
- It is better to remove protective films from blocks as a last resort, after all finishing is completed.
Installation of glass blocks into a frame is simple and can be done even without experience. Installation on a mortar or adhesive mixture is labor-intensive and requires skills and constant alignment of the vertical and horizontal. Stability is the main condition for the safe operation of a glass block structure. Installation using the second method is usually trusted to specialists.