Types of inlay
Using inlay you can decorate wooden furniture, dishes, knife handles, walls, beams. The result is a very interesting drawing, unusual both in form and execution. Depending on what materials are used, the types of inlay can be determined:
- Intarsia is the decoration of a wooden object using elements also made of wood.
- Marquetry - applying a pattern with veneer (wood chips).
- Tauching - a metal object is supplemented with precious metals.
Various materials are used for inlay: stone, metal, marble, ceramics, other types of wood, mother-of-pearl, ivory. The chosen substance determines which decoration method will be used.
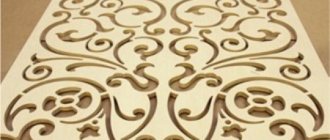
For beginners, wood marquetry is the most accessible technique. The material you will need is veneer (plywood from any wood). The idea is to put the wooden parts together like a mosaic, form the required pattern and stick it on the prepared base. Next you need to carefully polish and paint everything.
The hardest thing is to come up with a pattern and make a drawing of the future masterpiece. This is the basis without which it is impossible to create a unique, high-quality and impeccable thing. This type of inlay can be used to create parquet, table tops, paintings, and souvenirs. The technology of marquetry, although simple, requires maximum accuracy, patience, perseverance, a sense of proportion and aesthetic taste.
A little about the schemes
Intarsia for knitting is a kind of precision in size, since the implementation of a complex pattern will require full compliance with the parameters and pattern. Existing complex patterns are designed for a certain number of loops - one cell of the pattern corresponds to one knitting loop. If necessary, you will have to work with the scheme in advance:
- To increase the width of the canvas, you will need to continue drawing the pattern yourself - this is what makes intarsia difficult, unlike jacquard. Distribute the required additional number of loops across the width, taking into account the lines of the selected pattern.
- If it is necessary to increase the width and height of the patterns, it is recommended to “enlarge” the future knitting, taking 4 loops for one cell of the pattern - 2 loops and 2 rows. In this case, a sample of the selected yarn is first knitted and the number of loops per 1 cm of finished fabric (after processing) is measured. After the calculations have been carried out, it is necessary to calculate the “working” scheme. Carefully consider what ends up on the canvas - if the pattern is disrupted (important details of the landscape do not fit), it is better to choose a different yarn or pattern.
- If the pattern is small in relation to the height of the product, the craftswomen leave the pattern unchanged, finishing the top of the fabric with a single-color thread - preferably light, so that the knitted image becomes dominant in the entire product.
Now we should mention a point about reading the diagram. As mentioned above, one cell of the pattern is one loop of the front stitch. The diagram in the front row should be read from left to right - as the picture itself looks. The purl rows are read in reverse order - from right to left according to the pattern. Here, unlike ordinary openwork knitting patterns, where the purl rows are often knitted as the knitting looks, you will have to painstakingly knit every cell in the entire fabric.
Beginners in intarsia will have to use a simpler scheme. For example, knit a sweater for your child with the image of his favorite cartoon character or a simple bear. The direct technique turns out to be easier to perform than circular intarsia.
Intarsia making technique
Intarsia was the predecessor of marquetry. It was also used in Greece, Rome, Egypt and the East. Most often, this technique was used to decorate dishes and furniture for the church and noblemen. Previously, geometric shapes, as well as images of plants and animals, were common ornaments. Now you can choose a unique design both in shape and color.
Stages of creating a product using the intarsia technique:
- Wood intarsia is difficult to perform, so you first need to create a diagram and cut out the parts according to it. To make it more convenient, the color of the wood is marked on the diagram. As many colors as there should be, there should be as many sheets with the diagram.
- The surface of the object should be cleaned of dust and dirt. The prepared elements of the scheme need to be glued onto fragments of wood according to the color scheme. Use the most common glue (PVA), since the paper will then be removed.
- Saw off the fragments exactly according to the diagram, polish and polish them. Where necessary, smooth the edges with a file or sandpaper.
- At the base of the product, recesses are made for existing parts. You need to put the elements into a single structure, like a mosaic, using glue. At the end of the work, if desired, the item can be varnished.
To make the product interesting, beautiful and of high quality, special attention is paid to creating a drawing diagram; only with its help can you make the exact shape of the objects. Learning wood intarsia patterns is the foundation of this skill. It would also be a good idea to experiment with the choice of wood, because there are exotic types of wood with very interesting textures.
In terms of its execution technique, intarsia is similar to block mosaic, in which parquet is made and walls are decorated. Thin plates are prepared in advance from different types of wood, differing in color, size, and structure. Then you need to combine everything into a single composition. Operating principle: wood fragments are inserted into recesses prepared in advance and glued to the base. Block mosaics can also be three-dimensional (decorated with carvings). It is ideal for making boxes.
Intarsia - what kind of technique is it?
The intarsia knitting technique is similar in its implementation to jacquard patterns. But if a jacquard pattern on knitting needles means using 1-2, or maximum 3 shades, then intarsia can require up to 20 or more different colors. Knitting a jacquard pattern is the alternation of no more than three shades in a certain systematic pattern, according to which a unique graphic is obtained. While intarsia is the knitting of complex natural patterns, floral illustrations and other paintings.
Knitting “intarsia” requires not only experience and dexterity, but also attention and hard work - not all even experienced needlewomen finish the intended product. Moreover, using a large number of threads and tracking the loops of the pattern will require additional tools. The most convenient ones include all kinds of thread separators - here are spools for winding and thimbles for separating threads to avoid intertwining. The pictures show the tricks of craftswomen that will be useful to beginners.
Wood tauching
Inlaying wood with metal (copper, silver, aluminum, brass, etc.) is a fairly common type of technique. Recesses are made in the wood according to the diagram, and wire or liquid metal is placed in them. The main condition is that the wood must be strong and dry so that it can withstand the effects of molten metals. The grooves are made using a knife or chisel. Before placing the wire, the grooves are lubricated with glue, and then it can be carefully hammered in with a hammer.
This type of inlay is the most complex, so you need to carefully adhere to safety precautions. When working with wire straightening, you must use safety glasses to protect your eyes from possible damage. Basic means of protection should be at hand, because the work is complex, and any thoughtless movement can lead to injuries or burns.
Mosaic looks very impressive on wood products. By working on it, you can reveal yourself creatively and give free rein to your imagination. The process of creating even the smallest thing (for example, a souvenir) is very interesting and exciting. You can start small, and then expand your horizons and move on to planning large projects.
For example, you can create a wooden mosaic for the walls with your own hands. This undertaking certainly requires good preparation, but there is nothing impossible about it. With a lot of desire and experience, everything will work out.
The interior of the room will change dramatically if at least one wall is decorated, or if there is a decorative element in the room.
Intarsia in a circle
Intarsia in circular knitting needles does not exclude the fact of knitting in the opposite direction of the pattern - that is, despite knitting in the round, you will have to knit rows back and forth. Of course, needlewomen will not be able to knit in the opposite direction - such a technique is a priori impossible. Therefore, you will have to constantly turn the canvas inside out, bottom up. Then turn the “tube” over for easier knitting and continue knitting the purl row. The connection of circular rows in this case is carried out with yarn overs.
Beginners will find it difficult to knit intarsia in the round. Therefore, it is better to hone your skills on simple straight knitting, and only then resort to more complex variations. Intarsia in the round is used in knitting mittens or socks - here you can create interesting emblems or numbers. For example, make a gift for the upcoming women's holiday with the inscription “March 8th”. The video shows an option for knitting intarsia in the round using stocking needles.
Complex intarsia patterns
Knitters can use already complex intarsia patterns, where several shades are used, and colors change every 1-2 loops. Intarsia can also be used using only two colors, which is also attractive and quite difficult to implement - you will have to carefully calculate the loops and rows.
If you have already mastered simple variations, use slightly more complicated schemes using 3-4 shades.
Then you can proceed to even more complex schemes. If you cannot find a more suitable landscape or pattern, use a regular cross stitch pattern - this will save you from time-consuming searches for patterns. This also counts one square as one loop. The rows go according to the purl and knit rows of knitting.
Fashionable and comfortable - children's wardrobe in intarsia style
Knitting using the intarsia technique is especially important for children. The products are not only bright and stylish, but they are also much easier to put on and take off, because there are no stretched threads that can get caught on and tear them.
If you've never knitted intarsia before, start with a pattern that features an ice cream cone design with some flowers in it.
Necessary materials:
- yarn in 4 shades - blue, lilac, yellow, and light brown;
- threads for the background;
- straight knitting needles.
Step-by-step description of the process:
- Consider the diagram. On it, empty cells indicate the front ones (in the front rows) and the purl ones - in the purl rows. A colored square with a dot inside means that the garment should be knitted purl on the face, and knitted on the wrong side.
- Cast on the loops with the main thread (35 + 2 edges).
- Tie the background yarn to the beginning of the image, attach the first colored one (according to the diagram), leaving a free tip (at the end of the work, secure it and hide it in the canvas).
- Knit the specified number of stitches using this color according to the pattern.
- To switch to the background, connect thread from a new skein.
- From the wrong side, at the junction of two threads, make a cross and tighten the threads so that they fit very tightly (but do not tighten!).
Advice! You can attach a double thread more masterfully - fold the new one in half, put it in the form of a loop on the first one and tighten both threads (as in the photo).
Intarsia for beginners
After carefully studying the technique of changing colors, beginners probably no longer want to create something original on their own. However, intarsia is initially a simple change of shades, so you can first “practice” on simple models. For example, this simple vest, which can be worn upside down, will help solve the problem. To knit a vest, pick up an edge equal to the cut length of the front. The set uses 2 colors, so changing threads will not be difficult.
Next, you can use the technique for knitting blankets or pillows. Changing different shades to knit squares is also intarsia, which is easier for beginners. Starting with simple variations, you can gradually move on to more intricate ones.
For those who are not interested in simple variations and want to implement a more complex model and pattern, you can take a simple example for knitting. Let's say an attractive women's sweater can be knitted with small flowers, according to the diagram below.
For sweaters, there are also less complex intarsia patterns - a diagonal change of colors that is carried out throughout the knitting of the fabric. There are special schemes for such products that use no more than 5-6 shades - the product is not colorful, but individual and stylish.
According to the script - disadvantages of intarsia
Intarsia looks impressive and unexpected, but the needlewomen know exactly what they will have to face next.
Firstly, knitting with intarsia leads to a significant weighting of the fabric due to the presence of “useless” broach threads. A cardigan knitted using the intarsia technique will be 2 or even 3 times heavier.
Secondly, using the technique to knit all the details will lead to thickening of the fabric - broaches from the wrong side will give additional heat, which sometimes turns out to be unnecessary and inconvenient.
Thirdly, from the wrong side you will have to remove numerous cut threads and knots. The fabric turns out to be “terry”, which is also unattractive and uncomfortable to wear.
To decide to use the intarsia technique, you should weigh all the pros and cons of the resulting product. Intarsia is complex and painstaking, so it will be sad if you stop halfway and decide not to implement your plan.
Jumper "Lemon branches"
Size: 38-40.
We need to prepare:
- yarn, 51% cotton, 49% polyamide, 50g per 130m, banana color (No1) – 500g;
- the same yarn, yellow (No2) – 150g;
- the same yarn, kiwi color (No3) – 100g;
- the same yarn, melange (No4) – 50g;
- straight knitting needles No. 2.5 and No. 3.5;
- circular knitting needles No. 2.5;
- hook No.3;
- buttons Ø1cm.
Patterns:
- elastic band 2l/2i;
- persons Ch.: in k/r – l/p, in p/r – i/p;
- purl Ch.: in k/r – i/p, in p/r – l/p;
- small pearls: 1 p.: alternate 1 l/p with 1 i/p; 2p.: above i/p we knit l/p, over l/p we knit i/p. Next we repeat these two steps;
- “lemon branches”: we knit according to the pattern, using the intarsia technique.
Density: 26 p. by 36 p. equal to 10 cm by 10 cm.
Description
Before
We dial sp. No. 2.5 yarn No. 1 130 p. and knit an elastic band of 2 l./2 i. to a height of 5 cm, adding in the last p. 7 p. In total we have 137 p. Go to sp. No3.5 and carry out according to cx. pattern of lemon branches. At the level of 21cm (76 rubles) on both sides we make an increase of 10 rubles. 1 time for 1 p., then in every 8th p. 7 times 1 p. In total we have 153 p. At the level of 39 cm from the cutting under the armholes we close 6 sts on both sides, then in every 2nd p. twice 2 stitches, 5 times 1 stitch. Continue straight for another 17cm. At the level of 56 cm from the cut (204 r.), we close it under the cutout in every 2nd r. once 5 pets, twice 3 pets, once 2 pets, three times 1 pet. Then every 4th row twice 1 st. At 65cm from the cut, bind off the remaining 38 stitches. under the shoulder.
We perform the second shoulder in the same way.
Back
We knit according to the description of the front. At a level of 47cm from the cut (row 172), we close 1 loop in the middle of the part for rolling out and finish each side separately to a height of 15cm. At a level of 62 cm from the cutting edge, cast off 14 stitches on the inside, then in every 2nd row, 4 stitches once, 3 stitches once, 1 stitch twice. At 65cm from the elastic band bind off the remaining 38 stitches. under the shoulder.
We perform the second shoulder in the same way.
Sleeves
We dial sp. No.2.5 yarn No.1 50 p. and knit an elastic band of 2 l./2 i. to a height of 5 cm, adding in the last p. 24 p. In total we have 74 p. Go to sp. No3.5 and carry out according to cx. pattern of lemon branches. To expand the sleeves on both sides, we increase in the 2nd row. 1 time for 1 pet., then in every 4th r. 33 times 1 st.
We have 142 pets in operation. At the level of 39 cm from the cutting edge, close 4 stitches on both sides, then in every 2nd p. 1 time for 2 pets, 7 times for 1 pet., 5 times for 3 pets, 3 times for 4 pets. At 52 cm from the cut, bind off the remaining 34 stitches.
We knit the second sleeve in the same way.
Assembly
We slightly moisten the parts and dry them. We sew the shoulders. By persons side along the edge of the rollout we raise in circular sp. No2.5 124 pet. for the plank. Having knitted 8 cm of elastic band 2 l./2 i., close the stitch. We perform a binding on the back along the edge of the cut. We make 1 row of sc – see photo of the model. At the same time we make buttonholes.
Sew the sides and sleeves. We sew in the sleeves.