Russian craftsmen have always been famous for their skill in artistic wood carving. For centuries, from generation to generation, they passed on the secrets of their ability to make wooden spoons. The Russian word “spoon”, according to scientists, comes from the word “log” - ravine, depression.
She captivates everyone with her unique color. To make wooden spoons, environmentally friendly materials are used: linden, aspen, maple, rowan, so using wooden spoons is good for your health. Wooden spoons do not spoil the taste of cooked food.
The history of the wooden spoon dates back ten centuries ago. In each country, spoons were made using different materials: wood, ivory, shells, bronze and silver. In Russia, until the 18th century, wooden spoons were used. Dahl's dictionary contains an interpretation of the names of spoons: boska, mezheumok, blunt-nosed, pouring, nosed, butyrka, white, semi-bosque, thin and other names. “Russian wooden spoons” were first mentioned in the “Tale of Bygone Years” in 996.
Spoons began to be painted much later, starting in the 19th century. To create such a spoon, it was necessary to perform 52 operations. A wooden spoon was hewn out of the shell with a hatchet, then with an adze, planed with a knife and cut with a curved cutter, and the handle and forging were processed with a handsaw. Wooden spoons were decorated with carvings and painted patterns.
Materials and shape
A spoon can be wooden, metal, plastic, and can combine several types of materials at the same time.
Made from any material. The spoon consists of three parts:
- A scoop is a rounded, curved part of an object that is used to scoop up food.
- Holder - the part that is held by.
- A jumper is a connection between two specified parts.
The history of the spoon
It is a cutlery necessity of mankind, and is the most popular table tool across the globe. The spoon is such an ancient structure that it is impossible to even approximately indicate the beginning of its use.
Of course, everyday objects have had to change since the time of Adam and Eve. However, the general similarity in the found tools of antiquity remains.
sea shells as it . Such prehistoric household items are confirmed by excavations dating back to approximately the 3rd century BC. And currently they are used by the natives of Africa. Instead of spoons, they prefer mollusk shells that resemble the shape of spoons.
Over time, they began to be created from clay, fired on fire pits. These spoons looked like a tiny pot with a small handle.
The first mention of turned wooden spoons is in The Tale of Bygone Years. Residents of Ancient Greece and Rome managed to create bronze and silver spoons.
They learned how to process horns and bones, and strong, long-lived cutlery appeared. Spoons were also made from wood; in a later period they began to be painted with patterns.
In the Middle Ages, metal, gold, silver and aluminum cutlery appeared. Aluminum appliances were expensive at that time and were offered only to distinguished guests.
The spoon acquired the shape it has now in the 18th century . At the same time, tea ceremonies were brought from China along with teaspoons and other kitchen utensils.
With Baroque style, the handle of the device is lengthened. Wide sleeves and a lush jabot collar served as such an innovation, otherwise the court nobles could not handle food without getting dirty.
Silver cutlery, which received secretly high marks, began to be replaced with an alloy of nickel, zinc and copper, which in appearance was difficult to distinguish from the precious metal. This is how instruments made of Argentine or cupronickel came into fashion.
The last century was famous for the creation of stainless steel, so steel appliances filled store shelves.
Step-by-step instruction
The selected piece of log must be sawed or chopped in half with an ax. On the flat side, the outline of the upcoming product is outlined with a pencil. Then the unnecessary areas are removed with a saw. Using an ax, you should first shape the outer rounded part. It is also necessary to cut a layer of wood to create the desired angle between the scoop and the handle. The place where they connect should be rounded off with a file.
The next step is sanding. To remove rough elements, you can use coarse sandpaper. And in order for a wooden spoon (it’s not so difficult to make one with your own hands) to be more pleasant to the touch, you need to complete the process with a “zero”. For greater convenience, wrap a stick in the sanding element.
Next, you should start cutting out the recess. Using a chisel, scrape out the wood in small pieces from the workpiece. Be sure to monitor the thickness so that it does not turn out too small. Next you need to clean the wood. To do this, you can attach two strips of sandpaper to a stick with a rounded end, placing them crosswise. After finishing the work, the finished wooden spoons can be soaked in vegetable oil. To improve the absorption process, the liquid is heated.
Modern spoons
Currently, cutlery is made from a large number of materials:
- titanium,
- copper,
- plastic,
- gold.
Let's look at the most popular materials:
- Stainless steel . The most popular type of cutlery. The products are easy to clean, durable, do not rust, have good quality, without dullness. Good price.
- Chrome-nickel steel. Has all the specified properties. Significantly more expensive. The difference from stainless steel is the golden tint of the items.
- Aluminum. A few decades ago it was very popular among cutlery. Currently there are few products due to appearance. Spoons are easy to bend, difficult to clean, and darken over time. It was popular because the product was cheap.
- Tree. Currently used as a painted gift or a music instrument. In rare kitchens it can be found using a ladle, a stirring spatula, or a wall-mounted decorative item.
- Ceramics. It is used as a decorative decoration, as a household item in expensive establishments due to the high cost of the products.
- Plastic. Banned in some European countries. When consumed, it is more common in camping conditions.
- Silver. High-quality expensive beautiful material. If poorly cared for, it may appear darkened. Indicator of material well-being.
- Cupronickel. Attractive, but may darken over time.
Protey's wood & Protey's travels
Retreat. Discussions about the coating of finished products and the reasons for their damage. Having started making spoons, I was very puzzled by the issue of coating products that come into contact with food. You can read a lot of conflicting opinions and intrusive advice on the Internet. If we discard the “magic compositions” and the complex mixture of components, which I treat with skepticism and wariness, it turns out that in RuNet they cover it mainly with linseed oil, in the English language - with anything: apricot, walnut, olive, corn, linseed, tung... Having analyzed I found the information and after conducting my own testing, I came up with my own opinion on this matter, which I allow myself to express. As you know, wood is not friendly with water. Or rather, periodic wetting and drying lead to wood deterioration. The surface becomes rough to the touch, loses its visual appeal and may even crack. There is only one way to protect the surface of wood from moisture penetration - to cover it with an impenetrable film. It turns out that only film-forming coatings, namely varnishes and paints, can do this. I think many of us have encountered mass-produced woodworking products. These are all kinds of souvenirs, decorative dishes, spoons, boxes, jewelry. In most cases, these creations are covered with regular varnish or varnish-based painting. This reduces the requirements for surface preparation, simplifies production and, as a result, reduces costs. The advantages of this approach include the rather high moisture resistance of coatings. For example, the famous Khokhloma painted spoons and wooden bowls are coated with several layers of varnish and therefore are not afraid of water. Surely many remember these usual attributes of the revival of folk crafts, found in most small-sized kitchens from the times of developed socialism, which faithfully served housewives, despite the harsh conditions of the “cooking shop”... But what to do if you need to show the naturalness and beauty of natural wood, if the surface should the product remain “uncovered” by a film of varnish, but if possible protected from environmental influences and, above all, moisture? This problem can be solved by impregnation with natural oils and waxes. Oils, absorbed into wood, fill the pores and “leave no room” for water. Impregnation gives the products relative moisture resistance, but on the surface the oil is quickly erased and washed away, as a result of which the surface layers lose their properties. Fortunately, unlike film-forming coatings, impregnation can be easily restored, for which it is enough to wipe the surface of the wooden product with oil and the wood will absorb its lost part. Impregnating a product with oil or wax are the most ancient methods of imparting water-repellent properties to wood. How to choose the “best” oil? Unfortunately, I don't know a specific answer. Reading numerous opuses on this topic only deepened my doubt that such a thing does not exist. However, based on my own observations and experiences, as well as recommendation statistics from various specialized sources, I will give a subjective rating of the popularity of impregnations. Let me note that my considerations concern the coating of wooden spoons and utensils that come into contact with food, so I give my own assessment of only natural ingredients without modifications or additives that speed up drying, add shine, protect against rotting, etc.
1. Natural tung oil. It is obtained from the fruits of the tung tree, which grows in China and several countries in Southeast Asia. That is why it is often called Chinese among cabinet makers. According to historians, in China this legendary oil has been used for wood processing for more than 2000 years. Refers to slow-drying oils. I did not conduct laboratory experiments on drying time, but subjectively, touch-drying took about two days. The disappearance of the characteristic odor - according to experts, evidence of complete polymerization - takes more than a month. Online sources provide data from several days to several weeks. Penetrates wood deeply. After drying, it hardens and strengthens the layers, approaching the waterproof effect of a varnish coating. An experiment with water (leaving a puddle of water on the coating until it dries) showed that with prolonged exposure to water, whitish spots form on the surface of the tung “film.” The vast majority of “foreign” carpenters consider it “the best oil”. It is difficult to argue with such an assessment when looking at the carefully prepared and coated with tung oil on the noble surface of products, especially those made from valuable and hard woods.
2. Natural linseed oil. Also applies to drying oils. According to reference information, the drying time is longer than that of tung. To speed up drying, linseed oil is boiled and siccatives (drying accelerators) are added. As a result, a widely known covering composition is obtained - drying oil. I do not work with linseed oil and therefore have no opinion on it. In Rus', from time immemorial, spoons have been soaked in linseed oil. But this does not mean that it is the best, it’s just that flax was the cheapest and most accessible. Currently, you can probably find natural flaxseed oil only in the diet departments of grocery stores or specialty stores for artists. Otherwise, you can run into either drying oil or God knows what with a bunch of additives, the composition of which the manufacturer is modestly silent about. And if there is not much difference for covering the wall of a barn, then for products in contact with food, the choice of coating should be more careful. The modified oil must contain a drier based on compounds of lead, cobalt, manganese, zirconium, lithium, strontium, etc. And although the additive content is very small, it is difficult to convince yourself or product users of their safety.
3. Mineral petroleum jelly. Refers to non-drying oils. Colorless, odorless, harmless to humans. Used in medicine. Made from petroleum. It is quickly washed off the surface, but just as quickly reapplied. Sold in pharmacies or in churches as oil for lamps. I soak spoons intended for practical use with Vaseline oil.
4. Compositions based on beeswax and carnauba wax. Wax as such is difficult to use for impregnation due to its hardness. Typically, mastics are used in which wax is mixed with turpentine (a mixture of essential oils obtained from coniferous trees) or natural oil (linseed or tung). After treatment, the turpentine evaporates quite quickly and only a waxy coating remains. Although in fairness it is worth noting that taking turpentine orally is undesirable due to its toxicity. But the amount of turpentine in the mastic is initially small; in addition, it is volatile, like any essential oil, and quickly disappears from the product. The presence of turpentine in the surface layers can be determined by the presence of a characteristic odor, after which I consider the coating to be safe. When applied in a heated state, wax mastics penetrate deeply into the pores of the wood and, like oil, “leave no room” for water. A layer of wax on the surface gives the product a characteristic shine, called “waxy”. Water droplets roll off freshly waxed surfaces. But if you leave drops of water on the surface of the product for a long time, the result will be whitish spots that will be difficult to remove. Sometimes wax is used to cover products already soaked in oil to give them a noble shine. I coat decorative items and collectible spoons with beeswax. Although I consider the classic wax composition (wax + turpentine) safe for contact with food.
Other oil-based coatings are approximately similar in properties and, in my opinion, the success of their use depends more on the preferences of a particular master or availability in the region. Controversy on the topic of the “best” oil often occurs on carpentry forums; fairly well-reasoned arguments can be read in articles from reputable woodworking magazines. But, apparently, humanity has not yet invented a better oil and a better coating, and therefore I will leave this question open.
Types of spoons
- Dining room. The volume of this spoon is 18 milliliters. It is intended for the consumption of liquid dishes: soups, cereals. It's hard to imagine your life without this cutlery.
- Dessert. The volume of a spoon is usually half that of a tablespoon. Created for eating dessert and various tasty dishes: jam, ice cream, soufflé treats.
- Tea room. Volume 5 milliliters. Use it to stir sugar. However, very often it is she who enjoys sweets, and not dessert.
- Coffee shop. Volume 3 milliliters.
Auxiliary spoons
Varieties of the spoon family help the housewife to prepare different dishes.
Draft, ladle . These are all different names for one kitchen appliance. The volume of such an instrument is 100 ml or more. Every housewife has several ladle, because they are all designed for scooping soups, compotes and other liquid dishes.
During lunch, it is inconvenient to use one scoop for all table changes. Having ladles of different sizes in stock, you can pour dishes in certain identical portions.
Sauce . Designed for serving sauces. It is very convenient to pour through a special spout, getting onto a steak or cutlet.
The spice spoon is the smallest in the list of cutlery. It’s understandable that you can’t eat too much salt or pepper.
Like a musical instrument
For the first time, buffoons began to use them in this capacity, who accompanied funny songs and ditties by rhythmically tapping each other. This custom has survived to this day. Any ensemble of folk songs must have spoons for playing in their arsenal. Warm, melodic sounds have become the “soul” of any Russian celebration.
It is very useful to teach young children to play this instrument. This develops not only a sense of rhythm and fine motor skills, but also allows you to relieve the excessive activity of little fidgets and instill in them the traditions of our ancestors. It was noticed that children who learned to play such an instrument at school had the most even and beautiful handwriting.
Spoon traditions
- For many centuries, a silver spoon was a gift for a child to get his first tooth out. In old Russia, an entering high school student was awarded a silver dessert cutlery, and a graduate was treated to a canteen.
- Beautiful forged silver is always in fashionable acquisitions and looks luxurious as a gift.
- Painted wooden utensils were given to newlyweds as a sign of stability and prosperity.
- Until the 19th century, Cambridge students who performed poorly in mathematics were given a very large spoon as a consolation. This story takes us back to old England, where those who did not win in competitions were given a consolation prize - a spoon.
- Until the 20th century, Kazan students put teaspoons of the whole house under the bookcase before exams.
- Before going to bed, Salvador Dali took a metal spoon in his hand and placed an iron bowl under it. Falling asleep, the artist let go of the device; it hit with a loud sound. The artist woke up and wrote down what he dreamed. According to him, this is how the most ambitious ideas for the paintings came about.
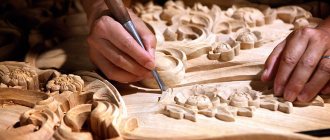
Thread
Wooden utensils are often decorated. This can be either a simple design or intricate patterns. It all depends on the skill and desire of the master. If a person has little experience in creating ornaments, then you can turn to specialized sites. They present a large volume of materials of varying complexity.
If you know that the work will be limited to one or two products, then there is no point in purchasing many different tools. Using available materials, you can also decorate wooden spoons. Photos show various devices for professionals. These are jamb knives, flat, angular and semicircular chisels, cleavers, jigsaws, rasps. However, to make a simple pattern, a sharply sharpened knife will be enough. It is better if the blade is short and wide.
A drawing is applied to the untreated handle with a pencil (if geometric, then using a ruler) or the ornament is copied from tracing paper. Most often, the thread has a triangular recess. In order to complete it, you need to draw two auxiliary lines on the sides of the main line of the drawing, indicating the width of the cut. First, the main strip is cut strictly vertically. Then the knife is placed against the side marks and cuts are made at an angle of 45 degrees. Then the procedure is repeated on the opposite side. The cut wood should come out of the resulting groove on its own.
If the pattern is more ornate, then it is made with the same grooves, but less deep. The main cut is made along the marking line. To make side cuts it is not necessary to draw auxiliary contours. Slight fluctuations in the shape of the groove are allowed to emphasize the relief of the image.