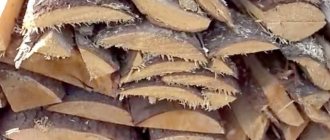
Croakers are parts of wood that are waste from lumber production. Croakers are divided into commercial and wood-burning.
A small wood slab is suitable for fuel chips. No further benefit can be derived from this species, as it is heterogeneous and has defects.
Business croaker is often used for agricultural and construction purposes. It is much larger, thicker and wider than a wood-burning one, and it has almost no defects.
Compared to boards, logs or beams, slabs have a large number of advantages. It is inexpensive, can be used almost anywhere you need to build something, and is lightweight. You can make a decorative finish from the slab, which is really inexpensive.
Of course, this material is not without its drawbacks: it has an ugly appearance. You need to work hard to make something aesthetic out of it.
While a wood slab is only suitable for fuel chips, a business one can be used for many purposes:
- in the construction of premises for domestic needs such as a change house, a woodshed;
- for the construction of baths (panel or frame);
- in the construction of fences;
- in solving the dacha issue with fencing flower beds and beds, for the construction of greenhouses;
- as formwork;
- in the manufacture of all kinds of furniture and pallets;
- in the design of structures intended for keeping animals (goat shed, aviary).
If you give the slab a decent appearance, you can build it into a veranda or gazebo for the garden.
The slab serves as an excellent replacement for timber or boards in the construction of houses. For example, if you use it during the construction of load-bearing structures or at the stage of building cladding.
If you plan to store things in the utility room that are not susceptible to the influence of drafts, low temperatures or high humidity, the building needs to be sheathed only from the outside. However, if the materials in the utility block require special protection, then it is designed in the same way as panel buildings.
When building a garage, the requirements are much stricter than when building a greenhouse or utility room. For this reason, only the load-bearing frame, roofing, panel sheathing and ceiling lining are made from slab.
Making furniture, all kinds of household items or cladding facades with wood has many advantages.
To make an object from a slab with your own hands, you must first of all process the raw materials properly. First of all, the slab is divided into strips of the required thickness.
Then you need to plan them from start to finish. The planks are assembled into panels, usually consisting of several layers.
These panels, which subsequently acquire high strength, are subjected to high pressure under pressure. Their cost is disproportionately lower than solid wood panels, which is important for budget construction.
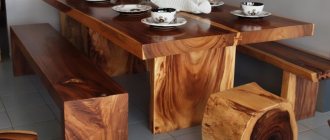
Various furniture such as beds, tables, benches, chests of drawers, shelves and other things are often made from such an unpleasant material as slab. Such furniture is considered extremely environmentally friendly, and the glue used here is the least toxic.
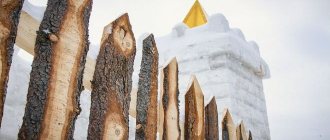
The slab is used not only in the construction of houses, but also for the construction of fences.
The slab is useful for the construction of load-bearing pillars, and also for cladding. For the crossbar, as a rule, they take material processed on a thickness planer. All sides are flat, and therefore there are no problems when assembling it. The racks are installed with the flat side to the crossbars.
With a very small difference in the width of the boards, you can build a good and aesthetic fence that can compete in beauty with fences made from other materials.
When constructing formwork, the material in question can be useful as lintels or supports (in this case, no preparation is required), as well as for creating panels (in which case boards of the same parameters must be formed).
Most often, the size of the boards is much smaller than the formwork, and, therefore, they need to be joined using vertical jumpers. In this case, the joints of the boards that are located nearby should be placed on different lintels - this will increase the rigidity of the formwork and make installation easier.
The boards are placed as close as possible so that the concrete does not leak. Sometimes the inside of the shield is sheathed with polyethylene - firstly, the shields will last longer in this way, and secondly, when disassembling they will not have to be torn off from the concrete.
Animal housing does not require the use of first-class materials, so any type of slab can be used in their construction. In this case, the croaker does not need special preparation, but if the owner wants the wood to last for a long time, then the bark must be removed from it. It is often inhabited by pests that feed on cellulose.
If you want to make a pen for animals beautiful, you need to select a croaker of the same size and process everything using special equipment and tools.
Croaker is also used if a low-cost access road is needed. The slab is laid across the track, and drainage is made along the sides. The road is covered with sawdust or earth on top.
Paths, as a rule, are not covered with small material (chopped wood, crushed stone). This is ineffective, since in wet weather the earth becomes limp, that is, a significant part of the fill goes into the soil.
Croaker is an extremely suitable material for this purpose. It is laid with the cut facing up, having previously been soaked with a hydrophobic liquid.
Paths made of slabs are convenient and beautiful at the same time. If you have imagination, you can lay out drawings from it (for example, alternating boards of different lengths).
There is a significant difference between decorative, fuel and business slabs. The first board usually has the same size and shape. Decorative croaker perfectly imitates debarked logs, while also having a lower price.
The main purpose of finishing walls with slabs is to imitate logs, the authenticity of which is increased by removing the bark and hiding nails and screws.
The procedure is as follows:
- holes are made in the material, into which nails or screws are then sunk;
- round pins are turned out, after which they are glued into the holes using PVA;
- At the final stage, the protruding part of the dowel is removed, and the built-in plug is sanded with sandpaper.
This method can be used for cladding both outside and inside the building.
The finish will last a long time if it is impregnated with a water-repellent solution, as well as a preparation that prevents the proliferation of unwanted microorganisms.
But it is worth remembering that in damp rooms only larch slabs should be used.
This finishing can be done from other materials, for example, fir, cedar, pine, spruce, but it must be treated with natural oils or resins. Otherwise, high humidity will destroy the material in a short time.
Croaker is also rarely used in the production of lining.
It is very important that the source material is of high quality and strong. The lining is made only from thick boards. A striking example of the use of this material is lining the inside of a bathhouse.
Slab lining is used both as cladding of facades and to decorate rooms from the inside. To do this, the boards are attached with clamps to a wooden sheathing or nailed with nails.
First of all, markings are carried out in order to indicate the location of the support pillars. The materials needed for marking are twine and stakes. It is also determined in advance where the gate will be located. Calculations for the fence from the slab should be carried out based on its foundations.
The size of the hole for the post directly depends on the thickness of the post. 200-250 centimeters is the recommended span width. 150-220 centimeters is the optimal fence height. Next, the size of the fence spans is taken to calculate its area.
A fence made from slabs protects the area well from dirt and dust from the road, it is environmentally friendly and extremely durable, although it is low in cost. As a rule, it “lives” for more than 15 years if the wood is processed correctly.
Using a slab - pros and cons
When logs are sawed into boards of different thicknesses at a woodworking enterprise, the side parts of the trunks, which have a hemispherical shape on one side, go to waste. These are the slabs that zealous owners most often buy for firewood due to their cheap price.
Classification of lumber
The slab should not be confused with an unedged board. The latter has both sides flat, and differs from ordinary boards in having untreated side edges. This material is much more expensive than semicircular scraps sold at the price of woodworking waste.
Croaker - waste from sawing tree trunks
As a material for constructing a fence, slab has the following advantages:
- Low price is the main advantage of timber. If you consider that you plan to build the fence with your own hands, then its total cost will consist only of the costs of purchase and transportation plus money for fasteners (nails).
- Any tree, including the side parts of logs, is easy to process.
- Although slab is classified as sawing waste, it remains wood and retains all its properties - environmental friendliness and durability with proper processing.
- It is difficult to choose more suitable timber if you need to quickly make a temporary fence.
Finished fence span made from slabs
The advantages of the material also depend on the type of wood that was cut at the sawmill. In terms of hardness and durability, oak, larch and beech take the lead, followed by coniferous species and aspen. In construction, timber from coniferous species - pine and spruce - is most often used.
If you decide to build a fence from slabs, get ready to put up with its shortcomings:
- the unsightly appearance of the material will require significant labor costs to improve;
- it is not easy to select the required number of products with smooth sides and approximately the same width, from which it is more convenient to build a fence;
- Without sanding (otherwise known as debarking) and special antiseptic treatment, the service life of the fence will be significantly reduced.
A fence made from untreated material looks rather unsightly
From the above, the conclusion suggests itself : although croaker is cheap and available, you will need a lot of effort and time to make a decent fence out of it. As a result, you will get as nice and original a fence as you wish. An example of this is a photo gallery of similar fences made with your own hands.
DIY slab products
Manufacturing furniture, household items, facade cladding, and interior wood finishing has many advantages. The material is environmentally friendly, has a fairly high resistance to stress and durability.
Thanks to the wide range of finishing options, it can be used in almost any interior. The only significant drawback can be considered the relatively high cost, but this is completely eliminated if you use recycled woodworking materials.
A striking example is furniture made from slabs, made by hand.
What is a croaker
During woodworking, when making timber, a log is cut on four sides. As a result, waste is formed - croaker, one side of which retains its natural texture and bark.
Industrial lumber with a thickness of 35 mm is used as a material for the manufacture of various structures, cladding of facade walls, and interior decoration.
Options for fences made from unedged boards in the photo
Here the slab serves as a nice filling for the gate frames. A successful combination of a concrete euro fence with a wooden filling
Even a crooked and knotty slab can be successfully used for a picket fence
An elegant fence made from slabs placed between the posts
Here the slab is inserted into a frame of metal pipes
Option for a fence with a stone base
The slabs can be attached to the posts horizontally, and the joints can be covered with vertical strips
Recommendations for choosing timber
The selection of sawing waste depends on the fence design you have chosen. If you need to install a solid picket fence without gaps, then it is advisable to choose slabs with smooth edges, otherwise you will have to work on them with an ax or plane. For a picket fence with gaps, the requirements are not so stringent; uneven boards will also work here. The main thing is to arrange them correctly so that the fence looks aesthetically pleasing.
Not all of this waste is suitable for collection.
When choosing slabs for a fence, consider this point: the lower the cost of the material, the more knots and irregularities there are.
When selecting materials, follow these recommendations:
- Try to select wider and thicker croakers. Some of them can be cut to length to make a decent lumber suitable for posts.
- Avoid buying scraps of logs that were cut during the warm season and have been left outdoors for a long time. Under the bark of such material, the wood is often affected by mold and pests. In winter, you can safely purchase stale wood, since bacteria and pests are inactive in the cold.
- Do not take openly damp timber; it will begin to crack and warp as it dries, causing the constructed fence to lose its appearance.
- Do not buy a croaker that is too narrow and thin. To assemble a picket fence, you will need a large number of narrow boards, and removing bark from thin cuttings is very inconvenient.
When choosing timber at a woodworking enterprise, take the time to sort through the waste piece by piece in order to select the most suitable trimmings. This will save your time and labor costs when installing the fence.
It is better to use ready-made timber for the pillars
A separate issue is the choice of lumber for poles. For a temporary fence around the site, supports made of two slabs nailed together will do. A structure designed for a long service life (15-20 years) must be placed on poles made of timber with a cross-section of 10x10 cm or round timber with a diameter of 80-100 mm. The crossbars can be made from thick scraps or take 60x40 mm timber. For a more permanent fence up to 2.5 m high, you will need metal pipes of round or rectangular cross-section measuring 40x60 mm (for a solid picket fence) or 40x40 mm (for a fence with gaps).
Selection of unedged boards and tips for choosing
There are two types of croaker - wood and business. The first type is not suitable for constructing a fence, since its surface is uneven and most often it is a split of unstable wood species. Business slab is used to sheathe sheds and is used to construct formwork and outbuildings, fences and partitions. It, in turn, is divided into thick and thin. Croakers formed into packs are more expensive than heaped ones, since they contain less waste. The calibrated type of material, or block house, is considered the best. It is ten times more expensive than a regular business slab. But it will also have to be processed and cleaned.
Unbarked croaker seduces with its texture, but over time the bark will peel off, and a bark beetle may infest it. Barked and sanded material looks expensive and noble, and if it is also treated with protective impregnations, then the durability (20–25 years) of the fence is guaranteed. Grinding services are provided by sawmills for an additional fee, but it is quite possible to clear the bark from the dies yourself - using an ax and a grinder.
There is no significant difference in the species, but poplar (rots) and birch (excessively hard and warps) should be avoided. It is worth remembering that after delivering the material to the site, it should be sorted and processed in a short time, otherwise the bark beetle will very quickly render the wood unusable. Then it is recommended to dry the dies.
If you want to save money, choose croaker
Fence options
- Vertical, or palisade. This is the easiest option to implement, when the dies are packed vertically onto a pre-prepared frame.
- Horizontal, without the use of crossbars. The slab is stuffed horizontally from pillar to post, end-to-end, with gaps or overlapping.
- A double-sided fence in which unedged boards are mounted on both sides. This is the most expensive option, since you need twice as much material.
Gallery of options
Combined fence decorated with slab
Simple slab fence Double slab fence
Stylization as an ancient castle Rustic style Visible fence
Eurofence from slab
Combination of vertical and horizontal laying
Horizontal packing
Materials for the device
- Gorbyl
- Poles (metal, wood)
- Fasteners
- Cross members - poles or beams, or long dies of the slab itself
- Sand, gravel
- Special composition for wood processing
- Resin or waste
- Dye
- Cement
Tools for building a fence
- Twine and tape measure
- Carpenter's ax
- Sander
- Saw
- Shovel or drill
- Hammer
- Brush
Basic Tools
It is important that the weather is dry at the time of construction of the fence so that the unedged board can dry out after processing. The installation of a slab fence can be divided into three stages.
- Calculation of the fence area and amount of material.
- Site preparation and marking.
- Preparation of lumber.
- Installation of support pillars and frame construction (if necessary).
- Sewing the slab onto the frame.
Calculation of fence area and amount of material
To calculate the number of pillars and building materials, you can use a free online calculator, or do the calculations yourself. The calculation begins by measuring the perimeter of the territory that needs to be fenced. Next, the distance between the supporting pillars is determined and the amount of required building materials, as well as the costs for them, are calculated.
For example, if the area of the plot is 12 acres, then the perimeter will be 140 meters. If the distance between the pillars is 2 meters and the width of the gate is 1 meter, then a total of 70 pillars will be needed. With a board length of 2 m, width of 10 cm and thickness of 2.5 cm over the entire area of the fence, which is 278 square meters. meters, you will need 1390 pieces or 6.95 cubic meters of slabs. The material is taken with a reserve so as not to buy more later. With a fence height of 2 m and a width between sections of 2 m, you will need a metal pipe 76 x 4 mm.
Next, we calculate the depth of burial of the pillars to determine their length. In order for the fence to stand firmly and not be exposed to the force of wind, the depth must be at least 60 cm. A foundation made of a slab fence is not needed, but the metal supports must be concreted. Wooden posts must be treated with bitumen mastic or charred.
In soft soils, the posts are driven into pre-drilled holes. The pillars are set strictly according to level.
Installation of a wooden pole
Pillar concreting
Calculation of the length of the fence
Before purchasing timber and other auxiliary materials, it is necessary to calculate their quantity. To do this, you need to determine the total length of the fence using one of two methods:
- calculation of the fence according to the area of the site;
- determination of external dimensions based on land documents;
- full-scale measurements of the sides of the site.
The perimeter of a square plot can be easily calculated using the area
The first method is convenient only when you need to calculate the length of the fence on a square-shaped area with straight boundaries. You need to take the area value, take the square root of it and get the length of one side. All that remains is to multiply it by 4 and get the perimeter, this is the length of the fence. For other shapes, this technique is not suitable, since with the same area, the perimeter of a rectangular area is larger than a square one.
Example. A square plot with an area of 1000 m2 will have a length of one side of 31.6 m and a perimeter of 126.4 m. A rectangular plot with sides of 20x50 m has the same area, but the perimeter will be larger - 140 m.
A rectangular area of the same area has a larger perimeter
The second method is also convenient because it does not require time or labor. The documents contain a plan of the land plot, where all the required dimensions are indicated. But if there are no such documents or the calculation needs to be clarified, then the best method is to measure the area with a tape measure or laser range finder, then you definitely won’t go wrong when purchasing timber.
What is a croaker
These are boards that are sawn (or sawn not along the entire tree trunk) on one side and convex and covered with bark on the other. Typically, these woodworking remnants make up 0.1 part of the total purchased material.
There are two types of croaker:
- Wood (or small) is a material that is no longer useful in construction.
- Business (or large) - boards of sufficient thickness and length so that they can be used to make various wooden products.
How much materials and tools to prepare?
As a rule, owners of country cottages and private houses erect solid picket fences 2 m high from slabs so that passing people are less likely to look into the yard. The location of the pickets is vertical, this is the simplest option. The distance between the pillars is taken to be 2.5 m, and the length of the bars for the supports is 3 m (the third part is immersed in the ground). The calculation of the amount of timber is carried out as follows:
- The number of posts is equal to the total length of the fence divided by the distance between them. Here you need to add supports for gates and wickets.
- The total length of the horizontal jumpers is equal to the length of the fence multiplied by 2 plus 10-15% for trimmings, overlaps and other waste. The number of boards depends on their size and is determined by dividing the resulting figure by their length with a small margin.
- The number of pickets for a solid fence can be found by dividing its length by the average width of the slabs.
It is better to purchase wood with a small reserve, since during the process of sanding and further processing some of the boards will have to be rejected.
Antiseptic to protect wood
Other materials will be needed for construction:
- antiseptic for pre-treatment (for example, Biosept or Novotex);
- nails 10-15 cm long depending on the thickness of the lumber;
- M400 cement, sand and crushed stone for concreting supports;
- bitumen mastic or resin to cover the underground part of the pillars.
Mastic for wooden posts
Fence posts can be installed without concreting; in this case, cement and sand do not need to be prepared.
To make a fence from a slab with your own hands, you need to have the following tool:
- devices for measurements - tape measure, building level, laser range finder (if available);
- cord with pegs for marking the area;
- scraper and ax for debarking and processing wood;
- plane, hammer and hacksaw for wood;
- wide brush;
- drill or shovel for digging holes;
- concrete mixer or sheet of iron for manual preparation of the solution.
Set of tools for installing a fence
Tools and materials for DIY
If you decide to make such furniture yourself, then you have an idea, inspiration, and confidence that these items will fit into your interior.
Then to realize your idea you will need the following tools and materials.
Spil
It would be vain to think that this material is easy to obtain. It seems that you need to choose a thicker tree and cut round pieces from it.
- Firstly, the cut had to be beautiful and neat.
- Secondly, not every tree is suitable for these purposes: it must be voluminous, not alive, not rotten, and without bark beetles.
- Thirdly, it is better to cut sections from dry or fallen wood.
- Fourthly, the sections must be properly dried in a warm, ventilated area, turning them regularly.
The most important thing in this matter is the cut pattern. Therefore, approach this issue creatively. To do this, the tree does not have to be a valuable species.
Grinder
The surfaces of future furniture must be carefully sanded. It is ideal to have a hand sander for this.
Keep in mind that you will need more than one sanding pad as the wood needs to be polished, literally like glass.
You can hardly get by with a block and sandpaper.
When sanding, it is desirable to maintain the integrity of the bark. Items with bark look much more interesting and are more expensive.
Don't forget to wear safety glasses when sanding!
Plane
This tool may be required for general rough roughing of the cut. We use it to trim large uneven areas of the tree and, if necessary, remove the bark.
Epoxy resin, hardener, wood glue, varnish
By mixing two substances - epoxy resin and varnish, we get a mixture that can fill wood cracks and voids, as well as fix inserts. We strengthen the elements of the product with wood glue, and, if desired, you can cover the surface of the product with varnish.
Keep in mind that in Europe, furniture made from slabs and cuts not covered with anything, not even wax, has long been common.
Chainsaw, drill, self-tapping screws, angles, mortgages
Using a chainsaw will make cuts faster and more accurately. To secure the elements of the product, a drill, corners and self-tapping screws can be useful. And to attach the legs to the table, it is good to use mortgages.
If you like this style, or are a fan of unusual interior design, then try to create this fashionable eco-friendly furniture with your own hands. This is not only savings, but also the pleasure of creative creation and working with wood.
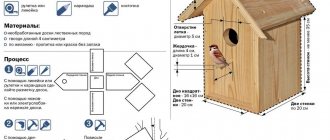
How to make a beautiful slab fence at your dacha with your own hands: the whole step-by-step process
The process of erecting a wooden picket fence from woodworking waste is divided into the following stages:
- Laying the route of the future fence, marking places for installing poles.
- Cleaning the croaker from bark and antiseptic treatment.
- Installation of supports.
- Fastening crossbars and picket fence strips.
Each of the steps will take you a lot of time, so expect to complete them in a few days. The process can speed up if you can attract assistants who simultaneously perform other operations. It is not recommended to build a fence in winter, since it will be difficult to drill holes, and the whole work will take a long time due to the cold.
Site marking
End peg with attached cord
Before you start measuring and installing pegs, check the land documentation and coordinate your actions with your neighbors, so that later disputes do not arise due to an incorrectly installed fence. Then work in this order:
- Determine the location of the corner points of the allotment and drive stakes there.
- Stretch a cord between the pegs.
- Walking along the cord with a tape measure, mark the installation locations of the supports (standard - every 2.5 m). You can do it differently by dividing the entire length into equal intervals of 2 to 2.5 m in size, so that at the end you do not end up with one short span.
- Without removing the cord, drill holes 1 m deep at the designated points.
Pole installation locations
If you plan to build a fence 2.5-3 m high, then you need to take into account the increase in windage and wind load on the fence acting from the side. The installation step of the supports should be reduced to 2 m, and deepened into the ground by 1.2-1.4 m.
Using a gasoline drill, making holes is more convenient and faster than using a hand drill
Barking and processing of croaker
As practice proven by many generations of Russian residents shows, it is best to remove bark from a tree with a scraper. This is a sharpened steel strip with two handles, by which you need to pull the tool along the trunk, tearing off the bark - scraping. Unlike an axe, a sharpened shovel and a power tool, the stapler does not damage the top layer of wood during operation, thereby increasing its service life.
Debarking with a sharpened shovel is quite quick when it comes to logs. Lighter slabs are inconvenient to clean in this way, as they drag along with the tool.
Debarking with a stapler
At this stage, work is carried out in the following sequence:
- Place the croaker vertically, resting it on any structure.
- Perform debarking by moving the scraper from top to bottom.
- If necessary, clear the knots and level the plank along the edges using an ax and plane.
- Apply antiseptic to the wood with a brush and let it dry.
This is the most labor-intensive procedure when constructing a fence. The longer your fence, the more material you will have to recycle. Together with an assistant, things will move faster.
Wood debarking video
Installation of pillars
Fence posts can be installed in the following ways:
- driving into wells whose diameter is slightly smaller than the cross-section of the timber;
- installation with backfilling;
- concreting;
- deep concreting with soil replacement.
When using wooden supports, the first 2 options are most often used. First, the ends of the pillars are covered with a layer of bitumen mastic or resin, after which they are driven into the finished wells. Then the earth is filled and compacted around the column. In the second method, a hole is dug, a support is installed in it and wedged on all sides with stones, after which a liquid clay solution is poured into it.
Rubble is added under the counter
Both steel and wooden pillars can be concreted; only anchoring parts are welded to the former - pieces of corners or reinforcement that firmly hold the pipe in the concrete. A combined method is also practiced - a steel pipe is concreted in the ground, and a wooden support is attached to it on top. Regardless of the chosen option, work is carried out as follows:
- Fill the bottom of the hole with crushed stone to a height of 5 cm and compact it.
- Using a level, place the stand strictly vertically and secure it by nailing the support strips.
- Mix 1 volume of M400 cement with 4 equal volumes of sand and 6 parts of crushed stone, add water and prepare M100 concrete.
- Concrete the posts, filling the holes to the top with the mixture. Further work is carried out after the concrete has hardened (at least 2 weeks).
When installing a pole, you must maintain the vertical
Metal posts can be secured using a so-called concrete collar. With a pit depth of 0.5 m, the pipe is driven another half meter below its bottom, and the top is filled with concrete.
Concrete stand
In the vastness of the Federation, there are often super-wet soils that are susceptible to frost heaving. In winter, they push out any objects located in the soil freezing zone. In such conditions, concreting is carried out below this boundary, and from above, the wet soil near the pillar is replaced with a mixture of crushed stone and sand.
In heaving soil, concrete is poured below the freezing line
Construction of a fence
The final stage of construction consists of installing logs (crossbars) and attaching pickets. Wait until the concrete mixture has completely hardened and proceed with installation, following the following procedure:
- Nail the cross members to the posts. If you use wooden beams as joists, they should be leveled. It is better to align the slabs “by eye”, for which the assistant needs to move a few meters away and adjust the position of the crossbar.
- Adjacent timber crossbars can be attached end-to-end or stacked vertically on top of each other. Slab logs can be nailed together with an overlap.
- Nail the first picket, aligning the vertical with a level. Drive at least two nails at each attachment point to the joists.
- Attach the remaining pickets, pressing them together and periodically checking the vertical position.
Wooden picket fence installation diagram
In the case of metal racks, the logs will have to be bolted, making through holes in the pipe. Another option is installation with self-tapping screws, which will cost much more.
Installation of picket fence strips
To protect the upper end of the planks from precipitation and rapid destruction, stuff a canopy from the same slab on top. At this point, the construction of the fence is considered complete.
Video material on slab fences
Design options
The slab differs from the board only in its non-standard shape. A fence can be made from it in both vertical and horizontal directions, using all known techniques.
Horizontal
The most budget-friendly and least labor-intensive option would be a visible fencing made of slabs, mounted horizontally on supports at intervals.
Source na-dache.pro
This is not the most durable structure, and it also does not protect well from penetration into the territory - it is easy to climb onto the fence using the “lying” crossbars, like using a ladder. But it is suitable for fencing a pasture or barnyard. If the veins are sparse, the space between them can be covered with a mesh
There is another option on how to make a slab fence more reliable and solid. It needs to be cut along the edges and secured tightly. The result will be an imitation of a powerful log fence that can be installed along the facade and perimeter of the site.
Source na-dache.pro
By securing the slab on both sides of the support pillars in a spaced manner, blocking the cracks on the reverse side, we get a fence that is not visible from the outside, but is well ventilated.
Vertical
To position the slab vertically, you will need at least two veins connecting the support posts and serving as a frame for the sheathing. The number of veins depends on the height of the fence: if it is higher than 180-200 cm, two will not be enough.
The planks can also be fastened at intervals, side by side or on both sides. And even with an inclination. Advantages of vertical installation:
- higher strength and reliability of the structure;
- It is more difficult to climb onto the site using such a fence;
- It is easier for him to collect material by cutting out sections of the required length without defects from an unsorted slab.
Note! Like a regular board, the slab dries out and decreases in size. Therefore, after some time, a solid fence will have to be rebuilt, moving the slats to eliminate cracks and adding new ones.
One of the options for making a double-sided fence is shown in the video:
Croaker is a very specific material. In my opinion, it does not combine well with metal and concrete, so it is also better to install wooden posts for a permanent “front” fence.
Tips for finishing and caring for wood
In addition to treatment with an antiseptic composition, it is desirable to further protect the wooden fence from external influences. For finishing wood located outdoors, there are the following methods of exterior finishing:
- Painting with waterproof acrylic compounds in 2 coats of primer.
- If there are no special requirements for the appearance of the fence, then the wood can be impregnated with waste oil or bitumen. For fear of getting dirty from head to toe, local thieves are unlikely to want to climb through such a fence onto your property.
- Cover with homemade Swedish paint, which protects against pests and precipitation no worse than antiseptics.
- For gourmets, it is suitable to open up wooden surfaces with several layers of varnish over an artificial blackening made using stain.
Beautifully painted fence with a canopy
Lovers of beauty and aesthetics can put in more work and carve some kind of pattern on the wood. For example, cut the ends of pickets from slabs with a hacksaw before nailing them to the joists.
The ends of the slabs can be beautifully cut and then painted
Recently, Swedish paint has gained popularity; it has a remarkable red color and can be prepared with your own hands. You will need the following components:
- regular salt - 250 g;
- red lead - 240 g;
- copper sulfate (otherwise known as copper sulfate) – 250 g;
- drying oil - 230 ml;
- flour - 500 g.
Fence painted with Swedish paint
Pour the flour into water (3 liters) and cook the paste. Strain it through cheesecloth, add drying oil, then salt, red lead and vitriol, while heating the mixture over low heat. At the end, add another 1.5 liters of water and mix well. The predicted consumption of Swedish paint is 200-250 g/m2 surface area.
Processing slabs at home
It is unlikely that anyone would want to install a woodworking line at home or in their garage in order to organize the mass production of boards from wooden waste. Of course, you can buy a couple of machines and start processing slabs, but in any case, a handicraft “factory” will not be able to cope with large volumes of raw materials.
Therefore, it is much more profitable and convenient to make, for example, designer furniture, interior items from sawmill waste at home, or to make custom repairs using “wild”, little-processed wood. You can learn more about these ideas by watching the video:
Of course, even such work requires the use of special tools. But on the other hand, this type of processing can be more profitable at home.
Please note that for various products it is better to use coniferous slab - it has a more interesting texture, is also almost not subject to rotting and is less permeable to moisture even without special treatment. Also, coniferous wood is particularly durable, but can be easily processed in the skilled hands of a craftsman.