Marquetry (from the French marqueter - “to modify”) is a type of inlay, a technique for finishing surfaces by gluing decorative elements made of veneer (thin plywood) onto a wooden base. Marquetry is widely used for the artistic design of furniture and decor in the form of beautiful patterns, ornaments or designs.
Marquetry is an ancient craft in which a craftsman uses cutting tools and glue to create unique works of art. This inlay technique requires enormous patience and perseverance from the artist, as well as the obligatory presence of talent and efficiency.
What is Marquetry
To understand where this type of decoration came from, it is necessary to turn to the history of the appearance of this decorative art. Since inlay is an ancient technique, covering buildings made of clay with facing material was known back in ancient Mesopotamia and Ancient Egypt.
The brick and concrete buildings of the Romans were covered inside and out with marble tiles of different shades. Furniture decoration was also carried out by Roman artists.
This is evidenced by the antiquities found by researchers, which have a two-hundred-year history. However, the demise of the Roman Empire caused this ancient art to fade into oblivion.
Its revival began in the 16th century in European cities - Florence and Naples. However, Italian craftsmen gave clear preference to stones considered precious and natural marble.
- Art was completely revived in Flanders. Valuable wood was transported by ship to the largest port of the sea, Antwerp.
- The assortment made by local craftsmen was wide and varied.
- Luxurious furniture, household items, panels, musical instruments, and columns were made from veneer, which were decorated with various designs.
- Storylines on various topics were created from wood.
The heyday of the marquetry technique occurred in the 17th century. Objects decorated with veneer could be afforded by the rich and prosperous French, British, and Germans.
Since the 18th century, the popularity of marquetry has gradually declined. The same cannot be said about our days, when antiques made using this unique technique are valued very expensively.
Rapid firing will change the color of the veneer
Using hot sand, make the ends of the rectangles darker, as if going into the shadows, to create the illusion of interlacing stripes.
Set the heat control of the electric stove to the middle position and place a small cast-iron frying pan 2/3 filled with fine sand on the stove. Practice with veneer scraps and determine the optimal time to soak light-colored rectangles in sand until the desired color is achieved. Darken both ends of each rectangle (Photo D).
Famous marketers
The masters who mastered this oldest decoration technique did everything possible for its development and prosperity.
- The artist Andre-Charles Boulle, well known to his contemporaries, is an unsurpassed master in the field of wood decoration. The artist’s name is given to the elegant style of marquetry, and his sons and students continued his work. Thanks to the King of France, the brilliant Frenchman had his own workshop.
- Another equally famous master, of German blood, Jean-François Eben, was in great demand among customers because of his unique ability to create complex mechanisms in the manufacture of exquisite interior items.
Jean-Henri Riesener, a German by birth, worked as a furniture maker at the court of King Louis the Sixteenth; the styles of neoclassicism and rococo were popular in his works.
David Roentgen is also an artist of German blood; his works were bought up by German, Russian and French monarchs. The unsurpassed master created drawings in the Rococo style and used expensive types of wood in his masterpieces.
New techniques
Contemporary marquetry cabinet made from Tasmanian timber.
In the 1980s, Georges Vries developed a technique called VRIZ, where two layers of veneer are laid on top of each other and sanded through the top until the grain is transparent. It was used mainly in France by professionals and students of École Boulle marquetry. With his technique, Georges Vries contributed to the revival of marquetry, which he called RENAISSANCE. He launches modern marquetry. In the USA, this technique was used by one of the teachers, artist Patrice Lejeune, at the American School of French Marquetry. The school staff are also suggesting a new name for it: "Given that 'piercing' is an unfortunate mistake in the world of veneering, we decided to use the word 'Fusion' instead, by which the artist expresses his intention to sand the veneer as a decorative, textural effect rather than as a mistake." "
- VRIZ - ombres et lumières. (1994)
- VREEZ - empreinte (1985)
- VREEZ - Femme aux violons (1984)
- VRIZ – Espace (200×240 cm)
Patrice Lejeune again uses a technique he calls "spraying": using waste materials - sawdust, shavings, scrapers, etc. - as pigments to create various effects. Perhaps this is no longer marquetry in the pure sense of the word, as it flows into textured painting, even to some extent into collage. This technique was also invented by Georges Vries, who used it on a series of large panels exhibited in the Paris arena. In 1996 it was used mainly in France by professionals and students of the École de la Bonne Graine.
Advanced technology was also used in marquetry. These include laser cutting, where the design is drawn or imported as CAD or vector with a file and each piece is cut individually; Each type of wood and thickness may require some adjustment of the beam power; the offset will determine the gap between the parts. In some cases, the beam leaves a dark edge due to the high temperature required for the process.
Features and types of marquetry
In addition to wood, other materials can be used in the marquetry technique. For example, ivory, turtle shell, straw, tin and brass inserts.
The simplest type of marquetry consists of finishing surfaces with decorative elements made from plywood of two different colors. Wood such as mahogany and ebony is used to create veneer.
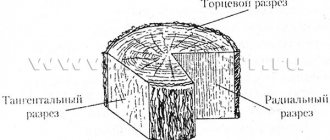
Objects of art made using the marquetry technique can be identified by the type of veneer, its thickness, coating, pressing, and also by the type of additional processing.
Wooden mosaic tile set options
Over the long century of marquetry's existence, cabinetmakers have come up with many ways to create this type of mosaic. Let's list some of them.
Reverse typing on paper
A sheet of paper on which a sketch of the future image is applied is attached to the board. The necessary shaped elements are cut out of wood and work begins. The starting point of the set is the upper left corner of the composition. Gluten glue is applied to the front side of each part using a small soft brush and pieces of veneer are glued onto paper in accordance with the sketch. During the work process, the master tries to fit the mosaic elements to each other as closely as possible, checking the quality of the work against the light. This is the simplest method of typing, however, there are often gaps between the joints of parts, which ideally should not exist.
Set according to the mosaic principle
The finished model is cut into parts and transferred to thin wooden sheets (veneer). First, the main elements are collected, which serve mainly as a background, then smaller details are cut in. When all the elements are cut out, they are applied to a paper model in the form of a mosaic, fastened with tape on the front side. During the work, every effort is made to avoid gaps, gaps and cracks in the wood, and the tape is glued extremely carefully - shifts and wrinkles on its surface are not allowed.
Set on paper
First, thin contours of the elements are clearly drawn on thick Whatman paper, and then, placing the knife in a vertical position, one part is cut out to attach it to the veneer. The fallen paper element on a wooden sheet is carefully traced along the contour with a knife: this is how a part is obtained that fits into the groove as accurately as possible. It is glued with paper tape on the reverse side to the adjacent elements adjacent to it. In the same way, all the elements are cut out, along their contour - wooden parts, which are then glued onto whatman paper. So the paper model gradually replaces the veneer set without gaps or overlaps.
Set in veneer
The design is transferred onto a wooden base through carbon paper and parts are cut out in the veneer along the contour. Then the necessary inserts are made from a different type of wooden material to fill the niches on the background board. The elements are connected to each other with paper tape.
Boule technique
The method was named after the French furniture maker Andre Charles Boulle, who, during the formation of marquetry as an independent art, made a significant contribution to its development. If it is necessary to obtain two identical ornamental sets with a background and an image, work simultaneously. Two wooden canvases (one background, the other for making fragments of the composition) are glued to thick paper and folded together, fastening them in several places with a special adhesive dispersion. The intended image is transferred to the top wooden sheet and all its elements are cut out along the contour with a cutting tool. When the wooden sheets are disconnected from each other, two niches and two inserts come out at once for two sets of opposite colors.
Areas of application of marquetry
Today, the scope of application of the marquetry technique is extensive. A true master can turn any item, be it a box or a box, into a real masterpiece that will be unique.
Marquetry can decorate even an inexpensive piece of furniture. Furniture products decorated with veneer mosaics take on a completely different look. This could be an imitation of some kind of portrait, natural landscape or still life with flowers.
- The mosaic technique is best suited for making exclusive furniture.
- To decorate indoor doors, an applique made of veneer is used. The designs can be very diverse, ranging from geometric patterns to natural landscapes.
- The marquetry technique is actively used when creating some kind of souvenir collection of things. They can be boxes, mirrors, wall panels, as well as clocks and icons.
Materials such as ceramics, wood, marble, ornamental and precious stones are used for decoration in applied arts. Also used for inlaying furniture pieces is Florentine mosaic, which is made from plates of malachite, jasper, rhodonite and lapis lazuli.
Small pieces of smalt and colored stone are used to decorate things using the Roman mosaic technique. Small cubes made it possible to reproduce picturesque paintings with high accuracy in the image. The products of Roman workshops, where custom mosaics were made, were especially popular.
Cutting veneer strips
This pattern requires 63 squares and 62 rectangles, but it doesn't hurt to have a few extra pieces. To cut out the parts, you will need a sharp knife, a metal ruler and a working polish. The workboard can be made from a piece of plywood or laminated particleboard, adding a wooden strip to which the edge of the veneer is pressed. First, make a 10mm template from scraps that are at least 12mm thick.
Press a piece of black veneer against the stop rail and, using a template, position the ruler parallel to the stop with a 10 mm offset (photo A). Cut several strips with a total length of at least 60 cm to make squares (photo B). Then cut two more strips 300mm long and set aside. Join the edges of the previously cut strips, fasten the strips with tape and cut into squares (photo C).
To make a template for the light rectangles, tape the two black strips that you have set aside, butting their edges together.
Cut several 20mm light strips with a total length of at least 2400mm. As before, join the edges of these strips, secure with tape, cut one end at a right angle and press this end against the stop rail. Tape two 20mm strips together and use them as a template to set a ruler to cut the strips into rectangles.
Marquetry in a modern interpretation
Today, modern designers have become interested in inlaying furniture with wood veneer of precious wood. So the ancient technique came back into fashion, but in a new interpretation.
For example, the Patchwork series of the Morelato brand consists of objects covered with veneers of walnut, maple, cherry, padauk, and ebony.
Or take, for example, designer Jean-Marc Gadi, who released the Timber collection together with cabinetmaker Craman Lagarde. The patterns here are more complex and the tree species are more varied.
- In the hands of many designers, marquetry becomes an art.
- Take the classic Ettore Sottsasse. His collection of chests of drawers was released in 1999.
- Mahogany craftsman Andrea Fedeli transferred Sottsasse's architectural drawings to the fronts of the chests of drawers using multi-colored veneers.
Having become part of modern design, the marquetry technique has undergone external changes, but remains the same luxury as before.
Knife-cutter: how to make it yourself
The master's main tool is a special steel knife with a flat, beveled blade. If you don’t find one ready for sale, you can easily make it yourself from a medical scalpel. Part of it needs to be blunted along the entire length with a sharpener and a handle attached. Or you can just wrap the bottom of it with duct tape. Alternatively, you can improve your straight razor by dulling the bottom to avoid cutting your fingers and wrapping it with duct tape or duct tape. There should be several such tools: for small and large parts. Whatever the cutter knife is made of, the main parameters include the following: blade thickness - from 1 to 1.5 mm, width - from 10 to 15 mm, length - from 15 to 20 mm, bevel angle - 30-45 degrees.
Photo ideas for creating marquetry
Assemble the pattern
To keep the pattern flyers in place so you can continue assembling, place a sheet of so-called contact paper, sticky side up, with a piece of cardboard underneath (photo E). Mark two perpendicular lines on the contact paper, intersecting in the center of the sheet. These lines will help neatly
arrange the fly so that the finished pattern is rectangular. Place squares and rectangles face down (photos F and G).
If some parts move or do not stick well to the sticky layer of contact paper, temporarily secure them with clear tape. Having assembled the pattern completely, trim its edges (photo H, I, J).
Add a beautiful border
Cut 5mm strips from the black veneer and 25mm strips from the walnut veneer in the same way as before. Attach these strips to the edges of the pattern (photo K), overlapping at the corners. Cut the overlaps diagonally from the inner corner to the outer corner (photo L). After making mitered joints at all four corners, turn the set over and apply strips of masking tape to the border. Remove the transparent film from the front surface.
Quick tip! Apply clear tape diagonally to all corners on both sides to prevent cracks when cutting the veneer.
Apply gummed tape
Before gluing the finished set to the base, the masking tape must be removed. To do this, first moisten the strips of gummed tape and cover the entire front side of the set with them (photo M). When the wet paper tape dries, it tightens the veneer and the set may warp. Do not panic! It will become flat again after gluing to the base. When the tape is dry, carefully peel away the masking tape, tearing it off at a 45° angle to the direction of the grain. Pull the tape along the surface of the set to avoid accidentally tearing off one of the parts.
Quick tip! If, when removing the tape, one of the veneer pieces falls out of the set, insert it into place and secure it with a drop of glue, rubbing it into the seams with your finger
Lightly moisten the gummed tape using a wet sponge and apply it to the front of the set. When dry, this tape will tighten the joints of the veneer parts more tightly.