The roof is one of the most important elements of the appearance and design of your home. The roof is also a kind of continuation of the house in architectural terms, thanks to which its overall appearance is formed. Moreover, the type of roof installed on the house determines its overall comfort and energy efficiency.
The roof is the upper part of the house, which serves to protect it from the harmful effects of precipitation (rain and snow), sudden fluctuations in outside temperature, as well as from the sun. The main purpose of the roof is to protect the building from getting wet and to remove water from the walls of the house as much as possible. It must be strong enough to withstand various loads (from wind, snow, people during operation). The penetration of water and cold into the building, as well as overheating of the roofs by the sun's rays, leads to their destruction. In this article we will briefly look at the main components of a roof.
Roof of the house
According to regulatory documentation, a roof is the upper load-bearing and enclosing structure of a building or structure to protect premises from external climatic and other influences. It consists of a supporting rigid structure (rafter system) supporting the roof, and a waterproof roofing covering (roofing) lying on the supporting structure. The roof is a roof element that includes a waterproofing layer (roofing covering), a base for the waterproofing layer, accessories to ensure ventilation, connections, safe movement and operation, snow retention, etc. A high-quality roof should ensure durability, ease of operation and minimal load that the roof of houses bears.
General roof structure
In conversations you can usually hear both roofing and roofing. You can consider these two concepts interchangeable.
The design of a gable roof and its elements
Today, gable roofs with a residential attic (attic) are very popular. Often these rooms are equipped as summer rooms. But you can also find reliably insulated roofs.
Elements of a warm gable roof:
- rafter system - includes rafter legs resting on each other (in pairs). Location: on the walls; one level;
- two pediments or sewn walls - they are formed when the rafters intersect (read: “How to make a pediment with your own hands”);
- roofing pie - consists of sheathing, waterproofing layer, roofing material, vapor barrier membrane, insulation and interior finishing elements;
- drainage system;
- other elements, for example, a viewing window in the roof. Read more: “Gable roof construction: structural elements.”
Purpose and necessity of structural elements
Regardless of the complexity of the roof, each element is designed to perform its function. The structure of the roof, the shape and design of the roof are determined at one of the stages of designing a house or when drawing up a plan for repair work.
The reliability and durability of the roof depends on the correct installation of all components, including the main parts, roofing material, and junction points with additional roof elements. The roof covering will provide good protection for the rafter system and the entire structure only if you purchase the roof and additional accessories from one manufacturer. In this case, installation work will be completed without unnecessary difficulties.
A competent specialist must draw up a project for any building, especially residential buildings. This can only be done by private architects or designers with special permission. The finished project contains a plan of the house, the roof, indicating all the components and details of the structure. The construction itself should also be carried out by professional craftsmen, since they know the names of the parts of the roof, their purpose and correct location, will carry out the work at the highest level and in a short time, and will also provide a guarantee.
Natural ceramic and concrete tiles
The widest range of additional elements is available for roofing made from natural ceramic or concrete tiles. This is due to the fragility of ceramics, although its strength and durability are high. It is not recommended to drill tiles, so separate elements are produced for all possible cases: for snow retainers, ladders, antennas. Ventilation outlets and gable elements are available.
There are special side tiles for gables, they come in left and right. As for the ridge, in addition to ordinary elements, they also produce ridge parts that complete the intersections of several ridges of complex roofs.
Different types of ridge elements, including for intersections
There are many types of tiles; each type has its own range of additional elements. For various types of ceramic tiles, additional elements unique to them are used.
Types of wooden roofing coverings
The name “wooden roofing” combines quite a few varieties. They differ:
- by quality and type of wood;
- by installation methods;
- according to the shape and type of plates.
Let's look at the types of plates, since they determine everything else.
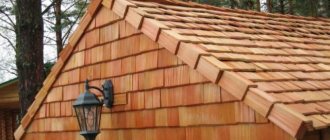
Shingle
The word “shingle”, along with the principles of application, came from Poland. Formally, this term combines shingles, wood chips, and shindel.
Shingles (from the Polish word gont) are thin and short wooden plates or planks used to cover roofs - “shingles”.
Encyclopedic Dictionary of Brockhaus and Efron
https://ru.wikisource.org/wiki/%D0%AD%D0%A1%D0%91%D0%95/%D0%93%D0%BE%D0%BD%D1%82
Shingles are made in two ways.
- Split shingles are dies that break off from a block using a cleaver, but due to inaccurate manufacturing, they do not connect well and warp more. In addition, split shingles require more wood and labor, so they cost more.
- Sawn shingles are produced using special machines. It has a lower cost, but when sawing, the structure of the fibers is disrupted and moisture penetrates better into the rough surface after sawing, so the service life of sawn shingles is shorter.
Based on the type of section, shingles are divided into two types.
- Tongue - wedge-shaped in cross-section, with a trapezoidal groove in cross-section (or tongue, flange) cut into the thick longitudinal edge of the “shard”. Its length is 65-70 centimeters, width - 11-13 centimeters. The thin longitudinal edge (edge, ridge or feather) is sharp; when laid, it fits tightly into the groove of the previous shingle. Such shingles can be mounted not strictly parallel to the slope, but with an inclination, which looks unusual and beautiful. It is this variety that is called shingles in everyday life.
The tongue-and-groove shingles are tightly connected to each other, forming an airtight coating - Non-grooved. It is manufactured in the form of ordinary plates up to 10 cm thick without special connecting locks. Non-grooved shingles are also called shingles.
Due to the complex design of the plates, a tongue-and-groove shingle roof is very durable, but it is almost impossible to make it yourself.
Shingles and wood chips
Non-grooved shingles come in lenticular or rectangular sections and are then called shingles.
Special shingles more than a centimeter thick made from Canadian cedar will last for decades
Shingles got their name from the verb “to tear” - plates 35-100 centimeters long, 15-20 centimeters wide, and a centimeter thick are cut or chipped from a log or lump along the fibers.
If coniferous species are used, then the shingles are split manually using a cleaver (special ax) and a “dryna” - a beater.
The shingles are plucked off using a cleaver and a drill
If soft linden or aspen are used, a shingle machine works better. The historical machine for “drawing” was called a mahal. The master “waves” a log with a knife attached to it, which splits off the shingles from the attached block.
Mahalo - a machine for pinching shingles - requires great physical effort
It is quite possible to make such a machine yourself. You need to movably fasten the end of a heavy log about three meters long with a pin to a heavy long base. Attach a latch for the block on the base a meter from the kingpin, and on the log - a knife-clip with a length of at least 50 centimeters. A handle is attached to the second end of the log for convenience. True, only a physically strong person can work on such a machine.
Video: homemade machine for tearing
Properly made shingles are plastic, do not flake, on the one hand it is smooth and even (and is laid with this side down), on the other it is splintered, which is precisely why it does not crack when driving a nail. It bends only towards the smooth surface. The finished roof is very beautiful and looks like wrinkled scales.
Thin (up to 10 millimeters, and usually 2-3 millimeters) non-grooved shingles of rectangular cross-section are called chips or shavings. It is planed from blocks of equal length and width either by machine or by hand. On the upper side of the chips there are always “spins” that are noticeable when bent. The wood chips must be laid with the smooth surface down, and the “pins” must be directed towards the eaves of the roof so that water flows down them. Chips make it easy to create a coating with a large number of layers, which increases the protective properties of the roof in all respects.
Video: features of roofing chips
Producing the required amount of wood chips or shingles and laying them is within the capabilities of any meticulous non-professional.
Chips lying on the roof often acquire beautiful shades
Video: installation of shingles
Shindel (wooden tiles)
Shindel is often confused with shingles. This, of course, is one of its options, but more labor-intensive to manufacture. The name "wood shingles" is more accurate. Its form and name came to us from Europe: scindula from the Latin verb scindere - to split. Wood preparation is similar to that used in the production of non-grooved shingles and shingles. But then each plate is individually planed on all sides - the thickness is removed from one end, where it will be attached. For a better fit, the plates are butted on the sides, and a transverse chamfer is removed from the bottom edge to facilitate water drainage, or its entire geometry is changed - the edge is rounded or takes on a different shape.
On the side where the shindle will be attached to the roof, its thickness is less
Making a spindle yourself is almost impossible due to the incredible labor intensity.
Depending on the shape of the shingle, you can get a variety of patterns of roofing material
Video: serial production of schindel
ploughshare
The ploughshare is the most beautiful of all types of wooden roofing; it resembles a concave blade with carvings along the edge. The already mentioned churches of the 17th-18th centuries are covered with a ploughshare. And also - boyar mansions and wooden palaces. The ploughshare is made only from soft aspen, cut down in late spring, with the maximum amount of sap. Each petal is a unique piece of art. It takes a lot of wood and a huge amount of manual labor. Therefore, the ploughshare is now used only for the restoration of old and, rarely, for the construction of new churches. When covering a dome, each row has its own “patterns” that differ in curvature. Due to humidity and time, the ploughshare bends even more and creates an impeccable dome shape.
A dome made of ploughshare is very expensive, so this material is most often used for the restoration of ancient temples
The ploughshare represents true ancient art. I saw temples whose heads were covered with ploughshares. It looks incredible. They are covered with a noble silver patina and shine in the sun. It's as if the heads are covered with pure silver.
The ploughshare-covered dome of the chapel of St. John the Evangelist in the village of Zekhnovo, Arkhangelsk region, gives the impression of being made of pure silver
Video: how a ploughshare is made today in one of the monasteries
Only a very few professional woodworkers can use the plowshare.
Tes (plank roof)
Tes are simply boards, often equal in length to the size of the slope or half of it. Initially, they were split from a long log with an ax, and then hewn to a more or less flat surface - hence the name. From that time, only grooves remained on the upper side of the boards for quick drainage of water.
The roof is made of planks using old Russian technologies.
The boards are laid perpendicular to the ridge in three ways:
- in two rows, fitted close to each other. The top row is placed so as to evenly overlap the seams of the bottom row;
The roof is made of planks in two rows: the upper row overlaps the seams of the lower - the bottom row is placed with a small gap of about half the width of the board, then the empty space is covered with the top board - this is a more economical, but also riskier method: there is a danger that when drying, the roof will begin to leak;
Roofing from planks in two rows with a gap saves wood, but it is risky - the cracks of a single row of boards are covered with narrower boards - flashings with an overlap of at least 5 centimeters. Roofing made of planks in one row with flashing also provides savings
In all cases, the boards of the bottom row are laid with the core down, and the top row - out. Then, when the boards of both rows are deformed, they will create an airtight structure.
If the principle of laying planks is followed, the roof will never leak
You can lay the democratic plank yourself.
The basis of the supporting structure of the roof
The basis of the supporting structure of a sloped roof is the rafters. They perform a very important function, supporting the sheathing and thereby bearing the weight of the roof, snow and wind pressure. In addition, the design contains additional elements of the truss roof (mauerlat, crossbars, spacers, etc.), which serve to fasten and impart rigidity to the truss frame.
The estimated snow load for the middle strip is 180 kg/m2 in the horizontal projection of the roof. With a slight roof slope, snow accumulation can increase this figure to 400-500 kg/m2. However, with a slope greater than 60°, the snow load can be ignored. At the same time, when the roof slope is more than 30°, rafter calculations must be carried out taking into account the wind load. For the middle zone it is equal to 35 kg/m2.
An important factor is the dead weight of the roof elements and sub-roof structures, which directly depend on the roofing materials used and the size of the entire roof. When using heavy materials (for example, natural or cement-sand tiles) in the rafter system, it is necessary to use large-section timber, installing rafters with a minimum pitch. If lightweight roofing material is used when constructing the roof of a house (for example, Euro slate, bitumen tiles), then even timber with a cross-section of 50 x 150 mm can be used, and the pitch of the rafters can be significantly increased - up to 1.5 m.
Roofing pie
The roof structure of wooden houses is multi-layered, which is why it is called the capacious term “roofing pie”. The materials included in it complement and improve each other’s performance characteristics, making the roof resistant to moisture, temperature changes and durable. From the point of view of the composition of the roofing pie, the roof structure can be of 2 types:
- Cold. A cold roof is a structure whose composition does not include thermal insulation of the slope. Wooden towers in Rus' were equipped with roofs of this type. The under-roof space in them, where an unheated attic was equipped, served as an air layer that insulated the living floors from the cold. From a construction point of view, this is a simpler and cheaper structure, consisting only of a vapor barrier, waterproofing and roofing.
- Warm. Warm roofing is a more modern technology that has spread with the advent of modern thermal insulation materials and heated attics. If the under-roof space is heated, then the building is deprived of an air layer that protects against cooling, while maximum heat loss occurs through the roof slopes, which have a large area. Therefore, in addition to vapor barrier and waterproofing, a warm roof also includes a layer of insulation, which optimizes the temperature regime in the building.
Warm and cold roof
Differences between warm and cold roofs
Important! A warm roof for a wooden house is a rather complex and expensive construction solution, which is used only in buildings with residential attics and heated upper floors. Cold-type roofs are used for bathhouses made of logs and timber, canopies, gazebos, seasonally used or unheated buildings.
Soft types of roofing
Roll materials. They can be used on slopes with a slope of up to 50 degrees. The thickness of this type of roof is 1-6 mm, the specific weight of the carpet does not exceed 10-12 kg. The advantages include the relatively low cost and the ability to provide waterproofing even on a zero slope. The main problem is the large number of joints. Previously, paper-based roll materials (tar paper, roofing felt) were used. Today they are gradually being replaced by more advanced bitumen-polymer products.
Roof shapes: A - pitched; B - gable gable; B - tent; G - semi-hip hipped; D - four-slope hip; E - gable half-hip; F - multi-pincer; Z - half-hip attic; I - Attic hip; K - conical forceps; L - hip with a broken slope; M - pyramidal forceps; 1 - slope; 2 — gable (pediment); 3 - hip; 4 - half-hip; 5 skate; 6 - broken slope.
Membranes. This is a polymer that has the most optimal performance characteristics among other rolled materials used for soft roofing. The main disadvantage of this type of coating is the high cost and the need to attract qualified specialists. Among the main advantages:
- durability: service life can reach up to 50 years;
- frost resistance;
- resistance to precipitation;
- immunity to ultraviolet radiation.
Bitumen shingles (shingles). This is a coating that has a wide variety of shapes, color shades and has no “contraindications” associated with the required angle of inclination of the slopes. Therefore, shingles are well used on roofs with complex configurations. Such tiles do not conduct sound well and resist the effects of precipitation and sun well.
Basic technical requirements
These standards do not depend on the design features of roofs and apply to all types:
- Resistance to loads (both constant and variable) - for houses made of wood, the safety factor cannot be lower than 1.4. This is all due to the same fluctuations in linear parameters that need to be compensated for by strength.
- Quality of lumber - the first grade is considered the minimum acceptable, but given that the tree is a living material, boards with the same parameters cannot always be of the same grade. Therefore, the choice must be careful.
- The lower limit of weight - the lower the load on the foundation, the higher the reliability of the structure. Therefore, the roof of a wooden house must have a minimum weight - for this, the cross-section of the rafter legs is often reduced by installing stops and spacers.
Copper tiles
Copper is used in roofing work not only in sheets, but also in the form of finished tiles. This type of roof finishing is durable, highly aesthetic, but very expensive. There are a number of manufacturers of copper tiles and each of them has its own range and design of tiles and additional elements.
There are many types of copper roofing. In the photo - tiles, the basis of which is sheets of fiberglass impregnated with a bitumen-polymer composition
On top of this roof is a fairly thin layer of copper. This type of copper tile is quite flexible, so the additional elements are similar to those used for bitumen shingles.
Additional roofing elements are an integral part of modern roofing systems, without which the roof will not fully perform its functions. When designing a house, it is necessary to take into account that the more complex the roof, the higher its cost per square meter will be. The more complex the roof, the more “additions” will be needed, and this costs money, sometimes a lot. Additional elements for metal tiles have the lowest cost relative to the base material, and the highest cost for natural tiles. Companies supplying roofing materials help buyers calculate the consumption and cost of materials. Having a roof plan, it is worth seeking advice in advance.
Types of rafters according to load distribution
We’ve sorted out the concepts, now let’s look at how the rafter system is structured from the inside.
Rafters of layered and hanging type
The roof structure, depending on its internal structure, can be spacer or non-spacer. Depending on this, the rafters themselves are divided into two main types: layered and hanging.
Layered ones are easier to make, but hanging ones will require some tinkering. They are quite difficult to design, repair or change, but this is the design that will have to be resorted to if the entire rafter system will rely only on the outer fence:
The main advantage of hanging rafters is that they work well in compression and bending. But such a rafter system creates considerable horizontal bursting forces that act on the walls.
In order to reduce this physical phenomenon, an intermediate metal or wooden tie is installed that will connect the rafter legs. Most often this is a crossbar - a special element that is used in the construction of attic roofs. And the higher it is located, the higher the ceiling in the attic will be, and the larger the cross-section of such an element should be.
Layered rafter systems are more economical and simpler in design, but they are used only when the building already has two or even several rows of vertical supports, between which the span does not exceed 8 m.
Roof on purlins: for log buildings
The choice between layered and hanging rafters matters when we are talking about an ordinary roof of a residential building, but a bathhouse or a cottage made of rounded logs is built differently, according to its own laws. For example, the basis of such a roof is often slabs, or purlins.
These are special long boards that are parallel to the ridge and rest on log gables. This makes sense!
The fact is that logs tend to shrink, and a conventional rafter system simply warps on them. It will be almost impossible to correct this, and in the above method, with the shrinkage of the gables, the angle of inclination of the rafters will change. That is why movable fasteners are used for everything on the rafters, and the roofing covering is only allowed to be laid after one and a half to two years.
Of course, installing such a roof will require both time and expense, but the technology itself is quite reliable and time-tested.
Although, it is worth noting that quite often roofers use a different technology for such buildings. They take dry logs in advance and tighten them with spring-loaded capercaillie (the so-called special elements). In this case, classic purlins are abandoned, and trusses are installed with vertical supports or struts.
As a result, any shrinkage of the gables no longer affects the geometry of the roof, and those gaps that appear over time are closed with decorative strips. This is how beautiful Russian baths and country houses in the appropriate style are obtained.
Main parts of the roof
The roof is the main final covering of the roof and consists of many components. The main elements that make up the roof:
- Slopes are inclined planes that ensure the removal of precipitation from the roof. The slopes are 95% of the roof. There is only one requirement for them - the angle of the slope must be chosen in such a way as to withstand maximum loads.
- Slanted ribs are obtained at the junction of the slopes and look like protruding corners.
- Skates are horizontal ribs. These elements are designed to cover the gap at the junction of two slopes.
- Valleys, or valleys, are internal angles that are formed at the intersection of two slopes. These elements must be collected in such a way that precipitation does not leak inside.
- Drip cap is the lower part of the slope that protects the walls from water ingress. It is a strip that covers the overhangs from moisture and gives the overhang a clear edge and a complete shape.
- The horizontal part of the slope extends beyond the walls of the building and is called the “eaves overhang.”
- Front overhang is the inclined part of the slope extending beyond the walls.
- A gutter for collecting and discharging precipitation is located along the edge of the slope. The collected liquid is carried away from the house by drainpipes. A drain funnel is installed at the junction of the gutter and drainpipe.
Roofing
All roofing work can be divided into 3 main groups:
- Procurement. This stage includes selection, sorting or cleaning, cutting of rolled materials. Roofing elements are made from sheet steel, slate is cut, and mastics are prepared.
- Preparatory. The base for the roof is completely prepared.
- Basic. Roofing materials are laid, secured to the base, and cared for after installation is completed.
Valleys and drainage system
The most vulnerable elements on the roof are the valleys, which form the recessed angle; precipitation accumulates in them at any time of the year. That is why the construction of this roofing element must be approached with all responsibility. The valley is a tray with a width of at least 300 mm, made of boards 25 mm thick. It is covered with galvanized, roofing or black painted steel so that its ends extend 200 mm under the roof on all sides.
The chimney is also surrounded by a roofing steel collar. From the ridge side, a sheet of steel needs to be placed under the roof, and from the eaves on top of the roof, the result is a kind of apron. Next to the pipe, the sheet must be placed under the brickwork. According to fire safety requirements, the roofing and sheathing must be no less than 140 mm from the pipe, and all wooden elements must be no less than 400-500 mm.
When choosing drainpipes, you should give preference to a diameter of 100-140 mm; they are located at least 120 mm from the wall. If the roof is covered with tiles or asbestos-cement sheets, then drain pipes will be needed to drain the water. Their basis is roofing steel; they are hung with a slope of 2-3 degrees relative to the corners of the structure.
Dormer windows are also covered with the same roofing material. Carefully separate the junctions between the windows and the roof slope.
Features of creating a gable roof
For competent construction, they use drawings of a gable roof and design documentation, which indicates all its dimensions (for more details: “Drawings of house roofs - design stages”).
When the walls of a house are built of logs or timber, the function of the mauerlat is performed by the upper beam. But, if the walls of the building are made of brick, to attach the mauerlat to the load-bearing base before installing a gable or hipped roof, metal threaded rods of at least 10 mm are mounted into the masonry and bolts with washers are used. When installing the Mauerlat, an interval of 1-1.5 meters is maintained between adjacent fasteners. To avoid getting the walls wet, waterproofing is laid from two layers of roofing material.
What is a wooden roof
We know many architectural monuments of antiquity, and most of them are covered with wood. In forest-rich Russia, this was the best and most affordable roofing material. However, today's fashion for wooden roofs comes not from Russian antiquity, but from modern Europe. They did not stop using wood for these purposes, since modernizing old houses in Holland, Switzerland, and France is prohibited by law.
Shingled house in the Swiss Alps is protected by the state
A wooden roof in the most general sense is a roof made entirely of wood, with the exception of fastening materials - nails or screws. Although in ancient Rus' the fastening spikes were also made of wood. Let us at least remember the famous churches that have survived: in Spas-Vezhi (1628), Yuryev (1718), Yanidor in the Perm region (1702), Varzuga in the Murmansk region (1674), Kizhi on Onega Island (1714).
The Church of the Transfiguration of the Lord in Kizhi was built without a single metal fastening element
Advantages and disadvantages of wooden roofing
Fashion is fashion, but we need to understand what we are up to in our quest to make our home beautiful.
The advantages of such a roof are very significant:
- Aesthetics. Of course, your house will stand out from everyone, as Baratynsky said, “with a unique expression.”
- Economic factor. Such a roof does not require the installation of noise, thermal, hydro and vapor barriers, nor ventilation in the under-roof space. The “shards” work like a fir cone: when dry, they “breathe” and do not allow condensation to form under the roof, and when wet, they swell and close tightly.
- Excellent performance characteristics. The roof can withstand heavy snow loads, strong winds, high humidity, precipitation, large temperature changes, and protects residents from the noise of rain and wind.
- Eco-friendly and hypoallergenic. It does not emit harmful fumes either inside the house or into the environment.
- Fairly high durability. However, this directly depends on the type of “shards”, the type of wood and the thoroughness of installation. An oak or larch shingle will last up to 80 years.
A house of an unusual shape, covered with shingles, has an “uncommon expression”
Of course, there are also disadvantages:
- Fragility in case of improper installation or use of unstable wood. A roof made of aspen shingles is designed to last only 8 years, and a roof made of pine planks - up to 20 years.
- High cost of material and labor.
- In the case of independent execution, there is a large labor cost for installation, which implies scrupulous fixation of each, often very small, element.
- Low fire resistance. Some danger remains even with careful impregnation of each element with modern fire retardants, proper design of fire-fighting materials around the pipe areas and installation of anti-spark deflectors on pipes and lightning rods.
- Strict requirements for the slope of the slope. A wooden roof does not rot or leak even with a fairly large roof slope - from 18 to 70°, ideally 40-45°.
Roof elements
Different designs have their advantages and disadvantages, so before erecting a building, the feasibility of using any type of roof should be clearly determined. All elements can be divided into two types: geometric and structural. The former include all kinds of slopes, ridges, ends and valleys, and the latter include rafters, beams, supports, and mauerlats. Each element plays a specific role.
The main load-bearing component of any pitched model is the rafters. They can be classified depending on the type of support, for example, rafters are equipped with a support leg, vertical or diagonal support. One end of the rafters rests against the wall of the house, and the other against the base of the roof. The upper support is often called the ridge, which performs the stabilizing functions of the entire configuration. They can be made from logs, bars or boards. In order to, are often used. They must be made of the same material as the main part.
Types of roof truss systems.
The rafter leg rests on the mauerlat, which can be made of timber or other material. In wooden houses, this is the top point of the wall or an additional wooden element that is placed on its surface.
Ties are L-shaped structures that connect the rafters at the highest points. To increase reliability, transverse beams can be used, which will significantly increase rigidity. Thus, the puffs can be made in an A-shape. The wall that comes into contact with the ridge must be equipped with a special ridge beam placed at the very top. They are made from the same material as the rafters. End beams are used only if the second floor of the building is equipped with walls.
End beams serve to connect the ridge and the wall, but, as a rule, they are placed diagonally rather than at right angles. Like rafters, they can be reinforced with various beams and posts. After the waterproofing measures have been completed, the rafter structure is supplemented with a counter-lattice - a system that acts as a gap between the surface and the waterproofing material. If this issue is not resolved in a timely manner, the moisture that forms from condensation will take a long time to dry out and thereby damage the coating and the structure as a whole.
But do not confuse the counter-lattice with the sheathing - these are different things. Sheathing is the base for the roof, which, in most cases, is made of wood. It is the wooden lathing that allows you to quickly and reliably fasten tiles, slate, ondulin and other types of roofing materials to its surface. The thickness of such boards should vary depending on the type of roofing and can range from 15 to 30 mm. If soft tiles are used for the roof, the surface of the sheathing should not have gaps and should be continuous. Then, instead of boards, plywood or boards made of wood materials can be used, since a continuous arrangement of boards is, at a minimum, uneconomical.
Rafters can form certain planes called slopes. and will be called a slope, hence the division of roofs into single-pitched, gable, hipped and so on. If the slopes have combined surface edges, then such a model will be called a tent model, the description of which was presented above. - this is an indicator that determines how much the roof will extend beyond the walls of the house.
The walls that border the slopes and extend up to the ridge are called external gables. To hide the entire system of rafter elements, a special binder is used. It allows you to improve roof ventilation, which will prevent the formation of moisture. The plane on which two fixed slopes touch is called a ridge. In some types of roofs there may be several ridges, for example, hip or hip roofs. At the bottom, the slopes are attached to the valley, but this element is used exclusively in single-pitch structures.
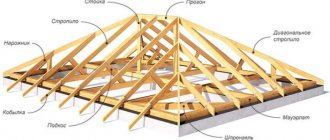
Parts of the rafter system
The rafter system is a supporting frame consisting of many wooden elements that represents a kind of roof skeleton.
Through the roofing shell, the frame takes on external loads from precipitation, wind, its own weight, roofing pie, drainage system and various technical equipment installed on the roof.
The task of the rafter system is to evenly distribute and transfer the above loads to the load-bearing walls of the house. An example for analyzing the elements of a rafter system would be gable, hip and multi-gable roofs. These roofs have almost all types of wooden rafter frame support elements.
The load-bearing parts of the rafter frames can be reflected in the following list:
Mauerlat.- Rafter legs and frames.
- Runs.
- Fillies.
- Lies and trusses.
- Tights, racks, struts.
- Lathing and counter-lattice.
- Overhangs.
The methods and rules for fastening elements of the rafter system are described in the video:
Mauerlat
The origin of the name is from two German words “Mauer” and “Latte”, which means wall timber. Mauerlat is a beam or log laid on top along the perimeter of the external fences of the house . The structure serves as a support for the lower ends of the rafters and frames. It is a horizontal beam with a regular section of 150 x 150 mm or a double beam of two beams 150 x 75 mm. There are exceptions depending on the complexity of the structure of the rafter frame.
The purpose of the Mauerlat is to tie the roof to the house and uniformly distribute the load on the walls from the nodes of the rafter system with the roof covering.
Under the Mauerlat, preparation is made of cement or concrete screed on the surface of the masonry walls. The screed is covered with a layer of rolled waterproofing made of roofing felt or other modified material. The beam is secured to the wall with studs or anchor bolts. It is screwed to the frame with wire.
Rafter legs
Rafters are inclined wooden beams supported by a ridge girder (crossbar) and a mauerlat. Long bars can be part of wooden trusses or free-standing elements of the roof frame.
Taking on the external load from the roof, the rafters work together with racks, tie rods, struts and other elements .
Depending on the length of the span between the load-bearing walls, two types of beams are used - these are layered and hanging rafter legs.
- Layered .
The layered rafters form rigid nodes with the Mauerlat. Typically, such beams are used on buildings with a span of 6 to 15 meters. The upper ends of the rafters meet at the ridge, where they are secured with nails and perforated metal plates and angles. The beams are supported on the Mauerlat by notching (cuts) or bolts through metal plates. - Hanging .
Gable roofs with spans between load-bearing walls of up to 6 meters, where there are no internal walls and ridge girders, are most susceptible to deformation from shrinkage of houses. To ensure that shrinkage occurs gently and gradually, the attachment points of the rafters to the Mauerlat are made movable. Inclined beams are called hanging rafters. Sliding knots are made in different ways. The main thing is that the rafter legs, transferring the load to the walls, can slide along their axis, maintaining their integrity.
fillies
They are attached to the lower ends of the rafters. Thin boards are used to extend the rafter legs in order to extend the edge of the roof slope beyond the perimeter of the walls. The roof covering with fillets, wind board and sheathing form the overhang or eaves of the roof.
Narozhniki
This special element of the rafter system of hip, half-hip and hip roofs is a rafter beam of variable length . Spreaders fill the space between the slanted (diagonal) hip rafters.
At the bottom, the spigots are attached to the mauerlat in exactly the same way as the rafter legs. At the top, the beams are attached to the slanted rafters by notching, sawing under their bevel, or through the cranial bars, stitching the joints with nails, pins and reinforced with metal plates. The farther from the center of the hip, the shorter the sprigs become.
Runs
Horizontal wooden beams that rest on the load-bearing elements of the rafter system are called purlins. They are divided into two types - ridge and side beams .
The center ridge purlin is a horizontal beam that is installed at the top of a pitched roof.
The side purlins are intermediate transverse supports of the rafter legs, which themselves are supported by racks. They are installed when the distance between load-bearing walls is 12 meters or more. They can also be side ridge purlins in a broken rafter frame.
Sill
This is a wooden beam that is laid on top of an interior wall . Through the racks, the bed unloads the ridge girder on which the rafter legs rest. The bench is made from timber of the same cross-section as the Mauerlat beams. The beds are placed on the walls, which are located strictly under the ridge girders.
Skate
This is a load-bearing beam that supports the upper ends of the rafter legs. It is also the upper horizontal edge - the ridge, formed by the union of two gables of the pitched roof. The ridge can be a self-supporting interlocking beam for the rafters.
In long-span houses, the ridge girder rests through the racks on the floor . The ridge transom is made from solid or laminated timber with a cross-section of 150 x 150 mm. In small buildings, the upper purlin is made of double boards, each with a cross-section of 120 x 50 mm. The rafters are supported on the ridge with a cutout or secured with end-to-end ends with metal corners.
Tightenings, racks, struts
These additional beams play an important role in strengthening the rafter frame. Their number and installation locations are determined by special calculations for wooden structures by designers.
Tightenings made of timber or boards tighten adjacent rafter legs, significantly reducing the expansion forces in roof trusses. The racks unload long inclined beams, and the braces remove part of the load from the nodes of the rafter frame.
Sprengels
In German the word Sprengwerk means load-bearing rod. From it comes the name of the part of the rafter system - sprengel. The design is a horizontal brace in the corner of the mauerlat with a stand supporting the slanted rafters of the hip roof.
Lathing and counter-lattice
These are two structures perpendicular to each other . Sheathing refers to slats laid parallel to the ridge girder. The counter-lattice beams are laid, on the contrary, along the roof slope.
Before their installation, the rafters are covered with a special vapor barrier film, fixing it with nails or staplers. Then the counter-lattice is nailed and the sheathing slats are attached to it. The sheathing can be made of solid boards if the roofing consists of piece elements (tiles, bitumen tiles, etc.).
Cornice
The eaves are the name given to the roof overhang, which is a rather complex assembly of a pitched roof. It covers the lower boundary area of the roof, protecting the internal space of the rafter system from the penetration of moisture, wind and external low temperatures.
The wind (frontal) board covers the ends of the lower ends of the rafters or fillies. A j-bevel is snapped onto the board or covered with other material. A drip bar is installed on top. The edge of the waterproofing is placed over part of the drip width. After filling the counter battens, the sheathing slats are nailed. Hooks are attached on which the gutter is laid. The overhang from below is hemmed with sheet material.
The J-chamfer is an apron made of polymer material with a plastic profile with a longitudinal locking pocket. The chamfer is snapped into the pocket at the top, and secured to the bottom of the overhang with screws from the bottom. Thanks to this new part, the installation time of the cornice is significantly reduced.
Types and purpose of additional elements
The roof of a house today is not only an enclosing protective structure. New technologies and materials make it possible to implement the most seemingly crazy ideas both in roof architecture and in their use. And all thanks to additional elements, of which there are quite a lot. Let's look at the main, most common extras:
- upper and lower valley - strips to protect the junction of two adjacent surfaces;
- eaves slats - to protect roof eaves from precipitation;
- a ridge plate, sharp or flat, bent at a certain angle, protects the junction of the slopes;
- snow barrier - keeps snow and ice from falling;
- end strip - preserves the under-roof space at the ends from moisture, dirt, dust;
- window sill - protects the building from moisture penetration through window openings;
- umbrella for ventilation and stove shafts - a dome over the pipes to prevent moisture from entering the house through chimneys, ventilation ducts and pipes;
- junction strips are an important element that protects the junction of the roofing decking with pipes, chimneys, parapets;
- gutters - designed to drain water from the roof;
- parapets - protect the side flat surfaces of the roof from the penetration of water during precipitation and melting snow.
When installing the roof, you will also need plugs for gutters and ridges, gaskets and seals. All this is purchased in stores or made individually.
Additional elements allow you to implement many interesting architectural solutions
Calculation of the number of additional elements
The calculation of additions is based on the roof or facade design. You can calculate the quantity yourself, taking into account the main point - the necessary additional elements are always purchased with a reserve.
- The cornice strip runs along the entire perimeter of the cornices, so their footage will be the required size of this extension.
- Valleys (lower and upper) are calculated based on the length of all converging edges of the slopes + 10% for overlaps.
- The length of the end strip is equal to the length of all ends of the roof.
- The dimensions of the seal are calculated based on the number of additional panels under which it will be placed.
- Drainage extensions are purchased based on the perimeter of the building plus 10–15% for overlap at joints and for trimming. In addition to the gutters, you need to select funnels, brackets and drainpipes from a material similar to the ebb.
- Additional elements for covering the ridges at the junction of the ribs or longitudinal edges of the slopes are purchased taking into account the total length of the ribs and ridge plus 7–10% for overlap.
Selection of additional elements
When purchasing extras, you need to follow certain rules:
- It is advisable to purchase goods (roofing and accessories) from one seller - if you purchase large volumes, you can get a good discount. In addition, a guarantee is provided on all elements and in case of defects it is easier to replace defective products in one place. When shopping at different retail outlets, it is not always possible to guess the color scheme and texture of the roofing coverings, so purchasing the entire roofing kit at once can save time.
- Additional elements must be installed according to the rules established by the manufacturer. In case of their violation with subsequent damage to the accessories or improper transportation, the warranty does not apply.
- Don't forget to buy fasteners for the extensions. Here you will need a manager's consultation, since each accessory has its own fastening system, and sometimes even several - hardened nails with wide heads, plugs, special bolts with nuts, self-tapping screws with drill-shaped legs and silicone gaskets. You can, of course, get by with ordinary roofing nails, but a beautiful roof needs a decent frame, so today few people use nails the old fashioned way.
Roof base
The base can be made of rolled or piece materials in the form of flooring or lathing. To make the sheathing you will need blocks of wood, and for the flooring you will need not only bars, but also boards. It is advisable to make a continuous flooring if roll material or asbestos-cement tiles are chosen for the covering. For tiles, flooring boards are laid out in one layer with a small gap, and for rolled material - in two layers: working and protective. For the protective layer, narrow boards are chosen, which should be located at an angle of 45 degrees to the worker. Between the two floorings you need to place an anti-wind roofing felt lining (roofing felt grade RPP-350 or RPP-300).
Lathing will be required in cases where the roof will be covered with sheet steel, tiles, wood or corrugated asbestos-cement sheets VO (or slate).
When making the base, you need to follow two simple rules: each element must be securely attached to the supporting structures, and their joints must be spaced above the rafters.
In addition, the specified distance between the bars or boards must be strictly observed over the entire surface of the base. The widest ones are located at the eaves, ridge or under the joints of the roofing material, and the thickest (15-35 mm thicker than others) are located near the eaves. Under the gutter, the base must be at least 750-800 mm wide, and under the eaves overhang with wall gutters, the base must be equal to the width of the overhang. On roof ribs and ridges, wooden blocks must be installed on the edge.
By the way, read our new article: How to make a weather vane for a metal roof with your own hands
Roof classification
Depending on the slope of the roof slopes, there are pitched (more than 10%) and flat (up to 2.5%). In individual housing construction, as a rule, pitched and flat roofs are used. In flat roofs, stagnant water may form on the roof and, as a result, leaks may appear in these places. The advantage of flat roofs is the ability to use them for various purposes. According to the design, roofs can be attic (separate) or without attic (combined). Attic roofs can be insulated or cold. In atticless (combined) roofs, load-bearing elements serve as the ceiling of the upper floor of the building. Attic roofs can be ventilated, partially ventilated and unventilated. Depending on operating conditions, roofs can be used or not. The type of roof is mainly determined by its geometric shape and roofing material. Depending on the shape, roofs can be single-slope, gable, three-, four-slope, multi-slope.
A pitched roof with its plane (slope) rests on load-bearing walls of different heights. This roof is most suitable for the construction of outbuildings.
A gable roof consists of two sloped planes resting on load-bearing walls of the same height. The space between the slopes, which has a triangular shape, is called gables or gables. A type of gable roof is the attic. If the roof consists of four triangular slopes converging at one upper point, then it is called a hip roof.
A roof formed by two trapezoidal slopes and two triangular end slopes is called a hip hipped roof. There are also gable hip (half-hip) ones, when the gables are cut off.
The gable roof of an industrial building with a longitudinal lantern differs from the gable roof of a residential building in the smaller slope of the slopes and greater width and length.
A vaulted roof in cross section can be outlined by a circular arc or other geometric curve.
A folded roof is formed from the connection of individual trapezoidal elements - folds.
The dome-shaped roof is half a sphere in outline, supported entirely by a cylindrical wall.
A multi-gable roof is formed by connecting the slopes of the planes. It is used on houses with a complex polygonal plan shape. Such roofs have a larger number of valleys (internal corners) and ribs (protruding corners that form the intersections of the roof slopes), which requires high qualifications when performing roofing work.
The cross vault consists of four closed arched vaults.
The outline of the spherical shell is a vault resting at several points on the base. The space between the supports is usually used to install translucent lanterns.
The spire-shaped roof consists of several steep triangles-slopes, connecting at the apex.
The roof of oblique surfaces consists of several flat planes supported by load-bearing walls standing at different levels.
A flat roof rests on load-bearing walls of the same height. Flat roofs are most widely used in both civil and industrial construction. Unlike pitched roofs, flat roofs do not use piece or sheet materials as roofing materials. Here, materials are needed that allow the construction of a continuous carpet (bitumen, bitumen-polymer and polymer materials, as well as mastics). This carpet must be elastic enough to withstand temperature and mechanical deformations of the roof base. The thermal insulation surface, load-bearing slabs, and screeds are used as the base.
Rafter material: which one is better?
Depending on what loads are planned and what the fire requirements are, the roof frame is made from a variety of materials. Here's what a classic wood and metal roof system looks like, for example:
We propose to dwell briefly on the features of the materials used for roof rafters.
Wooden rafters: advantages and disadvantages
For many, erecting a roof seems like working with wooden boards, which are sawed and fastened in the right place. This is partly true, of course:
The wood used is usually dried coniferous or glued if the rafter elements must withstand increased load. But working with wood is actually no easier than working with metal, although many people think so.
Thus, when making wooden rafters, only high quality wood is suitable. These are dry boards and beams with a moisture content not exceeding 25%. They also carefully ensure that such boards and beams do not have large knots, wane, cracks or unnecessary bending of the fibers.
What's the point? Any serious defect can lead to the rafter leg simply cracking under load. If it is not possible to buy good quality dry lumber, then it is dried directly onto the lens in a special ventilated stack. But this takes more than one month, and even after drying, about 30% of the boards have to be rejected.
Therefore, it is more rational to purchase ready-made boards for the manufacture of a rafter system, with a margin of width. And that is not all. Typically, lumber looks perfectly smooth only by eye, and for a rafter system, geometry is an extremely important parameter. And just having a margin in width, the master gets the opportunity to straighten the rafters independently using planing equipment. This is the only way the slopes turn out to be truly even, and absolutely any roofing covering can be successfully placed on them.
Steel beams: for special loads
Today, the rafter system is often assembled from galvanized steel beams. You've probably come across their name: I-beams, channels or tees. Such elements turn out to be much more expensive than wooden or ordinary metal ones, but it’s worth it.
Yes, they are much more difficult to install, but they are valued for one important advantage - their high resistance to bending loads. Thanks to this, in the construction of the roof it is possible to do without any vertical supports and other elements. But in residential building construction, beams are not often used today, although such practice exists, and now we will explain why.
For example, the complexity of the rafter system and the presence of internal elements directly affects the planning solution of the attic. After all, the more different jumpers and crossbars between the construction legs, the lower the attic ceiling will be.
Moreover, all this is important not only for arranging another living space under the roof. The fact is that today the so-called attic roofs are popular, under which the most ordinary rooms of the house are located. And any additional elements simply won’t fit there.
But there is a fly in the ointment: metal beams often serve as cold bridges, and therefore a roofing pie must be installed for them. Basically, the filling here is oriented strand boards and extruded polystyrene foam as insulation. This is a great alternative to traditional hanging rafters!
LVL beams and combined I-beams have shown themselves to be the best in this regard in practice. I-beams are relatively inexpensive, but have not yet been tested by time, but LVL timber is three times more expensive than conventional lumber. Whether or not you should give preference to such a rafter system is up to you to decide.
Rafters
As the base of any roof, rafters made of wooden boards or beams are used. This is a load-bearing structure that takes the weight of the roof upon itself, so it is always made of high-quality wood, without cracks or rot. The material for making rafters is softwood boards or beams. They must be perfectly dried and contain a minimum number of knots. It is acceptable to use logs, but they are much heavier.
The support for the rafters is the mauerlat. This is a beam with a cross-section of at least 10x10 cm or a log, necessarily hewn from the bottom side. This element is also designed to ensure that the load on the load-bearing walls is distributed evenly. The upper crown of a log house can be used as a mauerlat for the construction of cobblestone and log buildings.
Rafter diagram for a gable roof. Mauerlat as a support is required.
The cross-section of the rafters is calculated additionally, and it depends on several indicators: the load created by the weight of the roof and snow precipitation, the pitch of the rafters, the size of the span and the slope of the roof. According to the method of installation, rafters are divided into two types: layered and hanging. The first ones are installed obliquely on supports, which serve as external walls (for a single-pitched roof) or internal and external walls (for a gable roof). Hanging rafters rest only on the walls of the building. They are installed in those buildings where there are no additional supports and internal load-bearing walls.
Video description
The video shows how to choose a rafter system for different types of roofs:
Ridge run
An important element of the roof. It forms the ridge, but in a structure with layered rafter legs it is a support for them. The ridge run must be installed horizontally. And they are made from timber or double boards.
The purlin cannot stand on its own, so racks are installed under it. They are placed evenly at the same distance from each other. Sometimes the place of the outer supports is taken by pediments built from bricks or blocks.
Sill
Another important element of the roofing structure. Its purpose is to support the posts under the ridge girder. In fact, this is part of the Mauerlat, but not necessarily installed on the wall of the building. The bench can also act as a load-bearing beam.
Let us add that there may be several lying on the roof. Intermediate ones are installed under racks that support rafters longer than 4.5 m.
Roof sheet lying on the wall Source clip.fail
Euroslate
Euro slate (trademarks Onduline, Gutanit, Nuline, etc.) is similar to domestic asbestos-cement sheets only in shape; it is a polymer-cellulose base impregnated with bitumen components. The release program contains all the necessary elements: ridges, valleys, wind parts (gable), elements connecting to walls, ventilation outlets and cornice filler. A cornice element is not needed for a roof made of large-sized sheets. Euro slate is quite flexible, so additional elements are made to fit an average roof with a slope angle of 20°, and during installation they are given the desired shape.
The Euroslate ridge is secured with special nails through the wave
Due to the wavy section of the sheets and the straight profile of the ridge, valley and abutment to the walls, these units are ventilated. If necessary, the gaps can be closed with cornice filler, which also contains small holes closed with “plugs”. Some European slate manufacturers produce additional elements that provide the roof with, if not airtightness, then certainly airtightness.
The valley for Euro slate is shaped like an inverted ridge and effectively drains water
Given the general cheapness of Euro slate, additional elements are not that little, so developers with a limited budget can use alternative options. A ridge, valley and junction made of galvanized, polymer-coated metal will cost less and will look good. On wind overhangs, you can do without a tong altogether by simply bending the outermost wave of a fairly soft roofing sheet and nailing it to a vertical board.
The wind additional element of the tong can be omitted by bending the outermost wave of the profiled sheet. True, it won’t work out so neatly. The fasteners need to be placed more often, every 20-25 centimeters.
Integral roof trusses: for extra strength
The rafter system, like an ordinary construction set, can be assembled right on site during the construction of a house, or it can be ordered in the form of ready-made rafters at the factory, and only then installed on the roof. In a word, solid elements rise to the top, which only need to be secured. This is more convenient in terms of rafter work, because at height many manipulations with tools are not convenient.
Today, many companies are engaged in similar production. They adapt the client’s project to the required technology, accurately calculate what the structure of the rafter system should be, and calculate down to the millimeter all the cross-sections of the elements for the chosen type of roof, slope and covering. Time is also devoted to calculating the planned loads on the roof, of which there are many. But with certain knowledge and skills, it’s possible to do all this on your own.
Let's take a closer look at the design of such rafter frames. They represent a triangle, which is quite rigid in its structure and does not deform under pressure or thrust force:
Thanks to such trusses, the roof is provided with the necessary stability, and for many modern projects this is the main reliability criterion.
Composite tiles
Composite tiles can be conditionally described as improved metal tiles. It has a more expressive profile, quite reliably imitating natural material (ceramic tiles, natural slate or shingles), and is covered with colored stone chips. The ridge elements have a high figured profile and are also covered with a layer of stone dressing. The remaining elements (valley, cornice and pediment strips, abutments) are made of ordinary galvanized metal with a polymer coating. Elements from ordinary metal tiles can be used. The main thing is to get into color.
The ridge of the composite tile is also covered with stone chips. The photograph shows that the valley, unlike conventional metal tiles, is single and is located only at the bottom of the sheets
Of the entire range of basic and additional elements of a composite roof, only the ridge is processed with crumbs. The remaining elements can be made to order from flat sheets of polymer-coated galvanized steel.
Roof
The roof is the top covering of the roof, which provides protection from precipitation to all structural elements of the structure and drains water to the ground. That is why one of the main requirements for a roof is water resistance. The roof can be made from various building materials, asbestos-cement or steel sheets, rolls and local (clay-reed and clay-straw) materials.
As for the design, the roof covering may consist of:
- slopes (inclined surfaces);
- inclined ribs;
- ridge (horizontal ribs).
Valleys and valleys are the name of the places of intersection at an incoming angle, and eaves and gable overhangs are the edges of the roof that extend beyond the building horizontally or at an angle. Atmospheric water from the roof slopes is collected in wall gutters, then it enters water intake funnels, and then into drainpipes and storm drains.
The roofing components can be laid both transversely and longitudinally, connecting them with an overlap (most roofings) or in a lock (roofing steel sheets).
According to the roof structure, they are divided into:
- single-layer (consist of VO sheets, steel, asbestos-cement tiles and seam tiles);
- multilayer (roll materials, planks, shingles, shavings, flat strip tiles).
In multi-layer roofs, the number of layers will range from 2 to 5, it depends on the material you choose. This type of roofing is quite labor-intensive and less economical. If in a multi-layer roof each layer lies in the transverse direction, it must certainly overlap the joints of the elements of the layer lying below. If it is placed in the longitudinal direction, it must cover the underlying layer with an overlap established by GOST.
Soft bitumen shingles
Since this material is really soft and quite thin, rigid strips made of polymer-coated metal are used as cornice and wind elements. Moreover, they are not placed on top of the roof, but, on the contrary, from below. The plank defines a clear edge; flexible tiles are glued on top of it.
The eaves and wind strips and the lining of these planes are made of metal
From a material similar to the main sheets of bitumen shingles, only the starting (initial) strip, ridge and valley are made. Ventilation is very important for a sealed asphalt shingle roof; manufacturers offer a number of ventilation devices. They are made of plastic in the color of the roof.
Roofing made of bituminous shingles in the process of installation. The starting metal strips (poorly matched in color) are clearly visible; the ventilation aerators located closer to the ridge are covered with tiles. You don't have to do this, they are plastic.
General rules for constructing such a roof
Wooden roofs are laid only on pitched roofs, the slope of which cannot be less than 80% or 45º. This is necessary so that precipitation does not linger on the coating, posing a threat to moisture-sensitive wood. The specified limit is allowed in the construction of plank roofs. It is recommended to build steeper structures for laying shingles or shingles.
Direct contact between wood and building structures made of asphalt or cement concrete is prohibited. If contact is unavoidable, waterproofing must be installed between the wood elements and the concrete base.
It is important to note that a wooden roof is not stable. That is, when wet from heavy rains, during snowmelt or the traditional increase in atmospheric humidity in the off-season, wooden elements swell, and when humidity decreases, they shrink in size. Moreover, these changes can occur over the course of decades, and not the first year or two after the device.
According to the principle of operation, a roof made of wooden elements is similar to a spruce or cedar cone. When heavy rainfall occurs, its “scales” tend to cover as much space as possible to prevent water from penetrating inside.
By shrinking in dry weather, they open up natural ventilation pathways to remove excess moisture from underneath them. As a result of the described movement, condensation does not form under the wooden roof, it is well ventilated and perfectly protects buildings from precipitation.
The laying of wooden planks is carried out with the overlap of each element, i.e. with the overlay of the overlying part or the lower one so that the water flowing down the slope from above has no opportunity at all to seep under the roof. To speed up drainage on planks and shingles, for example, longitudinal grooves are selected.
Let's summarize the above information. A well-designed roof with a wooden covering should provide:
- Impeccable protection against atmospheric water penetrating from above. It is formed due to the swelling and closing of the edges of the elements when moistened, as well as due to the multi-layer system of the wooden covering itself.
- Unobstructed ventilation. The free passage of air flows is created by reducing the size of wooden shingles and having numerous channels for the flow of air flows.
- Impeccable water flow down the slopes. Non-stop water drainage is created by a special technology for laying wooden tiles and creating grooves on its surface for drainage.
However, there are significant differences in the device technologies that home craftsmen and owners of eco-houses who want to acquire a roof with a wooden covering that is a priority in an ecological and aesthetic sense should understand.
Selection of roofing material
To cover a wooden roof it is recommended to use:
- Shingle. A wooden roofing material consisting of small plates joined together with tongues and grooves. Shingles are made from particularly durable wood pores.
- Shindels are small chipped plates. Outwardly they resemble tiles only of unequal shape.
- A ploughshare is a type of shindel. Its shape is more complex - the upper part is made in a spade shape, the lower part is openwork.
- Tes – is an edged board made of coniferous wood.
Important: an important difference between a wooden roof and any other is its high maintainability. You can carry out the work of replacing a roof element quickly and independently.
Rafter system of a hipped roof: advantages and disadvantages
The hip roof is one of the most popular for modern private houses. It has a number of advantages:
- hurricane resistance;
- resistance to deformation;
- good protection of building facades from precipitation;
- beauty of appearance.
However, there are also disadvantages of such a rafter system:
- the design is more expensive than a gable one;
- slopes reduce the area of the attic;
- It is very difficult to install a four-slope rafter system yourself.
Combined rafters
In a number of cases in construction, one has to deal with the arrangement of rafter systems for multi-pitched, broken and other complex roofs. This type of work is quite complex and requires special skill and skill. Typically, in such situations, alternating hanging and layered rafter structures is used.
In order to increase the rigidity of the structure, a rack with struts is installed below the ridge girder. As a result, the gap between the side supports can be increased to 10-12 meters.