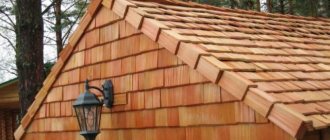
In nature, there are no roofs or roofing coverings that are not afraid of powerful gusts of wind. The denser and stiffer the roofing material, the easier it is for a powerful air flow to penetrate even the narrowest crack and tear it away from the sheathing of the wooden roof frame. Side overhangs facing the roof gables are considered especially vulnerable. To avoid a catastrophic undermining of the roof covering, a wind board is installed in tandem with a wind strip.
What is a roof windbreak?
According to the classification of devices used for arranging roofing, a windshield or lath, in common parlance a board or plank, belongs to the category of additional roofing elements. With its help, the roof structure is retrofitted with auxiliary devices that make the roof more reliable and protected.
Roof wind bars are used to solve small but extremely important problems:
- Protect the end edge from moisture penetration, most of the water gets under the roofing through the end edge, so the wind deflector is installed on the roof of the house at the same time as the roofing, without delaying the installation of the protection for more than a couple of days;
- Fix the outer edge of the first roofing sheets, this avoids heat loss and mechanical damage to the vapor barrier film;
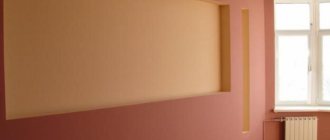
- Give the roofing and the entire structure an additional decorative look. With the correct installation of the roof wind board, photo, it is possible to close the joints, overlaps, waterproofing and insulation, which are clearly visible from the end of the roof.
For your information!
Roof wind barrier kits are offered by leading manufacturers as part of standard roof coverings. This simplifies the selection of protection, while you can get the best quality board from all possible options. After installing the wind strip, the roof slopes look like a single monolithic covering, without curved edges and corners. The flashing can increase the rigidity of the roofing sheet and at the same time protect the edge of the roof from annoying birds. It is known that jays, crows and jackdaws like to hide all kinds of supplies and bookmarks, moss, pieces of branches and wood chips under the edge of the roofing, creating considerable problems for the owners, including the spread of ticks and bark beetles.
Types of roof wind slats
The design of the windproof lining differs from nine other types of end additional elements. The main difference is that each of the structures used to protect the roof covering is profiled in a special way to better protect its place on the roof.
The eaves strip along with the drip edge is installed on the edge of the slope, the ridge corner is installed on the top of the roof. Installation of a windshield on the roof of a house is carried out at the end of the roof above the gable. To effectively close the joint, and at the same time ensure normal release of water vapor without the formation of condensation, the board is bent and profiled in a special way. For each type of roof, they produce their own version of the wind strip:
- For soft roofs, a wind strip with a U-shaped profile is used;
- For metal tiles, corrugated sheets, slate and ondulin, the G-profile is used.
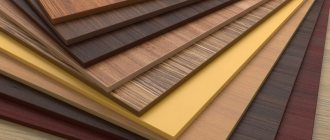
The mechanical and thermal load on the protective lining is often greater than on ordinary roofing sheets, so the part is made either from galvanized sheet steel with a polymer coating, or from polyvinyl chloride, resistant to ultraviolet radiation and temperature changes.
Additional device information
It is necessary to arrange holes between the roofing sheets and the ridge strip, which will ensure the effective movement of air mass flow. Rafter strips or metal purlins are installed on top of the hydro- and vapor barrier. The sheathing is longitudinally attached to them, the distance between the elements of which will depend on the type of corrugated sheeting.
For sheathing, use a square beam with a side of 50 mm. You will need moisture-resistant plywood sheets, their thickness should be 10 mm. The construction of a roof made of corrugated sheets may involve continuous or thinned sheathing. The first type is installed on ribs, around chimneys and on ridges. The thinned pitch is 50 mm. All wooden parts are treated with an antiseptic.
A diffusion gasket is placed on top of the sheathing, which prevents the formation of condensation. The bottom row of corrugated sheeting is laid on the sheathing. In this case, a cornice overhang should be formed. Its dimensions will depend on the height of the profile sheet. It is also important to take care of the cornice strip, which should be located below the waterproofing layer.
Requirements for a plastic wind board
On sale you can find a fairly large number of wind slats of various designs, made of impact-resistant polyurethane or polycarbonate. They are not cheap, and their suitability as a protective board is questionable, since both types of plastic have a high coefficient of thermal expansion, much greater than that of galvanized metal or slate.
For your information! Plastic roofing wind boards must be flexible and resistant to solar ultraviolet radiation.
Both polycarbonate and polyurethane plastic quickly deteriorate under sunlight, so only polyvinyl chloride is suitable for the roof, preferably in a similar color to the main color of the roof.
Wind protection for soft roofs
For roofing felt, bitumen shingles or any other types of soft coverings, two types of profiles are used. In cross-section, the wind strip resembles an L profile with a small V-shaped spring shelf.
In addition to the standard profile bar, visors with the lower edge bent outward, performing the functions of a drip pan, are used for protection. The spring in the upper part of the lining tightly presses the horizontal shelf to the surface, thereby ensuring a reliable fit of the protection even in cases where the roof sag or “plays” due to gusts of wind.
It is advisable to choose the size of the horizontal shelf of the wind cover at least 80 mm, but you can find models with a standard size of 65 mm and a double width of 113 mm. Narrower models are used for the most even and flat roofing coverings; in other cases, the selection and installation of wind boards on the roof must be carried out according to the recommendations of the roofing manufacturer. Very wide planks are inconvenient to install, have mediocre flexibility and do not always fit smoothly to the surface of the flexible roof.
The vertical part of the wind bar shelf usually does not exceed 100 mm, the height of the spring side is 20-30 mm. For the most problematic bitumen shingles, it is recommended to use a wind protection with dimensions of 78x100 mm, with a spring height of 20 mm and a drip edge of 10 mm wide.
For your information! All models of wind slats must have a special polyvinyl chloride coating, this will provide reliable protection against moisture seeping into the fastening points.
Additional information about the appointment
The described plank is also called a shaped inlaid element. It is used for the construction of corrugated roofing. This element looks like a corner with one mounting shelf. The plank is attached to the sheathing, thereby protecting the overhang from snow, moisture and gusts of wind.
The wind strip for corrugated sheets is made of high-quality galvanized steel. The material is covered with polyester or pural during the production process. Some manufacturers produce shaped elements with stone chips. This node performs several functions.
Firstly, it protects the roof and gable overhangs from moisture. Secondly, it provides protection from the wind. Thirdly, it gives the roof structure an aesthetic appearance. Some believe that a wind strip for corrugated sheeting is not needed, because the outer surface of the roof is protected by a covering material. However, this is not entirely true, because rain and melt water, as well as snow, quite often penetrate into the rafter frame from below. This situation can cause the wood at the base of the sheathing or rafters to get wet. This can even deteriorate wood that has been treated with an antiseptic. But the described plank does not allow water to pass through, it extends the life of the roof and preserves the wooden elements.
If you are wondering what a wind bar is, you should know that it also protects from side gusts of wind, which is especially important for those areas where climatic conditions are difficult. The latter quite often cause deformation and failure of the roofing material. Unprotected edges of the deck may become broken due to intense wind loads. But if you install the bar, the roofing cake will not be damaged, and cold air will not end up under the sheathing.
Pediment protective board for ondulin and metal tiles
The design of a windbreak for roof coverings with a wave-shaped or trapezoidal structure differs in design from the strips used for bitumen coverings. Most often, wind slats have an L-shaped profile with a small edge bent at an angle of 45°. There are no springs along the junction line of the horizontal and vertical flanges in slate and metal tile wind boards.
Dimensions of the end cap for wind protection of slate sheets:
- The width of the horizontal shelf is 100 mm;
- Vertical support shelf - 85-90mm;
- The upper edge is bent downwards on a horizontal line by 20 mm; in the lower part there is usually a drip of the same size, bent in the direction opposite to the edge.
The thickness of the metal is only 0.2-0.3 mm, so the wind strip is easily deformed, bent and cut with ordinary scissors. The standard profile length is 200 cm, which is convenient for installation, since the length of the profile has to be adjusted to the location where the wind board is installed, taking into account the overlap at the joints and the length of the roof.
Decor
Since the width of the eaves boards rarely exceeds 170 mm, well-known siding blanks can be used to decorate them. Standard sheets of material have very similar dimensions (from 170 to 200 mm).
Since the width of the wind board can be up to 190-200 mm, you can cover it all the way with a G-plank with an outer flange about 20 mm wide (including the vinyl sheet inserted into it).
Another approach to decorating the outer part of the board allows for its simple treatment with drying oil, which, due to its decorative appeal, will give the workpiece an ennobled appearance.
If desired, the roof element can be slightly tinted by diluting a small portion of dry stain in drying oil.
Installing wind bars on a metal roof
The protective cover itself, made of plastic or thin-sheet metal profiles, is too flexible and fragile, and can easily be damaged during installation. Therefore, even if a counter-lattice strip peeks out from under the metal tile along the edge, you cannot attach a wind strip to it. Even if you manage to nail the wind strip directly to the batten under the roofing, this can lead to deformation of the metal tile roof. Most likely, it will simply be torn off by a gust of wind from the gable edge of the roof.
Therefore, to attach the wind strip, you will need to first fill a backing board with a width of 80 mm and a thickness of 15-20 mm.
Advice! The lining is chosen from durable wood, it is best to choose oak or elm, while the board itself is nailed with oblique nails. Fasteners hammered at an angle to the surface of the board will withstand the strongest gusts of wind.
This part of the work is most conveniently performed at the stage of filling the counter-lattice slats onto the base of the future roof.
After the metal tile sheet is laid on the roof, the edge is fixed with a 20x20 mm pine strip, so the edge of the covering will be firmly fixed and will not squeeze out the wind cover when there is a large accumulation of snow on the roof.
Installation of the windproof lining begins with the eaves, while the horizontal shelf of the first section should go over the drip strip. For each subsequent section of the wind strip, an overlap of 40-50 mm is installed with the previous piece. In the upper part, the shelf is placed under the ridge overlay.
Using the tool
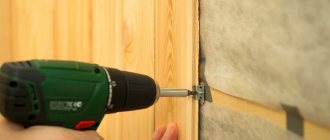
When working with a screwdriver, you should not drive the screws at high speeds; it would be more correct to work at the very minimum. If necessary, it is better to weaken the torque, otherwise the view from the side of the end plate will not be very attractive, since it will begin to resemble sea waves. The fastening process will inevitably be accompanied by scratches. They are best painted over with spray paint. Otherwise, the metal will begin to experience corrosion processes as early as next year. There is only one difficulty - to guess the shade as accurately as possible. Otherwise, the painted areas will look very strange.
Installation of a wind strip for a corrugated roof
The method of attaching wind strips to a roof made of corrugated sheets is no different from installing a profile on the edge of a metal tile roof.
As in the previous method, the protective element is attached to a support wooden board, 70-80 mm wide, pre-sewn along the end of the roof. It is she who will absorb most of the loads associated with gusts of wind and deformation of the roof.
The second difference is the location of the edge of the roofing covering on the edge of the base.
For your information! The metal profile sheet is laid in such a way that the peak of the trapezoidal or rectangular profile is located directly above the seam line between the wind board and the counter batten.
All that remains is to apply sealant to the top of the wave, lay the wind strip on the edge and secure it with self-tapping screws and sealing washers.
How to attach these elements
The front part of the base surface is hemmed with a veneer board. Corrugated sheeting can be used in these works. After this, the support beam must be fixed to the wall of the building. It is needed for secondary support when hemming the cornice overhang. Brackets must be installed on the drainage system. They can be mounted either on the legs of the rafters or on the eaves board. Next comes the collection of the cornice strip itself. It must be placed on the drainage mount to the eaves or front board. The gap between the screws is at least 30-35 cm.
When this work is completed, you should begin cladding the roof with the presented material. After this, you need to assemble the end strips, gutters, ridges and adjacent strips.
Installation of a wind strip for a soft roof
The sequence of assembling wind protection for bitumen types of coatings is somewhat different from the cases of metal tiles and profiled sheets. The main feature is that the wind strip is glued under the roof.
The first step is to lay a counter-lattice on the base of the future roof. For soft surfaces, treated plywood or OSB boards are traditionally used. The next step will be laying the end gable board. Since flexible roofing material does not have a profiled surface, there is no need to press the wave to the base of the roof. Therefore, there is no need to raise the wind bar above the base of the underlayment. It is enough just to seal the glued edge of the sheet or shingle.
To hold the protective metal strip on the edge of the roof, it is enough to nail a beam with a cross-section of 40x40 mm. This will need to be done at the stage of laying the roof sheathing.
After the shingle backing or the first layer of glass roofing material has been glued to the roof slope, the windshield is nailed. A layer of glue is applied under the horizontal shelf and secured with ties. Already at the stage of laying the roof covering, the canvas is glued to the wind protection at the level of the spring. In the places where the canvas joins the cornice overlay, the metal profile of the wind strip is laid on top of the cornice; in the upper part, the strip is run under the ridge triangle.
Problems to be solved
From the definition of a frontal board it follows that it solves the following problems:
- the end part of the rafter legs is closed, which improves the appearance of the slate roof overhangs (decorative function);
- the penetration of rain and snow under the roof is partially blocked (reduces the level of humidity under the roof);
- the attic space is protected from strong blowing, which negates all efforts to insulate it.
Performing a protective function, the roof wind board does not interfere with the natural ventilation of the attic space. After installing the eaves board, along with reducing temperature and humidity differences, air circulation in this area is completely preserved, since there are always small gaps at the joints of building structures.
Tips and tricks
The main condition for successful installation of wind protection is to ensure rigidity of the edges of the roof overhangs. If the roof sheathing is made of thin edged boards, or the overhang is too large, then before installing the gable overlay, the lower surface of the overhang is lined with a pair of 40x60 mm beams.
The second condition is the correct splicing of the wind board. Usually, developers neglect joining the boards and stuff them onto the end of the counter-lattice, even without overlap. If it is not possible to connect the end boards into one element, then you need to at least knock them down at the ends with oblique nails.