Almost every apartment has paintings or photographs hanging on the wall. But if you just stick a piece of art to the wall, it won't look good. For this purpose, frames were created - the design of paintings and photographs. They allow you to improve the design of the room by adding a little coziness.
Stores sell various frame options, but not all of them are suitable for a specific interior. Therefore, many craftsmen prefer to make such frames themselves, using different types of materials. This article will tell you more about how to make a wooden photo frame with your own hands.
DIY wooden photo frame
Stylish monochrome
Frame based on the subject of the photograph In a frame, any photograph has a finished look. And if these are several photographs in the same subject, then together such a group of photographs will simply be a complete work of art. The main storyline of the photographs dictates the style of the frames.
For example, it is better to frame landscape photos in light, slightly convex frames. And portraits of relatives are usually framed in classic frames.
Children's photos require brightness and shockingness. These frames may differ from each other, but they are united by a cheerful design that matches the subject in the photo. But the frames should not be brighter or more interesting in design of the photos themselves.
How to make a textured photo frame with your own hands:
DIY plaster photo frame:
Note: empty frames, but what about photographs?
Often in cafe interiors, fantasy groups of empty photo frames hang on the walls. Everything is appropriate in public spaces. And in a residential interior? It turns out that our compatriots fell in love with such layouts. This means that they perceive the frames as a work of art.
Frames can be of any style, but the more exotic, the more interesting. Yes... you can't hang the classics here. However, options from vintage frames are possible. And don't be scared by the empty spaces in the frames. The composition of the frames is a unique thing in itself. Think Shabby Chic frames that set the mood all by themselves. Something, namely such a framework, will be brought.
Double framed or framed frames
A popular trend today is frames inserted into each other. The inner frames must be empty. You can place a simple plot in light colors in them so that it does not compete with the frames. External frames should be stylish.
With photo frames you can make a panel of photographs on a certain topic, for example, travel. Double framing looks good on the landing - a kind of photo gallery, like in ancient castles. For frames, you can use polyurethane moldings, which are available on the market in a huge variety of classic styles. You need to step back five to ten cm from the edges and the inner frame will end up in a “large” classic frame.
Wish:Designers and especially photographers require purity of style for their work, be it the design of a space or a photo frame for a good photograph. And if the photo is a work of art, the photographer seeks to sell the photo along with the photograph. As a rule, they give good advice to the owners and even offer their services for placing photos in the interior. Don't ignore the knowledge of professionals. They, like no one else in their field, have been involved in this business for many years and can solve any problem in interior design.
Frame improvements
With the beginning of industrialization and mechanization of production, first lithography techniques appeared, then photography and offset printing, which made it possible to replicate pictures. At the end of the 19th century. Color photography and color offset already existed. Great works of fine art in copies have become available to thousands of people, although not yet to millions. In this regard, inexpensive material for picture frames and a simpler technology for their manufacture were also required.
Profiled slatted frames in the sweatshop conditions of the brutal dawn of capitalism turned out to be unprofitable, because their production required the involvement of expensive skilled labor, which still retained the corporate spirit of medieval workshops. Therefore approx. in the middle of the last century, a baguette was invented in France - a cheap decorative overlay that imitates carved wood and is suitable for mass production by unskilled workers. Perhaps this is where the name comes from: une baguette is the French people's bread. A loaf of baguette with a piece of cheese or dried fish and a glass of wine constituted the usual lunch of a French worker at that time, and France itself was a world leader in the arts. Frame frames for pictures turned out to be so popular that the name became a household word: now a frame for a picture and a baguette for a picture are semantically (in meaning) the same thing.
Types of baguette and the device of a baguette frame for a picture.
At first, the baguette was made cast from gypsum plaster mortar with finely chopped fiber filler; one wooden casting mold, subject to timely impregnation with linseed oil, could withstand more than 10,000 castings. The gypsum molding adheres perfectly to wood with ordinary wood glue, so the frame itself, as a load-bearing (load-bearing) structure, was made from simple timber (on the left in the figure). The slats - stiffening ribs - are connected halfway across the tree, which is not difficult and does not require special equipment, and the boards for the molding are simply butted. The finished frame was usually painted bronze without tinting or “antique”, see below.
Gypsum frames are still common today. It is this design that we will be most concerned with - despite its simplicity (perhaps thanks to it), it contains great technical potential for improvement and modification.
But noble carved wood as a material for frames has now almost completely replaced baguette, pressed MDF, textured like valuable wood, in the center in Fig. The material is not cheap, but still affordable to the wealthy craftsman. Since the viscosity of MDF is much higher than that of natural wood (MDF does not splinter), frame parts made from MDF baguette are connected with corner (oblique) plywood dowels using glue, on the right in Fig. We will talk about some of the subtleties of this process (grouting joints) later, but before that, keep in mind: cutting under the key is done correctly only if you have a desktop vertical wood router with a saw blade installed in the spindle. Manually or with the help of homemade devices, the connection of the lengths with the cross members is almost always obtained with a ledge, which is an unacceptable defect in this class of products.
Popular decoration methods
Frames made industrially either look too unpresentable, or are obscenely expensive, and, in any case, lack individuality. Additional decoration of a simple factory frame is a creative process. It allows you to show taste and imagination and turn the mat into an original work of art.
Using plaster or plastic castingsSource i.ytimg.com
It’s especially nice that there are no strict rules for decorating, and anyone, even a child, can get creative. The starting point will be the simplest purchased frame; in some cases, the passe-partout is cut out of cardboard. Decorating is a fun activity that does not require any special skills. There are hundreds of different ways you can decorate a photo frame; Popular ideas include the following:
Coloring. The easiest way to paint a frame made of any material is with universal aerosol paints; it is convenient to use stencils. Various techniques can be used; An aging effect is applied to the wooden surface.
Color for the ceiling plinth frameSource sense-life.com
Pasting. A common way to decorate; The material used is paper, pieces of fabric, wallpaper.
For all occasionsSource i1.wp.com
From sea pebblesSource diy.sndimg.com
Pasting is a popular type of decoration. Homemade frames covered with unexpected materials, from bottle caps and pencils to buttons from an old keyboard, make great gifts for friends.
From felt-tip pensSource i.pinimg.com
From pencils and keyboardSource navseruki.guru
The matte finish made from paper tubes has an original look. Before decorating the frame, prepare the necessary materials. Strips are cut from an old magazine with a width equal to the width of the frame. Using a knitting needle, each strip is rolled into a tube and the edge is sealed.
From paper tubesSource kiwico-icdn.dexecure.net
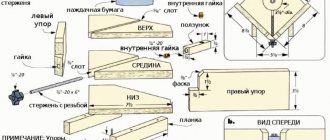
Translation of the drawing
For me, drawing translation has always been the main process in my work. I will tell you a couple of rules, as well as tips for high-quality translation of a drawing. Many people transfer the drawing onto plywood not only using a pencil and copying, but also using “Black Tape”, glue the drawing to the plywood, then wash off the drawing with water and the markings of the drawing remain on the plywood. In general, there are many ways, but I will tell you about the most common method. To transfer the drawing onto prepared plywood, you must use a copy, a ruler, a sharp pencil and a non-writing pen. Fasten the drawing in plywood using buttons or simply hold it with your left hand. Check if the drawing fits the dimensions. Arrange the clock drawing so that you can use a sheet of plywood as economically as possible. Translate the drawing using a non-writing pen and ruler. There is no need to rush, because your future craft depends on the drawing.
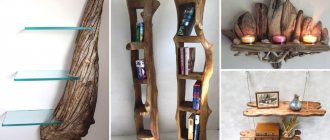
Made of wood
Probably few people have ever thought about making a wooden frame themselves. Not ordinary, hewn and polished, but atmospheric, with the spirit of the forest.
It only requires one medium-thick stick. Depending on the photo, the size of the stick should vary; the larger the photo, the larger the frame.
A long stick must be sawn into 4 parts, the ends cut obliquely so that they fit snugly against each other. When everything is ready, the ends must be sanded to give a more aesthetic appearance. Fasten exclusively with nails, this will make it stronger and look better.
This unusual frame can be hung anywhere, it will go perfectly with any interior.
Other creation ideas
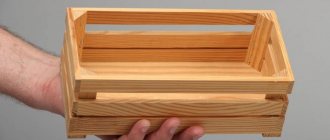
In addition to plywood, you can use other materials to create a wooden photo frame. The simplest and most interesting option is to use popsicle sticks. With their help, you can make a frame and glue a photo on it.
No less simple and interesting is the use of a wooden plank to create a half-frame. Having secured the photograph to the base by the upper part, holes are made in it for a cord, on which the half-frame with the photo is hung on the wall. For a more complete mounting of the photo, it is worth attaching the same wooden plank at the bottom of the photo.
Another easy-to-use material is pallet wood, which can be cut into desired pieces, sanded and joined.
Each option has its own characteristics, so it’s worth trying your hand at creating photo frames from different materials, using various decorative elements. With each new work, the level of skill will tirelessly grow, and the products will delight with originality and beauty.
To learn how to make a photo frame out of wood with your own hands, see the following video.
The old fashioned way
Artists painted pictures when there was no trace of mechanization of production and mechanized tools. Since those ancient times, the traditional design of frames for prestigious paintings of high artistic and material value has developed.
The carved wooden frame with the painting is shown in section and from the back in pos. 1 pic:
Traditional expensive picture frame design
Mechanically (technically, structurally) its essence is that the main force load (including from the frame) is borne by the painting’s subframe (a frame made of wooden beams on which the canvas is stretched); The stretchers of large canvases are reinforced with crossbars, steel corner plates or plywood gussets. In the event of a painting falling, the frame acts as a collapsing damper - it falls into pieces, but the canvas (perhaps of immeasurable value) remains intact or, at least, suitable for restoration.
Such frames are made individually for paintings. The stretcher with the canvas is inserted into the frame and secured in it, using traditional technology, with small wooden wedges. The rope suspension is attached to the subframe.
Just because of the carved wooden frame alone, its cost is truly royal. The frame parts are connected by joinery joints, bevel tongue and groove (positions 2 and 3 in the figure on glue, and then the frame is held together in a wedge wedge, position 4. The whole technology requires a well-equipped carpentry workshop and worker(s) with solid carpenter skills -cabinet maker. This did not bother the medieval customers at all, on the contrary - since he can afford to order or buy a painting, then the frame should match it. A unique frame, a work of art in itself, frames the painting of the great master, and this lord (sir , sir, Herr) their owner - isn’t this evidence of nobility and dignity?
The original oil painting is still of great value, but line monochrome images and drawings (engravings, etchings, watercolors) in the old days were quite widespread in the homes of the middle classes and the poor. Works of applied art - embroidery, applique, modular (from real objects) compositions even more; The human attraction to beauty is eternal and ineradicable. Simpler pictures were inserted into cheaper frames made from profiled wooden slats; While there were no wood milling machines, the slats were planed into profiles manually using special planes - zenzubels - with shaped pieces of iron. Slatted picture frames are still in use today, but to make them you still need an equipped carpentry workshop, see for example. video:
Video: simple and durable picture frames (in the workshop)
Master class on making your own photo frames from scrap materials
We propose to make the next craft from fiberboard, but we will decorate it with ordinary putty. The finished frame for a photo or picture will look so luxurious that no one will guess that it was made by hand from building material.
What tools and materials will you need for your work?
To work you need to prepare:
- 2 sheets of fiberboard: one for the base, the second for the frame;
- putty;
- dye;
- stationery knife;
- double sided tape.
How to make and decorate a unique photo frame with your own hands
Let's look at the master class in more detail.
| Illustration | Manufacturing procedure |
| Cut a photo frame from a sheet of fiberboard. | |
| Glue double-sided tape onto the second sheet of fiberboard, then white paper. | |
| Dilute the putty according to the instructions, apply it liberally to the frame around the perimeter, then use the convex side of a spoon to create a texture using a slapping motion. | |
| After the layer has completely dried, put the putty into a plastic bag, cut off a corner and squeeze ornate patterns onto the surface of the frame. For these purposes, you can use different methods and tools, for example, a thick syringe without a needle. | |
| Paint the base with black or brown acrylic paint. | |
| Apply gold-look glossy acrylic paint using a blotting motion using a dry sponge. | |
| One part can be painted with red acrylic or gouache, after making a smooth transition from dark. | |
| Tint the top with gold. | |
| Cover with several layers of clear varnish. | |
| Glue the frame to the fiberboard base using Moment glue. |
You can watch the entire step-by-step master class in more detail in the video:
Watch this video on YouTube
Wooden half frame
Another option for making a photo frame using wood. Such a product can fit into more modern designs, and its manufacture does not require special skills. It is enough to follow all the rules and recommendations.
Tools and materials
To create a half frame, prepare the following:
- photo in the size you choose;
- two light wooden strips;
- a piece of fabric;
- natural rope;
- special eye screws large enough to pull the rope through;
- some polymer clay;
- stapler;
- universal glue;
- scissors;
- pencil and knife.
Making a wooden half frame
You also need to prepare a ruler or other measuring instrument. Once everything is ready, you can start working.
Instructions
Step 1 . Set the recommended temperature to preheat your oven to make polymer clay. Then, using a knife, cut the clay into two even pieces. Roll them in your palms to form smooth balls. Use a pencil to make a hole. The diameter of the hole should be slightly larger than the thickness of the rope. Place the finished clay on a baking sheet and bake for a few minutes until the material hardens.
A hole is made in the ball
Step 2 . While the clay is baking, use a cloth to rub the varnish or stain into the wood, giving it a deeper shade. Don't forget to add old sheets of paper to avoid damaging your home surface. Leave the wood until completely dry.
The wood is given a deeper shade
Step 3 . Take one of the wooden strips and, measuring about 3 cm from both ends, make marks with a pencil.
A wooden strip is marked
Step 4 . Screw both eye screws into these points until they are tight.
The eye screws are tightened
Step 5 . Place the top of the photo or painting face down on the top strip of wood (with screws). This will be the back of the picture. Carefully align the paper so that it is centered and straight. Then secure the canvas with a stapler and glue.
The paper is neatly aligned
Step 6 . Place both clay balls onto the rope and thread the end of the rope through one of the eye screws. Tie a tight knot and then do the same on the other side. Remove any excess rope and use all-purpose glue to secure the edges. This will protect the clay balls from wearing out and the knot from coming undone.
The edges of the nodes are fixed with universal glue
Step 7 . Now all that's left is to hang your new wall art in a place of honor.
The finished frame is hung on the wall Photo of the half frame
Another photo of the craft
Types of materials for decoration
When choosing materials for decorating a frame with your own hands, it is important to know how to choose the right color. So, it is better to decorate color photographs with light details
When choosing a color, you can focus on a particular detail of the photo.
For black and white photos, gray, white or silver material is suitable.
- Paper: for decoupage, packaging, glossy (old magazines), geographical maps, sheet music
- Natural materials: stones, shells, tree branches and disks, cones, birch bark, corks
- Fabrics, threads, accessories: yarn, felt, cord, cord, knitted pom-poms, lace, silk, brocade, satin, wool, leather, fur, jeans, buttons, beads, seed beads
- Grains, fruits, spices: coffee, lentils, nuts, seeds, cereals, beans, vanilla, pepper, coconut flakes, bay leaves, anise stars, dried orange slices.
- Various items: puzzles, broken disks, keyboard buttons, pencils, dough, eggshells, sealing wax, spools of thread, artificial or dried flowers, jewelry.
- Quilling - shapes twisted from sheets of colored paper, postcards or glossy magazines
The design of a photo frame can be made in different styles:
- Eco-style;
- Shabby chic;
- High tech;
- Classical;
- Romantic;
- Antique styling;
- Country (rustic);
- Children's.
The design style of the photo frame base should match the style of the interior and the intended photograph.
Metal frames
Metal frames are more difficult to make, but they will last you much longer and will look no less impressive if you approach the work correctly. The cheapest models are aluminum frames, decorated with varnish, decorative film or paint. As a rule, additional elements for decorating such frames are not used.
You can provide a stylish look to a metal frame by making carvings on its surface. In order for the metal to acquire the shape you need, it is better to contact a master.
Another option for metal picture frames is forged products, which can be made to order.
Sawing parts
There are many rules for cutting, but you need to stick to the most common ones. First of all, you need to cut out the internal parts, only then according to the external pattern. There is no need to rush when cutting. The main thing is to always keep the jigsaw straight at a 90-degree angle when cutting. Cut out the parts along the lines you accurately marked. The movements of the jigsaw should always be smooth up and down. Also, do not forget to monitor your posture. Try to avoid bevels and unevenness. If you go off the line while cutting, don't worry. Such bevels and irregularities can be removed using flat files or “coarse-grained” sandpaper.
How to decorate a photo frame with your own hands
A good option is to buy an inexpensive frame or make it yourself from scrap materials, such as cardboard, and decorate it in an unusual way. You can use the following original ideas, photos of which are presented in our gallery:
- decorate using decoupage technique;
- wrap the frame in soft material and decorate it with fabric, wrapping it with braid, lace, twine;
- decorate with twigs or pencils;
- A great option is to glue buttons of different sizes, you can paint them the same color;
- glue beads or rhinestones, which every craftswoman accumulates in huge quantities;
- glue shards of broken toys or dishes;
- garnish with coffee beans, cinnamon sticks, dried citrus slices;
- an autumn photo frame can be decorated with pine cones, acorns, lentils;
- glue shells and beautiful pebbles from the sea.
And this is not a complete list of creative decorations for photo frames. Here nothing limits the master's imagination.
1 out of 10
Using the dough as a base
The need for invention is tricky - and sometimes a cool photo frame can be made from such improvised material as salt dough. All you need:
- flour;
- fine salt without iodine;
- water;
- vegetable oil;
- food coloring of your choice or gouache.
Water with the coloring you need and oil are added to the dry ingredients. You can do without dye, but then you will have to paint the dough with gouache yourself, which will take a lot of time. The dough is thoroughly kneaded, and then you need to give it a little time - a couple of hours - so that it is convenient to work with. The next stage is decorating. You can add any element you like: buttons, shells, beads or rhinestones
. The final touch is drying. Avoid too high a temperature when placing the photo frame in the oven to avoid cracking the dough. Afterwards, you can thoroughly varnish the resulting frame - this way it will look even more interesting, especially if you hang it on a favorably illuminated wall.
Collages - an effective solution for a modern interior
Collages, along with paintings from several parts, are a good alternative to conventional photo frames, which, as a rule, use one photo. To make it you will need a sheet of plywood and a jigsaw. The main advantage of creating such large improvised photo frames is the ability to place several dozen photographs, arranged in a given order, in a small area. You can select one central one, for example, with a larger area, and stick small pictures around the perimeter. Here your imagination is not limited in any way: both a collage on a free theme and a narrow thematic concept dedicated, for example, to one family member are allowed. Look how beautiful such products look in the interior - fresh, modern, inventive.
Stripping plywood
We clean our plywood with sandpaper. As you already know, “Medium-grained” and “Fine-grained” sandpaper is used for cleaning plywood when sawing. You've probably seen sandpaper in hardware stores, and that's what we'll need. In your work you will need “Coarse-grained”, “Medium-grained” and “Fine-grained” sandpaper. Each of them has its own property, but a completely different coating, by which it is classified. “Coarse-grained” sandpaper is used for processing rough plywood, i.e. which has many defects, chips, and cracks. “Medium-grained” sandpaper is used for processing plywood after “Coarse” sandpaper and has a slight coating. “Fine-grained” or otherwise “Nulevka”. This sandpaper serves as the final process for stripping plywood. It gives the plywood smoothness, and therefore the plywood will be pleasant to the touch. Sand the prepared plywood in stages, starting with medium-grain sandpaper and ending with fine sandpaper. Sanding should be done along the layers, not across. A well-polished surface should be flat, completely smooth, glossy in the light and silky to the touch. How best to prepare plywood for sawing and which sandpaper is best to choose Read here. After stripping, check the plywood for burrs and small irregularities. If there are no visible defects, then you can proceed to the process of translating the drawing.
Wooden photo frame
You can always use frames to update your interior, especially since you can make them yourself absolutely suitable for your home.
Of course, you can buy wooden frames in a store, but the price for them there will be several times higher.
Using the presented master class, you can make a similar frame with your own hands. You just need to stock up on the necessary material.
To work you will need:
- boards of different shades;
- scissors;
- hot glue gun (you can use transparent “Moment” glue);
- base frame (finished frame or cardboard);
- sackcloth;
- wire;
- self-tapping screws;
- decorative nails.
The manufacturing process is shown in the photo below.
Photo source: www.masterklass-krasivo.ru
Process Features
There are no restrictions as such when choosing material for the frame. The base can be made from different items, and choose decorative decorations at your discretion. The only condition is that the material must be strong and dense. The simplest option is old boards, from which you can easily make a frame of different sizes. The finished product needs to be painted or varnished so that it fits perfectly into almost any interior.
DIY photo frame
For decoration, improvised means can be suitable, for example, beads, small clothespins, sea pebbles or even pasta. You need to choose the material for decoration so that the finished frame complements the picture. For example, if the photo was taken on the beach, then it would be logical to decorate the frame with small shells or pebbles.
Original options for photo frames
Frame in the shape of an owl
A beautiful frame that you can make yourself. This frame will undoubtedly make a wonderful gift.
The photo shows how to make a frame in the shape of an owl, but the shape of the frame can be any, it all depends on your preferences. This frame is made of wooden board.
The carved design can be anything; the photo shows a frame made on the same principle as an owl, but the pattern is more complex.
To work you will need:
- wooden plank;
- jigsaw;
- sandpaper;
- wood carving tools;
- watercolor paints;
- PVA glue;
- varnish
The work sequence is shown in the photo.
Photo source: www.ped-kopilka.ru
Rest
When sawing, we often get tired. Fingers and eyes, which are always tense, often get tired. When working, of course, everyone gets tired. In order to reduce the load, you need to do a couple of exercises. It is necessary to observe a work and rest schedule. You can see Exercises for rest. Do the exercises several times during work.
Cleaning Parts
You should always clean the parts of a future craft carefully. At the very beginning of the work, you already sanded the plywood with sandpaper. Now you have to do a small part of stripping the plywood. Using medium-grain sandpaper, sand the edges of the parts and the back of the plywood. “Fine-grained” sandpaper is considered the final stage of cleaning parts. It is better to clean the front part of the parts with fine sandpaper. When processing plywood, take your time. You can also use a rounded file, which is convenient for cleaning the inside of the holes. Try to ensure that the parts come out without burrs or irregularities.
Photo frames in the interior
Every home has a collection of family photos, but the idea of using photographs in interior decor was developed by European designers. Thanks to their efforts, frames on the walls in the interior have become a common decoration; They are placed not only on walls, but also on any horizontal surfaces - shelving, chests of drawers, tables and mantelpieces.
How to post a collection Source designcrimea.files.wordpress.com
How to decorate an empty wall in the kitchen Source i1.wp.com
A family album or its modern equivalent, a folder on your hard drive or in the cloud, is considered a more common way to store photos. But if you want to make your home more comfortable, emphasize its individuality, and simply decorate the room, you cannot do without photographs in the appropriate frame.
Framed collage Source i.pinimg.com
In interior decor, frames of different shapes and designs are used. Depending on the idea, this can be one large photo or a composition of several photos.
In order for a collection of photographs to look harmonious, it is not enough to decorate the frames. It is necessary that the style and color palette of photo frames on the wall in the interior coincide with the style of the room.
In a bright interior Source anniehallinteriors.com
Creative approach to frame design Source www.inspirerend-wonen.be