Wood processing is carried out in order to increase the service life of this material. Impregnation with special oils, staining, waxing, and varnishing prevent the processes of rotting and deformation, as well as damage to wood by insects. Brushing reveals the texture of the wood, giving it the appearance of old wood. How to process the wood is up to you; each of the listed methods has its own advantages and disadvantages.
Optimal tree protection scheme.
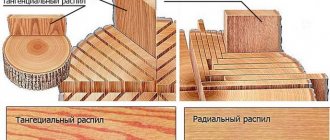
What wood to use
The essence of brushing is a more vivid manifestation of the texture of wood, its natural pattern. This is achieved by creating a relief surface from which soft fibers are removed, while hard fibers, on the contrary, remain. Hence the first obvious truth: there must be fibers of different densities in wood.
Therefore, species with a uniform, dense structure, such as maple, beech, alder or teak, are not suitable for brushing. But this does not mean that hard wood cannot be aged by brushing. For example, when processing oak boards, a very interesting effect is achieved: the appearance of thin, ragged scratches, which, if painted correctly, makes such products a very valuable decoration.
Coniferous species look best after brushing. The most common pine has a poor texture, and the pattern after processing is unlikely to surprise anyone. But in spruce and larch truly unique patterns appear.
Any wood for brushing must be well planed and free from any kind of defects and blemishes; brushing will not eliminate them. The moisture content of wood should ideally be 10–12%, but in any case not more than 15%, otherwise the fibers will tear and form abundantly fine pile.
Brushes and other tools
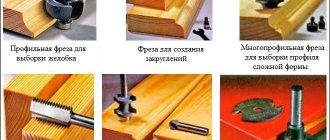
The main work when brushing is done with brushes. These are fairly coarse metal disc-type brushes with brass or steel bristles. It is desirable that the brush has a wide end part and is close in shape to the roller - this way the processing will be more uniform. The thickness of the wire depends entirely on the type of wood: the pile should be 7–10 times thinner than the soft veins, while straight wires are preferable to “curly” ones.
The brushes select the bulk of the fibers, but the surface remains too rough and fleecy. The quality of processing can be improved with the help of synthetic nylon brushes, in which abrasive powder of different fractions is fused into the thickness of the plastic. This type of sanding helps eliminate most of the small nicks and lint that interfere with painting; without them, the surface looks cleaner and more pleasant.
The third stage of processing is usually avoided, but if you want a premium surface quality, then brushed wood will have to be polished. Due to the presence of pores, this is not easy to do; it is necessary to use brushes with hard natural bristles, for example, sisal or coarse wool.
Good processing quality is achieved, as a rule, when using power tools. A drill will be preferable to an angle grinder; when working with it, it is easier to control the direction of grinding and speed. Careful fixation of the workpiece is also necessary; a pair of clamps will come in handy. And, of course, you will need means of protection against dust, which is generated more than abundantly, and its removal: a vacuum cleaner, glasses and gloves will definitely not be superfluous.
Work order
At the first stage of processing, the dry and clean surface of the wood is treated with rough brushing, tearing out the soft layers to the desired depth. The most reasonable thing would be to orient the front surfaces of the parts across the layers of fibers, where there are many veins and they are thin. But do not forget that all visible planes must be processed, otherwise the contrast will be too noticeable.
You need to move the brush strictly along the fibers without strong pressure. Small irregularities on the plane will inevitably remain; this is the main disadvantage (or advantage) of manual wood processing. The number of revolutions is 1500–2200, although this value may differ for different breeds.
The main nice thing about brushing is that it opens up a wide field for experimentation and can be used with deviations from the basic rules if visual design goals require it. For example, when you tear wood across the grain, you leave a random pattern of rough scratches, which can be useful for rare decorative inserts.
After brushing the wood, it’s time for sanding. A synthetic abrasive brush is directed along the fibers until roughness visible to the naked eye is completely eliminated. From time to time, the workpiece needs to be tapped on the back side to remove accumulated dust from the pores and evaluate the quality of processing. After removing the lint and burrs, it’s time for polishing to give the surface smoothness and a slight gloss. This can be done either with a brush on a drill or manually using the hard part of a kitchen sponge.
Stages of brushing technology - step-by-step instructions
The DIY wood brushing technique consists of the following steps:
- The prepared surface (cleaned and dry) is treated with a coarse brush, removing soft fibers to the desired depth. In this case, you need to move without strong pressure along the fibers and along the entire plane, so as not to disturb the structure of the wood. When using a power tool, you should set the number of revolutions to 1500-2200.
- Sanding with a synthetic brush (attachment). Movement also along the fibers until all roughness is eliminated. Periodically you need to tap the workpiece on the back sides to remove dust.
- Polish with a softer brush; even the abrasive side of a regular dishwashing sponge will do. At this stage, the product is given smoothness and a slight glossy shine.
If you point the tool across the fibers during processing, you can get unusual patterns in the form of scratches, but you should not abuse this. It is better to use a similar technique on separate inserts to give the product an additional decorative effect.
Features of working with floor coverings
Not only furniture elements, platbands and all kinds of decor can be brushed. This processing technique is often used to imitate the aging of parquet and parquet boards.
The main difficulty in working with wooden floors is the large amount of work involved. The drill is of little use here: uniformity of processing and productivity suffer. At such volumes, it is reasonable to purchase or temporarily use a brush sander. This will allow you to maintain a uniform scratch depth with the brush and then quickly sand over a large area.
For the floor, it is not recommended to show deep wood relief, otherwise the coating will get very dirty and difficult to wash. The optimal depth is 0.5–0.8 mm, so the wood on the floor will become warm and pleasantly rough, and the unnatural gloss will disappear.
Processing, painting, patination
Texturing wood is only half the battle. Brushing has the ultimate goal of visually highlighting the wood texture; most often, this is achieved by painting using special techniques.
You need to make sure that the fiber selection is done well and the surface is ready for painting. For this purpose, water-based stains are used with a light tanning or cauterizing effect. Application should be done with a brush, carefully wiping along the fibers and monitoring the lifting of small fibers in the process. If such are present, the surface must be thoroughly dried and lightly treated again with a grinding brush, breaking off dried and hardened burrs.
Instead of a brush, it is convenient to use a soft sponge - the paint is distributed more evenly and without excess
When painting, most often the arrangement of tones repeats the play of light and shadow on irregularities: depressions are painted in a dark color, ridges in a light color. To do this, the surface is first opened with a richly dark varnish, and then wiped with a sponge or rag, removing the remaining varnish from the hard fibers, where it does not have time to be absorbed.
When working on a large surface, uniform coloring is achieved after complete drying of the dark dye and subsequent light processing with a petal disc with grit P400–800. When the bulges are highlighted, they are opened with colorless or light-colored parquet varnish.
Another coloring option offers inversion: the upper tier of the relief is planned to be dark, and the depressions are painted in a light tone. In this case, the surface is first tinted with dark polyurethane varnish and dried. This is followed by the application of a light opaque composition, the excess of which is removed with a rubber spatula to reveal the dark substrate on the ridges.
Source: www.rmnt.ru
Painting wood during brushing
Agree that without painting the wood, even after severe damage has been caused, will look new. Therefore, one of the important stages, the purpose of which is to enhance the process of “aging” of wood, is painting the treated wooden surfaces. In turn, simple-looking painting can give furniture an original and presentable look.
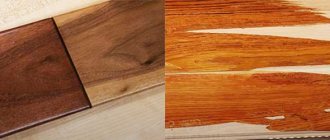
One of the most acceptable ways to paint wooden surfaces is to apply stain and then wash it off. In this case, the stain has time to be absorbed into the soft layers of the wood, while the hard ones remain unpainted. Thanks to this method, the natural pattern of the wood appears and, accordingly, the result is an interesting texture.
In the process of painting wood, you can add gold or any other paint, and wipe off the excess from the surface with a spatula. In this way, pores, nicks or dents in the wood will be painted over.
Wood aging techniques: brushing and firing
Wood is a good material: if you want, build it, if you want, use it for finishing. You can also make furniture. One of the important positive properties of wood is the mass of options for finishing its surface. Each method gives its own unique effect, and it can be chosen to suit any image and style.
This material is durable: furniture made of natural wood, with proper care, lasts for many years - tens, or even hundreds. And wood does not lose its beauty over time - on the contrary, like cognac, it can become even more interesting.
Time does not spoil wooden furniture
The charm of a time-worn wooden surface is so strong that there is a whole trend in furniture production - artificial aging. In previous publications on this topic (Renewing old furniture. Aging with painting and Renewing old furniture. The charm of cracks) we talked about how you can age furniture using varnishes and paints. In this material we will look at how to give the surface of wood a more respectable appearance using mechanical methods.
Technology and Applications
The brushing procedure is used to give the wood a vintage look.
The main purpose of brushing is to give ordinary wood the appearance of antique material by processing it with tools . During surface treatment, soft fibers of a light shade are removed. After this, the surface becomes embossed, which is inherent in old wood.
The extent of soft tissue removal varies during treatment. Depending on the purpose, the depth of roughness imparted can be from 0.5 to 2–3 millimeters. Deep processing is carried out when they want to give the effect of deep aging. The hard surface of the wood is exposed and the beautiful texture is revealed. It is optimal to treat the surface to a depth of 0.5 to 1 millimeter.
Natural aging of wood reduces the strength of the tree. Artificial brushing helps increase the strength of lumber and prevents rotting and fungus formation. Such properties are given to wood by treatment with special antiseptic compounds during the process.
To emphasize the relief, after removing soft fibers, the surface is coated with compounds that impart color. The wood is painted with shades of two tones to make the relief stand out as much as possible.
Brushing is a popular way of processing interior wood. Designers use it in the following cases:
- in the manufacture of stairs;
- in furniture production;
- when processing floorboards;
- in the manufacture of finishing lining.
Only wood species with a multi-layer structure are subjected to such processing. An excellent result is obtained after brushing larch, spruce, and oak. The structure of these species allows you to obtain unique rich patterns of living wood.
Varieties with an implicitly expressed structure are unsuitable for brushing: cherry, maple, beech, alder, birch, teak. The fine-fiber structure of the wood of these tree species does not allow for a layered effect, so brushing cannot achieve decorative effect.
Burning
Firing wood is most often considered the first stage of brushing - just like with chemical etching, the softer areas are destroyed (burnt) first.
The beauty of simplicity. Photo from wickdpleasures.tumblr.com The wooden surface is burned with a blowtorch or gas torch, and then the charred parts are cleaned off, washed generously with water and coated with oil. The degree of firing and subsequent brushing depends on preference. You can also choose a blowtorch in our market; to do this, look at the products in the Blowtorches selection.
Wood that has gone through fire and water does not require additional tinting - the surface of the board takes on a noble dark shade. But if desired, charred wood can be additionally coated with colored stains. The combination of red and charcoal black looks especially impressive.
A house lined with burnt boards. Photo from skyhousedesigncentre.com
Firing can be an independent type of finishing. Now this direction is gaining popularity and is considered the Japanese technique Shou Sugi Ban (Yakisugi), although this method of woodworking is known in many countries. In Rus', burning wood was called smoking.
Fire-treated wood becomes less flammable and is practically not susceptible to rotting and damage by insects. Therefore, such boards are used for cladding facades and building fences. There is no need to regularly paint such a fence or facade - the burnt board does not change its qualities for a hundred years.
Fence made of burnt wood. Photo from oilobit.com
Naturally, the designers could not ignore such material. They began to use fire-treated objects in their interiors, and used boards using the Shou Sugi Ban technique of varying degrees of charring to decorate walls and ceilings. Oil coated surfaces do not get dirty.
Wall cladding using the Shou Sugi Ban technique. Photo from urbantimber.ca
Then the designers went even further and learned how to decorate pieces of furniture by firing. Things that look like they were rescued from a fire may not be to everyone's taste, but they look very stylish. See for yourself.
Try texturing familiar wood - perhaps you will discover a new material.
Source: 7dach.ru
Brushing technology - step by step
The use of brushing opens up enormous possibilities for changing the texture and color of a wide variety of wood types.
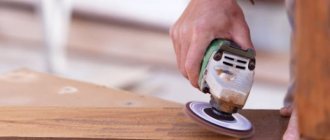
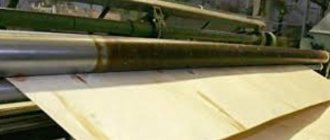
- The selected workpiece can be slightly moistened so that wood dust does not fly around the room. The first pass is carried out with a metal brush, the rigidity of which is selected depending on the hardness of the wood. The “bristles” should not damage the hard fibers of the material, but at the same time should successfully remove the soft ones. The movement of the instrument is carried out in the direction of the fibers, at a speed sufficient for effective scraping. Increasing the rotation speed of the brush can lead to baking of the wood, so it is necessary to select the best option for each sample. When working with a hand tool, this problem does not arise, but you have to apply more force and spend significantly more time on processing.
Processing wood with a manual wire brush
A variable speed drill will make your brushing process more productive.
- By replacing the nozzle with a polymer brush with an abrasive applied to it, the part is initially polished, during which roughness and fragments of fibers remaining on the surface of the wood are removed. Having removed everything unnecessary, you can evaluate how deep and high-quality the structuring was done, and, if necessary, further deepen the resulting grooves. At this stage, you can add decorative elements to the finishing of wooden products. Using a chisel, indentations of arbitrary shape are selected in different places of the workpiece. After rough grinding, they can be corrected and given the most natural appearance of old cracks that have formed in the material.
The movement of the tool must be carried out in the direction of the wood grain
- The final polishing is carried out using a sisal or hair brush, which gives the part a finished polished look, fully revealing all the decorative texture of the wood. When processing by hand, the finest grit sandpaper is used to create a perfectly polished surface. Having smoothed the structured texture of the product, it is prepared for further painting and varnishing. If the wood was wetted before work, now it must be dried and completely cleaned of dust.
- To give a particularly decorative look, the part can be painted, patinated, gilded and other finishing options. Using stain will age the product due to the formation of contrasting textured patterns. Abundant application of the composition with quick removal of excess allows you to paint over areas with soft fibers that absorb paint, and leave light areas of hard fibers that have not had time to absorb the pigment. Gold paint looks especially impressive when applied to microcracks and depressions against the background of the natural color of the wood. Such reflections of gold will give the product an original decorative effect. After treatment with coloring compounds, the surfaces are polished again to get rid of the roughness that arose during painting.
Decorative spread with the effect of aged wood
- Varnishing is carried out on completely dried and cleaned wood. When making brushed parquet, it is necessary to use a special parquet varnish to open it so that the finished coating can serve its intended duration.
The effect of aged wood can also be achieved by firing with a blowtorch.
Sanding after flame firing
View of the solid wood after firing and varnishing
brushing wood of different species
Hello, our dear subscribers and residents of the Masters Fair!
Lately, many of you have been asking questions about the possibility of brushing a particular type of wood.
I finally found time for this topic!))
First, a little terminology and theory).
The term “brushing” is firmly attached to the process of removing soft fibers from the top layer of wood . A rarer term is brushing.
And, in fact, this is our favorite transliteral distortion of the English noun and verb “brush” (brush; clean, clean out) or “brushing” (cleaning).
Correct complete technology:
– rough sampling of soft fibers with a metal brush (movement along the fibers);
– grinding with a polymer abrasive brush;
– polishing with a sisal or synthetic brush.
Cleaned soft fibers are usually formed in the spring, when the growth of wood annual rings is most intense and therefore they are more “loose”. Brushing is used to give wood a pronounced textured surface.
In Russian there is a similar term: wood structuring - i.e. identification of natural wood structure. It is clear that in order to identify it, this structure must already exist and be visible to the naked eye.
Since brushing involves the removal of soft layers of wood, soft and medium-hard wood species are, respectively, most suitable for this process. larch, spruce and pine is clearly expressed . In hard wood (for example, oak ), the brushing process will reveal and expand the pores.
Brushing is one of the methods or preliminary steps that allows aged surfaces to look more realistic. A new board that has been brushed will look like new, just with a textured texture. . But if a new pine board is properly painted gray, it will seem like it has been outdoors for more than 15 years. This is understandable; natural conditions quickly change the color of unprotected wood, but shrinkage of soft layers of wood takes much longer. And they occur following a color change.
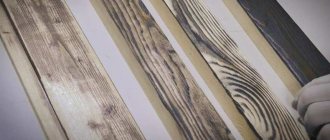
Therefore, it is the correct subsequent play with the color of brushed wood that gives it an aged look. For this, in addition to the brushing itself, the wood is unevenly painted:
– areas with soft wood (cavities or pores) – in a darker color,
- and areas of hardwood (ridges) - in a lighter shade.
The easiest way is to apply a generous amount of dark stain and immediately wipe with a cloth. The stain will be absorbed quickly into soft wood, but will not have time on the ridges. Also, in places where there might be abrasions, part of the wood with stain is cleaned off, exposing lighter areas.
Brushing the process is quite simple, but labor-intensive!!
It is believed that homogeneous wood species (such as beech, maple, alder ) are not suitable for brushing, but we tried this method on them - it turns out that it is also quite possible))!
I took photos of samples - in each photo there is a variant of brushing with a wire brush by hand + a piece of untreated wood for comparison.
https://cs1.livemaster.ru/storage/91/6c/33d64d36594cf048093e1fed6a.jpg – Angara pine. (It is less resinous and has fewer knots compared to regular one), by the way, fir looks the same.
https://cs1.livemaster.ru/storage/6a/31/0905a9d7dd90f51ab8b8d4e87a.jpg – beech. (It is considered that it is not suitable for brushing, but I wouldn’t say so. It’s the master’s choice.)
Having processed the given samples (as stated manually, with a metal counter), I came to the following conclusion - all samples are suitable for brushing, the effort and time required for each one was the same. Oak is of course ideal for this - the pattern comes out very beautiful! But other breeds are also acceptable!! I think for firing too.
Let me emphasize once again - brushing is not a complicated process, but it is labor-intensive. - lazy people should not take it on!!
Of course, the experiment conducted is not a scientific fact)), but only my subjective experience! But it has its place))
So try it - don’t be afraid)) Create with pleasure!!
Source: www.livemaster.ru
Features and benefits of brushing
Brushing (from the English brush) is essentially nothing more than structuring wood through additional rough processing. The latter consists of removing soft fibers from the surface of the material; the annual rings acquire additional texture. The technique got its name due to the fact that brushes are used to give the desired structure to the wood.
A similar aging effect is observed in wood sandblasting technology, when soft fibers are removed by a powerful sand stream. Unlike brushed wood, sandblasted wood is smoother.
Types of brushing directly affect which brushes are used:
- Deep – brushes with thick metal bristles are used.
- Light - created using brushes with synthetic hard bristles.
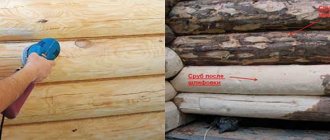
Brushing wood can be done with your own hands; most often this method is used for small amounts of work, since it is quite labor-intensive and time-consuming. Brushing of massive elements (parquet, stairs, large boards) is most often done in a factory, where special machines with replaceable brushes are used, and the process is as automated as possible.
There are several brushing methods, but the most popular are the following:
- Manual - brushes and abrasives are used. Manual processing is of great decorative value, but is more labor-intensive and is suitable for small elements.
- Electromechanical - an angle grinder or brushing machine is used for the appropriate materials, as well as suitable attachments for a drill or grinder.
Natural aging of wood is a long process. Under the influence of external factors (ultraviolet radiation, temperature changes, precipitation, wind), the tree trunk wears out. The surface literally crumbles, leaving only the hardest fibers in place. There is a decorative effect, but during natural processes the material loses its basic properties: it becomes less durable, susceptible to destruction and rotting.
The advantages of brushing wood include:
- Improving the original properties of wood. The material becomes stronger, less friable, and resistant to external factors, mold, and fungi.
- High decorative qualities based on noticeable contrast and brightness of the texture after removing the soft layer of fibers. Such materials and decorative elements are universal, fit into almost any interior, making it more solid and exclusive.
- Large selection of wood for subsequent processing.
- Wood tinting can be done in several colors at once. For example, the base is painted in a light shade, and the pores in a contrasting dark or bright shade.
The only disadvantage of brushed wood is the difficulty of processing; the process will take a lot of effort and time.
By the way! After brushing, the wooden surface can be varnished, stained, waxed, oiled or tinted using impregnations. Decorative coating is necessary to emphasize the texture of the product; without this, the wood will not look expressive enough.
There are many possibilities for using brushed wood, especially since the finished product can be given almost any look, based on the general style of the interior. It can be a monotonous or combined color, the effect of a dusty or moldy surface, imitation of chips, cracks, gold or silver embossing.
Artificial aging of wood
Aging of wood is a long and painstaking process consisting of mechanical processing of wood and work with paints and varnishes. Leon42 associates this method of finishing wood with naturalness, antiquity, and folk culture.
According to leon42 , buying furniture and brushing it with a metal brush does not make it old, but simply scratches it or, at best, creates a textured surface. Furniture bought in a store - made of slats and “skinny” - is not suitable for texturing; it looks rather sad and defective.
It is precisely the superficial approach to aging wood, according to a forum member, that forms in many people the opinion of products processed using this technology as “furniture of fire victims.” Meanwhile, the combination of aged wood with metal, stone or ceramics in the interior is always a fashionable and stylish technique that allows all the inhabitants of the house to touch eternity and feel like they are in the Middle Ages.
Under natural conditions, wind and moisture, sun and temperature changes “work” on the aging of wood. How to do something that takes many decades to do in a few days?
Preparation of material
For brushing, it is better to use soft and medium-hard wood with a pronounced texture, for example, spruce, pine or larch. In these types of wood, soft fibers are formed, as a rule, in the spring-summer period, when intensive growth of growth rings occurs, and they are more “loose”.
Before working with wood, you should prepare its surface. Eliminate all defects and dirt, be it traces of sweat, grease or other stains that may appear during the application of the tinting composition. Treat any products (small architectural forms, furniture, etc.) after disassembling them: you will spend less time and can reach everywhere with a brush.
Brushing
Brushing (English brush - “brush”), or texturing wood, is giving it a relief characteristic of old wood. At the initial stage, soft fibers are removed from solid wood. There are several processing options: light aging - a barely noticeable roughness is created on the surface, or deep and rough, when the depth of the unevenness reaches 2-3 mm (for decorative elements, sometimes for rough furniture).
You can pre-process any part, say a ceiling beam, with an ax: make notches, trim the edges without fear of spoiling it - no one but you knows what the result should be. In this case, you will receive a product with a deep micro-relief of the surface and irregularities on it up to 20 mm deep.
Don’t forget about the “traces” of the vital activity of bugs and worms. Imitate them before finishing with a drill or drill. You can also apply simple carving elements: braids, dragons, etc. – you will get “Scandinavian style”.
Sanding: tools and brushes
Large enterprises use machines and automatic lines, where everything is provided - from the feed speed of the workpiece to a powerful dust removal system. For an ordinary summer resident, such equipment is an expensive and, in general, unnecessary pleasure. If you will be doing this kind of work often, it is better to purchase a brush machine. The most common and widely available is Makita. The most economical and simple option is a grinder or drill, preferably with the ability to adjust the speed.
The entire brushing process can be divided into three stages:
- Rough selection of soft fibers
- Grinding
- Polishing
Accordingly, each of them needs its own brush. At the first stage (brushing), metal (brushing) is used. If you are making structures for the street - a gazebo, canopy, fence, etc., then most likely this will be your only brush.
When processed with a metal brush, scratches may remain on the annual rings themselves, which are difficult to get rid of during further processing.
When working with brush, you must adhere to the following rules:
- move the brush along the fibers, otherwise you will damage the annual rings and spoil the wood grain;
- the speed of movement of the brush and the pressure should be approximately the same, otherwise pits will form;
- the light source should be placed on the side at an acute angle, directing the light beam across the fibers - this way you can better see the surface being treated;
- do not press hard on the surface, do not overload the motor, otherwise this may cause premature equipment failure;
- the rpm speed should not be higher than 3000, preferably 2000–2500: the brush can quickly fly apart;
- be sure to wear glasses and do not neglect protective gloves: pieces of wire from the brush can fly several meters away, injuring others;
- take care of respiratory protection and dust removal: during this work, even your eyelashes become covered with “mealy mascara”, let alone your lungs;
- the new brush needs to be “run in”, otherwise it will strongly “whack” the workpiece, after a while it will begin to treat the surface cleaner;
- work only in one direction (rotation), do not turn on reverse - this will “kill” the metal brush;
- The humidity of the wood being treated should not exceed 15%, otherwise instead of a textured surface you will get a shaggy-hairy surface.
If you want to get rid of lint and get a better finish, you will need another brush - a plastic (nylon) one, or rather a sanding disc made of a polymer-abrasive material. The most common grain size is 120.
An abrasive brush is a universal one, characterized by a more delicate surface treatment. If you use this brush, you can do without a metal brush, especially if the element being processed needs delicate treatment or if you want to avoid the specific scratches left by brushes.
The principle of working with an abrasive brush is the same as with a metal one. It is better to reduce the speed to 1500 to extend the life of the brush. The dust when working with a plastic brush is finer and stickier, so don’t forget about a respirator.
Surface treatment specifics:
- do not sand the edges and corners of the workpieces, especially if you do not plan to varnish them later: they will cling and chip;
- do not make deep relief on seats, tabletops and other horizontal surfaces - they will make it difficult to clean the surface: spilled drink stains, crumbs, etc. will get clogged between the fibers;
- In order to prevent clogging of dust and snags of the rag during cleaning, such surfaces must be sanded with an abrasive brush and fine-grained sandpaper.
The final stage of brushing is polishing or fine grinding: performed with sesal or other synthetic brushes. You can use fine-grained sandpaper, abrasive sponges, and steel wool, removing dust from the finished surface with a wide brush and vacuum cleaner.
Finishing operations
At the final stage, they do tinting (changing the color of the wood by several tones), patination (emphasizing the texture of the wood with special compounds that penetrate the pores opened during brushing), craquelure (the effect of cracking and drying out), and varnishing.
After brushing, the board will look like new, but with a textured surface. To give it an old look, it is coated with various compounds; dark colors look more natural.
The easiest way is to liberally apply dark stain and immediately wipe the area with a rag or wide rubber spatula. In theory, the stain should absorb quickly into the soft surface, but more slowly on the ridges. However, in practice this often does not work out, so leon42 opted for a more complex method: after complete drying, the ridges are sanded with fine-grained sandpaper. This method requires further treatment with varnish or colorless impregnations, so the exposed top layer remains without a protective coating.
Another option is to use paint of two contrasting colors: the surface is completely painted over with the first color, then the second is applied. While the latter is drying, run a wide rubber spatula, removing excess paint and exposing the ridges of the first layer.
As a result of difficult and hard work, you will receive decorative elements that carry the beauty of antiquity and at the same time have high durability. Each detail, lovingly made with your own hands, will be unique.
Based on materials from a participant in the “House and Dacha” forum
Source: www.forumhouse.ru
How to properly paint the inside of the lining: technology
To paint lining in “dry” rooms inside the house, you can use any type of paint. Here you simply decide on the requirements for the decorative appearance of the surface. If the lining is dry, it can not be impregnated with protective compounds, or you can choose paint/varnish/wax with appropriate additives. You can paint it only on one side, leaving the back side untreated.
Paint each panel of the lining separately
If the lining will be used in damp or unheated rooms, on a balcony, it must first be thoroughly impregnated with protective compounds on all sides, maybe twice. Only after the impregnation has dried can it be painted, varnished, or, in general, given decorative properties. Another point: when installing the lining on a wall or ceiling, it has to be cut into pieces. Places of cuts in damp rooms must also be coated with the composition. It is not necessary to wait until it dries, but it is necessary to process it.
There is one very important nuance that many amateur decorators overlook. If you want to get a professional-level painting of the lining, you need to process each board separately: sand, paint, dry, and only then assemble the surface from the already painted lining. That is, mount already fully processed boards on the wall or ceiling. Only with this approach will the surface of the lining have the same color from any point.
It’s difficult to paint the entire surface of a clapboard wall well
If you paint an already assembled surface, unpainted areas remain in the grooves and recesses, making it difficult to sand large areas. You definitely won't get a perfectly flat surface. The quality of finishing in this option is not above average. It is permissible to paint a finished surface if you are renewing the paint job. This must be done at different intervals, depending on the operating conditions and the properties of the paintwork material.
Correctly, the painting technology looks like this.
- The lining is checked and sorted. All bent, bent or cracked boards are rejected. They can be used to test color, select color, number of layers, practice technique and painting sequence.
- Boards that have been sorted are sanded until completely smooth. It is most effective to work with a sanding machine, but you can also use a block with sandpaper attached to the surface. Sandpaper grit - 250-280. When grinding, circular movements pass through the face, tenon and groove. The back part of the lining can be left without treatment.
Wood brushing
Giving wooden surfaces an aged appearance by mechanical means - that’s what wood brushing is, in a nutshell. In fact, this is a very interesting and fascinating process, which is carried out not only by professional carpenters and designers, but also by many who like to work with their own hands.
Wood has always occupied, occupies and will continue to occupy a leading position among finishing materials, not to mention furniture and household items. That is why he is always given increased attention and preference. Aged wood combines perfectly with any modern materials, giving the room uniqueness and originality.
No. 2 Paint filling method
This method works best on unsanded wood with a slightly rough surface (such as a wooden fence). With its help, wood can be given a rustic look and an antique effect.
- Clean the wood with soapy water and a brush and leave to dry.
- If your paint is too rich, thin it with thinner.
- After this, pour some paint onto the wood surface, and then take a scraper and spread the paint over the wood.
On an unsanded, that is, not completely flat, wooden surface, the paint layer will not be the same everywhere. A little more paint will flow along the depressions and less on the bulges, that is, in some places the white color will be more saturated, and in others more transparent, which will create the effect of antiquity.
You can see the result of painting a wall using this method above.
What is the essence of brushing?
The natural aging process of wood occurs over a long period of time. The cut surface wears unevenly, the texture becomes uneven and somewhat wavy. Approximately this effect can be achieved if you treat a wooden product with special tools. Brushing wood when it is young removes the soft fibers, revealing the natural appeal of the wood's natural patterns.
Each product made of natural wood is unique and inimitable, thanks to the individual properties of each type of wood, moreover, of each trunk. However, not every wood species can be aged. Before brushing wood, you need to know about its susceptibility to this method. So, it is best to age pine, oak, larch, walnut, ash, wenge. But for beech, maple, birch, cherry, and alder, this finishing method is practically ineffective. The wood of these species does not have a pronounced texture. It has little noticeable transitions between layers of different densities, or even none at all.
Brushing equipment
To an inexperienced person, brushing wood may seem like a complicated and inaccessible process. In reality this is not the case at all. You need to have a room for creativity, that is, a workshop, the necessary equipment and a little effort. To work you need to prepare:
- sandpaper in a set, with different degrees of grain;
- a set of special brushes for brushing wood;
- stain, preferably several shades to enhance the color scheme;
- Transparent wood varnish for final finishing of the product.
Some craftsmen prefer mechanized labor to manual labor. Therefore, instead of ordinary brushes, an electric tool for brushing wood, equipped with a set of brushes, is used. You can also use a home drill with a speed controller with special attachments. Each of the brushes has its own purpose:
- a steel wire brush is needed for the main process - brushing wood with your own hands;
- a brush with synthetic fiber bristles performs the first sanding;
- A soft brush is necessary for final polishing of the surface.
It should be noted that it makes sense to purchase special equipment (machines or machines) to perform a large volume of work. If we are talking about isolated cases, then there is no reason to spend money on purchasing an expensive tool for brushing wood, and do the work manually.
What tools and materials are needed for the job?
If you decide to age a buffet, chair or mantel yourself, then first prepare a set of tools. To use the brushing technique you will need:
- sandpaper of different grits (coarse-grained is suitable for roughing, fine-grained for finishing polishing of surfaces);
- two or three metal brushes of varying degrees of hardness;
- stain (to give individual elements additional decorativeness);
- paints for tinting;
- matte or glossy varnish for finishing.
Varnish coating
For large volumes of work, a stripping milling machine is used, which automates most of the aging processes. Replaceable attachments allow you to perform grinding, polishing, and brushing in stages.
Using a power tool speeds up the brushing process
When made by hand, the product looks more aesthetically pleasing, it looks like a piece product.
How to brush wood correctly
The procedure for performing the wood aging procedure for manual and mechanized methods is the same. It is important to choose the correct rotation speed of the machine or adapt to the uniform movement of the brush. Since it is undesirable to brush wood at a high engine speed, you can bake the wood and end up with a defect that can no longer be corrected. Before starting work, it is recommended to pass the board through a thicknesser or sand it with a sander. Stages of aging boards:
- The workpiece must be sprinkled with water to reduce the amount of dust. Then they begin the main process. The tool, mechanical, electric or manual, is moved along the location of the fibers with measured movements. For each type of wood, they experimentally select their own pace and mode of operation. It is important to thoroughly scrape the board and remove all soft fibers.
- Next, brushing the wood with your own hands continues with a brush with synthetic bristles. Sanding should be done in the same order as hard processing was done - with movements along the grain of the wood. After sanding, the initial processing result will be noticeable. If the depth of the grooves seems insufficient, the process can be repeated. The main thing is not to overdo it, as you should brush the board carefully and accurately. At the same time, additional decoration can be done. Using a chisel, create artificial cracks and grooves that highlight the natural wood structure.
- Final sanding is done with a soft-bristled brush or, if the work is done by hand, with sandpaper with the finest grain. The main thing is to make sure that the surface of the workpiece is absolutely smooth. This action prepares the board for final finishing. Upon completion of grinding, the workpiece must be cleaned of dust and dried.
- The final stage is giving the product a touch of antiquity, grace, and nobility. This is where artistic talent comes in handy, if you have it. For this purpose, stains of different shades, gilding, and silver plating are used. For example, if you literally fill a board with stain and immediately remove the excess, then the soft tissues of the wood will absorb it and darken, while the hard ones will remain light. It turns out to be a very beautiful effect.
- The painting process ends with another polishing cycle after the paint has dried.
Varnishing of brushed wood is done last, when its appearance fully corresponds to the expected result. But before this, the workpiece must be thoroughly dried.
Sometimes, in order to speed up the process and make labor easier, acids, alkalis and other chemicals that corrode wood are used for brushing. In this case, steel brushes are not needed. The composition is applied to the surface of the board, then washed off, and so on several times. Such work will not bring much satisfaction, and it will cause great harm. You should work with chemicals wearing protective equipment and outdoors.
Processing wood with stain
- stain;
- wide brush;
- fine grain sandpaper;
- rags.
The stain is applied parallel to the wood fibers, preventing the layers from touching.
Treating wood with stain is one of the most popular finishing methods. Stain can be water-based or alcohol-based, the latter giving more saturated tones. The alcohol-based composition is applied to a cleaned and sanded surface using a flute (wide brush), moving along the fibers in one direction. At the same time, they try to apply as much stain as possible. After which the product is allowed to dry, the operation is repeated if necessary. Using stain of various tones (by layer-by-layer application), you can achieve interesting color effects. After the stain dries, the washing stage begins. It is necessary to remove excess product; to do this, place the product at an angle of 30º, then dip the brush in acetone and walk over the surface (with light up and down movements).
To give the wood an antique effect, use the following method. First, apply the main background color of the stain (water-based), after it dries, go over the surface with fine sandpaper (strictly along the fibers, otherwise transverse stripes will be visible after processing). The result should be uneven tinting with scuffs and bald spots. Then they take a water stain of a different color, cover the wood with it, let it dry, and then sand it again. The operation is repeated until the desired tone is achieved. If you plan to make a single-color coating using water stain, then it is applied in several layers with mandatory intermediate drying and processing with fine sandpaper. Excess stain is washed off immediately after its application. Excess is simply wiped off with a damp cloth.
Where are products with brushed surfaces used?
Brushed wood looks appropriate in the interior of any style and architectural direction. With her participation, stylish decorative items are created. Planks with an aged surface are used to decorate sections of walls and ceilings; they fit perfectly into the lining of fireplace portals, ceiling beams, decorative and real columns.
Furniture finished with brushed details in combination with patinated metal, especially copper, always looks sophisticated and elegant. Wooden blanks whose appearance has been worked on by bark beetles are very popular among connoisseurs of antiquity and cabinetmakers. It is impossible to achieve such an effect artificially. Therefore, products made from such wood are especially highly valued by experts.
Source: stroikadialog.ru