Preparing Worn Wood Floors
Laying plywood on a wooden floor is carried out after inspecting and repairing the old covering:
- Remove the baseboards.
- Rotten floor fragments are replaced with new ones.
- Creaking and sagging floorboards are strengthened by screwing them to the beams with self-tapping screws.
- Areas with damaged paintwork are treated with an antifungal compound (primer).
- Check the plane with a level to identify differences and irregularities.
If the differences are significant, then leveling is indispensable. Most often, plywood is used for this purpose on a wooden floor - this material is the most popular due to its availability, cost and ease of working with it.
Minor irregularities and protrusions (2 - 4 mm) can be eliminated with a plane and/or a sander - in this case, the decorative coating can be laid directly on the wooden floor.
Installation on old wood flooring
A smooth, durable surface is a good basis for laying plywood on a wooden floor. The advantage of this installation method is a slight rise in the surface after installation. The minimum thickness of the sheet is 1.2 cm. The cut sheets are attached using special glue and self-tapping screws.
Tools and materials
To properly attach plywood to a wooden floor, you need the following tools and building materials:
- electric saw;
- roulette;
- level;
- marker;
- self-tapping screws;
- screwdriver;
- construction vacuum cleaner (a broom will do);
- roller;
- sander;
- plywood sheets;
- substrate;
- primer;
- glue.
Preliminary preparation
Before you begin installation, you need to:
- Check the condition of the floor. It is necessary to strengthen loose elements, replace rotten, damp parts, and ventilate the room;
- Remove dust and dirt from the surface, prime the floor with a special compound for wooden surfaces. Then you need to dry the base for 16 hours;
- Level out minor differences in height, up to 1 cm. To smooth out unevenness, you need adhesive tape and a special backing for plywood on a wooden floor. The joints between the strips of material are glued with adhesive tape;
- Place the sheets vertically to dry for 2-3 weeks at room temperature or slightly higher;
- Treat the dried fabric with an antiseptic solution;
- Ventilate building materials;
- Coat the plywood with acrylic varnish in several layers. This treatment increases strength;
- Bring the plywood into the room two days before installation. The material is placed horizontally. This is necessary so that the canvas adapts to the microclimate of the room.
Marking and cutting
Plywood is cut in such a way as to minimize the number of joints. The material is sawn taking into account gaps of 3-4 mm between sheets and 8-10 mm between the sheet and the wall. Indentations allow you to avoid swelling of the coating due to temperature fluctuations and increased humidity. The material tends to increase in size by several millimeters under the influence of the microclimate.
The plywood sheet is sawn with a jigsaw. It is necessary to carefully inspect the ends of the workpieces for delamination and sand the edges. It is convenient to cut the material into squares with sides of 50 or 60 cm. This helps to smooth the wooden surface and avoid installation defects. Each sawn square is numbered and indicated on the sheet layout diagram.
Installation of plywood
The correct installation of plywood on a wooden floor is done as follows:
- Spread the underlay on the floor, seal the joints with tape;
- Lay out the sheets to cut the material as rationally as possible. Plywood is placed taking into account gaps in case of expansion of the sheet under load or temperature fluctuations. The gaps between the sheets are 3-4 mm, from the wall along the edge of the sheet there should be 8-10 mm;
- Cut the elements with a jigsaw. For a spacious room, squares with a side of 50-60 cm are convenient. All parts are numbered, the location of the elements is fixed on the diagram;
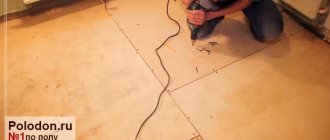
- Drill the holes. This is followed by countersinking with a slightly larger diameter drill. When laying with glue, additional fastening is required. Holes are made at a distance of 2 cm from the edge. The distance between the fastening elements is from 15 to 20 cm;
- Apply plywood adhesive to the wood floor. The layer thickness should be 2-3 mm;
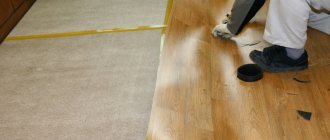
- Lay the canvases, starting from a niche, podium, ledge. Then place the sheets from the center to the edges, moving the squares like brickwork;
- Press the material down with a roller to ensure a secure grip;
- Secure the material with self-tapping screws to ensure greater reliability and prevent movement. The hats need to be thoroughly sunk. This will protect the bottom layer of the final coating from damage;
- Check the quality of the laid coating using a level.
What kind of plywood is used for the floor
Plywood is available in various thicknesses, sanding and finishing qualities. Therefore, an inexperienced builder is always faced with the question: what kind of plywood to lay on a wooden floor so that it will be a reliable basis for a decorative coating.
- The brand of plywood is a difficult choice for the home craftsman. Usually the choice is made between the FS and FSF brands. FC is plywood in which the veneer sheets are glued with a less toxic glue than the FSF brand (read: “Which plywood is better for the floor - choose the brand and type of material”). However, the quality characteristics of FC are weaker: it is not very moisture resistant. Therefore, if environmental friendliness and safety are a priority (floors in a children's room, bedroom), then it is better to buy FC. For rooms with high humidity and traffic (the hallway of an apartment, a country house), FSF is chosen.
Note: there are brands of plywood that combine strength, moisture resistance and safety (for example, FB), but due to the high cost (2 - 3 times compared to FC), the average user rarely considers this option.
- The quality of the material also matters: the higher the grade of plywood, the better, smoother the surface, which means the decorative coating will fit better and last longer. To level the floors, grade 1 and 2 plywood is used.
- Plywood can be sanded on both sides (Sh2), on one side (Sh1), and not sanded (NS). For leveling take Ш1.
- Material thickness. Experts believe that for floor work this material should be at least 8 mm thick, and preferably more (for more details: “What thickness of plywood is suitable for a floor”). What thickness of plywood to lay on a wooden floor is regulated by a simple rule: the thicker, the better. At a minimum, the plywood should not be thinner than the final floor covering.
Sometimes plywood is used as a subfloor, laying sheets directly on the joists. In this case, the thickness is needed from 2 cm.
Plywood: advantages and disadvantages of the material
Pressed sheets are an excellent material for rough and primary work. They are inexpensive, easy to transport, easy to install and are good at eliminating small differences in floor level. Often they prefer to lay linoleum, parquet boards or laminate on plywood, since it has the following advantages:
- laying sheets significantly reduces the time of preparatory work before installing the final finishing floor covering;
- prevents rotting of the underside of floor coverings due to good ventilation between the material and the concrete screed;
- a floor lined with plywood prevents premature wear or deformation of linoleum or carpet, extending the life of the decorative coating;
- provides a smooth subfloor;
- plywood sheets are light, hard, durable, resistant to stress and abrasion;
- plywood is flexible enough and does not break during installation;
- has no pungent odor;
- has good sound and heat insulation properties;
- due to the large size of the sheets, the number of joints is minimal;
- high-quality factory grinding prevents slipping of the sheet and materials placed on it.
Characteristics of plywood
Do you need any preparation for plywood?
Covering the floor with plywood on a wooden floor begins after preparing the plywood sheets. They need to be brought into the room where installation is planned and left for 2 - 3 days. Wood tends to change dimensions depending on humidity and temperature, so it is necessary that these parameters of the material and the environment coincide.
Experts advise moistening the edges of plywood sheets with water at room temperature if the room in which work is being done is not heated regularly.
It is also advisable to treat the sheets with an antifungal and fire-retardant primer.
Attention: you should not work with plywood in a room with high humidity: if condensation accumulates on a piece of film left in the room during the day, it is recommended to dry the room using available means (heating devices, turning on the heating).
Flooring on concrete screed
Concrete screed is the most reliable foundation, but its construction takes a lot of effort and time. The installation of such a screed begins with markings: draw horizontal lines along the walls of your room using the building level. These lines are the upper edge of the future concrete screed.
The next stage is the selection and laying of the bars. The internal frame is organized with bars, so they must be thinner than the screed itself so that the cement mortar covers them. The bars are laid in a grid, the cells of which are equal to 1 square meter.
Pouring concrete is the final stage of constructing a concrete screed. For pouring, cement-sand mortar is used in proportions of 1:3. Fill the cells with concrete and smooth it into an even layer, then let the concrete dry.
If the quality of the resulting screed is important to you, then take care that it does not crack. To do this, maintain a high level of moisture, for example, by covering the concrete with polyethylene for 8-10 days. You should start laying the subfloor only after the concrete floor is completely dry, otherwise the material used will become unusable.
You should start laying the subfloor only after the concrete floor has completely dried, otherwise the material used will become unusable.
There are two ways to check floor moisture:
- Use an expensive moisture meter that you can rent.
- Lay polyethylene over the concrete area and press it around the perimeter, then leave it overnight. If the concrete is not dry enough, then in the morning you will find condensation on the surface of the film, and if there is none, then you can safely begin installing the subfloor.
The slabs should be laid according to the brickwork rule to prevent premature wear of the material. After that, number them so you don't get confused later.
Apply glue to the concrete and lay the slabs, then additionally secure them with dowels. You can see the finished result in the photo.
Measure seven times: cutting and fitting sheets
Cut sheets of the same shape. Experts recommend 0.6 by 0.6 m, but you can do 1 by 1 m or 1 by 0.5 m - it all depends on the thickness of the plywood and ease of use. After cutting, the sheets are tried on: laid on the floor, following the “staggered” method - the transverse joints should not match, the appearance of the laid sheets resembles brickwork (read: “How to lay plywood on the floor - laying rules”). You should ensure that the damping distance is maintained during installation: a gap of 2 - 3 cm from the wall, 0.5 - 1 cm between sheets. If the fitting was successful, the sheets are numbered so that the final attachment of the plywood to the wooden floor goes smoothly, without a frantic search for the right sheet. In addition, it is useful to draw a plan for laying sheets with the corresponding numbering. Finally, you should mark the floor with a pencil or chalk so that you know where to place the joists.
Note: cut plywood is inspected for defects formed during cutting; delaminated or deformed ends of the sheets will affect the quality of the coating; it is better to replace them.
Types of plywood glue
The choice of glue for plywood is an important point in the installation process. Since the speed of laying materials and the strength of the finished coating depend on the quality of the adhesive mass. Using the right adhesive will improve the longevity of your flooring. Types of glue are divided by composition. Let's talk in more detail about each of them.
The basis of this product is a solvent. The drying time for the glue is three to five days. Before gluing, it is necessary to prime the concrete. After applying the glue, you have to secure the plywood with dowels to improve the result. This glue is used when working with wood, which has poor resistance to moisture and is deformed.
Be careful, the one-component mixture is fire hazardous.
Expert opinion
Strebizh Viktor Fedorovich, leading construction foreman
Deciding on what is the best glue to glue plywood to plywood depends on the type of connection and further operating conditions. If you want to clarify something, please contact me!
Tools for making a plywood base
Before starting work, you should check that you have the necessary set of tools:
- Electric jigsaw;
- Drill with a set of drills;
- Screwdriver;
- Level;
- Roulette;
- Self-tapping screws;
- Dowels.
After installing the plywood base, you will need to prepare it for decorative flooring: thin coverings (linoleum, carpet) will require careful sanding of the surface. To do this, it is better to purchase a grinder or use a special attachment for a drill. You can use fine-grit sandpaper if the floor area is small.
How to glue fabric to plywood
To decorate furniture or restore it, you need to glue the fabric to the plywood surface.
Use universal glue - PVA. It spreads well, is transparent, and is quickly absorbed.
Restoration experts recommend professional, expensive fabric glue, hot melt glue, or waterproof polyurethane-based glue.
They all do their job well - quickly, reliably, fasten the fabric to the plywood surface and do not leave stains.
Plywood leveling technology
Before laying plywood on a wooden floor, a technology of execution is chosen; the choice depends on the magnitude of the differences and unevenness of the wooden floor. Three alignment methods are used:
- Leveling by laying sheets directly on a wooden floor. It is used if the unevenness is no more than 1 cm and is formed by the ribs of the floorboards. The flatness of the sheet, based on the protruding edges, evens out the difference. This installation method often uses a plywood underlay on the wood floor to act as a shock absorber and improve thermal insulation.
- Leveling using point supports (bosses). Used as a budget option for floors with small differences. For the bosses, squares cut from plywood, laminate, or boards are used.
- The sheathing device for leveling floors is used when horizontal differences are 1–8 cm. The strip support is made from beams or cut strips of plywood; this method is the most expensive, but also the most reliable.
For any type of base, the rule is: the thinner the plywood, the closer the support points should be.
Comparison of characteristics
To choose the most suitable option for rough or fine finishing of a floor structure, it is necessary to take into account the main parameters of the product.
Environmental friendliness
Health safety is one of the main factors. The indicators of wood-based panel materials comply with the standards reflected in standardization documents.
- Plywood. Eco-friendly option. The most harmless products are those that are glued using natural resins.
- OSB. It does not pose a threat, but only if the production technology is followed. It is better to choose trusted manufacturers.
- Chipboard. This variety causes the most controversy regarding health hazards, since formaldehyde resins are used for gluing. Products must comply with standards (marking E1 or E0.5).
- Fiberboard. Does not pose a threat provided that high-quality raw materials are used.
- MDF. Eco-friendly material made using urea resins. These products must also comply with class E1 or E0.5.
Since the outside of all materials is finished, harmful fumes are minimized.
Strength
To choose the most reliable option, you need to take into account the density and structure of the product:
- OSB and plywood. Oriented strand panels can withstand heavy loads well: the layers are placed in different directions and glued together extremely firmly. But wood-laminated board may have a significant disadvantage - the possibility of deformation due to non-compliance with the technology.
- Chipboard and fibreboard. They have sufficient hardness. Their areas of use are somewhat different. Wood-shaving parts are thick, and wood-fiber parts are very unstable in bending, so they cannot be used for leveling voids.
- MDF. A relatively soft material that is not used in places with high loads.
It is difficult to compare all products on this parameter, since they have different sizes.
Dimensions
The length and width of all varieties are approximately the same, so it is necessary to compare the thickness:
- Hardboard. The thinnest material. Its thickness can reach up to 7 mm, but the most common is 3.2 mm.
- Plywood. For the floor, products with a thickness of 12–15 mm are selected.
- OSB. Can be of different sizes, but for flooring options from 10 to 22 mm are used. If you need to level the existing base, then a thickness of 1 cm is suitable, but in order to lay the material on wooden logs, the parts must be more durable.
- MDF. Due to their softness, the recommended thickness of the slabs varies from 18 to 25 mm.
- Chipboard. For horizontal structures with increased load, a tongue-and-groove version with a thickness of 16–22 mm is used.
The thickness and structure of the parts also affects protection from sound penetration and heat retention. If the noise pollution is very strong, then it is recommended to give preference to medium-density fiberboards of maximum thickness. They also serve as additional thermal insulation, which is similar to OSB.
Price
The difference in the price of materials depends on many factors: production method, raw materials used, additional processing, size and even place of sale.
- The most expensive is high-grade plywood.
- The cost of MDF is calculated per square meter and depends on the manufacturing method.
- The price of OSB-3 and 2 corresponds to wood-laminated boards of grade 3 or 2 of a smaller size.
- The lightest and cheapest option is fiberboard.
To ensure that the total work budget does not amount to too significant an amount, it is necessary to immediately determine the scope of application of each type of product.
Easy to install
Laying wood boards is not difficult; it does not require professional skills or complex tools. The order of work depends on the specific situation:
- If a frame structure is being erected, then OSB would be the best option.
- The light weight and thickness of hardboard make processing the fastest, but it is not suitable for serious leveling.
- Chipboard and OSB panels are cut and fixed almost identically. They are much easier to trim than MDF, which due to its dense structure offers more resistance.
- The most labor-intensive material to process is plywood. It will take much longer to place the product. It is more difficult to drill or adjust to size due to the presence of layers of natural wood in the structure.
All floor slabs are mounted on glue or joists, the only exception is the fiberboard covering: these sheets are not intended for laying on joists, they need a flat and durable base
The procedure for leveling using joists
Before starting leveling, determine the highest point of the floor by level. From this point they begin laying lags - beams located in parallel. Lay the logs, adhering to the marks made during the initial layout of the plywood fragments. They need to be located at the junction of the sheets.
- The logs are laid one by one and secured to the wooden floor using special glue and self-tapping screws. Each beam is checked with a level in all directions, if necessary, placing bosses under it and filling irregularities with plywood trim. Pieces of trim should be additionally lubricated with glue to increase the reliability of the base. There is a special glue for plywood on wooden floors that does not require additional fastening. But more often, craftsmen use proven methods: they lubricate the required places with available glue (“Bustilat”, “Liquid Nails”, “Moment”), and then secure them with self-tapping screws.
- Then the sheathing is installed - transverse bars located at a distance equal to the width of the prepared sheets, and in accordance with the original marks. Installing a plywood sheathing on the floor will make the coating more stable and durable. It is necessary to carefully observe the markings so that the sheets, during the subsequent installation of plywood, do not, as they say, “hang in the air,” but are attached to the sheathing and form a reliable plywood floor in a wooden house or apartment.
- To improve heat and sound insulation, the sheathing space can be filled with appropriate material, after first getting rid of construction waste.
- Plywood sheets are fastened according to the diagram, checking the number marks. To ensure that the heads of the screws do not protrude above the plane, they are recessed. To do this, drill a recess at the attachment point equal to the diameter of the screw head.
After installation is completed, all that remains is to prepare the plywood floor in accordance with the type of finishing coating. For thin coatings, all irregularities, cracks at joints, and recesses from recessed screws are puttied. For more rigid coatings, a special noise-absorbing underlay may be needed. In any case, it is advisable to varnish the plywood several times to extend its service life.
Laying on the frame
Plywood floors on joists are formed using the following technology:
- Supporting parts are set with a fixation step of 40–60 cm. It is taken into account that all products must be placed in the same plane.
- The treated slabs must be laid in a checkerboard pattern so that the joints fall on the timber. To fasten the products, wood screws are used. A distance of 15–20 cm is formed between the screws.
- Before fixing the flooring, the logs must be treated with antiseptics and fire retardants.
For flooring in domestic premises, logs can be laid in increments of about half a meter, and for highly loaded rooms, logs are installed at a distance of 150 - 200 mm
Attention! With a distance between the support beams of up to 40 cm, the optimal sheet thickness is 12 mm, 60 cm - from 15 mm.
Rules you need to know
Before laying plywood on a wooden floor, it is worth checking and repairing all communications running under the floor, so that later you do not have to open up a new finished floor. It's worth knowing that:
- The length of the screws used in the work should be three times the thickness of the plywood.
- The distance between the screws is no more than 20 cm.
- The sheets are screwed, retreating 2 cm from the edge.
- If there is thin plywood, it is used in 2 layers, placing the sheets so that the seams of the top and bottom layers do not coincide.
- When installing a plywood base using the point method, the bosses are placed at a distance of 20–25 cm.
Photos of beautiful modern coatings will not leave anyone indifferent, and an insufficiently level floor will no longer be an obstacle. Using these recommendations, any man who knows how to hold a tool will know how to lay plywood on a wooden floor and will be able to do it with his own hands.
Installation subtleties
How to glue plywood? It is worth noting that before you start gluing materials, it is necessary to prime the surface. To make a primer, you can use the same glue that will be used to secure the plywood sheet.
The primer helps remove dust from the concrete and provides stronger adhesion. It is strictly forbidden to neglect this stage of work.
Before laying the plywood, it must be cut into equal squares. Their size should be about fifty centimeters on each side. This is due to the fact that a large piece of plywood is quite uneven and can inflate. In addition, a large number of seams ensures improved performance of the coating during temperature and humidity changes.
There are both high-quality and dubious manufacturers of adhesive compositions. And in order not to become a victim of a counterfeit, especially for you, this section contains popular brands of adhesives that can be purchased when deciding how to glue plywood to a screed. These options include:
- IBOLA L12. Glue based on artificial resins. Designed to work with any wood materials. When applied to a concrete screed, no priming is required;
- FORBO 148 Euromix Wood. It is prepared on the basis of polyurethane, is odorless, has sufficient elasticity and good strength, and is also moisture resistant. It is noted that upon complete solidification, the composition becomes chemically inert;
- PARCOL Poly 2K. A two-component original composition that is able to retain its properties for one hour from the moment of preparation. Therefore, it is necessary to quickly use up the prepared mixture. The concrete is first primed and then glue is applied. The finishing coating can be laid only three days after applying the composition to the surface;
- KESTO (KIILT0) Standard. A budget water-dispersion option, the composition is based on Finnish-made PVA. After applying a layer of adhesive to the surface, the plywood must be laid within a maximum of 20 minutes, otherwise the adhesion property will be lost;
- VERMEISTER Repox. An excellent composition from a well-known brand that does not provide any special restrictions on use. Consists of two components, has a polyurethane-epoxy base. Due to its strength properties it is able to withstand various temperature changes.
The adhesives in these photos are universal, but are ideal for gluing plywood to the floor Source kraski-net.ru
Expert opinion
Strebizh Viktor Fedorovich, leading construction foreman
After preparing the old wooden floor and plywood sheets for the new one, the installation process begins, consisting of several successive steps. If you want to clarify something, please contact me!
Preparatory work
Preparing a Wooden Floor
Before laying plywood on a wood floor in your home, the flooring and surface must be prepared. Do-it-yourself activities are as follows:
- the base for installing plywood must be cleared of debris, dirt and treated with antiseptic compounds; when laying without logs, priming will need to be done;
- checking the condition of the floor, removing and replacing damaged elements;
- if you have time, it is recommended to arrange the sheets vertically and dry them for 2-3 weeks, the temperature should be at room temperature or slightly higher;
- after drying, the sheets are treated with antiseptic compounds;
- Next, it is necessary to ventilate the material;
- if there is a need to increase strength, it is worth treating the plywood with acrylic varnish; the coating is done in several layers;
- When laying it yourself, you need to bring the sheets into the room two days in advance and lay them out horizontally; this is done so that the material adapts to the temperature and humidity conditions of the room.