Creaking floorboards are the most common problem in homes with wood floors. Its appearance can be caused by various reasons, and it occurs not only in old houses, but also in new buildings. To get rid of an annoying sound, it is not at all necessary to undertake large-scale repairs: there are several simple methods that will help quickly and at minimal cost eliminate any squeaks. First, you need to establish exactly why the boards are fastened together, and only then choose a way to strengthen the wooden floor.
How to strengthen a wooden floor so it doesn't creak
How to put joists on the floor video
Today, when the floor can be laid, poured, polymer coatings can be made, plastic parts can be used, brick inclusions, etc., many people refuse the classical methods of repair.
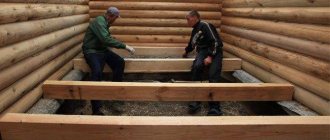
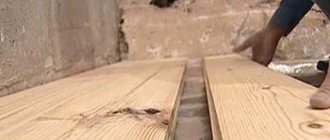
But sometimes, instead of complex and expensive designs, old and proven methods are required. The same floor on joists, which will “make friends” with both a wooden and a brick house. A board of suitable size is adjusted to the place intended for it, for which:
If the board is too thick, mark the positions of the joists on it and use a chisel to select grooves for them;
If the board is very wide, plan the edges, beveling them slightly downwards;
If the board is thin, thick cardboard or plywood is placed on the joists before attaching it.
If the old board is sawn off next to the joist, a support block for the new board is attached to the latter with screws. (In the future, when replacing the board, the screws will be easier to remove.)
SOLVING PROBLEMS WITH LAGS
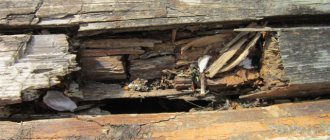
Many warped places, sagging floors, cracked or damaged boards are signs of poor condition of the joists. Problems with lags most often arise on the first floors, where there is a high probability of moisture. But in any case, if you have to lift more than two boards, you need to check the condition of the joists.
Rot and woodworms are immediately visible, and joists affected by them must be repaired immediately. Darkening or the presence of areas with soft wood on the joists indicates the onset of rotting due to increased dampness. Lags can be saved if measures are taken in time.
The reasons for sagging floors with working joists can be:
Weakening of lags due to sampling for pipes and cables;
Insufficient initial strength of the joists or the material from which they are made.
These defects can be eliminated by reinforcing the joists with overlays or increasing their rigidity by inserting spacers between the joists. But for such repairs you will have to remove a significant part of the floorboards.
If the board is sawn off near the joist, a block is attached to the side of the latter with screws to support the new board.
On the floor of the first floor, you can strengthen the sagging joist with an overlay resting on the nearest floor beams.
In floorboards that are too thick, grooves are selected above the joists. Thick cardboard or plywood is placed on the joists under a thin board.
intersecting spacers made of 50×50 mm bars. They are fastened at intervals of 600 mm between the defective joist and adjacent joists.
not less than 900 mm. The bolts are installed in increments of 300 mm. Star washers are placed between the overlay and the joist.
52 Tips from professionals No. 3″ 11
Additional supports
If the floor beams are in generally good condition but have cracked - for example, due to heavy snowfall - the best option to strengthen them and restore their functionality is to install supports on either side of the fracture. Of course, if we are talking about the attic and other utility rooms. However, a beam equipped with additional support may well fit into a living space if it is designed in a designer manner. The support can be installed either wooden or metal.
The procedure for strengthening work can be reduced to the following points.
- Bringing together the ends of the damaged beam. You will need an analogue of a jack, which will allow you to connect the fragments. Or the coordinated and leisurely work of a team of three or four people.
- Fault fastening. You can use any option of prostheses and onlays: until the supports are installed, they will hold the split part.
- Calculation of the location of the support. It is likely that they will become places of schism. But it may happen that two supports are needed, in those places where the maximum load falls on the wooden beam. This is especially likely if the beam has a large cross-section.
The rest is a matter of technique. The only thing that is required from the repairman is to clearly check the perpendicularity of the support, otherwise strengthening the ceiling will definitely not be possible.
Laying mini lag
How to sew a Euro sheet with elastic.
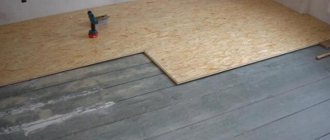
How to fix a sheet on a mattress so that it does not slip Along the lines of the contours obtained on the floor, it is necessary to lay boards with a width of at least 100 - they will support the flooring sheets on both sides. The overlap of the sheet on the joist should be sufficient, at least 45-50mm. The top of the log should be at the same level as the horizon outlined along the walls. Obviously, due to the curvature of the leveled floor, the distance from the bottom of the mini joists to the existing floor will be different. Therefore, to form mini-lag supports, it is necessary to prepare scraps of materials of different thicknesses.
Each support will have its own thickness. This is the most painstaking part of the work. By combining support pads of different thicknesses (OSB/QSB, fiberboard, laminate, cutting boards) we bring the top of the mini-lag to level. The size of the support pads should be the width of the mini-lag or larger. It is necessary to use durable, antiseptic materials.
The pads are attached to the existing base with wood screws - at least two screws for each. To avoid cracking of the wood, we pre-drill. You cannot skimp on the length and number of screws, otherwise such a floor will very soon begin to creak. We tighten the self-tapping screws, deeply recessing the cap. It is very convenient to do this with a screwdriver with a tangential impact (impact screwdriver), the so-called “impact driver”.
It is much easier and faster to equip joist supports for leveling a wooden floor with reverse plastic wedges. Unfortunately, they are not on sale everywhere.
The pitch of the support pads is taken to be 300-400mm, no more. Increasing the pitch is only possible with a larger thickness of the mini-lag, which will further reduce the height of the room.
We antisepticize and bring the logs into the required position along the contours of the sheets, install additional ones inside the resulting perimeters. When laying transversely, instead of boards, you can use slats of the same thickness. Step – no more than 500-550mm.
Installation of mini-lags for the construction of a new flooring.
It is better to install one “internal” log of the same size under each sheet in the center along the long side of the sheet - this is a little faster.
Don’t forget to check the quality of installation of the logs. At each stage, we control whether the top of the logs corresponds to a single horizontal plane. To do this, it is convenient to tighten the painting thread in increments of 500-1000 mm. Most often, problems arise when tightening the screws - the top of the lining goes below the required level. To avoid this, when selecting the thickness of the lining, press firmly from above with your foot or knee, simulating the tightening force.
Tools
To install the beams, the following tools are required:
- electric drill or hammer drill;
- screwdrivers or screwdriver;
- electric circular saw or simple hacksaw for wood;
- plane;
- hammer;
- tape measure and level;
- fasteners.
Other tools may be required.
Is the crack expanding?
How to install heated floors Review of methods for installing heated floors
The cement mixture itself is very susceptible to defects.
In this case, it is very important to find out not only the reason for their formation, but also the dynamics of the increase in cracks in the screed. This practice especially applies to apartments in which the interfloor ceilings are not particularly rigid.
How can you tell if there is a tendency for a crack in the foundation to grow larger?
When checking the coating for the possibility of further deformation, you need to do the following:
- Stick a strip of paper over the crack;
- Do not touch the pasted area for a month;
- If the paper breaks after a specified period of time, we can talk about a tendency for the size of the crack to increase.
What to do in this case? Often, such problems arise when renovating an apartment yourself. Why? Failure to follow the rules for mixing and laying concrete mortar inevitably leads to damage to the material. To correct the situation, it is advisable to seek help from specialists. Of course, the price for restoring a subfloor can be quite high. But in this case you can be sure of the quality of the work done.
Base made of concrete and reinforced concrete (laying on an uneven base)
Before installing the logs, the uneven concrete floor is leveled with a cement screed. This technology allows you to make a smooth and reliable base for parquet, laminate or floor tiles, as well as well insulate the floor and protect the room from external noise.
For most floor coverings, a spacing between joists of 60 cm is suitable, but floor tiles require cells measuring 30x30 cm because they are very fragile.
Reinforcing mesh in the screed and spacers between the beams increase the rigidity of the floor. Thermal insulation material can be placed in the resulting cells.
Preparing a concrete floor for laying laminate
How to strengthen the foundation, methods and technology for strengthening different foundations
The main defects of a concrete floor or screed are bumps and depressions.
The permissible size of bumps is 2 mm on a floor section 2 m long. The permissible size of depressions is 1 mm on a section 20 cm long. Preparing the floor for laminate comes down to eliminating all irregularities exceeding the specified values. Fig.1.
The main requirement set by laminate manufacturers is that the maximum unevenness height should not exceed 2 mm over a 2 m long section.
Preparing concrete floors for laying laminate can be done in two ways. In case of a small number of defects, they are eliminated locally. In case of severe defects in the floor surface, self-leveling mixtures are used - self-leveling floors.
The most effective way to get rid of bumps on a concrete floor is sanding. To grind the bumps, use an angle grinder (grinder) with a diamond wheel, or with a special attachment for grinding concrete. You can check the quality of floor preparation for laminate using a level by placing it on the defective area. There should be no gap between the level and the floor.
Fig.2.
You can get rid of small bumps on a concrete floor using a grinder with a special attachment for grinding concrete.
Depressions are eliminated using cement mortar or a specialized repair mixture. First, the cavity must be cleaned of dirt and primed. Then apply the solution and level thoroughly. Checking the quality of floor preparation for laminate is the same as when removing bumps.
Fig.3.
All depressions on the floor surface must be filled with cement-sand mortar or a specialized repair mortar.
A slight deviation of the floor from the horizontal will not affect the installation and operation of the laminate. In case of significant deviations and many other defects, self-leveling floors are used. Self-leveling floors are a universal way to prepare a floor for laminate flooring. Of course, the duration of installation will increase by 3-5 days, but the quality of the floor surface will 100% meet the requirements of the laminate manufacturer.
If the floors do not have surface defects, they are still subject to preliminary preparation before laying the laminate. Preparing the floor for laminate comes down to cleaning the floor from dirt and dust and priming. The primer will strengthen the surface layer of the floor and prevent dust formation.
Fig.4.
An important preparatory step when laying laminate flooring on a concrete floor is cleaning and priming the floor. The primer will strengthen the surface layer and prevent dust formation.
If there are doubts about the moisture content of the floor, then it is necessary to make a vapor barrier on the floor using plastic film. For this purpose, a film with a thickness of 0.2 mm is used. It is laid on top of a concrete floor. The film strips are laid with an overlap of 15–20 cm and the joints are taped.
Fig.5.
To protect the laminate from excess moisture and dust, a 0.2 mm thick polyethylene film is used. The film is spread on the floor with an overlap of 15-20 cm between the strips and 5-10 cm on the walls.
At this point, preparation for laminate concrete flooring or screed can be considered complete.
If the boards are damaged, but the floor is not damaged
Let's start with the simplest option, when the floor is strong enough, not damaged by insects or rot, but over time the boards have become damaged, causing unevenness to appear on the surface of the floor. How can I level a wooden floor in this case?
Option #1 - floor scraping
The easiest way is to try using a sanding machine or a plane. But it should be remembered that this is possible in the case when the floor is located strictly horizontally.
If you manage to get a sanding machine (sometimes you can rent one from hardware stores) or hire a sander, you can simply varnish the finished floor and not spend money on floor coverings. Sanding will not only level the floor, but will also emphasize the structure of the wood.
Before starting work, you need to take some safety precautions:
- Purchase protective equipment (headphones or earplugs, respirators);
- Cover upholstered furniture with plastic;
- Using a hammer, drive the nail heads into the boards, a few millimeters below floor level. If you encounter such an obstacle, the blades of the sanding machine may break;
- Having taken all measures to protect the car, furniture and your own health, you can start working. You need to start from the far corner of the room and move towards the door in a “snake”. That is, when you reach the wall, turn 180 degrees and continue working;
- After removing the top layer of wood, it is necessary to fill large cracks. Use acrylic putty of the desired shade for this.
- After the putty has completely dried, sand the floor again.
That's all. If you decide to varnish the floor, wait until the dust has completely settled, vacuum it up, treat the floor with white spirit or another solvent and begin applying varnish.
Option #2 - using plywood
This method can be used both to correct small defects on the floor surface, and in cases where the floor level is significantly deviated from the horizontal. In the first case, it is enough to simply stuff the plywood onto the floor surface. This must be done in two layers so that the joints of the sheets do not coincide.
When leveling using this method, you will have to tinker a little longer:
- First you need to make markings on the walls. The easiest way to do this is with a laser level;
- Now we set up beacons from self-tapping screws. At a distance of 250-300 mm from each other, screw them into the floor so that the caps form a horizontal surface. Check the level;
- As logs, you can use timber or strips of plywood, 3-4 cm wide. We attach them to the floor with glue.
- Now it's time to lay the plywood sheets. The easiest way to do this is by first sawing the plywood into equal squares with a side of 60 cm. You can easily get these by simply cutting a standard 125X125 sheet into 4 parts.
In order to raise the beacon to the required height, use scraps of the same material coated with glue. Simply place them under the guides
It is necessary to lay plywood squares on the guides with an offset, as when laying bricks. Before final installation, we cut the plywood to size and fasten it to the joists with countersunk self-tapping screws.
Floor insulation
Any type of flooring in a private house along joists requires the installation of insulation. When installing the logs, it is necessary to maintain a distance of 50 cm between them, where the heat-insulating material will be laid.
How to insulate a floor:
It is necessary to lay a waterproofing material on the concrete screed, which will protect the insulation from moisture; When choosing insulation, pay attention to its thickness: it should be 10-15 mm less than the height of the logs. This will create an air gap that will ensure natural ventilation of the floor; Next, you just have to cut the material so that its width is slightly larger than the pitch between the joists, so that the insulation fits in, imperceptibly pushing the joists apart.
Having installed the logs and insulation, you come to the final stage - installation of floorboards. It is important to learn about installing floorboards, because this is an important part of the question of how to make wooden floors in a private house
Having installed the logs and insulation, you come to the final stage - installation of floorboards
It is important to learn about installing floorboards, because this is an important part of the question of how to make wooden floors in a private home
You can fasten the boards to the floor with screws and nails, but you also have a choice:
- You can attach floorboards over the edge by screwing them to the joists;
- You can also attach them through the groove by screwing the self-tapping screw into the connecting groove at a slight angle. You just need to know which screws to attach the boards to the joists is best in your case.
To adjust the boards, it is worth using a piece of board that can be hit with a hammer. The joints must be strong, without cracks. The tightness of the connection will be maintained if you use a tongue and groove board. “Installing a floor in a frame house with your own hands – what and how.”
If there is no tongue on your boards, then you should fasten the boards in a slightly different way:
- Secure the first board with a self-tapping screw;
- Lay two boards in a small “house”;
- Secure the fourth board, which will preserve the “house”;
- Straighten boards installed at an angle using your own weight;
- Secure the middle boards and repeat the operation over the entire floor area.
Thanks to this spacer, you can create a tight connection between the boards.
Conclusion
In this article, we told you which floors are best made in a private home, because the options given have high technical characteristics, in addition, even a beginner can cope with such installation methods.
In conclusion, it is also necessary to give some general advice:
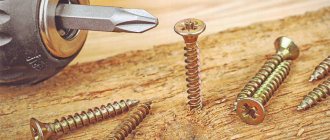
- It is advisable to use self-tapping screws for fastening, because the nails can gradually be pushed out of the floorboards;
- When laying boards, maintain a damper gap (the distance between the wall and the floor is 5 mm);
- It is advisable to varnish the floor to extend its service life.
About laying the finished floor
To install finished flooring options, tongue and groove or parquet boards, as well as plywood panels, are best suited. The latter, as a rule, are laid on top of the insulation and secured with self-tapping screws diagonally and along the entire perimeter. Then the actual installation of the flooring begins.
Ways to strengthen wooden floor beams
The main types and methods of strengthening wooden floors are given in order of increasing labor costs and duration of work.
Type of amplification without changing operating conditions
Reinforcement with wooden overlays
The method is used when the tree is damaged. The pads are installed on both sides of the timber beam (on the sides or top and bottom), as tightly as possible to it and are fastened (tightened) through with a bolt. It is important to treat the damaged area and pads with an antifungal solution. In critical cases, if the area is severely damaged, it is better to remove it
To strengthen the beam, you need to attach an overlay along its entire length.
Reinforcement of spans with metal plates (plates) or rod prostheses
Steel plates are used instead of the wooden ones described above. The metal also needs to be treated with an anti-corrosion solution. The device diagram is shown in the figure.
Reinforcement of flooring with carbon fiber (carbon fiber reinforced plastic)
Modern reinforcement technology (carbon fiber reinforcement). Carbon fiber (strips, sheets, plates, threads, fabric) is glued in several layers until the required beam stiffness is achieved. The ease of use and lightness of the material lead to the fact that carbon fiber is gaining popularity as an effective means for restoring beams and building structures.
Below is a diagram of reinforcement (strengthening) of floor beams with carbon fiber.
Reinforcement at the ends with wooden or metal prostheses
The technology allows you to strengthen the beam at the junction with the load-bearing wall. This is exactly the place where, due to temperature changes, wood damage occurs faster.
The diagram below shows the technology of reinforcement with prostheses made of channel, rolled profile
Installation of a rod prosthesis
The bar prosthesis of the Deidbekov system is made of two paired trusses, which are made from scraps of reinforcing steel with a cross-section (diameter) of 10-25 mm. The length of the prosthesis should be 10% greater than twice the length of the rotted end of the beam, but not more than 1.2 m.
- Install temporary supports under the ceiling at a distance of 1-1.5 m from the load-bearing wall, consisting of racks and purlins.
- Disassemble the ceiling from below to a width of 75 cm and from above - 1.5 m from the wall.
- Cut off the damaged section of the beam (0.5 m)
- Insert the prosthesis blank vertically into the interfloor ceiling and turn it to a horizontal position, first pushing it onto the beam, then pushing it into the wall niche in the opposite direction.
- Move and nail the sliding strip.
Type of amplification with changing operating conditions
Strengthening wooden floors using these methods requires a significant restructuring of the supporting structure of the beam spans.
Non-standard solutions
If it is not possible to strengthen the wooden floor beams, you can try to unload them, i.e., distribute the load from the existing beams to additionally installed elements.
Supports supporting beams from below are a good way to redistribute the load from the beam to the support.
Strengthening floors by installing additional beams
If the existing logs are intact and intact, their load-bearing capacity can be increased by increasing their number. Installing additional wooden beams will increase the load on the structure. When installing new logs, it is imperative to protect their ends with roofing felt to avoid damage.
We hope that from the above methods of strengthening wooden floor beams, you will choose the one that will solve your problem in the best way and at minimal cost.
Modern technologies in construction offer unique opportunities. For many, words such as bridging and polymers, strip flooring, GOST, cabinets, post connections, dimensions 100x200, or 150x50 mean nothing. But those who have already encountered repairs know that we are most likely talking about a field on joists. Some people just want to reinforce the floor, while others want to lay a new, durable and beautiful one. And the technology of installing floors on joists is very often used.
Other solutions
Before strengthening the logs of the second floor, you can check whether it is possible to unload them, that is, distribute the load to other elements.
For example, you can use supports or install additional logs. The first option, however, is not always possible to implement. The fact is that the supports will take up space and can create inconvenience when moving around the room. But some craftsmen turn them into a decorative element of the interior.
As for the installation of additional logs, as mentioned above, this is not always possible due to the design features of the building. If conditions allow, then it is better to add several elements to the ceiling. This is especially true when the existing joists are not damaged. In this case, the ends of the new elements must be protected with roofing felt before installation.
Defining a new floor level
At the initial stage of leveling, it is necessary to determine the highest point to the level of which the wooden floor will be leveled. The easiest way to do this is with a laser level or a hydraulic level of sufficient length (depending on the size of the room). We prepare a small slat, bring the level into working position, set an arbitrary horizon mark (it will be equal to the one at which the level you set will give its mark - it can be marked on the wall), place the slat vertically on the floor, and transfer the horizon to it.
Next, we walk along the floor to be leveled, placing the batten with its end on the floor, again and again marking the horizon on it in those cases when the previous horizon mark on the batten “falls” below the previous value. The place where the level horizon will correspond to the lowest mark on the lath is the highest point to the level of which it is necessary to level the floor.
Modern topping technology
If the use of impregnations often refers specifically to, then strengthening the floor even at the pouring stage is possible using reinforcement and other means. Reinforcement has already been discussed above. But another option is to use a topping technique, which makes it possible to provide the concrete structure with greater resistance to various adverse factors.
The topping is represented by dry mixtures, including cement, polymer additives and fillers of various natures (for example, quartz).
Research conducted on the use of topping has shown that those reinforced using this method are able to withstand significant loads and become resistant to impacts.
It is noted that the level of wear resistance of concrete reinforced using topping technology is 8 times higher than M350 concrete, approaching its characteristics to M800 concrete.
Concrete reinforced using this method is able to withstand the influence of diesel fuel and gasoline, but is slightly less resistant to aggressive chemicals (for example, acids).
Using this amplification technology, the process is also divided into preparation of the base and main work. First, prepare a concrete cushion from high-quality compacted crushed stone and sand. After this, a concrete screed is performed. In accordance with the project, reinforcement is carried out or formwork is installed, and a vapor barrier layer is laid.
The concrete laid on the surface of the cushion is leveled using special devices. Today, beacons or vibrating screeds are often used.
After laying the screed and drying it, wait a while to allow the concrete to acquire the necessary strength. Next, the concrete is rubbed with specialized mechanisms, achieving its ideal smoothness.
Concrete grouting is done twice. First, a rough grout is performed to eliminate significant surface errors. For the second time, finishing grouting is already carried out using the blades of troweling mechanisms, also called “helicopters”. It is at this moment that topping technology is introduced: the topping mixture is scattered on the concrete layer and then it is rubbed into the concrete thickness using the same mechanisms.
As a result of applying the topping, the floor surface becomes smooth and resistant to abrasion.
Elimination of minor defects
Restoring a screed with your own hands if there are small cracks is quite easy; for this you need:
- Using an angle grinder with a diamond disc, slightly widen the crevice;
- Remove loose pieces of concrete along the edge of the crack;
- Prime the resulting cracks;
- Fill the cracks with tile adhesive.
Renovating an apartment involves some difficulties that are worth mentioning. If the concrete surface is cracked in the bathroom, it is impossible to repair the defects with ordinary tile adhesive. In just a couple of months it will peel off due to high humidity in the room. If the microclimate in the room is specific, a mixture with water-repellent properties should be used to fill the defects. You can see how to repair a screed in a bathroom in the video below.
Optimal lag step size
If the thickness of the lags depends on the length of the span, then the size of the step (the distance between two adjacent lags) has a direct dependence on the thickness of the flooring.
This is explained simply: the thicker the board, the less susceptible it is to deflection. In this case, the pitch of the installed logs does not depend in any way on the selected material.
The ratio of floor covering thickness to pitch will be as follows:
- with a board thickness of 20 mm, the maximum lag pitch should be within 30 cm;
- with a board thickness of 25 mm, the maximum step should not exceed 40 cm;
- with a board thickness of 30 mm, the maximum step increases to 50 cm;
- with a board thickness of 35 mm, the maximum step is 60 cm;
- with a board thickness of 40 mm, the step size should not exceed 70 cm.
As you can see, with an increase in the thickness of the floorboard by 5 mm, the lag pitch increases by 10 cm. This ratio continues to be maintained.
Necessary clarifications
For all its positive qualities, wood still has a number of negative parameters. Of the most basic:
- relatively low endurance of both the floor beams and the entire structure as a whole. The maximum load is 500 kg/m2, and in most cases it does not exceed 200-300 kg/m2. Therefore, deflection is very likely;
- low sound insulation performance, which is typical for all wooden floors. They transmit the entire range of sounds, from airborne noise (conversation, music, murmur of water) to percussion, which occurs during repairs, moving furniture and even steps;
- fire hazard, to combat which it becomes necessary to treat wooden beams with special compounds;
- defenselessness against bioattacks. Wood is susceptible to rotting and woodworm damage, so wooden beams need additional impregnation not only from fire, but also from natural enemies.
Despite all the shortcomings, wooden structures do not lose their position. Even when strengthening the floors is considered vital. And this need may arise for various reasons. Watch the video:
The floors squeak, what to do reasons
By and large, there are not so many reasons that result in the appearance of squeaks - just one. You can say that the floor creaks because it is made of wood. If we get involved in the study of this phenomenon, then first of all we need to take into account such a property of wood as its dependence on changes in temperature and humidity. Many people know first-hand what happens to a tree under the influence of these factors - when there is excess moisture, it swells, increasing in size, and when there is not enough moisture, the tree releases the accumulated moisture into the environment. People say it shrinks or shrinks - in general, it decreases in size. The situation is almost exactly the same with temperature changes.
Now look further. What happens to fasteners (usually nails or screws). When wood, and in particular floorboards, increase in size, they pull the fasteners along with them, forcing them to come out of the base beam (joists). Naturally, when the process reverses and the wood begins to dry out, it will not be able to push the nail or screw back. These small movements of the fasteners are not visible to the human eye, but the wood, and in particular the structure of the wooden floor as a whole, feels them very strongly. A weakened board simply begins to wobble a little, and when you step on it, it rubs against neighboring boards, against joists, and a squeak is sure to form.
How to eliminate squeaking wood floors
Also, the cause of creaking can be joists deformed under the influence of moisture and temperature - by and large, this is practically the same phenomenon, only this time the answer to the question of why floors creak is not individual floorboards, but the entire floor. When bending under the weight of a person, friction occurs between all the floorboards, which results in creaking.
The wooden floor is walking. Why does a wooden floor begin to spring over time?
Wood floors used to be widely used in housing construction. Now new technologies have replaced outdated materials. The main reason for refusing to use wooden floors is their ability to spring and creak. This is a natural process that cannot be prevented. However, living in an apartment or private house where the floors make unpleasant sounds is very unpleasant.
The formation of creaks and the springy effect of a wooden floor is quite understandable. Even the driest boards dry out even more over time, decreasing in size. The logs on which the boards are laid also dry out. Their cross section becomes smaller. All this leads to the sagging of the boards, the formation of cracks between them, creaks and a springy effect when walking on them.
The springing effect is aggravated by the fact that when the size of the boards decreases, the tongues at their ends become loose and break out. In addition, due to the loosening of nail joints, the fastening of the boards to the joists is disrupted.
Another reason for the springy effect of the floor may be violations of its laying technology. For example, when they use too thin joists, or make too much distance between them. There are cases when the floor is lined with boards that are too thin and cannot support the weight of furniture and people.
You can eliminate problems with a wooden floor with the help of repairs. However, first you need to find out the cause of the problem. This will help determine the scale of repair work and the need to prepare certain materials.
If the springing effect appears due to the appearance of gaps between the boards and their exit from the end grooves, the problem can be solved simply. The boards are simply pushed together. The resulting space is covered with the same board. If during the repair process boards with wide cracks or a broken end groove are identified, they should be replaced. Otherwise, it will not be possible to completely get rid of the springing effect and squeaks.
It happens that one or both ends of boards rot, but the middle remains intact. In this case, the entire board does not need to be changed. It is enough to remove the damaged ends and cover them with fresh pieces of board.
Small cracks in the boards are filled with putty and sanded. If the cracks are too wide, putty will not work. The boards will have to be replaced.
The biggest problem with the appearance of a springy effect on a wooden floor is caused by incorrectly laid, sagging or thin logs. To fix this problem, you will need to disassemble the entire floor covering and replace or re-install the joists.
Manufacturing for a steel podium bathtub
To more reliably strengthen a steel bathtub, you can use a specially constructed podium. For its manufacture, you can use a variety of materials: brick, foam blocks, wooden beams, metal corner, profile pipe and other similar materials.
The most durable material for a podium is brick, but in houses with unreliable floors it is not always possible to use it. For the same reason, concrete is not suitable for the podium. Although wood or foam blocks are lighter than brick, these materials are easily destroyed when interacting with moisture. If you follow some recommendations, you can safely use the above materials in the manufacture of the podium.
Making a podium from foam blocks
The podium made of foam blocks must be made in such a way that the edges of the bathtub rest on the walls. The height of the podium is selected so that it is convenient to use the installed bathtub. Before use, foam blocks must be treated with special moisture-resistant impregnations, which will protect the material from destruction and protect against the appearance of fungus and mold.
Making a podium from wooden beams
Before use, the timber will need to be treated several times with a special protective impregnation. Additionally, it will be necessary to treat the places where the timber was cut. If the structure protrudes beyond the edges of the bowl, then a moisture-resistant sheet of plywood can be laid on the wooden beam.
To fasten the frame, you need to use only special stainless steel screws. Although the timber structure is quite strong, additional insurance will not be superfluous. The bathtub can be installed on additionally laid out stands or used for this purpose are the legs on which the bathtub bowl will rest.
Making a metal frame
The frame for the podium can be made from a metal corner or from a profile pipe. This frame is durable and lightweight. The main disadvantage of this design is the need to weld individual parts during assembly, since it is not always possible to use a welding machine in an apartment. And a frame welded outside the apartment, due to its size, may not fit through the doorway.
If there are no problems with such a frame, then the completely finished product should be pre-treated with anti-corrosion impregnation, primed and painted.
To prevent the structure from moving, it can be additionally secured to the wall or floor. After installing the steel bowl, you can begin covering the podium with plywood or other material.
If your podium is two-level or occupies a significant area, you can provide drawers or niches for storing toiletries.
Reinforcing joists using plywood or OSB boards
For logs made of glued material or structural wooden I-beams, overlays made of plywood or OSB boards are most often used. Such overlays are also installed in the form of double-sided overlays or one-sided lag reinforcement. This connection is fixed using self-tapping screws. The thickness of the plywood element or OSB board element should be no less than 10-12 mm. The size of the overlay for a structural I-beam must correspond to the height of the central part.
Reinforcing joists with plywood
Fixation with self-tapping screws is done on both sides of the linings. It is important that the screws pass through the thickness of all elements being fastened.
Methods for eliminating squeaks
So, when the reason is determined, you can choose the optimal method of strengthening the floor. There are several effective methods that have long been tested in practice by home craftsmen.
| Ways to strengthen the structure | Causes of squeaking | Peculiarities |
| Small gaps in the flooring, loose end connections | Minimum labor costs and financial investments with high efficiency |
| Strengthening with anchors | Gaps between the subfloor and joists | The method is expensive, but very reliable |
| Loose connection of floorboards to joists | Economical and fast method, no need to spend a lot of effort |
| Worn material, drying of floorboards, presence of large cracks and other damage | The method is time-consuming and labor-intensive, but it allows you to effectively eliminate squeaks and other defects |
| Bonding floorboards | The presence of wide cracks in the flooring as a result of drying out | The method is effective and durable, but requires some experience and physical effort |
| Small gaps in the floor, loose fit of elements | Expensive, but quick and easy. The method allows you to remove squeaking for a maximum of 3 years |
| Deflections of boards due to large distances between joists | Easy to implement, but not suitable for high traffic areas |
Causes of defects
Why does floor screed crack? In fact, there are plenty of reasons for flaws to appear on the rough foundation. As practice shows, cracks, dents and potholes can occur even if the grout is professionally poured. What is this connected with? It is worth noting that defects in most cases appear after installation of the cement screed. When laying semi-dry and gypsum mixtures, cracking of the coating occurs much less frequently.
Peaks and valleys in the coating inevitably appear after installation and dismantling of beacons. The reason for the formation of flaws lies in the physical and mechanical properties of the solution itself. The cement mixture has low plasticity, adhesion and a fairly high coefficient of linear expansion. Therefore, even if a little time passes between the installation and dismantling of the beacons, this inevitably leads to the appearance of small holes and cracks.
What are the main reasons for the formation of defects on the screed?
- Incorrect mixing of the solution, in which the water concentration becomes too high;
- Rapid (forced) drying of the coating;
- Uneven drying of the screed around the perimeter;
- Absence of a membrane base (polyethylene) under the solution;
- The presence of high temperature changes and drafts;
- Pouring too thin a layer of mortar;
- Direct contact of the cement mixture with the wall and communications;
- Using a fine-grained mixture that is unsuitable for pouring mortar;
- Absence or non-compliance with the required distances for expansion joints.
The reasons for the appearance of defects on the rough foundation are varied and are not limited to the list presented. The quality of the concrete pavement can also be affected by:
- Incorrect installation of thermal and waterproofing insulation;
- Poor quality cement mixture;
- Heterogeneity of the prepared solution;
- Lack of necessary tools for pouring and leveling concrete;
- Failure to comply with proportions in the process of preparing the working composition.
Repairing a floor screed is a responsible undertaking that requires strict adherence to the rules for restoring old and freshly poured screeds.
To repair the base without any problems, before performing the procedure you should pay attention to the following nuances:
- First you need to find out exactly the reason for the formation of flaws;
- Check whether there are expansion joints on the coating;
- Find out how the cement mixture was poured, what base the solution was laid on (concrete, wood);
- If there are no expansion joints on the floor, before repairing cracks and potholes, it is advisable to take care of laying them;
- To determine whether local delamination of concrete is present, it is advisable to tap the coating with a rubber hammer.
Danger Rot detected
If, when examining the floor and joists, you find areas of rot, they must be urgently replaced. In cases where only small areas of the joists are affected, you can do without completely replacing the floor. It is enough to remove the boards (this will give an additional opportunity to carefully inspect them and replace damaged ones), cut out the damaged piece of timber and replace it with a new one.
As you can see, most problems with uneven floors can be solved with little effort. And only in cases where the wood is severely damaged by moisture or dry rot will the floor have to be completely replaced. In any case, you should not lay the finishing coating on a shaky, uneven floor. This will inevitably lead to damage.
Natural wood floors are in no way inferior to their position in the building materials market, even taking into account the rapid development of more and more new floor finishing technologies. At the same time, this environmentally friendly material is not absolutely eternal, so wooden floors require periodic repairs. During use, a wooden floor inevitably acquires some disadvantages over time. However, by carrying out simple measures you can get rid of unpleasant squeaks, cracks, and unevenness for a long time.
Design
Wooden flooring is the oldest and at the same time reliable method of covering. First of all, it is worth understanding the design of the wood covering and how it is constructed. Traditional construction consists of: wooden floor beams, joists, floorboards and baseboards.
The main element is logs. They are a kind of lathing, a frame on which the floorboards are laid. They are needed to ensure that the final structure is strong and even. Any violation in the joist design will affect the quality of the floor as a whole.
The bottom line is that the main function of the joist is to provide the floor with a flat surface. They also facilitate the passage of air within the deck structure. This prevents wood elements from rotting.