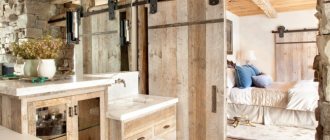
Despite the emergence of various innovative materials, wood has been, remains and, most likely, will continue to be in demand in any construction. Well, furniture made from natural wood is considered the most prestigious. The demand for the material is explained by its unsurpassed environmental qualities, natural warmth, durability, and ability to create comfort.
Wood stain
Both in order to maximize the life of products and for decorative purposes, many special means are used, one of which is wood stain. This unique composition can not only transform the appearance of ordinary wood, but also reliably protect its structure from various pests and the effects of external adverse factors.
But to use stain, it is important to be able to understand the variety of possible compositions and the technology for their application.
Alcohol stain: types and advantages of using the composition
Alcohol stain for wood allows you to protect against excess water, prevent the proliferation of destructive microflora, and also give the product a beautiful, intense color.
Stain will renew wood surfaces and give the entire room a fresh look.
Colored or transparent alcohol stain penetrates deeply into the wood structure and creates a special film on the inside and outside of the product.
Thanks to this, the wood fibers are raised and the structure becomes more prominent.
Alcohol stain can be obtained by diluting aniline dye in denatured alcohol. The substance can be purchased in powder form or a ready-made mixture.
The main advantage of alcohol stain is the rapid drying time of the layer applied to the wood surface.
But this property can also be attributed to the disadvantages of an alcohol-based substance.
In order for the surface to moderately absorb the applied tone, you need to use a spray gun; otherwise (with the manual tinting method), greasy stains will appear on the surface.
In order to really reveal the structure of the wood or “age” it, the surface can be treated with liquids of different colors.
By diluting several varieties of stains, you can get “Arctic oak” or “bleached oak” colors.
Before applying alcohol stain to the surface, you need to test it on a small area of the board. This is how you can determine the required tone and number of layers to be applied.
It is necessary to take into account that deciduous wood absorbs stain very well, while coniferous wood, due to the presence of a huge amount of resin, is worse.
Before choosing a tool for applying the substance to wood, you need to pay attention to the following points:
- The choice of equipment depends on the size of the surface being treated.
For small areas, a brush or foam swab is suitable. For large surfaces, it is better to use a pneumatic sprayer. When using a sprayer, the possibility of the formation of oil stains and smudges is reduced. - In order for the color of the wood to acquire a rich shade, you need to apply a few words of tinting agent. The 2nd and subsequent layers can be applied only after the previous ones have completely dried. The same rule applies to the finishing layer.
- The surface must be painted along the wood fibers.
Thanks to this, you can highlight the sketch, avoid smudges and reduce stain consumption. - The stain must be the correct consistency.
- The varnish coating does not need to be applied twice to the same place, then very black areas can be avoided.
- Alcohol stain needs a maximum of 3 hours to dry.
- The rules for applying the substance for exterior and interior decoration are the same.
Among the more popular manufacturers of alcohol-based stains, three companies can be distinguished, whose products delight customers with the price-quality ratio:
The products presented by St. Petersburg can be used for tinting door panels, baseboards and railings inside the room, as well as veneer and plywood products.
Among the advantages of the stain produced by this company are the following:
- does not require varnishing;
- does not wash off with water;
- easy to polish;
- emphasizes the wood pattern;
- prevents swelling of the coating;
- gives the wood surface non-flammable properties.
produces alcohol stains, the main purpose of which is to give the wood protective parameters and a certain color that imitates another type of wood.
The substance does not form a film on the surface of the product, but seeps into the structure of the wood, thereby emphasizing the natural outline of the natural surface.
When working with stain, certain conditions must be observed.
The room temperature should not be below +5 degrees, and the humidity should not be less than 80%. The wood surface must be completely dry before treatment.
Liquid from the Expert brand is suitable for treating wood surfaces indoors and outdoors, for tinting furniture, railings, log surfaces, and doors.
The substance penetrates deeply inside, allowing you to create an imitation of valuable wood species.
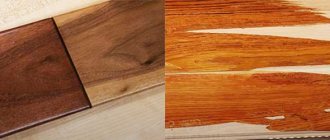
Available stain colors: maple, mocha, oak, mahogany, larch.
Watch the following video for more details on stain.
All rights reserved, 14+
Choosing the grade of plywood for painting
When choosing plywood, you should rely on criteria such as:
- moisture resistance;
- degree of processing;
- variety.
This material is hygroscopic, that is, it is able to absorb and retain moisture. Therefore, manufacturers try to reduce this disadvantage to a minimum and produce varieties with moisture-resistant properties:
- FC is a moisture-resistant material for the production of furniture and interior decoration.
- FSF - sheets with increased stability, are used for roofing in the construction of objects where mechanical loads are expected.
- FOF - laminated plywood, thanks to a special surface coating, has a high level of moisture resistance.
- Bakelite veneer sheets - in addition to the protective coating on the surface, are reinforced with a fiberglass reinforcing mesh.
According to the degree of processing - grinding, the material is divided into the following groups:
- Ш1 - the surface is polished on one side.
- Ш2 - processing on both sides.
- NS - no grinding.
Grade is an indicator of the appearance of the surface of the material, which indicates the extent of preparatory work before painting.
- Elite - the best in quality, there are no knots, cracks, wormholes, preparation before pigmentation is minimal.
- First grade - the surface quality is slightly inferior to the elite group; a maximum of 5 knots are allowed, measuring 1-1.5 cm per 1 sq. m.
- The second and third grades are distinguished by the presence of minor damage (scratches, dents), knots, cracks up to 20 cm. The difference between these groups is only in the amount of damage.
- The fourth grade is not inferior in quality indicators, but the surface may have any defects. This variety requires lengthy and thorough preparation before painting.
Thanks to this classification, before purchasing materials, you can estimate all the necessary costs in terms of time and finances.
How to apply?
In order to apply the composition correctly, you need to pay attention to the choice of the tool that will be used for the job. To decide on this issue, you should consider the following points:
To decide on this issue, you should consider the following points:
- size of working area;
- level of surface color saturation.
There are four main ways to treat wood with stain:
- rubbing painting - applying the product to the surface and then rubbing it over the entire area. It is best to coat porous types of wood in this way;
- spraying - a manual or automatic sprayer is used for this;
- painting with a roller - a foam tool is used. This technology will avoid streaks and reduce composition consumption;
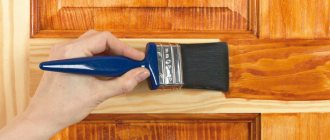
- using a brush. Thanks to this option, the surface will have a bright color. Brush work is not possible with all types of stains.
In order to saturate the wood well, you need to paint it strictly according to the fibers - this will reduce the consumption of the composition. For ease of use, the stain should have a convenient consistency for application.
The stain must be applied gradually and evenly so that it can dry in all places without exception. The first layer should be thin, it will create a base that will dry quickly and allow you to continue working.
The product cannot be applied to the same place twice. Such an error will lead to the formation of dark spots.
Water stain raises the fibers after treatment, so after application they need to be cleaned off using a piece of coarse cloth. This is done in a diagonal or longitudinal direction.
Surfaces treated with alcohol or water-based products dry in 2-3 hours, oil stains will take longer - about 2-3 days.
To determine the approximate consumption of the composition per 1 m2, you need to take into account the porosity of the wood. On average, one liter of stain is enough for 10-15 m2.
Step-by-step instructions for processing a wooden surface:
- remove all dirt and loose fibers from the wood;
- pour the stain into a small and convenient container, strictly following the dilution instructions;
- Use the selected tool to carefully distribute the solution over the surface. To cover wood faster, do not try to take as much stain as possible, since this method will increase its consumption and reduce the quality of the work.
How to apply stain to wood, see the video below.
Types and properties of stain
Special dyes that dissolve in liquids are stains of different tones. It is produced in powder and liquid form. The liquids are water, alcohol, and wax, which is why it is divided into different types.
Water stains. The most popular water-based group. Wood can acquire light and dark tones after applying stain. Available for sale in two states: liquid, dry. Liquid stains are used immediately, while powder stains should be pre-diluted with heated water.
Advantages:
— does not emit a toxic odor, which allows you to work without fear of poisoning in a closed room; - Great possibility of color selection. You can achieve darker tones using several layers of stain, after drying each layer first; - low cost; - long shelf life.
Flaws:
— drying takes a long time; — varnishing is a mandatory procedure; — during painting, wood fibers rise, due to this, moisture resistance is lost. To prevent this from happening, the surface is moistened and polished before work; — excess stain on the surface can cause cracks. Therefore, in this form, the tampon is slightly moistened before application.
Alcohol stains. Stains of this type dissolve in alcohol. Aniline dyes are used as the main components. The mixture quickly penetrates deep into the wood, where the alcohol evaporates within half an hour.
If you need to paint large areas, it is better to use a spray gun. This application prevents stains and washouts from forming. The disadvantage of this type is fast drying and a strong smell. A positive characteristic is that the wood does not swell; unlike aqueous mixtures, ultraviolet rays are not harmful.
Oil stains. Dyes of this group dissolve in linseed oil.
Positive characteristics:
- any dyes can be combined; — uniform application, without lifting fibers; - do not fade; — retain the original color for a long period; — drying time from 2 to 4 hours; — the mixtures are resistant to moisture and temperature changes.
Flaws:
- toxicity.
Nitromordants. The liquid is a solvent that dries very quickly after painting. It can be compared to an alcohol group. The characteristics are similar. They are also difficult to apply, but are resistant to washout and ultraviolet rays.
Wax stains. Dyes are diluted with wax. After applying the mixture, a waterproof film is formed. After using this group of stains, no varnish is required.
Acrylic stains. Dyes dissolve in acrylic resins. The mixture is perfectly applied to the surface, does not create stains or streaks, reveals the wood grain well, and is non-toxic. The only drawback is the high cost.
Stain gels. The mixture is thick and intended for soft wood species. The work uses a swab to apply the stain in an even layer. This group allows you to remove as much staining as possible from the surface.
Varnishes stains. Coloring components based on alkyd varnish. No finishing varnish is required here. The tree receives reliable protection from external influences. The work becomes more complicated with stain varnish due to several factors:
— the compounds are volatile and require the use of a respirator and goggles; - fire hazard. It is impossible to do without observing strict fire safety measures.
Work technology
Staining a wood surface is not a complicated process, but it requires a responsible approach. In order for the varnish coating to be uniform, the consumption to be minimal, and the stroke to lay evenly, it is necessary to become familiar with the intricacies of the work.
How best to apply stain to a surface: master class
- Spraying is the most effective method. The coating applies evenly, even gray wood will instantly acquire a new shade. The risk of smudges and oil marks is reduced.
- Rubbing the stain over a porous wood product with a rag will help you get the effect of oak or pine even on the most ordinary product made from base raw materials. The composition must be applied carefully, so quick-drying solutions should be avoided.
- A roller or swab for applying stain is useful when covering a small area of wood. In this way, it will be possible to highlight and emphasize the cut pattern, the stain will evenly penetrate deep into the product, creating a protective screen.
- A brush is most often used for work - the tool is easy to use, wood stains apply smoothly in the chosen direction. The master can play with natural patterns and play with existing patterns by saturating colors in certain areas.
The master decides which method is best to use and paint, based on his skills, type of stain and wood surface
To determine which stain in a particular case, when choosing, pay attention to the instructions for the product, which describe the conditions of application and operation
Basic rules for carrying out work
Often it does not matter how many layers of wood stain will be applied. The main thing is to follow the technique and take into account some nuances:
- The product must be painted strictly according to the wood grain. This way it will be possible to reduce the consumption of solution for smudges and emphasize the design.
- Wood stain should be of a convenient consistency. Non-aqueous is dissolved with white spirit to optimal thickness.
- How many layers to apply is determined by the master depending on the desired shade and effect. Usually 2-3 layers, each of which is thoroughly dried.
Make the first layer thin - the important thing here is to paint it gradually and evenly. The layer will create a base for subsequent applications and reduce the consumption of mortar solution
- To avoid dark areas, varnish should not be applied to the same area twice.
- When dry, water-based wood stain raises the fibers. They are cleaned with a coarse cloth in a longitudinal or diagonal direction.
- Aqueous and alcohol solutions dry in 2-3 hours, oil solutions dry in 2-3 days.
The rules are the same for interior and exterior work.
Master class on surface tinting
- Clean the wood from dirt and remove protruding fibers with sandpaper;
- Pour the stain, previously diluted according to the instructions, into a small tray. Cooking can be done in small portions.
- Take the tool and, gradually pouring the solution onto it, spread the varnish over the wood.
Do not try to take a lot of paint - this will increase consumption and reduce the quality of the coating.
What is the best way to apply stain?
To apply stains you can use: a spray gun (with a nozzle size of no more than 1.5 mm), a wide brush (100 mm wide), a foam swab, and rags. If you have a large area to cover, then you should definitely prefer a spray gun. It is also used when using nitro stains and alcohol stains. They dry too quickly, so when applied with brushes or swabs, stains often form on the wooden surface.
Water-based and oil-based stains can be applied well with brushes, swabs and rags. Brushes with natural bristles are more suitable for oil-based stains, while those with synthetic bristles are more suitable for water-soluble stains. The bristles should be strong and not leave behind hairs on the surface.
Fabrics and tampons used for stains can be cotton or foam rubber. They should also not “sprinkle” with lint and threads, which can remain on an already painted surface and reduce the quality of the coating.
Practical advice
When painting plywood and subsequent use, you should follow the following recommendations.
- Rollers are often used for work. You should choose foam rollers, since fur rollers leave lint, which is very difficult to get rid of.
- If plywood is painted or varnished twice, it is important to ensure that the previous layer dries completely.
- Edges and curved elements are painted with a brush.
- Painted dry surfaces can be cleaned with soft sponges using soap compounds.
- Glossy surfaces are periodically wiped with a mixture of water, vinegar and lemon juice to restore shine.
- Do not use abrasives or hard brushes to clean painted plywood.
Elimination of defects
Removing stains caused by stain is a complex process.
- Streaks
. If the fast-drying material was applied in a thick layer, this problem can be eliminated by removing it as much as possible. To do this, the drying layer is covered with fresh stain. The softened solution is removed with a rag. When the coating is completely dry, solvents are used. Another way to solve this problem is to use a plane or sandpaper. - Spots
. If the coloring is uneven, it will be difficult to cope with. The stained wood is passed through with a plane, and in plywood the top layer will have to be removed. But it is preferable to prevent the formation of spotting: conduct a preliminary surface test, use gel stain or suitable tools.
Wood will always be popular, because it is a beautiful and environmentally friendly material. However, like all natural decorative elements, boards are afraid of moisture and are a favorite habitat for insects, fungi, mold and other microorganisms. To increase the service life of things made from wood, various protective agents and antiseptics are used. Today we will talk about such a wonderful substance as stain, with its help you can not only solve some problems associated with premature damage to wooden materials, but also give your products an unusual and noble appearance.
Wood is a strong and durable material that is susceptible to adverse environmental factors, therefore, in order to protect products made from it from possible damage, they must be treated with special means. On the construction market you can find a huge number of different antiseptics, varnishes and other impregnations that change the color and some properties of wood; the most popular and inexpensive product is stain. Some people think that stains are used only to change the color of an object, but this wonderful drug also has other properties.
The properties of stains may vary depending on their composition. However, even if you do this tint yourself, it will still have some protective properties.
Properties of stains:
- If you want to change not only the color of the wood, but also highlight its texture, then stain is just what you need. It does not completely cover the design, like paint, but gives the entire product a pleasant shade.
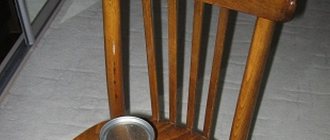
- Staining wood will protect furniture from insects and rot, while maintaining the texture and grain of the wood.
- Stain is a protective agent that increases the service life of wooden objects and costs several times less than varnish and paint. In addition, due to its watery consistency, it penetrates deeper into the wood structure.
- With the help of stain, you can make even inexpensive pine, painted with colored stain, look like noble and strong oak and exotic mahogany.
- Tinting with stain can lighten the wood. This technique is especially often used before painting wooden products.
- Impregnation with stain will strengthen the structure of the wood and give it a slight moisture-proof property.
How and with what to paint plywood correctly
Painting plywood is a simple matter. In theory. However, there are a number of nuances that need to be taken into account so that the end result pleases you for as long as possible. The painting features are caused primarily by the structure of the plywood. After all, this is a multi-layer material made of natural wood. The ability of wood to shrink and expand under the influence of factors such as humidity and temperature leads to the fact that the coating applied to it will also be deformed.
So, we suggest you figure out how to paint plywood correctly.
| Plywood selection |
The procedure for its further decoration depends on the choice of plywood. There are several options here:
- you buy plywood to paint on one side. Then varieties II/III, II/IV will suit you. It is important that the side to be painted is not lower than second grade;
- you need double-sided painting of plywood. You should buy material of grade no lower than II/II. That is, both sides must be distinguished by high quality processing;
- you want to preserve the appearance of the wood. Then, elite varieties I/I, I/II, I/III are exactly what you need. After all, they have the minimum permissible number of defects. And varnished plywood will allow you to emphasize the aesthetic qualities of natural wood.
Drying
Let's assume that you just purchased plywood. It was stored in the warehouse under optimal conditions - however, it needs to be kept in the room where it will be painted. If the plywood was stored outdoors and exposed to direct water, it is better to dry it with a hair dryer (one or two sheets). Or lay it on the floor on bars to ensure air circulation.
Thus, it does not matter at all where the plywood was stored - it will need to be dried in any case. The difference will only be in the duration of this process.
Please note that you will need to dry the sheet after completing each of the steps.
| Sanding and preparing edges |
If you have high grade plywood, there is no need to sand it. If below the second, then use sandpaper No. 80. You need to sand perpendicular to the wood grain. Corners definitely need to be processed. To do this, they also need to be sanded with coarse sandpaper.
| Putty |
Putty is only needed if you need to level the surface of the sheet. For example, you developed a defect while working with plywood. You need to hide the nails and fasteners. Or you purchased products lower than second grade. As a rule, plywood is puttied under wallpaper. In general, the quality of a sheet of any type will not be visible only if the plywood for painting is additionally treated with putty and sanding.
The primer involves covering the sheet with a special compound. Usually this is a simple drying oil. But other solutions can also be used, for example, pore fillers. Its use serves the following purposes:
- extend the service life of plywood products;
- protect them from damage;
- prevent the development of fungi and blue stains;
- ensure better adhesion of paint to veneer.
The primer is applied with a brush or sprayer. Application of the primer coating is carried out with a brush or spray. The pore filler is applied using foam rubber.
Decorative coating. Choice
The preparatory work is left behind - now it’s time to give the product a finished look. Depending on your wishes and the quality of the surface, there are several options for resolving the issue of how to paint plywood:
- staining;
- staining followed by varnishing;
- varnishing while preserving the natural appearance of the veneer;
- applying paint.
Please note that not only the sheet is coated, but also the ends.
Decorative coating. Implementation
Staining. This procedure will allow the plywood to acquire the color that you need. Allows you to achieve the effect of using valuable and rare wood species. There are a significant number of different colors on the market. In addition, stain also acts as an antiseptic.
| Decorative coating |
Plywood, opened with stain, has a matte appearance, so it is often additionally coated with varnish.
Stain coated with varnish. Gives the surface additional shine.
Varnishing. The varnished surface looks very beautiful. The naturalness of wood, emphasized by high-quality processing and coating, is always in fashion, always relevant. In this way, you can give a noble look even to such a very technical material as plywood.
| Varnishing |
Coloring
This point will probably raise the most questions precisely because painting plywood is the most common method of decorating it. What paint is best to paint plywood? Let's consider several options:
- water-based plywood paint – acrylic. Their advantage is that they have almost no odor, are easy to apply and dry quickly;
- Painting plywood with enamel is used most often in exterior work, since enamel better protects veneer from external influences. But it is also quite acceptable for interior work. For example, painting a plywood floor is done using enamel.
Step 8 - Selecting a Tool
Having decided on the type of painting, you need to choose the optimal method of applying paint or varnish. You can use:
- a brush or brush (if you are painting a large area);
- roller It is better not to use a fur roller. After all, when painting, it is important that the pile does not fall out. It is better to use a foam roller;
- spray.
Conclusion
We hope that the information provided here will help you decide what is the best way to paint plywood in order to give it decorative properties, as well as increase its service life.
What is wood stain
Wood is a strong and durable material that is susceptible to adverse environmental factors, therefore, in order to protect products made from it from possible damage, they must be treated with special means. On the construction market you can find a huge number of different antiseptics, varnishes and other impregnations that change the color and some properties of wood; the most popular and inexpensive product is stain. Some people think that stains are used only to change the color of an object, but this wonderful drug also has other properties.
The color of wood stain should be chosen depending on the interior design.
The properties of stains may vary depending on their composition. However, even if you do this tint yourself, it will still have some protective properties.
Properties of stains:
- If you want to change not only the color of the wood, but also highlight its texture, then stain is just what you need. It does not completely cover the design, like paint, but gives the entire product a pleasant shade.
- Staining wood will protect furniture from insects and rot, while maintaining the texture and grain of the wood.
- Stain is a protective agent that increases the service life of wooden objects and costs several times less than varnish and paint. In addition, due to its watery consistency, it penetrates deeper into the wood structure.
- With the help of stain, you can make even inexpensive pine, painted with colored stain, look like noble and strong oak and exotic mahogany.
- Tinting with stain can lighten the wood. This technique is especially often used before painting wooden products.
- Impregnation with stain will strengthen the structure of the wood and give it a slight moisture-proof property.
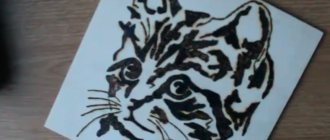
Tinting effects
Depending on the palette of shades used, the type of stain and the desire of the craftsman, you can give the wood a variety of effects. Due to the latter, design possibilities are greatly expanded.
Which is better: heated floors or radiators?
Warm floorBatteries
White color is very popular in the interior. In addition, with the help of bleaching, you can restore the normal appearance of old wood, which has lost its attractiveness, but has acquired dark, bluish spots. You can also decorate some interior elements, for example, cover photo frames and paintings with bleaching stain.
Embossed white products that have been treated with special brushes look beautiful (this removes too soft fibers). After finishing the processing, they are covered with a white, light walnut stain. To protect the wood from the influence of atmospheric factors, you can apply white wax on top.
Expert opinion
Strebizh Viktor Fedorovich, leading construction foreman
It is worth noting that the natural dyes that were listed in the article above are also widely used in the production of mulch at home. If you want to clarify something, please contact me!
Folk recipes for wood stain production
Making stain can be mastered at home. Compositions can be produced in several ways:
- from plant materials,
- from tea, coffee or vinegar,
- from chemical components.
You can also make a whitening composition. Let's look at the technologies for producing stains with our own hands in more detail below.
Vegetable stains
Below are recipes for plant-based beans:
- Larch bark decoction. Gives the tree a red tint. Birch wood will look especially beautiful.
- The onion peel also gives it a reddish hue. It is customary to treat light wood species with this decoction.
- You can get an impregnation from walnut shells that will give the wood a brown tint. To prepare the impregnation, you need to grind the shells into powder. The dried powder is boiled in water and filtered through a sieve. Next, soda is added to the solution. If you add potassium dichromate to the solution, the wood will get a reddish tint. To obtain a gray tint, acetic acid is applied to the already treated surface.
- Black coloring can be achieved by treating the tree with a decoction of oak and alder bark.
- Also, black color can be obtained by decoction of willow and alder bark.
- A uniform brown color is obtained thanks to a solution to which equal amounts of walnut shells, alder catkins, as well as oak and willow bark are added. The components are poured into water, which is brought to a boil. After this, half a teaspoon of soda is added and the solution is boiled for another 10 minutes.
- A decoction of nut shells and apple tree bark will give the product a brownish tint.
- The wood will acquire a golden hue after treatment with a decoction of buckthorn berries.
Compositions based on tea, coffee and vinegar
- To produce a stain that will give wood a brown color, you should mix ground coffee with soda.
- You can turn light wood brown by brewing tea. The depth of color depends on the strength of the brew.
- The “ebony” effect can be achieved by pouring acetic acid into a container with nails and letting the solution sit for a week in a dark place.
Chemical based formulations
- Oak wood will turn brown if you soak it in slaked lime. The walnut, in addition to its brown color, will acquire a slightly greenish tint.
- Cherry color can be imparted to wood by applying a manganese solution to it. To prepare it, you need to add 50 grams of potassium permanganate to a liter of warm water.
- A yellow color for light wood can be achieved by treating it with a decoction of barberry root. You need to add alum to the prepared broth, and then bring the liquid back to a boiling state.
- A greenish tone can be obtained by mixing 50 grams of copperhead with vinegar. Boil the solution for 15 minutes.
- If you mix wolfberries with vitriol, you get a brown tint. When these same berries are mixed with Glauber's salt, a scarlet color will appear. As a result of mixing wolfberry and soda, a blue tonality is obtained.
Whitening compounds
Bleaching impregnations are used as a preparatory measure before painting wood. Some types of wood get interesting shades as a result of bleaching. For example, the nut with its purple hue takes on a pale pink or scarlet color. Apple wood becomes ivory in color.
Recipes for whitening stains:
- Oxalic acid solution. For 100 grams of water, take 5 grams of acid. The solution is used to bleach light wood. On dark rocks, after treatment with this composition, stains of an unpleasant color will remain. After bleaching, the wood is washed in a solution where 3 grams of soda and 15 grams of lime are taken per 100 grams of water.
- Using a 25% hydrogen peroxide solution, you can bleach almost all types of wood, with the exception of oak and rosewood. In this case, washing is not necessary.
What is stain used for?
In a professional environment, stain for woodworking is called “stain.” This liquid product allows you to give the desired color to wood without changing its texture or pattern. On the contrary, stains emphasize the entire aesthetics of natural wood, enhancing it, and ennoble simple species: after processing, even pine can be “made” into dark oak or other expensive types of material.
Any wooden products, despite their strength, are susceptible to various adverse factors. Using stain, you can protect wood from damage by putrefactive fungi. There are different types of stains, the properties of which depend on the composition.
The main qualities of fighters:
- protection of wood from ultraviolet radiation;
- extermination of wood borers and other pests;
- increasing surface service life;
- wood lightening;
- moisture-proof function;
- possibility of restoration of old products;
- compaction of the material structure;
- preparing wood for further processing - painting, varnishing.
Some stains should be used only indoors - for covering floors, countertops, furniture, interior doors. Others are suitable for outdoor work - for example, for treating the floor on an open veranda. Some products are used only on the surface layers of wood, others are characterized by the possibility of deep penetration. Many modern stains can not only be applied to the base, but also perform various interesting effects - combining tones, creating shades uncharacteristic of wood.
The difference between stain and drying oil, paint, varnish
Stain is a means of adding texture to wood. It penetrates deep into the wood, tinting it from the inside without closing its natural pores and preserving the pattern, while protecting it from rotting and destruction. Drying oil also protects the material from moisture and putrefactive processes, but after its application a film appears on the surface.
Drying oil weakly penetrates into the deep pores of wood, but clogs them from the outside. While stain can become an independent finishing product, drying oil is used only to prepare wood for further work to improve the quality of staining and reduce the amount of paint.
Varnish is also very different from stain impregnation. Varnish is a film-forming agent, and the protective film from it is formed after the solvent evaporates from the surface. Oil varnishes form a super-strong elastic film that is not easy to wipe off even with white spirit. Again, the varnish layer will have to be renewed over time, first removing the previous one. Usually varnishes are used where there is a strong influence of atmospheric factors, and stain will have to be applied too often.
Paint is another popular material for finishing wood. You can paint absolutely any wood product: from floors to window sills or furniture. After painting, a dense, opaque film is formed on the surface, which will completely hide the natural wood grain - this is a fundamental difference from stain. Typically, the color range of paints is far from natural: white, black, brown, and green paints and varnishes are most often sold. After 2-3 years, many types of paints lose their strength, peel off, after which you will have to completely remove the old layer and apply a new one.
Kinds
Depending on the material that is the basis of the composition, several types of stain are distinguished.
One of the most common types is aquatic. This product is available on the shelves of hardware stores in two versions:
- dry;
- liquid
The first is a powder for dilution with water. It must be strained before use. Otherwise, particles of undissolved pigment will prevent you from applying the product in an even layer. The second option is a ready-to-use liquid, poured into various containers.
Water stain is economical, does not require special skills during application, and is inexpensive. Its advantage is non-toxicity and absence of unpleasant odor. It is ideal for interior work. The treated surface will dry in just over 12 hours.
Be sure to take into account the peculiarities of such finishing material. Penetrating deep, it lifts the wood fibers. Due to this, the product acquires a spectacular natural look. However, this impact is negative and shortens the life of the wooden covering. The problem can be dealt with if, before applying the composition, treat the wood with water and after a day clean it with an emery cloth.
Alcohol stain is also sold in dry or liquid form. To dilute the powder, ethyl alcohol is used. The peculiarity of this composition is quick drying. Therefore, it is often used for working with wood outdoors. If you need to process the product indoors, good ventilation is necessary, since the stain has a specific pungent odor.
The base of oil stain is usually linseed oil. White spirit is used for dilution. This composition allows you to paint wooden surfaces in a variety of shades. The stain is easy to apply, penetrating deep into the wood and protecting it from moisture. In this case, you can use a brush, as it does not leave streaks. The only drawback is that it takes a long time to dry.
Wax stains are environmentally friendly and safe for human health. This determines their high cost. They can be used not only for painting wooden surfaces. They can restore or correct errors in wood flooring.
The thickest type of stain is gels. They are applied to soft wood surfaces. It is difficult to distribute this composition with a brush, so special tampons are used. Mainly, gels are used for outdoor work. They will “revive” benches and gazebos in the garden and add uniqueness to the façade and fence.
Acrylic stains are based on resins. The product is an emulsion. It is easy to apply. Penetrating deeply enough, the composition protects the surface from the negative effects of moisture. A diverse range of shades will allow you to bring all your most secret ideas into reality. At the same time, the processed product will not fade under the sun's rays and will retain its color saturation for a long time. Acrylic stains are economical, but expensive.
A special type of stain is stain. It is based on organic solvents, dyes and pigments. The stain dries quickly and gives an even shade that is resistant to fading.
Hydrogen peroxide or acid is the basis for whitening stains. This composition is designed to make the wooden surface lighter for further processing or painting.
Selecting the desired shade
The opportunity to experiment with shades opens up broad prospects for the implementation of the most daring design projects. Today in the TBM-Market store you can inexpensively buy ready-to-use stain in dark and light tones to match the color of oak, alder, walnut and others. But on products made from different types of wood, the same type of stain can look different. The result depends on the structure and density of the wood, its chemical composition. That is why, after purchasing, the material should be tested on invisible areas of the surface to be treated or on a separate board.
Test painting is an important point that helps you choose the right color and shade of the coating. What's the best way to do it? The easiest way is to compare:
- First, the first layer of stain should be applied to the board chosen as a sample.
- After waiting for complete drying, cover 2/3 of the board with a second layer.
- Then, according to the same scenario, paint 1/3 for the third time.
This way you can see the difference in color intensity with different numbers of layers and choose the appropriate option. This method often comes to the rescue when furniture or room decoration is combined from different materials, for example, solid wood and plywood.
Solid pieces of wood look darker after staining, so more layers will have to be applied to the plywood parts to even out the color. Deciduous wood absorbs more coloring composition, coniferous wood absorbs less.
A skillful combination of shades allows you to realize any creative fantasies. Using the right tones, you can give a rich mahogany look to products made from birch, ash, pear, linden and alder. The same wood is ideal for imitation walnut.
In the specialized store "TBM-Market" you can choose your preferred stain shade from the catalog and evaluate the result of the future finishing from the photo.
General information about stains
Stain is a liquid composition, often dark in color, which can give wood various translucent shades, which allows you to radically change the appearance of the product, as well as protect the material from external destructive influences. Therefore, this means of processing wooden parts can be called multifunctional.
Stain can give wood different shades, radically changing the appearance of products
So, with the help of similar protective and decorative compositions, the following operations can be performed to change the appearance and characteristics of wood:
- It becomes possible to tint while preserving the textured pattern of the wood.
- A special-purpose stain is capable of bleaching wood - this is a necessary process during restoration work, when changing the color to a lighter shade, or when preparing the surface for applying varnish.
- Imitation of shades of elite expensive wood species is widely practiced.
- The stain has the property of deep penetration into the structure of the material, and its antiseptic qualities of the composition protect the wood from putrefactive processes and the destructive effects of wood-boring insects.
- The action of the stain is accompanied by strengthening the structure of the wood.
- An important quality is to give the material water-repellent properties.
- Any type of stain significantly extends the life of wooden products.
Using different shades of stain allows you to add visual volume to the wood grain.
- The stain is suitable for both interior and exterior work.
- The quite affordable cost of the material is also attractive - the price of stain is two, two and a half times lower than paint and varnish compositions similar in the created effect.
Different types of stain interact with wood differently, depending on the basis of their manufacture. Some of them penetrate deep into its structure, others create a protective film on the surface.
Application rules
The final result of treating wood with stain is influenced not only by the quality of the solution, but also by the correctness of its application.
There are a number of rules that must be followed when staining with water-based compounds:
- the solution is applied to the surface along the fibers;
- large areas can be covered with the mixture by spraying;
- the liquid is applied to small areas using soft paint brushes or a foam sponge;
- to prepare a solution from dry aqueous mixtures, the powder must be diluted only in soft or purified water;
- before treating wood with a tinting solution, the surface must be thoroughly cleaned of dirt, grease and resins;
- Before treating wood with an aqueous composition, it is recommended to moisten the surface with water to avoid the formation of lint;
- If the solution is heated a little before starting work, the stain will better penetrate into the structure of the material.
How to prepare a wooden surface for finishing
The beauty and aesthetics of the finish depends not only on the quality of the stain, but also on the properly prepared surface. It should be smooth, silky, without scratches or other defects. Preparation for staining includes:
- thorough cleaning of wooden objects from dust, dirt, grease stains;
- removal of old paintwork;
- sanding and grinding;
- test coloring.
It is important for the home craftsman to know that sanding is always done along the grain. At the first stage, medium-grain sandpaper No. 120 is used for sanding, and at the second stage, fine sandpaper No. 220 is used. If furniture or other parts are made of coniferous wood, they must be deresined with a special compound. Grease stains are removed with a cloth moistened with alcohol or white spirit. Traces of wood glue are easily washed off with hot water.
When the first three conditions for preparing for staining have been met, it is necessary to do a test staining on a separate piece of board, which will help you choose the right color and its intensity.
Applying stain to a dry, clean and smooth surface is the key to a high-quality, beautiful finish.
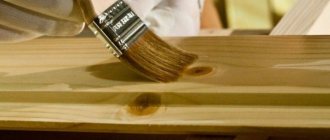
Do-it-yourself stain application: subtleties and nuances of the process
When approaching the issue of treating wood with stain, or rather choosing a tool for applying it, you should understand that it can be influenced by several factors. Depending on the area of the surface to be treated and the type of stain used, its application can be done either with a brush or with a foam swab or even a sprayer. In principle, there are no special contraindications in this regard. The only “but” is the so-called nitromortars, made on the basis of solvents. They dry quickly and as a result, when using a brush or swab, stains are obtained - this type of stain is best applied with a sprayer, regardless of the volume of the surface being treated.
As for all other types of stain, they can be applied using any tool - the choice depends on the area of the surface being treated. You understand that you cannot quickly cover a large volume of wood with a brush or foam pad.
What else you need to know about the question of how to apply stain is that to achieve the desired color of wood, it must be coated in at least two layers, and each of these layers must be completely dry. The approach to finishing wood should be exactly the same. The stain must be completely dry before you varnish it. Especially when it comes to aqueous compositions.
Stain colors photo
Varnishing plywood ↑
In terms of surface preparation, there is not much difference between painting and varnishing: you also need to sand the plywood, prime it and cover it with paint and varnish. Before applying the composition, it is necessary to thoroughly clean the surface of dust and small particles that have settled after grinding.
It must be taken into account that the varnish, whether matte or glossy, is transparent - the wood texture, knots will be visible, and putty cannot be used. They varnish flawless plywood - without voids, recesses, or other defects. Varnish can also be used to add gloss to a painted surface.
Don’t forget to read the instructions on the can of varnish - follow the manufacturer’s instructions: dilute the composition as the manufacturer advises, mix thoroughly; Follow the recommended time intervals. If after stirring you need to let the composition sit for several minutes, do not neglect this requirement: the varnish is allowed to stand so that the air bubbles leave the composition when it reaches room temperature.
The plywood is varnished in several layers, drying each one. The layer is applied thinly so that drips do not form. To increase adhesion, a layer of varnish (before applying the next one) is passed with a fine abrasive and thoroughly cleaned of the resulting dust.
Important! Remember your health. Wear gloves and a respirator. A draft is undesirable for drying paintwork, so ventilation of the room should not be used as a safety measure.