Ideal ways to stabilize wood at home and not only
Wood is a noble material that has long been used for the manufacture of various products, home decoration, dishes and things useful in the household. Noble color, aroma, beautiful fiber pattern - the qualities of wood for which it has become famous.
But there is a big drawback that cannot be written off - moisture is detrimental to the material, because it causes great harm - it leads to fiber delamination, deformation, and swelling.
This can be prevented by stabilizing the wood.
How to stabilize wood at home?
Today is an important day for us! Just yesterday we assembled the equipment for stabilization and today we will try it out. Along the way, we’ll look at the currently popular impregnations and answer the question: “How to stabilize wood at home?” Well, and most importantly, let’s get acquainted with the stabilization process “live”.
I will say right away that in order to stabilize wood it is not necessary to have a vacuum chamber and other related equipment. At the moment, it is easy to find sellers on the Internet offering modern polymer impregnations that independently and easily penetrate the pores of the workpiece. To stabilize in such solutions, it is necessary to immerse the workpiece in them and leave it... for 1.5-2 weeks (!). The only condition is that the wood must be sufficiently dry and the material itself sufficiently porous. Hard wood cannot be stabilized in this way.
We will check today if this is actually true. And we stabilize the walnut bars in two ways - using a vacuum chamber and without. But if in the first case we will see the result today, then in the absence of vacuum equipment the result will have to wait.
How to stabilize wood at home?
So we come to the most important thing, namely a review of modern and popular polymer impregnations presented today on the Internet.
This is an impregnating composition based on dimethacrylic polyester, which quickly polymerizes at a temperature of (95±5) ºС to form a thermosetting polymer. This composition was developed to seal micropores and microcracks, preventing internal corrosion in products made of ferrous and non-ferrous metals produced by casting or powder metallurgy.
However, high penetrating ability, non-shrinkage polymerization and the final properties of the resulting polymer, namely its high strength and chemical resistance, combined with operating temperatures from -60 ºС to +180 ºС, made the use of Anacrol-90 very interesting for the stabilization/preservation of wood .
This is a clear liquid stabilizing agent made from four thermosetting polymers with a simplified solid state reaction; a product created specifically for the highest quality stabilization of wood, horn and other natural materials.
100TERM is easy to use both within the walls of a professional laboratory and in an amateur workshop.
An effective non-toxic product for safe impregnation and stabilization (wood, textiles, paper, carbon fiber, fiberglass, leather, horn, fur, cones, corn leaves, etc.)
Polymer for wood stabilization. Private development. To be honest, we haven’t tried it at work yet. Implemented through the VK group, you can also see examples of stabilization based on Buravid there.
Application of polymers
Buravit Expert acts as polymers for stabilizing wood. This one-component substance eliminates problems with dosing and mixing the activator. The composition is characterized by high penetrating abilities. After baking, it becomes harder and denser, allowing the stabilized bars to reduce moisture absorption.
“Buravit” for stabilizing wood has a transparent color. Its viscosity and density can be compared with the density and viscosity of water. The polymerization temperature reaches 90 °C. In the process, it becomes harder and denser. You can use the substance at home. It contains optical additives that highlight the structure of wood.
How else can you stabilize wood?
There are a lot of options. You can use:
- any oils that can polymerize: flaxseed, poppy seed, nut, hemp, acacia;
- natural wax: beeswax, carnauba;
- boiling in coniferous resin;
- varnishes, drying oil, epoxy resin.
All of the compositions listed above will answer your question: “How to stabilize wood at home?”
The process that we will consider below is based on vacuum impregnation with Anacrol impregnating composition, and is also suitable for impregnation with other polymers and natural oils.
Using salt for stabilization
To prevent cracking and warping of wood, you need to prepare a tablespoon of salt per 1 liter of water. Some masters use different concentrations. The wood will need to be boiled in salt water until the active release of foam stops. This will indicate that the material is ready.
Stabilizing wood at home at the next stage involves drying the workpieces. They must be removed from the liquid and left at room temperature. If there is a stove, then the elements can be placed on top of the firebox. In just three days you will receive stabilized material.
Some craftsmen claim that the cherries will need to be dried for a very long time, sometimes this process takes up to 2 years. Stabilized wood and regular wood will differ in appearance. The part that was in the brine will darken a little. You can scrape and sand the surface. Color shades can be evened out. Wood sometimes takes on a pearlescent tint.
Let's move directly to the stabilization process
How do we know that in both cases the stabilization process was successful?
- Firstly, in case of successful impregnation, the bars must be completely immersed in the solution, i.e. drown in it.
For now they are floating freely with us)
- Secondly, we will control the quality of impregnation by control weighing of the bars before impregnation, after impregnation and after polymerization of the compositions.
- Thirdly, we will carry out the final stabilization process, namely drying and hardening of the polymer in different ways: in the oven and by cooking in boiling water.
Instructions for use
The stabilization process with the substance described above includes two stages: impregnation and heat treatment. The impregnation method is selected depending on the type of wood you will be working with. The most accessible and simple technology is natural impregnation. The bars are immersed in a container with a substance, and the effect is carried out naturally due to the capillary effect.
Stabilization of wood with Anacrol at this stage takes up to 2 weeks. The tree stops absorbing the substance, after which the finished bars sink. It is recommended to monitor absorption using a scale, as some samples may not sink due to physical properties or the presence of closed pores. During this time, almost any tree will be soaked to its full depth.
Wood stabilization liquid can also be used for vacuum impregnation. A special camera is used for this. The bars are completely immersed in a container, which is sent to the chamber. Air is pumped out of it. Due to the abundance of oxygen coming out of the bars, the composition begins to boil. The process ends, and then the products are kept in this state for about 60 minutes. After the return of atmospheric pressure, the bar is not removed, but remains in the liquid for another day.
Go!
Our experimental material is four blocks of walnut. Input data:
- Bar No. 1: initial weight 122 g; stabilization in the composition of Anacrol (without dye); soaking in polymer without using vacuum equipment for 1.5 weeks; the final process is an oven at 100 degrees Celsius for 1.5 hours.
- Bar No. 2: initial weight 116 g; stabilization in the composition of Anacrol (without dye); soaking in polymer without using vacuum equipment for 1.5 weeks; the final process is cooking in boiling water at 100 degrees Celsius for 1.5 hours.
- Bar No. 3: initial weight 112 g; stabilization with Anacrol (red dye) using vacuum equipment; the final process is an oven at 100 degrees Celsius for 1.5 hours.
- Bar No. 4: initial weight 110 g; stabilization with Anacrol (brown dye) using vacuum equipment; the final process is cooking in boiling water at 100 degrees Celsius for 1.5 hours.
Why do we weigh bars? Not only to understand that the wood has absorbed the composition. If you plan to engage in commercial stabilization, then by weighing the bar “before and after”, determine how much of the impregnating composition it has absorbed, thereby obtaining one of its cost values.
For our purposes, we will use identical plastic containers, which we will number in accordance with the markings of the bars.
Stage 2
1/ Soak bars No. 3 and No. 4 in Anacrol for 1 hour (let them get used to it)).
2/ Then we immerse them in a vacuum chamber and pump out the air.
3/ Vacuum until the end of the boil (about 30 minutes).
4/ Let stand at normal pressure for 30 minutes.
5/ Repeat processes No. 2, 3 and 4 two or three times. If everything is done correctly, then when the bars are completely impregnated, they should completely sink in the impregnating composition.
That's all for today. Tomorrow we will weigh the bars again, determine how much of the composition they have absorbed, and also move on to
"COLLECTIVE FARM" STABILIZATION
0) I weigh the absolutely dry block (let it dry even if the hygrometer is at 0!) and write it down. 1) cut the plastic bottle to the desired height. A bottle without a “waist” so that the bar fits tightly into it. 2) I don’t pour a lot of liquid into this bottle - so that the bar floats but does not rise above the cut. If the block is pushed in tightly, it should be immersed 1/2-2/3. The top of the block must remain dry - this is important! 3) I put the resulting 1 liter jar (800 ml, 1.5 liter - whatever is available and fits the size) 4) I pump out the air 5) after the liquid rises through the capillaries to the very top of the bar, I release the vacuum and add liquid so that the bar is completely immersed . You may need to weigh it down with a weight. 6) I give a vacuum. As soon as it stops bubbling, I reset it, keep it under a layer of liquid for an hour and vacuum again. Repeat the cycle until completely saturated. Indicators that impregnation is complete: 1) the block has sunk (not necessary, some rocks do not sink) 2) during the next vacuum cycle there are absolutely no air bubbles. 3) when weighing, you can see that you have gained from 30 to 120 grams of slurry (depending on the initial density, say for wenge and zebrawood it is usually 40-60 grams per standard, and birch sleeper can gain 150) You can start maintenance . THEN 1) I let the block flow around on the grill or wipe it with a paper napkin 2) I wrap the block tightly in aluminum foil. I make sure that the foil sticks to the bar and that there are no bubbles left. After this, you can secure the foil with tape and put it in the oven for 100-120c. But I continue. 3) I wrap it in stretch film - tightly, hermetically but in no more than 2 layers. 4) on top of the stretch - tape. Wide. Dense, airtight but no more than 2 layers. I cook in a pressure cooker - 1 hour. Sometimes even half an hour is enough if it’s small. But you can just do it in a saucepan, but it takes two hours. And someone says 3... Depends on the liquid. I take it out, peel it, weigh it. For poplar, I repeat everything from the very beginning, from drying and impregnation. A labor-intensive but very interesting process. Py. Sy. If you have a stove, it’s much easier. If the vacuum cleaner is not manual, it’s even easier. The camera makes it even easier. A chamber holding pressure and a compressor do not simplify things, but they speed things up significantly, improve quality and allow you to stabilize denser and more interesting rocks.
Wood stabilization at home
Among wood processing technologies, one of the most interesting and exciting aspects is giving the workpiece strength and resistance to negative environmental influences. Traditionally, several treatment options are used at home - applying a protective layer and impregnation with conservation formulations. But as practice shows, such methods do not give much effect; after 2-3 years you have to correct coating defects and re-do the treatment. This state of affairs often prompts the search for new solutions to the problem of protecting wood products, for example, such a method as stabilizing wood at home.
General information
We are talking about manual processing with special compounds. They strengthen the fibers, making them stronger, stronger and more durable. The main thing is that stabilization reliably protects the wood from moisture - even prolonged contact with liquid does not cause harm. The wood becomes like stone, and still retains its natural beauty.
What is wood stabilization
Such a process will represent a certain conservation. Processes in the wood structure stop from the inside, and the product will forever remain the same as during stabilization. Due to the high cost of consumables, time and complexity, this procedure is almost never used on an industrial scale, but
Perfect for processing small-sized products:
- Crafts.
- Furniture items.
- Toys.
- Exterior/interior items.
- Knife handles.
Now a little about what the goals of the process are.
Basic goals
The main task is to protect wood from the negative effects of moisture. After impregnation, the fibers will become impervious to various liquids and chemical treatments. They will not grow, will not lose their performance characteristics, and will retain their color and shape. Such a procedure will not just be impregnation, but will fill the available space between the fibers.
To do this, use protective compounds that clog the pores. Stabilization will help improve the consumer properties of wood. The best effect can be achieved with compounds that have the ability to polymerize. Most often, polymers, natural resins, various oils and paints and varnishes are used for this.
Cured type material properties
Proper impregnation at home helps achieve the following results:
- The wood will receive an increased level of strength.
- The density of the fibers will increase - fewer cavities and voids will appear in the structure.
- The products will become immune to external influences, sudden temperature changes, and increased air humidity.
- The surface will become resistant to ultraviolet rays. It will not fade under the influence of direct rays of the sun, and will remain amazingly beautiful.
- Crafts and furniture are insensitive to short-term flame exposure. Strong heating will not lead to deformation.
- The high level of density will prevent oils and various solvents from entering directly into the structure.
Despite this, wood treated in this way will remain pliable to mechanical processing. It can be ground, sawed, sanded, cut and polished. This will expand the possibilities for creating decorative products.
Advantages of the procedure
Stabilizing wood at home, unlike other methods of wood processing, makes it possible to achieve a long-lasting effect. Varnishing, for example, will create a protective layer only on the surface, and filling the pores with compounds with polymerization properties ensures ideal processing throughout the entire structure, and strengthens it outside and inside. As a result, the wood will become more protected from external factors.
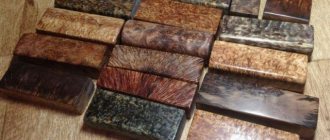
Note that there is another unusual factor. The structure of the stabilized material is more reminiscent of natural stone. Its cut pattern is similar to marble, and the process of filling the pores with a specially chosen product will have an impact here.
What is wood stabilization
In the process of mechanical processing of wood, various techniques and methods are used - sawing, planing, grinding, carving. During all this work, the natural order of the fibers is disrupted. Some of the fibers are revealed along the entire length, some are broken in the cross section. As a result, after all the manipulations, a product of the desired shape is obtained. But along with obtaining the desired shape, the tree itself becomes even more unprotected from external influences. Treated fibers will still retain the ability to absorb moisture, which can lead to the development of fungal infections and rot.
This state of affairs can only be changed by resorting to the use of stabilization technology or treating the wood with a special composition that can penetrate deep into the pores and literally clog the pores. The wood stabilization process is complex in nature. In the process of stabilization, wood acquires not only qualities that increase its strength and hardness, but also a more interesting appearance.
Main goals of stabilization
Despite the laboriousness of the process and the rather long time that will be spent on stabilization, the result will ensure ease of processing of the workpiece. Thus, during processing, special compositions make it possible to achieve the following material properties:
- Increase the density and hardness of wood;
- Ensure resistance to moisture, pressure and temperature changes, protect from ultraviolet radiation;
- The tree becomes resistant to high temperatures and open flames;
- Materials impregnated with polymers adhere better to paint and varnish coatings;
- The wood becomes impenetrable to biological pests;
- Fibers impregnated with polymer are no longer subject to deformation, wood becomes easier to process and glue;
- When processing manually and instrumentally, you can get a better result - the material changes its properties, it becomes easier to process.
Concept and goals of wood stabilization
Stabilization of wood is understood as a forced effect on the material, implying a certain kind of conservation of the natural structure.
The object is treated with various substances, the particles of which penetrate into the thickness of the wood and fill the voids between the fibers. Subsequently, the stabilizing composition hardens, increasing the strength of the wood and its resistance to negative external influences.
Additionally, the presence of foreign substances inside the material leads to improved aesthetic characteristics. The wood becomes more pronounced, brighter in pattern and color. The natural appearance does not suffer as a result of processing.
It is useful to stabilize wood to achieve the following effects:
- increased strength;
- achieving resistance to the effects of ultraviolet radiation and moisture;
- resistance to temperature changes;
- reducing susceptibility to combustion with minimal exposure to flame;
- resistance to damage by biological parasites.
There are different ways to stabilize wood. This is a complex technology that requires time and compliance with various nuances. Without experience, they often perform simplified processing options.
In any case, before starting work, it is important to carefully familiarize yourself with the chosen technology and the features of its implementation.
Stabilization methods
Today, for work at home, the same methods are used for processing wood in industrial installations. The process itself can be roughly divided into two stages. The first stage is called impregnation and consists of saturating the fibers with a special composition. During impregnation, the air in the cellulose tubes is displaced and replaced with a polymer composition. The second stage consists of polymerization of the composition, as a result of which the qualities of the wood fibers change.
To apply one or another stabilization method, the optimal composition of substances and work technology are selected. At home, the following wood processing methods are most often used:
- Cold impregnation is the easiest and most reliable way for beginning craftsmen to get a good result. The essence of the method is to soak the wood in a preservative solution or substance. For impregnation, natural oils are most often used - hemp, nut or linseed. The process lasts from 72 hours to 3-4 weeks. Oils are used both in pure form and with the addition of dye to give the material the required color. The convenience of the method lies in its simplicity; all operations are performed without special equipment.
- The hot impregnation method is used for deep penetration of the preservative substance into the layer of material. The complexity of the operation lies in the need to maintain a high temperature of the solution in the impregnation bath for several days.
- Using a vacuum to process wood allows you to obtain a material more saturated with polymers and almost completely remove air from the fibers. This method, unlike the previous ones, requires special equipment - a vacuum chamber and a compressor, which makes it more expensive.
- Pressure treatment is similar to the previous method, with the only difference being that air is removed from the fibers not by vacuum, but by excess pressure. During the processing process, the workpiece is filled with a liquid polymer solution and placed in a chamber to create excess pressure. The period of such processing can last from 12 hours to several days.
Polymerization of substances occurs in different ways - for some, drying at normal temperatures is sufficient, for others this process must occur at elevated temperatures or under the influence of other factors, for example, ultraviolet radiation.
Plant stabilization for lazy romantics. Well, geeks too
Roses in a flask are the most popular souvenir from stabilized plants. I think this is a very cool story when you gave flowers, and they don’t fade for a whole year!
The stabilized plant resembles a freshly cut flower more than a mummified carcass from a herbarium. It remains elastic - you can touch it without fear that the plant will crumble when touched.
There is no miracle at the heart of stabilization: the usual laws of physics and biochemistry, simple ingredients and wide scope for experimentation. Although manufacturers still have their secrets.
Recently, in the Belgorod city Boiling Point, a meeting was held with the owners of a herbal studio. It was about stabilized plants and their use in the interior. This is a great topic that we decided to delve into and figure out why and under what conditions moss or a sprig of lavender can remain fresh for years.
A little history
Stabilization is the replacement of plant juices with a special preservative solution that inhibits the process of cell death and destruction. Typically, glycerin is used as such a solution, but there are other options: paraffin, gelatin, wax, saline solutions.
Composition with tinted stabilized moss
The first stabilized plants appeared a long time ago. Putting a freshly cut flower in a highly salty solution or dipping a rose in paraffin - this could have been thought of both in the Middle Ages and in some Bronze Age. But it was only in the 20th century that it was possible to use a scientific approach and refine the stabilization technology.
The developers of the technology are considered to be the spouses Jeanette and Paul Lambert, who in the 70s created an industrial method for preserving cut flowers. But they started with lichen.
The Lamberts drew attention to the ability of moss to live on any surfaces and soils, even on bare stones. The fact is that lichen has no roots, and it absorbs moisture with the minerals it needs over its entire surface. When dryness sets in, the moss dries out, but when moisture appears, it returns to its previous state.
If moss can do it, why not repeat this trick with rootless flowers? And why not saturate them not with water, but with something else that does not evaporate so quickly? The couple began trying different liquids. Soon they managed to obtain stabilized moss, and then flowers.
The Lamberts moved from Belgium to Kenya, started a flower plantation and plunged into experimentation. As a result, in 1981 they filed a patent for stabilizing plants using a glycerin solution.
Kenyan workers at the Vermont Flowers EPZ stabilized plant factory, Nairobi, 2011. REUTERS/Thomas Mukoya
Basic stabilization algorithm
To obtain a good result, the Lamberts found the correct algorithm for producing stabilized colors.
First, plants need to be cut at their peak. Plants that are too young have a weak structure, while old plants have reduced permeability.
Second: it is necessary to minimize contact with the external environment and moisture loss before processing. To do this, immediately after cutting, the plants are placed in sealed containers and protected from sunlight.
Third: partial dehydration is necessary to make the plant “want to drink.” And after that, let him drink plenty of the stabilizing glycerin solution. This procedure lasts several weeks. A sign of complete replacement of water will be glycerin “tears” that appear on the surface of the leaves.
Behind the apparent simplicity of the process are hidden nuances on which the appearance and durability of the stabilized plant depend. How, with what and for how long to dry? What concentration should you make the glycerin solution and what components should you add to it to speed up the process, enhance preservation and give the desired color? The search for the optimal option continues to this day.
A simple experiment at home
You can easily make a stabilized plant at home. Take, for example, a freshly cut rose up to 50 cm long. Leave it for several hours in an empty container to pre-dry from surface moisture. To do this, you can take an ordinary vase, and during the process make sure that the plant does not begin to wither. Then we prepare a solution of water and glycerin in a 1:1 ratio, add dye there (you can take regular brilliant green). It is needed to give the plant a brighter shade. Then we cut the stem a couple of centimeters and put it in the solution. Cover the top of the container with the flower with cotton wool or cloth to reduce evaporation.
All that remains is to shorten the stem a little during the first week so that the plant continues to absorb the solution. In 2–3 weeks the rose will be completely ready. All that remains is to pull it out and hang it down with the bud to dry for a couple of days. It is mothballed for the next year. It looks like a miracle, but not for those who remember physics, chemistry and botany at least as part of the school curriculum.
A little physics and chemistry: why plants wither
Let's remember: water accounts for up to 90% of the mass of plants. Water rises from the roots through xylem vessels and approaches each cell. Mature plant cells have a large central vacuole containing water with nutrients dissolved in it. It is this vacuole that is tightly pressed against the cell wall and “holds its shape” in leaves, stems and buds.
Due to self-regulation mechanisms, plants are able to maintain a constant level of water content, continuously absorbing water and evaporating it.
The release of water vapor by a plant into the atmosphere through leaves and petals is called transpiration. Water evaporates from the surface of wet cells, seeps through the intercellular space and exits through open stomata on the surface of the leaves or the cuticle.
Stabilized lavender
In a cut plant, even immediately immersed in water, the natural processes of water movement are disrupted.
The cut stem does not provide the same osmotic pressure as the root; the channels on the cut line clog the air and are populated by microorganisms. All this shifts the water balance, and the plant begins to lose more moisture than it receives.
The lack of nutrients and mineral salts needed by the plant in the water also affects it. As a result, plant cells consume the reserve that is in the vacuoles, their strength decreases, and the plants wither.
On the left is a rose in ordinary water, on the right is in a stabilizing solution
To extend the life of a plant, you can go in different ways: provide it with water, supply nutrients, slow down the process of moisture evaporation. Glycerin acts in all directions at once.
How does glycerin work?
Glycerol is the simplest trihydric alcohol with the formula C3H5(OH)3. It looks like a viscous transparent liquid and is non-toxic. With water it creates an ideal mixture in any concentration. At the same time, it is very hygroscopic: pure glycerin is capable of drawing up to 40% of its own water from the atmosphere. At room temperature it evaporates very slowly.
If we dip a plant in almost undiluted glycerin, we get the opposite effect - the alcohol will draw out all the water it can reach from the plant. But if you use a solution in a concentration of 1:1 or more diluted, glycerin will quietly and peacefully penetrate into all cells and greatly inhibit water loss.
In addition, the plant uses glycerin as an energy source, breaking it down into carbon dioxide and water. This is very useful, since photosynthesis no longer works in a stabilized plant.
Other preservation methods
The glycerin preservation method has three weaknesses.
First: it’s long, the whole process takes about a month.
Second: glycerin is a breeding ground for a number of bacteria, so containers with it must be cleaned and the solution changed.
Third: like a decent alcohol, glycerin is flammable - a flash is possible already at a temperature of 150 ° C, and spontaneous combustion is possible at 260 ° C.
To speed up the process, denatured alcohol and acetone are added to the solution.
The standard solution for chemical preservation is a solution of alcohol, acetone and glycerin in a ratio of 1:1:2. The soaking period is reduced to 6–10 days.
But, frankly speaking, the result of such conservation can hardly be called environmentally friendly.
Composition with stabilized moss, Belgorod studio Mossty
One of the latest patents in this area - RU 2 698 058 C1 - was received by our compatriot in 2022. She suggests the following procedure for processing plants:
- First, we immerse the plants for 24 hours in sealed containers with distilled water and a set of sugars in a ratio of 10:1 at a temperature of 15–30 °C.
- Then for bleaching for another 24 hours - in sealed containers with an aqueous solution of hydrogen peroxide in a ratio of 3:10, then for another 48 hours in a 10-15% aqueous solution of titanium dioxide.
- Then, for 72 hours, we immerse the plants in sealed containers with a preservative solution containing glycerin and acetylated lanolin in a 1:1 ratio, as well as dye at 25–40 °C.
- The last operation is drying at 20–80 °C. Total 7–8 days.
To protect glycerin from bacteria, preservatives are used, including phenols, sodium benzoate, formalin and alcohols. The ingredient and its concentration is the know-how of every manufacturer of stabilized plants.
To produce non-flammable stabilized plants, mineral salt solutions without glycerin are used, but the physics and chemistry of the process and the result are completely different. The plants are tougher and less vibrant.
As for phytostudios, almost all of them purchase ready-made stabilized moss from manufacturers. Here's what Alexander Kremensky, co-owner of the Belgorod studio, says:
“Lavender is from Holland, moss is from the north, Russian. We tried the Scandinavian one, but the Russian one is much better: it’s prettier, cleaner, has bigger caps, and is native. Recently, “atmospheric moss” has appeared - it can even be used outdoors. He is not afraid of snow, rain, cold weather. But it feels a little harder.”
What can be stabilized
Stabilization gives good results when working with lichens (moss moss), mosses (tussock-bryozoan, for example), miniature trees and flowers with strong elastic stems and buds. Plants such as dandelion, lily of the valley, peony, and sunflower are not suitable for saturation with glycerin.
Some plants change color when soaked. Eucalyptus turns greenish-brown, beech leaves turn black, and sweet olives, loquats and magnolias turn brown. The colors of other plants lose their saturation. Therefore, plants are often first bleached and then dye is added to the glycerin solution.
Among mosses and lichens, the most spectacular species are those of the genus Cladonia (Cladonia stellaris), better known as “reindeer moss” or reindeer moss. In nature, reindeer moss is white-gray in color, so it can be easily painted in almost any shade. The most popular are shades of green. But people prefer flowers in natural colors.
How long do plants keep their appearance?
Depends on conditions and care. With mosses it lasts from two to ten years. But some creators claim that they will live to 50. Roses - two years or less. If in a flask, then usually three to five, although some manufacturers promise as many as seven. In the latter case, the process of stabilizing roses is more complex, where the stem and the flower itself are processed separately.
What is this all for?
A stabilized plant lives for several years; it does not need to be planted in the ground, fed, or watered. It looks like it was just cut and even smells a little.
Now installations from such plants are very popular. Many restaurants have “freshly cut” flowers on the tables. And entire walls made of stabilized moss began to appear in offices.
However, there are a few important points to consider when using stabilized plants in your design.
First : they cannot be watered. The water will begin to wash the glycerin out of the flower, and it will spoil.
Second : do not place it in direct sunlight. The sun starts the decay process and increases the evaporation of glycerin, the flower or moss will dry out.
And third : keep your composition away from open fire. One stray coal will be enough to create a small “eco-badboom”.
Interestingly, stabilized moss can serve as an indicator of indoor humidity. If everything is ok, it will be soft and bright. And if the air is too dry, it will begin to change color and harden. In this case, it is enough to turn on the humidifier, and the moss will recover: the glycerin itself will draw the moisture necessary for the plant from the air.
Another interesting property of stabilized plants is that they are antistatic, so dust does not easily settle on them.
This is also the merit of glycerin: it creates a thin film of water on the surface of the leaves, along which charges flow.
In general, conservation technology has not yet reached its maximum development, so we can expect new discoveries in this area. But the current level is quite enough to give roses to your wife and then tell her for a whole year that they will not fade, because they were given with love. The main thing is that she doesn’t start watering them.
Stabilizing compounds for wood
To achieve the desired result at home, several types of substances are used to stabilize wood. Conventionally, classification can be carried out according to several criteria, for example, by the origin of substances or by the method of their use. If we take as a basis the classification according to the type of origin of substances for stabilization, then the classification will have the following form:
- Materials of natural origin - saline solution, birch sap, linseed, nut or hemp oil, drying oil based on vegetable raw materials;
- Materials based on petroleum products – petroleum drying oil and oil impregnations based on it;
- Synthetic materials - epoxy resin and other polymer compounds.
According to their composition, impregnations can be single-component or multi-component. For example, the drug "Buravid" is a one-component polymer solution that does not require additional preparation before use. And epoxy resin is a two-component composition - the resin itself and a hardener, without which the polymerization process does not occur.
Polymer compositions
Modern polyester oils are most often used for the manufacture of polymer impregnations of wood. These compositions based on one-component oils provide stabilization of wood with deep penetration and reliable fixation. Most formulations use vacuum impregnation and pressure treatment technologies, followed by thermal polymerization at a temperature of 100-150 degrees.
During the impregnation process, liquid polymer compositions are used, and during heat treatment, the polymer changes its physical state throughout the entire depth of the wood structure. Among the most popular compositions today for stabilizing wood at home, we can recommend Anacrol-90, 100term, Buravid, and Pentacryl.
What happens during stabilization
After reviewing the information above, you were able to understand that the external appearance of the material changes after stabilization. If you are interested in what processes occur inside, then you can remember that wood is a mixture of ether-containing components, lignin and cellulose.
The first component of coniferous species is resin. Rosin and turpentine are made from it. As for grenadil, this ingredient makes up an oil with a specific taste and smell. If you want to understand why the material “relaxes” after stabilizing wood at home, you can imagine cellulose as reinforcement, while lignin becomes concrete.
Exposure to temperature will destroy the bond between these materials, as a result of which reinforced concrete becomes plastic. Internal tension will be relieved. Salt plays a rather important role in this. It makes the boiling point above 100 °C, which is enough to destroy the cell membranes of wood.
Step-by-step instructions for stabilizing wood
A step-by-step instruction on the method of vacuum impregnation followed by thermal polymerization will help you visualize the process of stabilizing wood at home. This is one of the most complex processes that requires special equipment - a vacuum chamber. But, despite the apparent complexity, all work can be carried out in a home workshop, and at the same time obtain a fairly high result in processing workpieces.
To work here, the available polymer material “Buravid” is used, and the vacuum chamber uses a regular compressor from a household refrigerator, so you can assemble such a unit yourself.
Two birch bars were selected for the work; the material had previously undergone slight processing - the edges were aligned and a chamfer was made. Drying was carried out at normal room temperature.
For work, we use Buravid impregnation, a ready-to-use polymer product.
The samples are placed in a container and filled with impregnation.
In order for the impregnation to proceed evenly, the bars are pressed with a weight; in this case, a nut from a cylinder is used.
To obtain a pleasant shade, you can use a special pigment dye, but in this case the processing will be carried out without dye, in order to clearly understand how the color of the wood will change only under the influence of the polymer.
Even before placing the container in the vacuum chamber, the process of replacing air with polymer begins - the figure shows how air bubbles begin to escape from the birch suvel.
The container is placed in a vacuum chamber. After closing the lid, the compressor turns on and a rarefied space is created in the chamber.
Through the viewing glass of the camera you can see air leaving the wood in bubbles.
After 72 hours, the bars are removed from the chamber. This is the appearance of birch suvel.
And this is what a board made of ordinary birch looks like.
The next stage is baking the polymer at a temperature of 100 degrees.
To prevent the reaction of impregnation and hot air, it is necessary to make a protective coating. To do this, take cling film, on top of which the bars are wrapped in aluminum foil.
The packaging is placed in a metal tray and placed in a gas oven preheated to 100 degrees for 1 hour.
This is the appearance of a birch block.
And this is birch suvel. Visible cracks appeared on the surface in places where the fibers had low density. Cracks can later be repaired with epoxy. But where the fibers initially had a high density, the polymerized composition of Burovid gave the material high density and strength.
Before the work began, the birch block weighed 101 grams, and after polymerization its weight became 194.5 grams. Before stabilization, birch suvel weighed 225 grams, and after polymerization of the resin it began to weigh 335.1 grams.
Application of stabilized wood
The process of stabilizing wood can significantly simplify the creation of many items with wooden inserts and elements. In practice, the use of stabilization makes it possible to use soft types of wood for the manufacture of tool handles. This material makes comfortable handles for files; the handles of cutters and chisels are not afraid of impacts, and they last much longer than handles made of soft wood. Stabilized wood is also great for making knives. Wooden overlays are durable and comfortable.
Stabilization techniques are also used by master gunsmiths - stabilized wood makes excellent stocks and butts for guns. Moreover, stabilization is often used by master modelers; it is from this material that models of sailing ships and historical ships are made.
Wood stabilization technology is also indispensable for furniture makers; almost all furniture parts made of natural wood require such impregnation. Thanks to stabilization, products last much longer, because wood impregnated with polymer resin is not subject to warping or changing shape.
Source
Compositions for stabilization
Various compositions and technologies are used to stabilize wood. The choice depends on the complexity of processing, cost and time. To decide, you need to carefully read all the possible options.
Anacrol
The most popular option among professional chemical compounds for stabilizing wood is Anacrol. This is a specialized polymer that is designed specifically for the procedure.
Use involves processing wood exclusively using a vacuum chamber. This is more like an industrial method of influence. You can assemble the vacuum chamber yourself. For this you need:
- Vacuum pump;
- compressor;
- pressure gauge;
- tubes;
- taps;
- plastic containers.
Anacrol is considered a polyester impregnation that acts properly when the temperature rises. A transition to a thermosetting state occurs. The polymer hardens between the wood fibers, improving the natural characteristics of the material. As a result of processing, wood becomes resistant to chemicals, strong impacts, and other negative effects.
Buravid
They like to carry out professional stabilization of wood using Buravid. It contains optical pigments that promote the polymerization process. The substance has a slight viscosity, without interfering with the desired reaction. Buravid easily penetrates into the thickness of the material, filling even the smallest pores.
The result of processing is a more impressive appearance: a distinct natural pattern, a more expressive natural shade. Additionally, the wood becomes resistant to biological contamination.
Resin
Epoxy resin is great for stabilizing wood. This product will help you get an excellent decorative effect.
It is better to perform the procedure using deciduous wood; coniferous wood is not suitable.
The difficulty of working with this substance lies in its difficult fluidity. To use the composition, you must additionally add alcohol.
Birch juice
Surprisingly, even birch sap can be used to stabilize wood. This is a natural product that does not contain harmful ingredients. This option is ideal for affecting items that are going to be used in contact with food, for children's household items.
Birch sap will not give a very bright effect. The appearance of the wood, as well as its natural qualities, will change slightly, but positive changes will still be noticeable. To increase penetration force and efficiency, it is useful to carry out the procedure using a vacuum chamber. Drying at a temperature of 90 degrees will help secure the result.
If you add natural coloring substances to the juice, the decorative effect will noticeably increase.
