Tool design
The device has a simple design . The basis is a functional module, which consists of:
- working circle, electric motor with gearbox;
- handles with switch.
This module is attached to a special base. When making this device at home, you need to take into account that the electric motor can be used of two types: either commutator or asynchronous. The latter work much quieter, and are also characterized by greater practicality and endurance.
As for the electric motor , it is installed on the right side of the saw wheel. Although on the market you can also find models in which the engine is installed behind the disk. This option is definitely more convenient, because the view is not blocked, which, by the way, is especially true when working with the instrument tilted.
The gearbox transmits (belt or gear) movements from the motor to the saw blade.
The gear drive operates easily without slipping even at maximum speed, while the belt drive is more practical, as it significantly reduces vibration and reduces sound.
It is worth noting that there are also models with direct transmission, which are the most reliable option. However, their torque is much lower.
What is a broach used for? It is thanks to the broaching mechanism that the miter saw has the ability to cut even the widest boards.
Since the saw is a rather dangerous cutting object, to prevent unexpected injuries, any manufacturer adds a protective casing to its design.
As for high-power devices, for greatest safety they are usually equipped with a soft start. Such a part is characterized by blocking of the torsion mechanism when replacing the wheel and a complete stop when the wheel is stopped.
Design and principle of operation
When considering the design features of wood trimming, it should be noted that a professional tool consists of the following main parts:
- mechanism base;
- saw (working) blade;
- motor with drive and gearbox;
- handle with a start button located on it.
The main load force in this mechanism falls on the disk blade, which is made of particularly durable materials.
Note! When working, any trimmer should always be placed on a strong, stable base, while the hand tool can be carried.
From the point of view of the structural design, special attention when choosing a wood trimmer is paid to the engine, which can have several designs.
Thus, in some cases, an asynchronous motor is installed in disk units, and sometimes preference is given to commutator drives. In the first case, the trimmer operates completely silently, and its service life is noticeably increased.
The positive side of commutator engines is their unpretentiousness in terms of maintenance and possible repairs. This main assembly of the cutting mechanism is usually located to the right of the disk, which ensures ease of operation of the entire device.
The functioning of a wood trimmer is based on the principle of transmitting a rotational impulse from the motor shaft through a gearbox to a cutting tool (similar to other mechanisms operating according to a drive circuit). Depending on the facing conditions and the material being processed, you can select a certain rotation speed and drive power.
Laser and electronic equipment
In rare cases, a miter saw with a broach contains electronic elements. However, there are models that are characterized by the presence of electronic speed control. Thanks to this, there is an excellent opportunity to control the work process.
In the modern world, many manufacturers strive for perfection and innovation, so they are increasingly introducing the most daring and expensive ideas. For example, laser guidance in a saw is an optional, but very useful and expensive option.
Using a laser, a clear cut line is drawn. This function is especially necessary for inexperienced craftsmen.
Video description
Incredible capabilities of the perfect miter saw.
High cutting accuracy thanks to laser marking and high-quality saw blade Source dasinstrument.com.ua
All saws for cutting lumber, regardless of the model, are divided not only into manual (portable) and stationary, but also standard and multifunctional. For example, in the top photo you see the German model Bosch PCM 8, which has laser markings, which allows you to cut lumber at a very precise angle, which is only possible for this modification of the tool. Multifunctional miter saws are much more expensive than standard models, and if you want a well-known brand, you will have to shell out some extra cash. But it's not a waste of money to work with a good quality miter saw - the investment results in cost savings.
Additional functions
In addition to the main functions, there may also be additional ones, such as:
- Dust removal is very necessary, because when working with a miter saw, you can notice the release of a large amount of wood dust, as well as sawdust. Thus, having this function, you can be sure that the garbage will be immediately removed from the point of release without further spreading throughout the room.
- Expanding the tabletop - this function is ideal for those who work with laminate or long bars.
Working with miter saws
Cutting down molded lumber using a miter saw significantly increases productivity Source gadgets-reviews.com
Miter saws are designed to accurately cut any lumber at a given angle (this is much more difficult to do with a hacksaw). Basically, such power tools are needed in enterprises producing and repairing furniture. However, work on a miter saw is performed by many home craftsmen and these are not necessarily top-class carpenters. Such a tool is needed both in everyday life and in industry.
Criteria for choosing a cross-cutting machine with broaching
In order for the purchase to bring only benefits, and the money is not wasted, before purchasing you need to decide:
- Why do you need a tool? After all, a saw with a broach is necessary when performing professional wide workpieces. If you plan to use it rarely, you can limit yourself to ordinary household-grade trimming.
- with the size and weight of the saw - it is also recommended to clarify the maximum free movement of the working head.
- what diameter of working disks is needed - it is worth noting that you need to choose based on a diameter of 0.2 m (but not less).
- How safe is the tool you are purchasing?
Also important parameters are the depth and width of the cut.
Setting up the trim and adjusting it
Proper setting and adjustment of the trim, including adjustment of the number of disk revolutions, will ensure the necessary accuracy when making cuts and will prevent you from receiving defective products. First of all, pay attention to the saw blade. Its seat and outer diameter, tooth sharpening and geometry must correspond to the material with which it will work. The drive and protective casing of the machine are designed for a specific blade size, and installing other sizes will negatively affect the sawing work and the operation of the product itself. Therefore, we carefully read the manufacturer’s recommendations specified in the operating instructions.
Reliable and high-quality installation of the side stop will help you adjust the saw correctly. It should have a right angle with the base or frame and fit tightly to it. It is necessary to make a chamfer so that the chips generated during the sawing operation are hidden there if it is not provided by the manufacturer. This way, sawing waste will not interfere with the formation of the desired cutting angle.
The next step is to check the rotation lock assembly. The fixing rod must fit tightly into the slot of the dial, which can be of a removable or stationary design. It has ready-made slots for frequently used angles, but for specially set ones they need reliable fixation. To do this, tighten the handle that fixes the tightening while pressing the key.
The 90° angle in the horizontal plane is set not using a square, but using a strip of at least 10 mm thick, double-sided tape and plywood. The last element is secured to the base with tape, and a rail is placed between it and the side stop. A control cut is made, from which the required angle is controlled using a side stop.
The bevel cutting angle is adjusted using two screws located at the rear of the machine structure at the bottom and top. The first one regulates the 90° angle, the second one controls the other sizes of the set angles.
Adjustment of fixed angles on miter saws must be carried out carefully and must be controlled with the appropriate tool.
Trimming with adjustable speed allows you to select the desired speed of movement of the saw blade in order to obtain a high-quality cutting line. For each material with which the device works, the number of revolutions is selected individually, and for experienced specialists this is achieved at the subconscious level.
Repairs can be carried out by the owner, provided that he understands its structure and has an idea of the principle of its operation; in all other cases, it is necessary to contact specialized workshops.
Simple cross-cutting machine
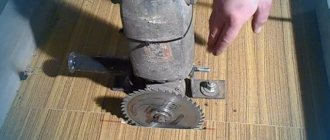
You can create a homemade wood cross-cutting machine at home. However, for this it is important to correctly draw up a diagram of the future structure and purchase materials for its creation. The main cutting tool can be a hand-held circular saw.
The most basic option for assembling a cross-cut tool for boards is to install hinges on the factory support of a circular saw. They are mounted on one side on the plane of the desktop. It can be chipboard or solid wood. Next you need to carry out the work in the following sequence:
- install hinges on the frame
- make a through hole on the work table for the circular saw to move
- mount a vertical metal stand with a bracket to secure the spring. The stand is needed to reduce the reverse force of the cutting device
- strengthen the spring to the stand and saw
- install a board clamp. For this, you can use any mechanical model created from scrap materials.
Be sure to take into account the maximum cutting depth of the wood. This indicator should not exceed the thickness of the support board. Trimming devices of this type have a main drawback - there is a limitation on the width of the workpiece being processed. To avoid this, it is worth making equipment with a pulling function.
To increase the depth of cut, you can create a full-fledged bed. Usually it is created from steel corners, and a metal sheet is used as a work table. The video will tell you in more detail how the cross-cut machine works.
Tools
It is unlikely that this is the most necessary tool in the home workshop until you decide to take up construction. But you should never renounce construction at your dacha.
When the ends of the boards are cut evenly and at the right angle, it is not only beautiful. The racks of a frame house, with strictly perpendicular ends, slopes that “give in” to the racks they pull together, this is not just beauty, but also higher strength of your entire structure.
Like any other tool, you can find a lot of information about miter saws on the Internet. This is a relatively expensive tool compared to a drill, jigsaw or screwdriver, so future buyers try to study this issue in detail before purchasing.
I will try to highlight the questions that arose for me after the purchase, during operation. I’ll say right away that today this is probably my favorite instrument, the motto of which is accuracy and quality.
The most important question, the answers to which should be well understood before purchasing a miter saw, is the size of the boards that you intend to cut with it (including in the future).
For example, if the maximum cutting depth is set at 10 centimeters, then you can insert an 11 centimeter (typical for our markets, poorly calibrated) beam into it, but you will not be able to cut it completely. You'll have to finish it off with a hand saw. But an 11.5 centimeter block may simply not fit into the working sector. The very design of moving the saw or pulling it will interfere.
It is clear that if you cut at an angle to the horizon, say 450, then with the same 10 centimeters of maximum cutting depth, you will be able to completely saw a block no more than 7 centimeters thick, or even less. After all, additional centimeters can be hidden by the protruding dimensions of the saw mechanism, which will protrude even more when the saw is tilted.
Thus, you most likely will not be able to cut a 10 cm beam (with a maximum cutting depth of 10 cm) at an angle. If... your saw does not have a “pull” function.
Broaching provides enormous benefits when working with large materials. Although within a relatively limited framework. You can cut even 10 by 20 timber, naturally along its longer side.
Therefore, before buying a saw, you need to try to imagine all the situations, what and how you will “put” into the miter saw to cut.
Speaking about the sizes of processed workpieces , one cannot fail to note two more significant points that are useful to pay attention to.
First . Miter saws were originally designed for use outside of Russia. Apparently, they were calculated for material that is measured in inches, not centimeters. In addition, they were designed to a certain standard. Our lumber is non-standard. That is, a 10 cm block can actually be from 9 to 11 cm, and have a cross section of a square about an exclusively curved parallelogram. So, having chosen a saw, for example, suitable for the size you need (10 cm), you will have to finish almost every block with a hacksaw. The standard blade size of 254 mm, which seems to be technically adapted for sawing 10-centimeter workpieces, will not suit you. It might make sense to get a saw with a 305 mm blade.
Second . I don’t know why, or perhaps for advertising purposes, but in the technical characteristics of miter saws, inverted concepts of angles are often used. For example, a normal person perceives a triangle with an angle of 300 like this:
The technical parameters of a miter saw often present such a cut as 600. So with a saw with the characteristics of possible cutting angles from 00 to 450, you will actually be able to cut wood at right angles, that is, from 900 to 450, and the “sharp” corners will be for you not available. If the ability to cut sharp corners is important to you, choose a saw with a cutting range from 00 to 600 – 700. Based on the purely technical characteristics from the pages of the online store, it is very difficult to really imagine the capabilities of a miter saw.
I think that this confusion with angles is, after all, purely an advertising trick by the manufacturers. So to speak, it is not entirely obvious and unprovable misleading of the buyer.
A saw is a very dangerous tool . I will not repeat the safety instructions. I would like to note the following:
First . The miter saw creates an amazing illusion of work safety. If there is some kind of hitch with the cut, then the hand reaches out to correct the situation, for example, to support the block or something like that. Remember this and try to control your movements. An attempt to grab and hold a falling object is often an unconscious and instinctive action for a person. It is important. Take my word for it.
Second . This is especially true when working with large materials. A miter saw, like a chainsaw, experiences kickback. A very unpleasant, unexpected and harsh thing. It happens quickly, like a shot. I caught it twice myself and try my best to avoid it.
A kickback occurs when the block is poorly secured, the “divergence” of the sawn wood to the sides after cutting is not thought through, and when it becomes possible to clamp the saw blade.
A similar phenomenon can occur when cutting with a “broach” if you try to move the saw blade mechanism back and forth, as if “grinding” the cut.
Saw only forward, away from you. Fasten the workpiece firmly, and place supports for the parts of the workpiece to be cut when they begin to move apart under the influence of gravity . If you feel that the cut is “stuck,” immediately turn off the saw and do not put your hands in it to correct the situation.
Workplace.
A miter saw without a properly organized workspace can be frustrating. A sturdy workbench is required to install it. For these purposes, I bought a workbench for a heavier tool - a thickness planer. Moreover, I screw the workbench legs to a heavy wooden pallet.
Now imagine that you have to cut a 6-meter 10-15 meter beam into pieces that are very precise in size. It’s a bit difficult to move such a beam on the workbench of a miter saw with just two people. But what do you do when you need to catch the cutting line with millimeter accuracy? Even if trestles and supports are installed for the timber? Chances are that when you move the beam, you will tilt the support post, the beam will be held in tension, and the blade will clamp at the end of the cut... which is very undesirable.
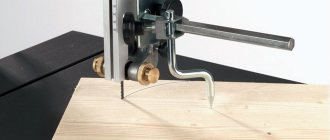
Here you need to be creative. Based on available space. For example, I made the following device. The beam can be easily moved back and forth by the efforts of one person on the rollers. To prevent the beam from jumping off the roller guide board, I added stops in the form of wooden frames cut with a jigsaw with rounded edges. It looks like this:
As a result, the trimming process is greatly facilitated.
Illumination of the workplace and laser marking of the cutting line.
In my understanding, these are purely advertising gadgets that are of little use. Judge for yourself, no matter how you design the saw, the radiation source (or its reflectors) must be located strictly on the cutting line, which it actually indicates. When the saw is operating, a dense stream of small sawdust flies, which almost instantly clogs all possible holes from which light can flow. Well, you cut two boards according to the laser markings, and then spit on it and that’s it. And yet, when the markup is visible, it’s nice:
Setting cutting angles.
I'll tell you right away. Where the cutting angle is set with fixation (a click is felt), the angles are set very accurately. The most important thing is that if you set the angle to 450 today, change it to 900 tomorrow, and return to 450 the day after tomorrow, all the workpieces will fit like a glove, no matter how many times you change the settings. If you use a “smooth scale”, for example, set the angle to 550, then after a while it will be difficult for you to repeat it with the amazing accuracy that you expect from a miter saw.
Morality. Either saw “non-standard” angles right away, without changing the saw settings, or strive to use angles with “rigid” fixation in your work.
There is one more problem with the cutting angles. Wood tends to dry out, curl up like a helicopter, crack... so don’t be under the illusion that the slopes you made will fit the posts well in a week. However, with a miter saw, such misunderstandings can be corrected quickly and efficiently. Measure the gap, use a marker to adjust the new alignment cut line and shorten your slope a little, by a few mm.
The sharp disk of a miter saw is capable of cutting wood into slices slightly thicker than an ordinary sheet of paper, almost transparent!
Clamp.
Definitely a very important part of a miter saw. When choosing a saw, pay attention to it. It should hold tightly, reliably, and be fixed easily and quickly. Subsequently, if you feel that you are spending a lot of “extra” time working with the clamp, you will try to avoid it, which is sometimes fraught! At least this is important for long and thick workpieces.
Despite the supports, rollers and other devices, I try to motivate myself to use the clamp:
If you decide to buy a miter saw, then you definitely need to feel it and personally turn all the adjustments with your hands. So, when buying in an online store, be sure to visit a regular one.
A miter saw is very convenient when working with small pieces of wood. The longer the workpieces, the more time it takes to carry them, unfold them with the opposite end, and the more difficult and routine the trimming procedure becomes. At such moments, you will inevitably face a choice of what is more important to you: a big loss of time, but maintaining excellent quality, or just take a chainsaw and... or even just use a device such as a “miter square”.
In conclusion, I will say that any tool should be kept clean. The miter saw becomes clogged with sawdust very quickly. Removing them is quite a long process. There are too many secluded places, various niches, and other easily clogged holes.
So, it’s difficult to do without blowing with a compressor: