Home >> >>
05.10.2017
For carpenters, boards and beams are the most common blanks, from which crafts and wood products are subsequently produced. And the first thing the material undergoes is sawing into pieces of the required length. At the same time, you should know how to saw off a board evenly, because performing this operation incorrectly can ruin the workpiece or significantly affect the appearance, and not for the better.
At large enterprises, the problem of how to saw off a beam or board evenly does not arise. Any serious production facility has high-precision equipment that performs this type of work. At home you have to make do with what you have on hand. At the same time, you still need to be able to use the tool or equipment correctly in order to saw off the board correctly, and the cut turns out without flaws.
Note that many enterprises that sell boards and timber provide cutting services. And for this they use the same specialized equipment, so the purchased material will be cut with high quality. But it is not always possible to use such a service, and it often happens that only one piece needs to be cut.
Rules for working with circular saws
Working with hand-held and stationary circular saws requires compliance with a certain sequence of actions, which we will consider below.
Manual models
If you have to work with a hand-held circular saw, then you first need to select a saw blade that matches the type of work ahead, adjust the cutting depth and tilt of the equipment. The cutting depth of a circular saw is set according to the following principle: the tooth of the saw blade must protrude from the workpiece either halfway or completely.
To work you should:
- secure the workpiece on the workbench using clamps (do not hold the workpiece with your hands);
- position the tool on the workpiece so that the saw blade does not touch it;
- start the engine of the unit and wait until the equipment reaches full speed;
- holding the device firmly in your hands, make sawing, pressing the sole of the hand saw to the workpiece;
- After finishing sawing, you should make sure that the casing has returned to its original position, after which you need to turn off the device.
Stationary models
To get started using a table saw, follow these steps:
- Select a saw blade of the required diameter that will match the parameters of the material being processed, and install it on the unit shaft. It is necessary to check the distance from the disk to the guide slots of the table using a dial meter or a regular caliper. You need to check the distance at the beginning and end of the disc. The maximum discrepancy should not exceed 0.05 mm.
- Adjust the required height of the blade over the workpiece. It should rise above it no more than the height of the cutting element.
- Set the rip fence at the required distance from the saw blade. The width (length) of the product that will be obtained after sawing the workpiece depends on this distance. It must also be strictly parallel to the grooves on the desktop (displacement no more than 0.05 mm).
- Install the riving knife. It should be about 5mm away from the cutters and in line with the saw blade. This can be easily checked using a ruler, placing it between the cutters of the equipment.
- Turn on the machine, wait for the engine to reach full speed, place the workpiece along the rip fence, then, pressing it against the table and the fence, cut.
Marking the cut line
To cut the material evenly with a jigsaw, you need to correctly mark the cutting line and securely fix the workpiece on the surface. If you have to work with a long blade, you should use a flat rail as a guide and two clamps to secure it and the working material. It is necessary to act in a certain sequence.
First you need to make markings on the chipboard using a ruler. To do this, the required distance is measured on both sides, the marks are connected, forming a cut line. To make a curly line, it is advisable to draw it on paper and then transfer it to wood using carbon paper, having previously sanded the surface.
To cut a circle with a jigsaw, markings are applied with a construction pencil or black marker to the surface using a pre-made stencil made of thick paper or cardboard. In this case, cutting the material begins by drilling a hole in the center. The blade should move from the center to the marking line, and then along the perimeter of the circle.
Important! A jigsaw is inherently designed for curved cuts; cutting it exactly in a straight line is quite difficult. You must constantly monitor the line and point the tool slightly to the side.
To avoid chips on the finished surface, the file during work is not guided along the mark, but near it. The laser guide on the jigsaw will help you cut smoothly.
How to set up a saw for an even cut?
The saw blade must be strictly perpendicular to the support platform. This can be seen both in the position of the disk and in the degree scale on the adjusting arc. If the disk is at an angle:
- The locking screw is released.
- The platform tilts to the desired position.
- The screw is fixed.
You should be more careful with tightening. On some models, over-tightening can strip the threads or break off the head.
Then it depends on how and what to cut.
across the board
When cutting in this way, the length of the workpiece must be accurate. Use a tape measure to measure the desired size. Two marks are made with a pencil (marker, sharp object) - at the beginning of the future cut and at the end. The marks are connected by a line. This is the place of the future cut.
On the front part (end) of the platform of each manual circular saw there is a notch. It is located opposite the disk and shows where the cut will go. The notch is aligned with the cut marking and sawed, making sure that the notch follows the marking.
Sometimes it is more convenient to make a marking strip not at the place of the cut, but along the left edge of the platform. Then it will be easier to control the accuracy of the cut. With this marking, the full length of the workpiece is marked, the saw blade is placed against it, and a mark is made on the left along the edge of the platform.
When sawing problematic workpieces (hard, thick, steamed or twisted wood with twisted fibers), there is a possibility that the blade will move away from the mark. In such cases, instead of a mark, a guide block is screwed from the edge of the platform with screws or pressed with clamps. They saw, pressing the platform to the block.
Board along
The easiest way is to make a cut along the entire length on an edged board. To do this, use a support bar on two rods, which is included in the delivery of most models. Also, it is also called a rip fence.
Rip fence
The rods are inserted into the eyes on the platform. Set the desired cutting width and secure the rods with screws. They saw by pressing the support bar against the edged board. Pencil markings are not needed.
They are required when you need to cut a wedge-shaped blank from an edged board (one end is wider, the other is narrower) and for cutting along or trimming the wane of an unedged board. In these cases, a circular saw is used to follow the markings, similar to the cross-cut described above. But we must remember that longitudinal cuts are many times longer than transverse ones.
At the same time, the engine operates with a fairly large load, especially on thick boards (35-50 mm). Therefore, they saw, moving the circular saw at such a speed that the engine does not lose speed, and the disk has time to select the wood and throw sawdust out of the cut.
SAW CROSSLY
For cutting at an angle, an aluminum corner 50 x 50 x 2 mm was useful. I press it with clamps to the board that needs to be sawed. In this case, it is necessary to take into account the distance from the edge of the saw base to the saw blade.
Instead of a corner, I sometimes used a rectangular aluminum profile 40 x 20 x 2 mm, 1 m long.
One day I found an old locksmith’s corner with a steel shelf in the barn. With its help, it turned out to be convenient to make cuts at right angles, since the shelf is well fixed at the edge of the board.
Circular saw – high performance and ease of use
A circular saw is the best option for performing the work. It has excellent productivity and allows you to cut a considerable number of workpieces in a relatively short time, and with high quality. In addition, such a saw allows you to make a longitudinal cut of the material, but you need to know how to cut the board straight along.
One of the most important criteria when choosing a circular saw is the maximum depth of cut. There are devices on the market that cut materials with a thickness of 30 to 130 mm. That is, you can choose a machine both for cutting only thin boards and for sawing bars.
It is also worth paying attention to the cutting tool itself. Discs with a large number of teeth will provide a neat, high-quality cut, while the cutting speed will be low
But discs with a small number of teeth will provide high productivity, but the quality of the cut will also be worse.
Now let's talk about how to cut smoothly with a circular saw. One of the conditions for high-quality performance of work is reliable fixation of the workpiece. If the material is loosely secured, the board may “move” when cutting, and the cut will be uneven.
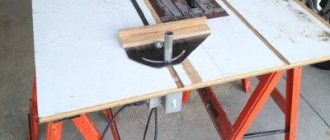
If the circular saw is hand-held, then all work should be performed on a workbench equipped with stops and guides for workpieces. You can make such a device yourself, using any table as a basis.
Before starting sawing, it is important to set the cutting depth correctly. Some hand saws have an adjustable side guide that allows you to rip material.
If there is no such device, then use the same workbench.
More convenient in terms of work is a tabletop circular saw, which is already equipped with everything necessary - guides, clamps. Often, such equipment allows you to cut workpieces at an angle.
During the sawing process, it is important not to exceed the force on the tool, otherwise the quality of the cut will be poor, and the increased load on the saw will lead to rapid dulling of the cutting blade. Don’t forget about safety precautions when using such equipment.
Work should be carried out only after checking the serviceability of the saw and the correct fastening of the workpiece. Also, do not neglect protective equipment - masks, goggles
Do not forget about safety precautions when using such equipment. Work should be carried out only after checking the serviceability of the saw and the correct fastening of the workpiece. Also, do not neglect protective equipment - masks, goggles.
Now everything is ready for dissolution
Using a planer and thicknesser, make the sides of the boards parallel and one edge straight and perpendicular. Estimate how many lamella plates you can get from one board, taking into account the width of the cut (1.5-2 mm) and the allowance for removing saw marks (1.5-3 mm). For example, from a 19 mm thick board you can only make two 6 mm plates.
Once you start sawing, press the board firmly against the fence and machine table, trying to maintain a uniform feed rate. Slow down the feed if the board gets stuck or the saw blade starts to move out of the way. If you are going to cut a board into three or more slices, plan the remainder of the board after each pass.
Then each sawn plate will have a flat base surface, necessary for final thickness calibration in a thickness planer. Finally, remove all sawing marks using a thicknesser or drum sander and give all the plates the same thickness.
Longitudinal sawing of logs
Before cutting the logs, the optimal method is chosen, which depends on the size of the required lumber, the desired surface quality of the boards, the type of wood and technical capabilities.
They start cutting only after inspecting the log, after which it is freed from bark and branches. If there are no flaws on the log, then processing is faster, and the lumber is of higher quality.
Cut the logs
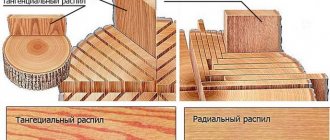
Depending on the orientation of the growth rings, different types of log cutting are used:
- Radial view - the cut passes along the radius of the growth rings. They obtain high quality lumber that does not deform.
- Tangential view - the log is sawn tangentially to the growth rings. The lumber is of low strength.
- Parallel view - the cut runs parallel to the grain of the wood.
For sawing in the direction of the grain, the simplest method is a circular cut. First of all, the croaker is cut off. After this, the log is turned 180 degrees, and then the second slab is cut off. To obtain boards, the log is constantly turned.
For high-quality sawing of logs in different ways, the following general rules are used:
so that the log does not move during processing, it is securely fixed; if sawing is done with a chainsaw, then use a chain for longitudinal processing
In order for the cut to be smooth and the saw not to be pulled to the side, the chain must be well sharpened and not sag; for sawing by hand, they try to select logs of short length; before sawing, the log is marked for a certain type of cut; sawing logs into boards begins with cutting the slab; special attention is paid to safety measures at all stages of sawing logs. Sawing of logs is carried out on their own using various cutting tools
Sawing logs is done on your own using various cutting tools.
Electric or gasoline saws
A gasoline saw has advantages over an electric model:
- the workplace is not connected to a power source;
- higher power;
- thanks to soft start and speed control, the risk of saw chain breakage is reduced;
- continuous operation for up to an hour, there is no need to interrupt the cut to allow the saw to cool down;
- You can work in any humidity, for example during rain.
Mini disc sawmill
One or two disks separated by an insert are used as a cutting element.
This sawing machine is widely used because of its advantages:
- simple design, equipped with an electric or gasoline engine;
- easy to use;
- accuracy of cutting logs according to marks;
- high productivity when sawing logs.
The main requirement for a circular saw is a durable frame and a powerful engine.
The peculiarity of independent longitudinal cutting of a log is clearly visible in four simple methods.
Ways to cut the trim at 45 degrees without using a miter box
The easiest way is to use an ordinary protractor, which is found in every home where a school-age child lives. With its help, marking is not so difficult.
Important: The drink itself is also important. To avoid the formation of cracks, it is recommended to use a hacksaw not for wood, but for metal. Yes, this method takes more time, but the cut will be much more accurate and smoother.
READ How to Cut an Object in Cinema 4d
When the marking using a protractor is made, you need to position the platband on a horizontal surface so that the front side is at the top. It is recommended to make a cut along the entire plane of the clypeus.
If there are no office supplies nearby, you can use a regular tile, with which you can draw a 90-degree angle. By dividing it into 2 halves, we get a template for a 45-degree angle, which can be used for marking instead of a miter box.
If you have a ruler, the task becomes several times simpler. You just need to take a piece of paper A-4 and draw a square, and then draw the bisectors of the corners. To make it more convenient, you can take a small board and attach it to one of the corners, which will allow you to fix the structure. Well, then you need to attach the platband and start sawing.
The design and principle of operation of a circular saw
The main parts of a hand-held circular saw include:
- Electric motor. With its help, rotational energy is created, which is needed for cutting the material.
- Frame. For its manufacture, plastic is used that is resistant to temperatures and shocks. It has holes for ventilation.
- Handle with start button. The latter is equipped with a lock designed to prevent accidental pressing.
- A platform with a guide (it is also called a sole or base plate). Thanks to this element, the tool is moved along the workpiece being cut.
- Spindle for fixing replaceable disks.
- Gearbox. It is designed to reduce the speed, load on the rotor and bearings of the electric motor.
- Main and additional handles.
The principle of operation of the equipment is to transmit torque from the motor shaft to the cutting disc. The latter rotates around its axis at high speed, this makes it easy to saw the prepared surface.
Circular saw device
DISSOLVING A TREE: TO THE START, ATTENTION, MARCH!
Start by assigning a rectangular shape to your workpiece and cutting wood of a similar size. With it, you can check how flat it lies on the saw table and how tightly it fits into the guide, and also adjust the band saw options. Secure the guide according to the desired cutting thickness and slowly feed the workpiece under the saw blade. At the same time, the saw motor should rotate moderately, without jamming. At the end of the cut, advance the workpiece using a pusher. Then inspect the sawn piece.
Move the guide to the angle required to align the cut. The guide adjusting bolt simplifies this problem. You can also use magnetic guides (for example, Carter Magnafence: carterproducts.com) - they significantly simplify such temporary adjustment.
If it turns out to be thicker at the top or bottom, check that the saw table is set exactly at 90° to the saw blade and adjust it as necessary.
If there is a depression or unevenness in the material, the problem may consist of insufficient saw blade tension. On many saws, the integrated tension controls are not very accurate.
Here is a perfect example of a symmetrical grain pattern. Such panels will make any furniture look even more attractive than two ordinary thick panels made from different boards.
A properly tensioned blade or blade should deviate less than 6 mm when pressed in the center (photo above left).
A very high speed of feeding material under the blade, the use of narrow blades with very frequent teeth or dull blades can also cause similar curvatures when cutting. If one end of the sawn part turns out to be thicker than the other, the problem lies in the displacement of the blade, in other words, the blade deviates from parallel relative to the guide.
If the blade is sharp, the guides are installed correctly, the feed speed is selected correctly, but the problem is still not resolved, try adjusting the tilt of the upper drive wheel so that the saw blade passes exactly in the center of both wheels (photo above right).
If this does not bring the expected result, adjust the position of the guide to compensate for the deviation of the blade. Oh, that's how it's done. Saw a block of wood into a rectangle, similar in thickness and density to the wood that you plan to saw, and draw a line on it with a pencil, parallel to the edge.
To prevent the workpieces from moving (to restore the moisture balance), it is best to lay them with slats. In this case, scraps of plywood were used as slats. They need to be positioned symmetrically, and pressed down with a weight on top to prevent the panels from bending during drying.
Without securing the fence in place, saw the block along the marked mowing line, holding it with your hands. Just before you reach the end of the cut, turn off the saw and, without moving the workpiece, run a pencil along the edge of the cut on the saw table. Set the stop exactly parallel to this mowing line (photo on the left) - as a rule, this allows you to perfectly compensate for the mixing.
In general, every time I change the saw blade, I check everything again and, if necessary, adjust the saw settings again.
READ How to Start a Stihl 180 Chainsaw When Cold
Hacksaw - simplicity and safety
A hacksaw is a simple tool that is quite suitable for the job. And although the cutting speed is low and considerable physical effort is required, such a saw is the most acceptable option for home use.
It is not difficult to cut wood correctly with a hacksaw. The main condition for a high-quality cut of the material is to make the cut correctly. To simplify the task, you can use a regular flat block, which is used as a guide.
The question often arises of how to cut a board smoothly with a hacksaw at an angle. For this purpose, a special carpentry device is used - a miter box. Moreover, it will help not only to make a cut at the desired angle, but will also allow any beginner to cut the board smoothly.
You can also saw off the timber with a hacksaw. The only problem when working with such a workpiece is that you have to put in a lot of effort.
The last option is to use an angle grinder with a wheel with teeth installed for the work. But since the “grinder” is not intended for cutting wood, this method can only be used as a last resort: attempts to cut a board can result in serious consequences. It’s better to use a hacksaw - it’s labor-intensive, but safe.
All my life will now take place in my VKontakte group, https://vk.com/club37090442 here I only post videos, without discussions or comments.
Serge_msv:
Well, damn...https://www.youtube.com/watch?v=P-j2UNR2Sbo
Mila Solovyova:
exciting film. Myocardial infarction!!)))) (according to TO) And so - super!! Thank you!
Cutting with a miter box
The use of a miter box is justified when the room has relatively smooth corners and walls. To cut the corner correctly, the part in which the cut is supposed to be made is placed in the miter box, and a saw is inserted into the tool guides. Remaining motionless, the part allows itself to be “cut off” at the required angle.
For fillet cutting to be effective, it must be in close contact with both surfaces at the same time. This is possible if it is pressed tightly against the wall of the tool with a section closer to the one working.
Let's say you need to cut an angle of 45 degrees. First of all, the baguette must be positioned correctly in the miter box.
Cutting sequence:
- Having determined the direction in which the cut will be made, cut off the corner;
- We put the cut out sections together, we get two angles: external and internal;
- Applying the miter box to the ceiling, we check how even the cuts are. If necessary, you can correct some things with a knife or use the services of putty.
Safety
A table saw is one of the most dangerous tools in the workshop. A disk rotating at a speed of more than 4000 rpm with sharp teeth, the number of which reaches 112, can directly or indirectly cause an accident. Directly, when the fingers are in close proximity to the disc; indirectly, when the workpiece is pinched or wood trimmings are thrown out by a stream of air.
Protection against such dangerous situations is provided by the slot wedge and protective guard that are included with every table saw. Some circular saws are additionally equipped with a safety clutch, which protects the machine and the operator in the event of a sudden blockage.
The slot wedge, located behind the saw blade and on the same axis, protects cut parts of the part from falling into the slot. The distance from the wedge to the disc should be small to ensure optimal opening of the gap.
Protective cover
The casing is placed above the saw blade. When the part is brought to it, the casing only rises slightly, and after it passes, it falls back onto the table. This eliminates the possibility of accidental collision of fingers with the cutting disc.
In the photo on the right, the casing is missing. But this is done for clarity, to show how to use this or that device, as well as the saw in the process. Of course, the devices are used with the casing folded down.
The protective cover allows you to keep your hands at a safe distance from the saw blade; The slotted wedge prevents the part from pinching.
Cutting technology
They begin sawing after securing the workpiece and applying markings. To do this, you need to turn on the jigsaw, set the maximum speed level and adjust the pendulum stroke by setting it to number 1.
You need to bring the file to the marking line, press the side of the platform against the guide and start working. When moving the jigsaw forward, you need to monitor the location of the platform. Do not deviate from the guide. When there are a few centimeters left to the end of the canvas, you need to carefully hold the free edge, avoiding breaking. At this point the process can be considered complete. To prevent the cut from turning out crooked, it is worth remembering a number of nuances:
- During operation, do not press too hard on the electric jigsaw, otherwise the file will break;
- when cutting a steel sheet, you need to choose a tool with maximum power and work at high speed - when heated, the steel softens and becomes more pliable;
- When processing plastic, laminate, organic glass or stainless steel, it is necessary to provide additional cooling for the file and periodically take breaks so that the tool has time to cool down;
- to prevent the plastic from melting during processing, it is necessary to set the minimum speed with a frequency of 1000 rpm;
- the figured cut will be smooth if you choose a narrow file with small teeth;
- After finishing the work, the electrical device should be cleaned of sawdust and placed in a special case.
Purpose and use of tool elements
Table for circular saw.
Circular saws are equipped with many different elements and additional functions. For example, quite often instruments have an additional handle. There is no point in talking about its purpose - it makes working with the tool more convenient. The only thing that needs to be noted is that this element comes in 2 types. The most convenient, according to user reviews, is the handle mounted on the saw platform. Most often, tools are equipped with an additional handle in the shape of a mushroom.
The circular saw must be equipped with a protective cover. This element consists of two parts. The lower one is movable, the upper one is fixed. There is a special hole in the upper part through which sawdust is removed during operation. The hole can have different shapes. If you do not connect a vacuum cleaner to your saw, then you can not pay attention to the shape of the hole. If the vacuum cleaner will be connected, then it is better to select a tool with a round hole, otherwise you will have to additionally look for a special adapter.
Circular saws must be equipped with a riving knife. It is designed to prevent the disk from being pinched during operation. This element is secured with a pair of bolts. To make it easier to install and remove, there is a special hole in the upper casing of the saw. But there are also models without such a hole. In such a situation, to gain access to the fasteners, the saw must be installed in a position that corresponds to the zero cut. It is quite rare to dismantle the knife. Usually the need for this arises when the workpiece has to be cut from the middle, and not from the edge.
Circular saw device.
It is important to know how to operate the tool's start button. For circular saws it is not entirely simple
This button is associated with a safety mechanism that eliminates the risk of accidentally starting the saw. That is, you will not be able to press this button until you press the unlock button. Thanks to this solution, the circular saw becomes as convenient as possible to use. The button can have different sizes. It is more convenient if it is large.
Another important design element is the spindle locking mechanism. It makes the disk installation process easier. In most cases, it is found exclusively in expensive imported models.
Related article: Roller blinds for the nursery: tips for choosing
It is important to know how to handle the power cord. This seems very simple at first, but if the saw will be used outdoors in cold weather, it is better to have a rubber insulated power cord
This option is preferable to plastic, because... rubber is more flexible and its elasticity does not decrease at low temperatures.
Quite often, modern models of circular saws are equipped with various electronics. It makes the tool easier to use and more convenient. The most common functions are soft start, overload protection, speed control, and maintaining a constant speed level.
You will end up with a lot of rafters that can be cut into 4*4 cm bars
Before you start cutting the bars, you should definitely check the angle of 90 degrees. It is recommended to do this regularly, over and over again when you start work, and in general it is worth keeping a square at hand at all times. Also look at the small picture to make it clearer which side the workpiece should be cut from.
After drying, the wood cannot be perfectly flat, and usually everything changes in shape and becomes like a crescent, namely, on one side the two edges bend outward (we are talking about side “A”), and on the other side the middle (side "B")
When you make the first cut on a circular saw, you will definitely need to press the workpiece with the first side against the clamp, and in this case the workpiece will not “float” and the reverse side “B” will pass in the form of a straight line along the circular saw blade. As a result, you get a perfectly straight line on the second side. If you press the workpiece together with side “B”, then on the first side you will most likely get the same crescent, because the workpiece will not be pressed against the clamp by its edges, they will “float”.
Why does a jigsaw cut crookedly?
The saw blade leaving the pre-planned line may be due to several reasons. The operator may not have enough experience in handling the tool, the file may be defective, and the rod and guide roller for the jigsaw may have serious play. In order not to guess from the coffee grounds, it is worth starting to sift out the factors that determine the accuracy and evenness of the cut line in your individual case.
As usual, it’s better to start with yourself and your approach to sawing. Often, novice craftsmen rush things and, wanting to speed up the cutting, apply a lot of pressure to the jigsaw. The tool does not have time to bite evenly into the material and create a clear groove for the file, which begins to follow the path of least resistance and makes unpredictable movements. This problem is especially common when working with thick timber (from 40 mm) and varnished plywood from Soviet times.
This is one of the reasons why the jigsaw moves to the side. What to do about this? The answer is obvious. Apply the minimum pressure sufficient to guide the tool along the line and set the maximum number of revolutions (when working with wood). The pendulum mode usually does not affect the evenness of the cut if its design is in good order.
The quality of assembly and wear of tool parts can be a good reason for the formation of beveled lines when sawing. There are basically no complaints about devices from the budget segment (up to 2,500 rubles), as well as hopes for their conscientious assembly. It’s another matter when original, branded instruments begin to perform such tricks. Often, the cause of a crooked cut is the guide roller, the jigsaw rod or its sole.
You can check the reliability of the element’s fixation by simply tugging it with your hand. Loosening of the rod or roller by more than 1 mm determines that this device is not capable of producing a perfectly even cut. The more play there is in the parts, the less accurate the cutting line they form. This problem should be corrected based on the circumstances. If the part itself is worn out, it can be replaced with a similar one. It is difficult to fix a breakdown if the attachment point to the mechanism is worn out. Not every modern Kulibin undertakes such repairs, and this problem is usually solved by purchasing a new tool.
Unfortunately, the products of many trusted brands are often counterfeited, and jigsaw files are very popular in this regard. It so happens that low-quality and counterfeit products have a rather short service life, which brings many problems to the owner. One of these problems is a crooked cut. An initially smooth blade can bend due to poor-quality metal, which can cause deformation of the tooth set, if it was present at all. In this regard, if your jigsaw cuts crookedly, replacing the saw blade can correct the situation. The process of choosing a high-quality jigsaw file was discussed in detail in a separate topic.
The advantage of sawing logs with a chainsaw
The method of cutting logs using a chainsaw has several advantages.
The ability to work under any conditions - the chainsaw is not afraid of humidity, so specialists can cut logs during the rain; in this case, the equipment will not deteriorate.
High productivity - it is allowed to carry out woodworking throughout the day, but it must be taken into account that the power of the device must be at least 7 horsepower.
Autonomous device - the equipment runs on gasoline and does not depend on electricity; the workplace can be mounted in any area where it will be more convenient to carry out the process.
Ease of use - the chainsaw is equipped with a soft start and adjustable chain rotation speed; these conditions ensure that beginners in this business obtain high-quality results.
Selection of cutting blade
Jigsaw blades vary in length and frequency of teeth. It is worth giving preference to trusted brands, in this case there is a quality guarantee for the metal, and the cut will be smooth. Files are classified by tooth configuration:
- on standard models, teeth of the same size are located at equal distances and in the same direction;
- the so-called skip-tooth file is distinguished by the absence of teeth, due to which the cutting speed increases, the blade heats up and jams less, and chips from the surface are removed to the side;
- In the case of double teeth, the cutting speed is lower, but the quality of the cut is better. The chips are removed from the cut;
- For reverse blades, some of the teeth are directed upward. Using such a tool, you can cut laminated chipboard and other wood with a jigsaw without chipping, since the upper teeth cut the material during the reverse movement.
The specific thickness of the blade depends on the material to be worked with, but the basic ones for the manual model are No. 3, No. 5, No. 7.
First stage
First you need to prepare the necessary tools:
- clamps;
- pencil;
- bar or beam for guide;
- jigsaw;
- measuring tool.
When starting work, you should secure the workpiece as firmly as possible. It is not at all advisable to use a jigsaw to cut along the fiber, because in this case it will not be possible to cut straightly. But if such a need still exists, then you can use a parallel stop, one end of which is attached to the jigsaw, and the second rests against the edge of the workpiece material. In this way it will be possible to saw off extremely smoothly.
If you need to cut with a jigsaw in the inside of the workpiece, you should first drill a hole in it. After this, a saw blade is inserted into the drilled hole, and the jigsaw is moved exactly along the marking line. Once the cut is complete, adjust the corners on each side of the workpiece.
To cut as smoothly as possible, it is recommended to use a jigsaw with a blade that has a good moving speed. The saw blade should be wide and designed for working with wood materials.
It is necessary to place something under the workpiece so as not to rest when working with a jigsaw. Next, using a measuring tool, measure the width of the area that needs to be cut.
Then a line is drawn along the ruler connecting the marks. After this, the guide is secured with clamps at the required distance from the edge of the cutting line.
Then the jigsaw is placed with the blade against the cutting line. The guide is pressed against it and also secured with a clamp.
You need to fix it motionless, but you shouldn’t clamp it too hard. Next, everything is done in the same form on the opposite side.
So, the measures necessary to make the cut smoothly have been taken.
Next, after turning on the jigsaw, you need to set the speed to the maximum and adjust the movement of the pendulum, setting it to one. The jigsaw is placed with the blade against the cutting line, the platform is pressed sideways against the guide, and you can start sawing.
Second phase
When working with a jigsaw, you should avoid applying excessive pressure on the tool. The device is pushed forward with a slight movement, also exercising control over the platform.
The edge of the sole should be pressed against the guide so that it does not move. At the end of the cut, when a couple of centimeters remain to the edge, it is necessary to hold the sawn fragment to avoid breaking.
To improve the quality of movement of the saw on the workpiece, you can use an auxiliary device in the form of a replaceable plate, which can be made of various materials. The plate is attached to the main support platform of the jigsaw. The adapter and guide bar allow you to cut more evenly.
When cutting some materials with a jigsaw, there is a need to cool them. Therefore, before you start cutting, you need to install a container with cold liquid on the support platform, designed specifically for this.
Before sawing metal, the file must be lubricated with machine oil, and the cutting line area must be cooled.
It is recommended to cut curved shapes using files with a narrow blade. When cutting out a round part, a special circle cutter is used, which is installed in the center of the circle.
That's all for a simple description of how to cut smoothly with a jigsaw.
How to make a perfect cut with a jigsaw
For example, to make some furniture you need to cut a piece of chipboard
make a mark and attach double-sided tape
we take any flat object, in my case the rest of the laminate with the factory edge preserved
glue it taking into account the distance from the jigsaw sole to the file
saw slowly, lightly pressing the sole of the jigsaw against the guide
we get the perfect cut
Fraud! Any Homemaker always has a jigsaw with a curved file, and no matter how hard you try, the cut will still pull, but you have to try.
So I, too, am a crooked master, I have a lot of experience in crooked cutting! This is a calling, we must stick together!
Holy shit, I already pulled my legs together, and something in my stomach (the so-called “point”) tightened.
Why do you need adhesive tape or does religion not allow clamps?
That's right, clamps and a circular saw = perfect cut.
this one will be more cheerful
Yes, at least he doesn’t stab, because there is a cutting edge