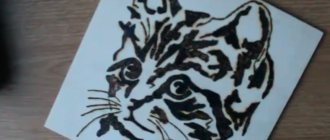
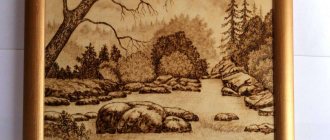
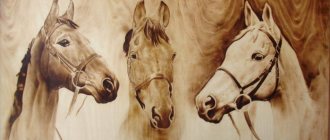
A device called a wood burner is a device that allows its owner to engage in pyrography. This type of creativity is based on heating a wooden surface, which darkens under the influence of a hot metal tip of an electric burner. The remaining trace makes it possible to create images on boards or any sufficiently light wood product. Professional pyrographers use burners to create real paintings - from landscapes to portraits. However, their operation requires productive and relatively expensive models. To teach pyrography to children, it is enough to buy a budget version with low power.
But as you already understand, the range is quite extensive, which is why today we want to look at the 10 best models of wood burners, according to our experts.
Photo: https://pyrography-fireart.ru
Content:
1. TransVit Electrical device for wood burning EVD 20/220, Pattern-10K (01905)
2. Transvit Set for burning Pattern-1 (wood + fabric)
3. Transvit Set for burning Elm
4. Sibrtech Openwork burning kit
5. Pebaro Burning set 0261
6. REXANT Burning machine with temperature control function ZD-8905
7. STAYER Burning device 45227
8. Soldering iron Rexant 12-0183 soldering iron-burner (1 set)
9. Micron Burning kit WBT-01
10. Universal burning device with t regulator, 220V/40W ZD-8905
TransVit Electric device for wood burning EVD 20/220, Pattern-10K (01905)
Photo: https://market.yandex.ru
An excellent device that is suitable for children. Adults will be able to give a child an unexpected gift by presenting such a set. The kit comes with an excellent burning device, which has a power of 20 W. The handle is made of high-quality material, which does not allow heat to pass through in large volumes, which creates comfortable working conditions. For more convenient operation, the manufacturer has equipped the device with a long network cable (150 cm). The set contains only one nozzle. The operating life is one year with daily use for several hours. With moderate use and care, the product will last up to 2-3 years.
TransVit Electric device for wood burning EVD 20/220, Pattern-10K (01905)
Advantages:
- good build quality
- small in size, so it won’t take up much space on the table
- heats up and cools down quickly
- Burning is easy, no effort required
Flaws:
- requires careful handling
Selection tips (recommendations)
To avoid mistakes when choosing, follow the following recommendations.
What to pay attention to
- high-quality material of the device;
- It’s better to take sets with additional accessories (protective caps, stand);
- if you take it for a child or for a non-professional, then the design of the device should be understandable;
- It is better for children to take sets with diagrams included in the set;
- you can take sets for burning not only wood, but also fabric and plastic (universal models);
- Check the operation of the device before purchasing.
It is impossible to say for sure which company is better to buy a burner; for some, the quality of the material is important, for others - the price or popularity of the models. Therefore, everyone chooses their “best burner” based on their goals and objectives.
Transvit Burning set Pattern-1 (wood+fabric)
Photo: https://market.yandex.ru
Another good option from a quality manufacturer, which is suitable for schoolchildren who already have experience working with an electric burner. The kit contains all the necessary tools and materials to create your own masterpieces. Another big advantage of this model is the availability of replaceable nozzles. The maximum heating power is 20 W. The pen moves easily across the board, leaving pleasant and beautiful patterns. The equipment is intended for use by children over 8 years of age. It is advisable to give your child a brief safety briefing before work.
Transvit Burning set Pattern-1 (wood+fabric)
Advantages:
- It is possible to burn both wood and fabric
- reliability and safety
- comfortable handle
- there is a heating adjustment
- stable work
- produced by a Russian company
- easy to use
Flaws:
- flimsy stand
- small power cord
Preparation of material
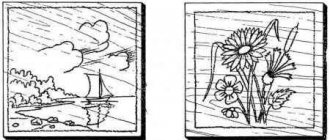
The surface of the workpiece for burning must be leveled and, if possible, thoroughly sanded with sandpaper. At first, you should not resort to using too complex drawings. If the image does not correspond to the size of the workpiece, its scale should be reduced or enlarged.
If you don’t want to, you don’t have to draw the design on the workpiece yourself. It is enough to use carbon paper, which will allow you to draw the main outlines of the drawing, which can later be traced with a pencil. To avoid staining the material, it is better to choose old copy paper. This is the only way to avoid damage to the wooden base, which was carefully sanded and prepared for work.
Transvit Burning set Elm
Photo: https://market.yandex.ru
Another reliable device from a branded manufacturer that will give you positive emotions from burning. The maximum power of the equipment is 20 W, which is normal for a novice user. To ensure high-quality image application, the manufacturer has provided the ability to adjust the heating. The kit includes: a comfortable stand, which is distinguished by its quality, burning equipment, replaceable nozzles and other materials designed to ensure maximum convenience. The device was manufactured in Russia, so the build quality is made according to the GOST standard. Intended only for children, because the handle is small in size.
Transvit Burning set Elm
Advantages:
- smooth arc temperature
- convenient adjustment
- universal stand placement
- reliability
- high-quality assembly
- good nichrome thread
Flaws:
- When operating at maximum power, the handle heats up
History of pyrography
Literally, the term “pyrography” translates as “to draw with fire.” Unlike pyrotype, this technique was considered very rare in the past.
The first burning devices were different from modern ones. They ran on gasoline, which heated a platinum needle. To maintain a high temperature, the master had to pump gasoline using a foot pedal. Despite the fact that the burning process in those days was labor-intensive and painstaking, it quickly gained popularity.
At first they burned nesting dolls on figurines, but pyrography was replaced by painting, which gained even more popularity. However, the art of burning was not forgotten: creators began to appear who used this technique to decorate boxes, chests, caskets and other wooden products.
Modern instruments
Pyrography became available when the modern electric burner . This tool is significantly superior to all previous ones: burning with it is much easier and more convenient. The simplest tool includes: filaments, handles, a rheostat and a step-down transformer. It began to be used not only for working with wood, but also with other materials - leather, special cardboard or bone.
Sibrtech Openwork burning kit
Photo: https://market.yandex.ru
A high-quality product that is intended for children over 14 years old, as it has a complex design. Burning is done smoothly and accurately. There is a temperature adjustment that will help you choose a specific value for each image. The kit includes a durable stand, replaceable attachments, etc. The power limit is 20 W. With such an electric burner, the images will turn out smooth and beautiful. The set is suitable as a gift for beginning pyrographers. The service life is 365 days, but if the operating rules are followed, this value can reach 2 years.
Sibrtech Openwork burning kit
Advantages:
- high-speed heating
- high-quality assembly
- there is a power regulator
- fast cooling
- low price for a set
Flaws:
- not detected
First stages of preparation. How to start burning?
Alas, you won’t be able to rush into battle right away and there’s no escape without initial preparation. To prevent your passion from becoming covered with a layer of disappointment, carefully read all the subparagraphs below.
It is strongly recommended not to neglect basic safety rules; this will protect you and your loved ones!
Selecting a base
As mentioned above, modern technologies have made it possible to improve the device, and the scope of use has expanded significantly. And yet, most often, experts recommend taking on wood, since it is more pliable and better suited for beginning burners.
When choosing a wooden material, it is best to give preference to soft larch over spruce species. For example, ash, maple, linden or birch are good options.
Consider the flammability level - not all trees are suitable for a temperature of 120°, while others are stable at 250°.
And the softer the chosen breed, the more comfortable and high-quality the design will be burned.
Wood processing
Let's say, in our case, a cutting board or a box from a set of screwdrivers. Before you pick up the tool and get down to business, treat the work surface.
The surface must be dry and smooth, without visible flaws and roughness, otherwise the quality of the work will deteriorate. If necessary, dry wet areas with a hairdryer and use sandpaper where necessary.
Then carefully, barely noticeably transfer the image, outlining the sketch using a pencil or a thin-tipped knife blade. If you wish, you can use ready-made templates to apply smooth, aesthetically beautiful lines.
When working on complex drawings or photographs of people, carbon paper is used. Unfortunately, it gets too dirty, and experts additionally transfer the contours onto transparent tissue sheets.
After which the picture is tightly glued using glue made from boiled starch or wheat flour. They burn directly on top of the paper, after which the sketch is easily separated from the main surface.
Additional recommendations
Beginning artists are recommended to take on easy images that do not require serious skills and abilities. Gain experience, be sure to attend professional master classes and train, the more the better.
Don’t be afraid to take advice from masters, attend their classes and get better at it. Over time, the clarity of the lines will improve. It’s even better if you order tools from a special store - the success of your future work depends on a high-quality burner.
Use non-flammable materials as a stand. For example, ceramics or thick glass. Make sure your workspace is clean and free of creativity.
Do not start work until the element of the electrical appliance is heated to the required temperature. If uneven heating is clearly observed, this indicates a problem with the instrument or the need to replace the nozzle.
Attention! Remember to turn off the tool periodically to prevent parts from overheating.
When starting work, be extremely careful and careful. It is impossible to erase or remove the drawn lines; try to avoid blots and inaccuracies.
For even greater convenience, secure your leading hand on a stable stand to avoid uneven lines and accidental sketching errors.
The volume of artistic work is given by using lines of varying thickness and shades depending on the intensity of burning.
To achieve a thin, burnt outline, move the burner quickly across the “canvas”, and do not stop in a specific place for more than a few seconds.
Accordingly, adjust the heating temperature to control the shades of the resulting result. Movements should be light, no heavy pressure or pushing, and do not stop in one place for a long time.
Try to draw from top to bottom, but not vice versa. If desired, you can use curly attachments when making decorative crafts.
Remember, good, high-quality projects are a combination of several skills, including experience, knowledge and skills, and attentiveness to your health.
Don’t neglect comfort: if you feel your neck, back or arms numb while working, it means you urgently need to adjust your position. Do not place the board too far away from you; your hands should move easily along the “canvas”.
And finally, try to start work from the outside. It is believed that initially the eye is drawn to the central contours, where errors will be much more noticeable than if they were located closer to the edges.
After the finishing touch, it is recommended to paint the work or cover it with a thin layer of varnish so that the design is preserved in its original form.
Pebaro Burning set 0261
Photo: https://market.yandex.ru
A high-quality device from a well-known manufacturer, which is designed to create unique images. A distinctive feature of the equipment is the presence of 20 attachments, which allows you to create an original image. Burning is carried out smoothly and accurately, creating beautiful and unique lines.
Pebaro Burning set 0261
Advantages:
- works well
- Suitable for both professionals and amateurs
- high-speed heating
- 20 nozzles
- reliability
Flaws:
- bad stand
Equipment
Apart from the burning device itself, all other equipment is very cheap. As you work, you will be able to determine the required set of devices.
- Pencil. Serves to apply the selected pattern to the workpiece. For light wood, the HB pencil is best suited, and for dark wood and leather, a softer one is 2B.
- Pencil sharpener. The pencil should always be well sharpened, otherwise it will be difficult for you to transfer subtle patterns or small details to the surface.
- Eraser. An eraser is needed to make corrections during the initial marking of the drawing and to remove pencil marks after burning. The eraser will make your work look better, and may also reveal areas you forgot to burn out.
- Colour pencils. They are needed to create flesh tones and subtle shades of brown that appear when burned. Moreover, they are very necessary at the preliminary stage of work - to outline the approximate distribution of colors in your drawing.
- Compass. Necessary for marking designs such as round borders.
- Ruler. Used for marking straight lines, for measuring and marking patterns.
- Pens. I use pens of varying thicknesses to make preliminary sketches.
- Tracing paper. Tracing paper is needed to transfer the design onto the surface of the wood.
- Copy paper. Using carbon paper you can also transfer a design onto wood. In this case, a sheet of paper with a design applied to it is placed on top of a sheet of copy paper, which is then outlined with a pencil and thus transferred to the wood.
- Sandpaper. Sandpaper is used to pre-sand the surface. The smoother the board, the better it is to work on it. It can also be used to remove small errors made during burning. After finishing the work, you can sand the edges of the product with sandpaper to remove stains from your fingers.
- Adhesive tape. Adhesive tape (scotch tape) is needed to attach tracing paper or copy paper to the surface of the wood.
- Corundum paper. It is needed for sanding small areas of the design: in this case, the natural texture of the wood will appear through the burnt area, which will enrich the tonal range of the design. Do not use it when pre-sanding wood as it leaves rough marks. Buy the thinnest corundum paper.
- Scissors. They are needed to cut corundum paper into small pieces that are more convenient to work with.
- Wire. Replaceable feathers are cut out of it. If you don't want to do this, buy a ready-made kit in the store.
- Screwdriver. Needed to adjust the burning device and replace feathers in it.
- Universal knife. This tool will come in handy for a variety of needs, from attaching keychains to rings to scraping out pumpkins.
Health and Safety
Keep the pen of the device away from your eyes and from others. It’s better not to touch a hot feather with your hand, but if this happens by accident, don’t worry – there will be no more pain and harm than from a nettle burn. Hold the pen as close to the heated end as possible, but try not to touch any metal parts. If the pen is turned on for a long time, it becomes very hot, and hot air rises from it. Some models are equipped with convenient protective covers. If you are burning fin or skin, which produces toxic fumes, wear a face mask and only work in a well-ventilated area.
REXANT Burning machine with temperature control function ZD-8905
Photo: https://market.yandex.ru
A reliable device intended for professional use in private workshops. The product is easy to adjust and has the ability to burn beautiful patterns onto leather and fabric. The handle is made in compliance with the anatomy of an adult hand, which allows for increased ergonomics. The maximum power value reaches 40 W, while the operating voltage is 1.6 V.
REXANT Burning machine with temperature control function ZD-8905
Advantages:
- replaceable tip
- convenient temperature adjustment
- universal work
- high-quality assembly
- reliability
Flaws:
- nozzles must be purchased separately
Silhouette burning
To use the silhouette burning technique, carefully ground, curved needles are suitable, the working surface of which should completely touch the material. The needle should be directed along the wood fibers.
Beginners who use the silhouette burning technique are recommended to use moderately heated needles. Only in this case can you achieve the smoothest possible surface texture when completing the work.
Silhouette burning can be used to process fairly impressive areas of wood. At the same time, applying smooth strokes can form not only dark lines. Moving a hot needle at a fast pace makes it possible to obtain a wide variety of shades, from the deepest brown color to a light beige pattern.
STAYER Burning device 45227
Photo: https://market.yandex.ru
A reliable pyrograph with good equipment, designed for amateurs and professionals. The set includes 20 unique attachments made of durable material. Therefore, they do not deteriorate during prolonged use. The power is 30 W, which is the best option for a small home workshop. There is also a convenient plastic case for transportation.
STAYER Burning device 45227
Advantages:
- famous brand
- design
- nice quality pen
- good case
- convenient stand
- 20 nozzles
Flaws:
- slow heating
Battery operated burner
To make an electric burner, similar to a pyrograph on nichrome wire, you will need: - syringe needles; - two-wire wire; - small toggle switch; - strong threads; — rechargeable battery; - wooden stick.
Take two needles and cut off the lower part from them, which fits onto the “nose” of the syringe. Then screw the wires onto the blunt end of the needles. After this, securely fix the medical needles with threads on the lower end of the wooden stick. Also connect the wires to the toggle switch, and then glue the battery itself and the toggle switch to the handle-holder, carefully connecting the elements together. Detailed diagrams of a burner with a battery can be found on the Internet.
Take the pliers and bend the ends of the needles so that they touch tightly. That's all. Now you can start drawing images and designs on plywood or a wooden blank. [adace-ad id=”1108"]
Soldering iron Rexant 12-0183 soldering iron-burner (1 set)
Photo: https://market.yandex.ru
An excellent model designed for the professional field. The power of the product is 30 W, power is supplied from an electrical network with a voltage of 220 volts. The kit includes a convenient case and 19 attachments, which greatly simplifies operation.
Soldering iron Rexant 12-0183 soldering iron-burner (1 set)
Advantages:
- good quality
- burns out smoothly
- optimal price
- comfortable handle
- quality tip
Flaws:
- long heating
Micron Burning set WBT-01
Photo: https://market.yandex.ru
A cheap device designed to improve professional skills. You shouldn't expect any supernatural meanings from it. The power is standard and is 30 W. The set includes 5 different attachments to ensure high-quality drawing. The operating temperature reaches 510 degrees.
Micron Set of attachments for wood burning device WBN-05 5 attachments
Advantages:
- low price
- durable network cable
- short heating time
- there are replaceable nozzles
- high-quality assembly
Flaws:
- no particular disadvantages
Rating of models with wire heating element
For drawing finer and better lines, a model with a wire pen is suitable. This option should not be chosen by a beginner, since working with it requires certain skills. Our rating will help you which wire burner to choose.
Stayer SXF Station
Price starts from US $12.59
View on Aliexpress
A simple station with a thermostat and a small set of replaceable tips. Suitable for a person who has already trained in work.
Advantages and disadvantages
many replaceable tips;
build quality;
thermostat.
No.
| Power | 40 W |
| Number of nozzles | 20 pcs. |
| Price | from 2,280 rub. |
Pebaro L.K.J.
Price starts from US $13.99
View on Aliexpress
Semi-professional, but quite simple. The compact power supply will fit on any shelf. Replaceable nibs will help you not to be distracted by searching for a new attachment.
Advantages and disadvantages
high-quality assembly;
long cord;
The tips are quite varied in shape.
flimsy stand.
| Power | 40 W |
| Number of nozzles | 10 pieces. |
| Price | from 1,960 rub. |
Stayer OPIU
Price starts from US $33.77
View on Aliexpress
Low power, but high quality. The set includes wires of various shapes to give each work individuality.
Advantages and disadvantages
high-quality assembly;
long cord;
interchangeable wires of different bends.
lack of thermostat;
lack of tools for replacing hot nibs.
| Power | 25 W |
| Number of nozzles | 8 pcs. |
| Price | from 1,574 rub. |
It will be difficult for a beginner to work with semi-professional models due to the fragility of the pen, which can become deformed and become unusable when pressed hard.
Universal burning device with t regulator, 220V/40W ZD-8905
Photo: https://market.yandex.ru
An excellent option for professional and semi-professional use with a maximum power of 40 W and a temperature of 750 degrees. Operating modes are regulated using a special control unit. The heating time of the device is only 15 seconds.
Universal burning device with t regulator, 220V/40W ZD-8905
Advantages:
- fast heating
- convenient temperature adjustment
- high power
Flaws:
- need to buy additional attachments
Anyone can burn a beautiful design onto wood. This does not require many elements, just a pyrograph and desire. Happy shopping!
#Top 10
Read us first - add the site to your favorite sources.
Add a comment
{"commentics_url":"\/\/express-novosti.ru\/comments\/","page_id":1448920,"enabled_country":false,"enabled_state":false,"state_id":0,"enabled_upload": false,"maximum_upload_amount":3,"maximum_upload_size":5,"maximum_upload_total":5,"securimage":true,"securimage_url":"\/\/express-novosti.ru\/comments\/3rdparty\/securimage\ /securimage_show.php?namespace=cmtx_1448920″,”lang_error_file_num”:”\u041c\u0430\u043a\u0441\u0438\u043c\u0443\u043c %d \u0444\u0430\u0439\u043b\u043e\ u0432\u043c\u043e\ u0436\u0435\u0442 \u0431\u044b\u0442\u044c \u0437\u0430\u0433\u0440\u0443\u0436\u0435\u043d\u043e.","lang_error_file_size":"\u041f\u043e \u0436\u0430\u043b\ u0443\u0439\u0441\u0442\u0430, \u0437\u0430\u0433\u0440\u0443\u0437\u0438\u0442\u0435 \u0444\u0430\u0439\u043b \u0440\u0430\ u0437\u043c\u0435\u0440\u043e \u043c \u043d\u0435 \u0431\u043e\u043b\u0435\u0435 %d MB.","lang_error_file_total":"\u041e\u0431\u0449\u0438\u0439 \u0440\u0430\u0437\u043 c\u0435\u0440\ u0432\u0441\u0435\u0445 \u0444\u0430\u0439\u043b\u043e\u0432 \u0434\u043e\u043b\u0436\u0435\u043d \u0431\u044b\u0442\u044c \ u043d\u0435\u0431\u043e\u043b\ u0435\u0435 %d MB.","lang_error_file_type":"\u041c\u043e\u0436\u043d\u043e \u0437\u0430\u0433\u0440\u0443\u0436\u0430\u0442\u044c \u0442\u0 43e\u043b\u044c ""lang_text_loading":" u0437\u043a\u0430 ..","lang_placeholder_state":"\u0420\u0435\u0433\u0438\u043e\u043d","lang_text_country_first":"\u0421\u043d\u0430\u0447\u0430\u043b\u0430 \u0432\u044b\u04 31\u0435 \u0440\u0438\u0442\u0435 \u0441\u0442\u0440\u0430\u043d\u0443″,”lang_button_submit”:”\u0414\u043e\u0431\u0430\u0432\u0438\u0442\u04 4c","lang_button_preview":" \u041f\u0440\u0435\u0434\u0432\u0430\u0440\u0438\u0442\u0435\u043b\u044c\u043d\u044b\u0439 \u043f\u0440\u043e\u0441\u043c\u 043e\u0442\u0440″,”lang_button_remove ":"\u0423\u0434\u0430\u043b\u0438\u0442\u044c","lang_button_processing":"\u041f\u043e\u0434\u043e\u0436\u0434\u0438\u0442\u0435..."}
Tools for performing pyrography [ [ edit | edit code ]h2>
In the second half of the 20th century, thanks to the invention of the electric pyrograph - a device for burning (hot engraving) - pyrography developed as an independent technique not only in creative arts, but also in artistic graphics. At the same time, wood pyrography is one of the most popular (along with embroidery and modeling) types of children's and amateur creativity in many countries around the world.
Modern burning devices for contact pyrography come in two types:
- Transformer with nichrome nozzle and temperature control.
- Soldering iron type with brass nozzles (mostly they come without a temperature regulator, but there are models with adjustment. Sometimes pyrographers independently modify soldering iron burners by connecting dimmers to them.)
For productive operation, a transformer contact device for burning must have sufficient power (about 40 W), smooth temperature control (at minimum, the needle/nozzle should barely leave a mark on the surface being burned, at maximum it should be red-hot), there should be screw clamps on the pyrograph handle, which securely hold the nichrome needle/attachment. For self-production of needles/nozzles, 0.8 - 1 mm nichrome wire is usually used.
You can burn wood with a jet of flame; for this you use a gas can with a gas burner attached to it, for example, with a piezo ignition. With some skill, you can burn out not only a black background, but also shades.
Read also: The hammer drill beats but does not turn
In addition, there is Novosibirsk tone pyrography, when working in this technique, instead of a hot needle, a special device is used, invented by scientists from the Novosibirsk Akademgorodok. This device is a pistol-shaped oven with replaceable nozzles of different diameters, and with a thin hose through which the pyrographer blows air into the heating chamber directly by blowing into the hose with his mouth, or by connecting it to a compressor. This non-contact burning device allows you to burn wood with a stream of hot air, like a brush [1[1]
Pyrography can be done using a converging lens. This is done in sunny weather. The surface to be treated is a wooden board, plywood, plastic or other similar material. For burning, the lens is positioned so that the sun's rays are focused on the surface being treated. The lens is then moved so that the bright spot moves across the surface, leaving lines. The required lens size depends on cloud cover and the height of the Sun above the horizon - the larger the lens, the stronger it burns. Usually a lens with a diameter of 5 centimeters is suitable. But too large is inconvenient because it can cause the surface to catch fire.
If you decide to master the art of pyrography - wood burning, this book is for you. Properties of wood, methods of preparing the material, necessary tools and equipment, basic techniques and burning techniques, methods of finishing finished products, clear illustrations - the publication will be useful not only for beginners, but also for experienced craftsmen.
Table of contents
- Introduction
- Types of pyrography
- Wood as a material for pyrography
- Pyrographer's Tools
A series:
Country of masters
This is an introductory fragment of the book Wood Burning. Techniques, techniques, products (Yu. F. Podolsky, 2014) provided by our book partner - the liters company.
Pyrographer's Tools
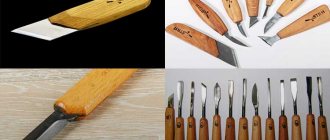
In general, pyrography devices, depending on the type of working part (tip), are divided into two categories: devices with a solid nozzle and a constant temperature regime, and devices with a wire pen with an adjustable temperature. Although both types are designed to do the same job, they are different from each other.
Pyrographic devices with solid nozzles.
Such devices cost about three times less than a device with a wire pen, or even less. They are in many ways similar in appearance to a soldering iron, but are designed specifically for wood burning (Fig. 4). Finding a similar domestically produced device is quite difficult, but there are many imported instruments on sale, including inexpensive Chinese ones.
Pyrography devices with solid nozzles have certain advantages. Equipment of this type best suits the needs of the craftsman who burns images with a thick line or in the form of repeating small patterns. The working part with a flat tip is very convenient when you need to shade large areas of the surface being treated with uniform shading or thoroughly burn them. In these cases, a solid tip pyrograph is the most suitable tool.
Rice. 4.
Pyrographic device with solid nozzles:
a
– pyrograph;
b
– oblique nozzle;
c
– writing (calligraphy) attachment;
g
– flat retoucher;
d
– spoon-shaped retoucher;
e
– example of a nozzle with a seal (stamp)
In addition, with such a pyrograph it is convenient to use various stamps instead of a flat or oblique tip. They are especially convenient for those who are just starting to practice wood burning. A burning stamp is a tool for applying a repeating pattern, mainly of simple shapes - circles, triangles, rectangles, zigzags. But what an amazing variety of patterns can be achieved if you use these seals, guided by your imagination!
To imagine how the pattern will be placed on the wood, you can first print it on a sheet of paper, moistening the print with ink on a regular stamp pad. Usually the seal itself is cut out or attached to the end of a replaceable tip, which allows you to quickly change the tool (and, accordingly, the pattern). There may be several manufacturing methods.
At the end of a brass, copper or steel rod, the diameter of which allows it to be used as a solid nozzle, a relief is made using engraving - as a rule, these are simple geometric shapes (Fig. 4, f
).
However, for pyrotyping, which translated from Greek means “fire print” (this is the name given to decorating a material using imprints of hot metal stamps), an electric pyrograph is not at all necessary. After all, this craft has been around for many centuries, but people began to use electricity relatively recently. Solid replaceable attachments can be secured in a special holder made of non-flammable material (metal); on the other side, a handle, usually wooden, is attached. Then this cliche is heated to 150–170 °C and pressed against the product. A similar stamp with a collet metal holder is shown in Fig. 5, a
.
The seal may be cut into the end of a strip of tin or sheet brass. Then the strip is bent along the diameter of the nozzle, and the seal is bent at an angle of 90° (Fig. 5, b
).
Such a cylinder with a stamp at the end is put on a solid attachment of a pyrograph or the stamp described above (Fig. 5, c
).
Rice. 5.
Stamps for pyrotypes:
a
– device of a collet stamp with removable tips;
b
– use of replaceable dies;
c
– fragments of die reamers made from a flexible metal strip and the manufacturing process of one of them;
d
– dies made of straight tubes;
e
– dies made of tubes with protrusions bent at right angles to the side surfaces.
Another type of stamp is made from brass or copper (worse - steel) tubes, the internal diameter of which allows them to be tightly fitted onto the tip of the pyrograph. Using a file, a regular pattern is formed at the end of such a tube, which will give a round impression. By flattening such a stamp on one or several sides, you can give the print a different shape (Fig. 5, d
).
You can make stamps of a fundamentally different configuration from the tubes. To do this, the ends are not cut with a file, but sawed to a certain depth. Then the resulting petals can be additionally processed with a needle file, after which they are bent outward or inward (Fig. 5, e
).
However, images made with hard attachments tend to be rougher than those made with a wire pen. Hard nibs are larger than wire nibs. They are often made from copper or brass rods and are either simply inserted or screwed into the heating element. The handles are usually larger, and you have to hold the tool with your hand much further from the surface of the wood. Burners with solid tips heat up slowly and cool down slowly (up to 5 minutes).
In addition, such pyrographs are designed to operate in only one temperature mode, and to change the degree of brightness of the pattern, there is only one way - to regulate the speed of movement of the nozzle. The faster you move the device, the lighter the pattern will be, and the slower you move it, the darker the pattern will be. Some manufacturers offer devices of different power; Obviously, the higher the power, the more they heat up, and devices with a power below 20 watts will be very slow. In this case, you can purchase several devices of different power.
You can try working with such a pyrograph by purchasing (or borrowing from familiar radio amateurs) a small soldering iron. The soldering iron tip should be shortened - it should protrude 2-3 cm from the heater. But such a short tip will overheat and quickly burn out. Therefore, connecting the soldering iron through a power regulator will provide additional convenience in operation - then you will be able to regulate the temperature of the tip (however, due to the inertia of heating, it will change very slowly). Using a soldering iron, you can also try working with stamps. But still, the process of burning with a soldering iron will be noticeably different from working with a specialized device.
Another significant disadvantage of such a device is that after a while it gets very hot and becomes uncomfortable to hold in your hand.
Read also: Rating of car polishing machines
In general, instruments of this type cannot produce as detailed a pattern as wire-pen instruments. They are good mainly for wide, large-scale works, preparing backgrounds, as well as for making simple patterns that do not require fine lines and light and shade.
Pyrographic instruments with wire pens.
This type of instrument has a flexible working part, the so-called beak or feather. It is made of nickel-chrome (nichrome) wire and is mounted on a special holder - a fork, which, in turn, is mounted on a handle shaped like a thick pencil. The feathers heat up when an electric current passes through the wire. The pen with the pen is connected via an electrical cord to the power supply, which has a switch or variable power control that allows you to change the temperature of the pen.
As a rule, the wire can become red-hot in literally a split second. It also cools down quite quickly. This is very convenient - unlike pyrographs with solid nozzles, the temperature of the wire pen can be changed almost instantly depending on the current task. Wire nibs on the handle are attached in different ways.
Some manufacturers do this using two screws located at the ends of the current supply plug (Fig. 6, a
), which ensures good contact in the connection. These nibs can be easily replaced by unscrewing the connecting screws, pulling out the nib and then securing a new one with the screws.
Other types of pens use replaceable attachments: nibs soldered or pressed into special mandrels. Usually, to change the nozzle, unscrew the cylindrical fastening coupling at the end of the handle, remove one nozzle with tweezers (you can pull it out with your fingers when it’s cool) and insert another into the socket, after which it is secured with the coupling. The wire feather from the nozzle can be desoldered and another one can be soldered with refractory solder.
In some of the cheap devices popular in North America, the nibs are simply inserted into slots in two posts at the end of the handle. They are very easy to change, but the poor performance of most replacement nibs undermines any financial benefit. Due to poor contact in such a connection, the electric current heats not only the pen, but also the pen, and the latter can become quite hot during intensive use. This system may be more suitable for those who are just going to write their name or plan to burn only occasionally, in short sessions. Finally, there are burning pens with a fixed tip. In them, the pen is soldered or pressed directly into the holder. This creates a better electrical connection than previous types, so these handles are usually more reliable and run the least hot. But they also cost more. Every time you need a new nib or a different nib shape, you will have to buy a new pen. However, if you are going to work a lot as a pyrograph, and even more so make money this way, it makes sense to immediately buy several fixed pens with different nibs. This will allow you to work for a long time and at the same time easily change tools as needed.
Rice. 6.
Pyrograph with wire pens:
a, b
– pyrograph handle;
c
– beak-shaped (writing) pen;
g
– flat retoucher;
d
– spoon-shaped retoucher;
e
– oblique feather;
g
– calligraphic pen (fine dotted lines indicate fold lines, large dotted lines indicate cutting or grinding lines)
In any case, a pyrographic device with a soldered or screwed tip made of nichrome wire consumes significantly less electricity than a device operating on the principle of a soldering iron, and the degree of heat of the pen can be quite accurately set using a special regulator.
Some appliances may have two knobs that turn on simultaneously. Typically, you can only use one pen at a time (switching between them is done with a toggle switch). This is very convenient, allowing you to save time and reduce wear and tear: you can use these pens one at a time whenever you want to change the nib.
Devices with wire tips also have disadvantages. Their main drawback: the size and strength of the feathers are limited by the caliber of the wire. In addition, such wire tips are more easily damaged. But they are easy to change and very simple to make yourself.
To make feathers, nichrome wire with a diameter of 0.5 to 1.5 mm is used. It can be argued that a wire with a certain diameter is slightly better suited for any type of pyrographic work or for making nozzles of any shape, but generally speaking, most often you can use a wire of the same diameter, preferably 0.7 –0.8 millimeters.
Three types of feathers are most often used for work: horseshoe-shaped, beak-shaped and spoon-shaped. The work with these feathers will be described in more detail later, but now let’s look at how to make them. It's really very simple.
Cut a piece of wire approximately 20–30 mm long with wire cutters. Bend the wire with your thumb and forefinger into a horseshoe shape. Loosen the screws on the plug until the ends of the wire fit into the sockets provided for them. Then tighten the screws, being careful not to bend the plug. When working, especially on hard wood, you will sometimes have to put pressure on the pen, and the shorter the wire, the less it will bend. The optimal length of the pen after placing it in the fork sockets is 10 millimeters.
This is the basic horseshoe shape of the feather. If you squeeze it from the sides, you will get a beak at the top of the horseshoe. Now, having grabbed the beak from the sides with pliers, squeeze it almost all the way and carefully bend the top of the beak so that it forms an angle convenient for work (Fig. 6, b
).
A flat retoucher can be easily made from a beak feather. To do this, you need to flatten its beak on an anvil made of hard metal or, for example, on the head of a hammer clamped in a vice. If burrs appear on the nozzle, they must be removed with fine sandpaper. Before flattening, it is advisable to heat the wire red hot. This can be done over a gas burner, or you can use a pyrograph power source, setting the power control to the maximum heat position.
From a flat retoucher you can make a whole series of additional pens, which are not mandatory, but can make further work easier for you. These are an oblique pen, a spoon-shaped retoucher and a calligraphy pen (Fig. 6, e – g
).
Read also: Lever mechanical measuring instruments
To make a spoon-shaped retoucher, bend the flattened loop as shown in Fig. 6, d
so that the bottom of the feather becomes slightly convex. Smooth the base using ultra-fine sandpaper and polish as desired.
To make a bias feather, sand the edges of the loop as shown in the illustration. 6, e
. File or sand both sides of the flat edge to the desired angle to create a sharp edge.
Make a calligraphic pen in a similar way: sharpen or polish a spoon-shaped blank, as shown in Fig. 6, f
. Bend at an angle and sand the base with ultra-fine sandpaper and polish as desired.
In the same way, stamps (seals) are made from nichrome wire using small pliers. Accuracy is important here: all the bends of the stamp must lie in the same plane, so that when burning it is pressed against the wood with its entire working part. Samples of wire stamps and features of their use are described below in the chapter “Drawing Techniques”.
Pyrograph maintenance.
It is very important to keep the working parts of the pyrograph (nibs and hard tips) as clean as possible. A dirty tip will move more slowly across the surface of the wood. Excessive friction reduces the ability to burn smoothly and can leave dirt in the pen's mark. It is not necessary to clean the pen after every stroke, or to remove any carbon or deposits as they appear.
But sometimes you will notice that when working, especially on materials that create a lot of carbon deposits, the pen begins to get dirty quite often. To avoid having to constantly turn off the pyrograph, you can scrape off most of the carbon deposits while leaving the device on. Of course, for this you cannot use materials that melt under high temperatures.
To clean the edges of an oblique pen, a regular blade is sufficient. Simply hold the blade by the edge and move it along the edge of the pen. However, it can quickly heat up and burn your fingers. To clean your pen without having to stop working, make your own desktop pen cleaner by inserting a blade into a block of wood (Figure 7). First, you need to hollow out or drill a slot in the block with a thin drill, and then insert the blade tightly into it. If it wobbles, drive a piece of wood or a paper clip into the gap.
Writing pens and touch-up pens can also be cleaned on a blade or something that has a fine abrasive surface. You can use sandpaper, but it will wear down the feathers. Therefore, you need to use the finest grit sandpaper you can find. But this is not enough - sand this paper with another piece of sandpaper. This additional sanding will even out the abrasive layer and mostly leave a thick paper. This paper can then be glued or stapled to the same block of wood and used from time to time to clean off the carbon deposits.
Rice. 7.
A simple desktop pen cleaner.
Hard nib nibs are denser and you have less to worry about damaging them while brushing. The edge of a sharp blade, a stainless steel scourer, or fine-grained sandpaper can effectively clean the feathers even when the device is turned on.
With the heat turned off, you can focus more on cleaning. A sponge is perfect for cleaning plastic dishes. It can be used to clean writing pens, retouchers and hard-tip pens.
It is important that the oblique pen is always sharp. Like a cutter, it needs a sharp edge, so use a fine whetstone from time to time to restore its sharpness. However, sharpening your oblique quill with a stone too often can shorten its lifespan. To avoid this, sharpen the edge using a leather belt coated with GOI paste or other fine-grained abrasive. Lay the quill on its side on top of the skin at the desired angle, place your finger on the top side to hold it in place, and carefully guide the quill along the strap.
Other equipment and workplace preparation
At different stages of making pyrographic masterpieces, you will need not only a burner, but also other tools.
Wood saw or jigsaw
(manual or electric) will be needed to cut a piece of the required size from a sheet of plywood or board.
Small pliers or round nose pliers
are indispensable for giving the wire pen the desired shape, as well as for adjusting different wire tips to your device. They will also come in handy if you need to change a tip or pen that is still hot.
A small anvil
For forging feathers, you can buy it in a store, or use a metal hammer or sledgehammer head instead. An anvil, which is available on many vise models, is ideal.
Wire cutters
used for cutting wire in the manufacture of nozzles.
Screwdriver
will be needed to secure or loosen the screws that hold the nozzle to the fork of the burning device.
Sandpaper
needed to prepare the surface of the wood, as well as to correct the image after burning. To avoid scratching the surface being treated, use fine sandpaper (grain size 150–280 and higher). Use the finest sandpaper to clean the feather from soot.
Wire brush
A piece of soft wire or
a metal dish scourer
is useful for cleaning the pen.
Scalpel or sharp blade
. A scalpel can be purchased at a medical supply store. It is used to remove minor drawing errors. Sometimes small but very annoying mistakes happen in burning details: for example, the burned line continues a little further than it should, or you burned a shadow where there should be a highlight. Quite often you can get rid of such mistakes by carefully scraping off the burnt wood with a scalpel blade. In addition, the scalpel can be used to apply shades, cut out patterns, and clean feathers of stubborn carbon stains.
Steel ruler, square or T-ruler
will be needed to mark the surface of the wood. A ruler is especially useful in cases where you need to draw a neat straight line. The line can be marked with a wire nozzle, heated to a very moderate temperature, by drawing it along the ruler. This will create a groove along which you can later run a more heated tip.
Pencils
. You will need several different, hard and soft, pencils. Pencils with hardness M or 2M are recommended for drawing designs on the surface of wood. Upon completion of burning, pencil sketch lines always remain on the wood, which must be removed with a soft eraser or, if necessary, fine sandpaper. To create a sketch on wood, you should use a soft pencil, because a hard one leaves noticeable grooves on it. But to transfer a drawing onto wood through carbon paper, use a hard pencil - the harder the better, for example 2T or 4T. The point is that a sharpened hard pencil will retain its sharpness over time, and this will give you a fine line every time.
End of introductory fragment.