Kitchen utensils are needed for various purposes; most of all, housewives love multifunctional devices. Among these things in every housewife's house there is a hot stand.
You can choose a beautiful backing that interests you in various hardware stores, or make it yourself from available materials. The last option is even more interesting - the stand will be unique, with good energy. This is what we will talk about in this article.
Advantages of do-it-yourself hot mats
- If the stands are matched to the interior of the kitchen, they can add coziness to the home.
- It’s even useful to create coasters, since you can rid your home of accumulated trash and transform it into a hot stand.
- They protect furniture from heated dishes.
- Coasters made from coniferous trees will delight you with their pleasant aroma, especially when you place a hot cup or mug on the stand.
Simple and inexpensive
A stand made of wine corks is the most common option. This material will perfectly protect the furniture surface from heat. They are easy to wash, and if any of the elements are damaged, they are easy to replace.
And such stands are very easy to make. The corks need to be fastened together to form any figure. The corks may be intact, but the stand will be high. It’s easier if you cut them into thin and flat pieces. It will be easier to fasten them together, and the thickness of the stand itself will be quite practical. The main disadvantage of this option is the amount of wine drunk in advance.
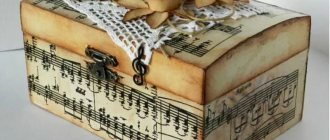
You can also make a stand from an old newspaper/magazine. They are cut into strips, then twisted into a spiral, resulting in squares that are connected or stitched with thread, or can also be glued. To make the finished product durable and waterproof, you can cover it with varnish on top.
This option is easy to do and is very inexpensive. But they won’t last very long after all.
Strips of corrugated cardboard can be twisted to create interesting patterns. The parts are attached to each other with glue, and fabric ribbons are used to decorate the products.
Hot stand in patchwork style
You will need the following materials:
- Stack of colored scraps 14 x 14 cm.
- A piece of fabric for sealing.
- Marker.
- Wear-resistant fabric for the reverse side.
Process of creation:
- 2 layers of lining material are attached to the inside of the block, after which the layers are sewn together. This tiny blanket is quilted the way you feel comfortable doing it.
- We select a suitable round object, apply it to the blanket and outline it with a marker.
- Carefully stitch around the intended line. We recommend going through the sewing machine 2-3 times.
- A circle of fabric is cut, then the circles are combined with each other and pinned together with small clothespins.
- Having created a small indent, all the elements are sewn together on a sewing machine, leaving only a small gap for turning inside out.
- Short cuts are made in a circle so that the material does not protrude in the future.
- Then the backing is turned inside out and the last gap is sewn up.
- Now we need to thoroughly iron our product.
- After making a 3-centimeter indent, a stitch is made in a circle.
Wicker coasters
For production you will need:
- Tubes from newspapers, magazines, notebooks, etc.
- Thick cotton thread.
Instructions:
- To make 1 backing, you will need approximately 20 sheets of newspaper. Roll them thinly, then apply PVA glue to the edges of the paper and leave to dry.
- The tubes are twisted into a spiral. But tightly, without unnecessary cracks and voids, they are well lubricated with PVA glue and put aside again. The tubes can be stacked and rolled into several next to each other, so the manufacturing process will noticeably speed up.
You can also make a stand from birch bark, which has just been removed from birch chocks. This birch bark exfoliates perfectly, after which you can easily wind the tubes.
The birch bark stand emits a pleasant aroma when a hot pot or frying pan is placed on it.
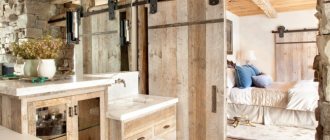
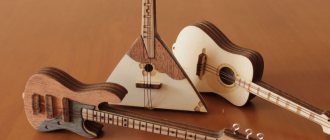
How to make a stand for hot dishes from scraps of wood
To protect your kitchen furniture from damage, it is necessary to have a hot pot rack. This item is very often used by housewives and is usually stored in plain sight. That is why the stand should have an attractive appearance and serve as an interior decoration.
People who are creative prefer to do many things with their own hands. The stand for hot dishes was no exception. You don’t have to be particularly fancy with the materials, since even small wooden scraps left over after finishing the carpentry work are suitable for it.
The method we propose is based on the use of two or three types of wood, differing from each other in color, texture and density. For example, they combine birch, spruce and oak trimmings.
At the first stage, the workpieces are given the same size by cutting them with a miter saw. Then, the scraps are first laid out on a flat surface, alternating them with each other according to color and texture. Having completed the selection, each of the individual parts is generously lubricated with wood glue and clamped with clamps. The workpieces are left in this position until the glue is completely cured.
Next, the upper and lower surfaces of the resulting shield are milled with hand tools. Then, the outline of the future product is outlined on the workpiece and the outer edges are cut off, giving the stand the desired shape. At the end of the work, the craft is sanded with fine sandpaper and treated with impregnating oil. Coating wood with varnish or paint is strictly prohibited. This will render the stand completely unusable and may even cause it to catch fire.
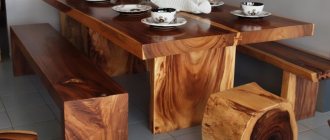
Another method involves making a stand for dishes from round cuts of wood. There are a lot of options here. The most common of them is the use of one large-diameter cut. Having selected a round timber without cracks or chips, a piece 3-4 cm thick is cut from it. It is ground and then treated with special wax or impregnating oil.
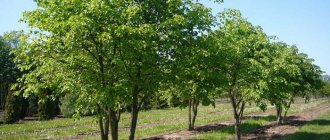
A prettier stand is made from cuts of thick branches. If you manage to find juniper wood, then under the influence of high temperature, the supply will also emit a pleasant smell.
The saw cuts are laid out on a flat surface and glued together with wood glue, connecting them with sidewalls. In this case, you can form any pattern from the parts. In some cases, thin saw cuts of small diameter are glued together in several layers, overlapping them. After finishing, the stand is ready.
Stand made of pebbles and shells
You will need the following materials:
- Pebbles and shells.
- Epoxy resin.
- Any silicone mold.
Creation instructions:
- Pebbles and shells are placed in a pre-cleaned and well-dried silicone mold; they can be laid out in a pattern.
- Epoxy resin is mixed with hardener in the required volume (read the manufacturer's instructions carefully).
- The resin is carefully poured into the mold, preferably in a thin stream, so that bubbles do not form and the resin flows into all the cracks.
- After hardening (24-36 hours), carefully remove from the mold.
Mosaic stand
Natural materials also look great as a stand. For this purpose, sea pebbles, shells and pieces of multi-colored or plain ceramic tiles are used.
Rubber or thick fabric is used as the base. Before gluing, mosaic pieces must be degreased with alcohol. The binding material can be glue, epoxy resin or plaster.
You can use a silicone mold, which is filled with epoxy resin, and mosaic elements are laid out inside.
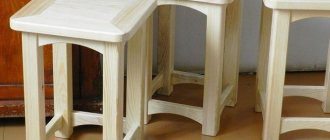
Wooden stand
To complete this craft, you need dried tree branches with a diameter of 5-8 cm. You can saw the washers with a miter saw or a hand saw. Seven-millimeter cuts are thoroughly sanded with sandpaper from the front side. All parts are connected into a pyramid with PVA glue.
Then it goes to press drying - the glue should completely dry in 12 hours. If there is no PVA glue, then titanium glue can be used, only drying should be carried out in a ventilated area.
Titanium is capable of maintaining temperatures up to +150° Celsius without deteriorating.
Using the same technology, you can make a hot stand from plywood.
Note! Do-it-yourself wood-based stands will, over time, take moisture from the environment, and therefore you will begin to notice a slow deformation of the substrate. To prevent this, all wooden elements of the product should be varnished.
Wine cork stand
This is probably the easiest and most practical way to make a substrate. Wine corks are ideal for making a heat-resistant stand, due to the fact that they have low thermal conductivity.
The corks can be laid lying down on a dense fabric base, and they can even be secured with hot glue, since the corks will not warm up to the base, and the glue will definitely not melt.
You can also remove the plugs into small washers, and then assemble a stand of any shape from them. Be it a circle, square, triangle or bee cell.
The washers are fastened using a construction stapler, the staples fit perfectly into the base, so the stand will hold its shape perfectly. It is important to staple the stand on both sides.
Important! To make a hot stand from corks, only cork oak corks are suitable. In no case should you use silicone or polyethylene for this homemade product, as they can simply ignite if the pan is too hot.
Stone
What can you use pebbles brought from the sea for? This stand will look very original. The pebbles are glued to the base, tightly attached to each other. The base should first be covered with ordinary putty, onto which the stones themselves are attached. You can coat them with varnish on top to make them shine.
Tiles can be used to decorate products; they are connected by slats in a frame, and attached to a cork sheet.
Knitted coasters
For the stand you need yarn of the selected color and a hook.
Step-by-step manufacturing scheme:
- Knitting begins using the classic method.
- 4 stitches are knitted with loops thrown on, after which 1 control loop is made, the algorithm is performed 9 times.
- The pattern consists of 5 similar pieces and 2 loops. This needs to be repeated 9 times.
- The next circle is 9 patterns of 6 double crochets and 3 loops.
- At each step, the volume of complex and simple loops increases, and the main algorithm is duplicated and repeated.
- Then a rosette with an individual pattern is made.
- At the end, the stand must be thoroughly tied. Every 3-4 circles you need to change the color from light to dark shade.
Sewn, knitted, braided
Yes Yes! If you have weaving or knitting/sewing skills, this will not only be not problematic for you, but also quite exciting!
The fabric version of the stand is made incredibly quickly, because it will require felt scraps, or new fabric. And the technique is very simple, the strips need to be intertwined. As a result, a checkerboard surface is formed. If you take scraps of fabric, you can even make a stand using Patchwork. True, this option takes longer to complete.
- How to decorate windows for the New Year - useful tips and creative photo ideas
- How to decorate the walls in an apartment for the New Year: 8 best ideas with photos on how to decorate a wall for the New Year with your own hands
DIY New Year's wreath. 12 master classes on making wreaths at home
The set of stands made of linen fabric also looks original. The main thing is that they are made in the same style.
Stylish and durable felt coasters. The felt itself can be processed in such a way that its seams do not have to be processed.
In fact, such things are not only useful in every home. The activity itself is very exciting! And your guests will be surprised when they come to you again and see something new!
Felt coasters
Materials and tools:
- felt (white, yellow);
- floss threads (similar colors);
- sharp scissors;
- needles (for securing workpieces).
Detailed instructions:
- Cut 2 circles Ø 9 cm from white felt material, one circle Ø 12 cm and another 2 circles Ø 8 cm from yellow felt. The last 2 circles should be cut into 8 pieces each.
- Place slices on the white elements and secure.
- Connect white circles with multi-colored ones between them. Sew with a similar seam, but with light threads.
Using a similar scheme, a hot stand is made from jute.
How to make from clothespins
A very original craft is obtained if ordinary wooden clothespins are used. Required materials for production:
- clothespins;
- glue;
- bank rubber bands.
No tools are required to create the product. Step-by-step manufacturing instructions consist of several points.
- The wooden parts of the clothespin come apart. A metal spring is not needed.
- Both halves are glued together on the outside and pressed with rubber bands.
- The rubber bands are removed after the glue dries.
- The clothespins are glued together to form a circle.
Stand made of discs and fabric
CDs fit perfectly in diameter with mug stands. Therefore, using them, a huge variety of ways have been invented to create stands for high-temperature cookware.
One of these methods is to cover and cover the disc with fabric. To improve the thermal insulation characteristics, it is important to use padding made of padding polyester.
The fabric is cut with a small margin, folded over the edge of the disk, stitched at the same distance and pulled together with thread on the other side.
Tips for choosing
Before you go to the checkout and pay for the hot tray, you need to look at and evaluate the following criteria:
- Resistance to elevated temperatures.
- Workmanship. At this point it is important to pay special attention; try to find all the elements that stick out, are poorly glued or are not fully stitched. It is better to immediately pass by such stands, as they can be thrown away after a month of use. Shake the stand in your hand a little; if you feel that some of its elements are loose, then it is better to refuse the purchase. Since most likely after the first or second use the stand will fall apart.
- It would also be nice if the material of the stand was anti-slip, both on the top and bottom. For this purpose, a fine abrasive coating is applied to the upper part, which does an excellent job of fixing dishes.
- Simplicity and ease of movement on a table or other surface.
- The coating of the stand plays an equally important role. Lightly scrape the surface with your fingernail; the protective coating should not come off.
- Smooth surface of the stand without slope. The relief of the stand is not at all necessary, since this reduces the contact area, and accordingly, the stability of the dishes decreases.
By thinking about the parameters of the product in advance, you will be able to protect yourself from severe disappointment with the purchase, as well as avoid unnecessary expenses. A properly selected hot pad will last you more than 1 year.
We are sure that you enjoyed reading the article, and we also want to believe that you will definitely try to make a hot stand yourself. Moreover, we have provided many interesting methods, and you can choose the one you like best. Good luck!
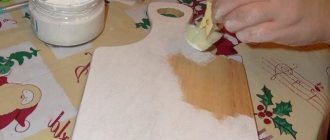
Manufacturing stages
Even children can be involved in the process of creating a hot stand made of wood with your own hands, since it does not require any special skills and can keep the restless for some time. And how much joy you will see in their eyes when they can give such a souvenir to their mother or grandmother. You can burn the drawings together on the saw cuts in advance.
So, the logs are ready, the tools are waiting for their turn, let's begin:
- We divide the branch into cuts 5-6 mm thick using a saw or hacksaw. Whether or not to peel the pieces from the bark is a matter of taste, but with the bark they look more harmonious and more natural;
- Using sandpaper, sand one of the sides of the resulting pieces (the one that will be the top);
- Place them face down and combine them in the order that seems most attractive to you. Make sure that each piece is adjacent to its neighbor in several places;
- We glue them together, and also lay out several circles on top and glue them to the lower parts;
- If you decide to use matting as decoration, then glue the cut circles onto the fabric on both sides;
- Now you need to dry the product, leaving it under pressure for 3-5 hours.
You can leave the saw cut in its natural form, or you can treat it with linseed oil. Such a stand for hot items made from sawn wood will last longer, and the color of the wood will acquire a golden hue.